
Chapter 3. Clicking Your Start Button
In This Chapter:
- Master Vista’s Start menu
- Modify your Start menu’s look and behavior
- Locate and run programs
- Search from your Start menu
- Pin programs to your Start menu
It’s time to jump into Windows Vista! The quicker you learn the ins and outs of Vista’s interface the quicker and easier you’ll get your work done and have time to enjoy some Media Player music, movies, or perhaps a game.
Just about everything begins with a single click of your mouse—a click on your Vista’s Start button. (You can also display Vista’s Start menu by pressing your Windows key.) With that one click, you gain access to all your programs, computer settings, and Vista interface. Even some Windows veterans are somewhat taken aback when they first deal with Vista’s Start menu. Here is where you first start to see that as much as the UI looks similar to XP, Vista is actually quite different once you start actually using it. Just remember, these differences only serve to help you get more done with less effort.
About Vista’s Start Menu
Clicking your Start button produces Vista’s Start menu, shown in Figure 3.1. Your Start menu will surely look somewhat different from the one in Figure 3.1 because the programs installed on your computer will differ. In addition, the Start menu changes, depending on what you’ve recently done, in an attempt to adapt to your behavior.
Figure 3.1. Vista’s Start button produces your Start menu from which you can launch your programs and perform just about any necessary task.

Did you Know?
If you don’t see your Start button, your taskbar is probably set to Auto-Hide mode. By hiding the taskbar except when you need it, you make more room for your other windows. Just move your mouse pointer to the bottom of your screen and the taskbar should appear. In Chapter 6, “Taking the Taskbar to Task,” you’ll learn how to hide and display your taskbar.
As Chapter 1, “Welcome to Windows Vista,” explained, Vista’s Start menu doesn’t cascade all over your desktop the way Windows XP’s did. This leaves you with more desktop space so that you can better see what you were doing and where you’re headed. One, two, or three clicks are usually all you need to start programs and adjust settings on your computer from the Start menu.
By the Way
When you install new programs on your computer, those programs add themselves automatically to your Start menu, in most instances. Chapter 28, “Adding and Removing Programs,” discusses how to add and remove programs from your computer.
Locating and Running Programs
Once you start using your favorite programs on a regular basis, just like XP, you’ll find that they will start to appear on your Start menu in the left column. Windows Vista tracks the programs you use the most and tacks them onto the Start menu. After all, the odds of you running the same program you’ve run every day for a week are greater than you starting up a program that you haven’t run in months. By keeping your most recent programs in the Start menu’s recent program list, Vista makes them available to you again with a single click once you’ve displayed the Start menu.
All your other programs are available on the Start menu even if they don’t appear in the recent list of programs to the left. Click the All Programs option above the search box to change the list of programs from your recent programs list to a new menu with your major program categories, as shown in Figure 3.2. After you display the Start menu, you can press your keyboard’s up-arrow and down-arrow keys to select All Programs or any other Start menu option.
Figure 3.2. When you select the Start menu’s All Programs option, Vista displays a list of programs and program folders from which you can select.

If you don’t see the program you want to run, click any program folder to see more programs and menu options. For example, you could click the Accessories folder to see all programs and folders (sometimes called subfolders or submenus) within the Accessories menu. You could then click the System Tools folder, shown in Figure 3.3, to locate a program you want to run, such as the Disk Cleanup program. If you rest your mouse pointer over a menu option, a pop-up description typically appears that describes that program or option.
Figure 3.3. When you select the Start menu’s All Programs option, Vista displays a list of programs and program folders.

Did you Know?
Vista keeps the Start menu as compact as possible while still showing you what you’ve selected which is considered what you’re most interested in at the time. Click the menu’s up or down arrows (or press your keyboard’s up-arrow and down-arrow keys) to scroll through the menu if too many options appear on it to show all at once. You can also drag the vertical scrollbar. By allowing this scrolling of Start menu items at each menu and submenu, Vista keeps the Start menu a manageable size and doesn’t encroach on the rest of your screen.
Did you Know?
If you click to select a Start menu’s program folder and then want to back up to where you selected that folder, click the Start menu’s Back button to back up one level at a time until you’re at the Start menu location.
When you click a program (or press the Enter key after highlighting to select a program with your arrow keys), Vista starts the program and the Start menu disappears.
Searching Is Simple with Start
As I mentioned in Chapter 1, Vista offers many places to search for data. Computer disks are so vast these days and so many programs and data files can appear on them that Vista offers you the opportunity to search for whatever it is that you need at the time from many places throughout Vista.
One of the most useful search boxes to appear in Vista is always ready at the bottom of your Start menu. Just display the Start menu and start typing when you want to search for something because Vista always puts your cursor in the search box until you move it to select a program or select another Start menu option. The reason a search box appears on the Start menu is twofold:
- The Start menu is so easy and fast to access that it provides an easy on-ramp to searching for anything on your computer.
- If you’re unsure of the name of a program you want to run, or if a program is not listed on your Start menu (it’s rare, but it does happen), you can begin typing the first few letters of the program and let Vista locate the program for you. When the result appears in the list, you can select the program to run it.
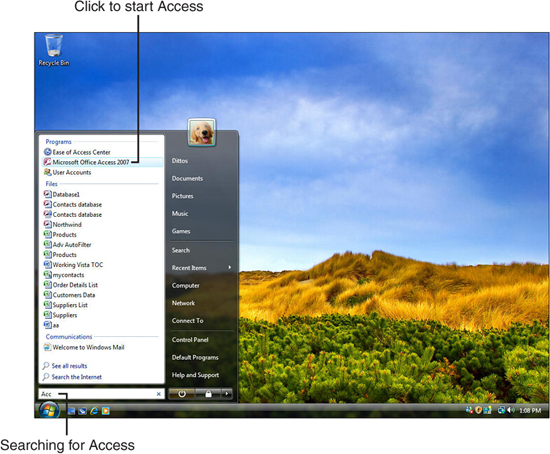
The Start menu changes from its normal list of programs to your search results as you enter a search term. Figure 3.4 shows a search for Microsoft Access, a database program included with some versions of Microsoft Office. Instead of drilling down into the menus for Microsoft Access, you can type the letters in Access and as soon as the program appears, you can select it with your mouse or keyboard.
Figure 3.4. You don’t have to locate a program within the Start menu if you know the first few letters of the program’s name.
Did you Know?
With previous versions of Windows, some users opened applications via the Run command, by selecting Run from the Start menu or by pressing Windows+R. Most of the time this was done to run programs that were not on the Start menu. If you didn’t know the exact name of the program, however, it was a hit or miss effort as to whether or not it would work. Vista makes the rather archaic Run command almost worthless. By typing the first few letters of the program in the search box and looking at the results, you’re far more likely to run the correct program the first time you try.
Other Start Menu Features
Up to this point I’ve focused primarily on the Start menu’s left pane, the left half of the Start menu. You’ve no doubt noticed that the right half, the right pane, is loaded with menu items, too. If you’ve ever used another version of Windows, you’ll be familiar with many of these options in your Start menu’s right pane. As with everything, Vista tries to keep familiar features that work the way you expect, but attempts to improve on them instead of trying to replace what you already know with foreign situations.
Table 3.1 lists the most common items that appear in the Start menu’s right pane. Some, many, or all of them will appear on your Start menu, depending on how your computer is set up and depending on how your Start menu is configured.
Table 3.1. Common Menu Programs, Folders, and Options That Appear in the Start Menu’s Right Pane

By the Way
As you point to each entry on the Start menu’s right pane, an icon appears at the top of the right pane to indicate the nature of each item. For example, when you point to Games, a deck of cards appears as an icon over the right pane.
In addition to the entries in Table 3.1, two buttons appear at the bottom of your Start menu’s right pane. The left button, the Power button, saves your open work and puts your computer into a sleep mode that you can quickly come out of when you’re ready to work again. This allows you to shut down almost all the power without having to turn the computer back on from a completely off state, which takes much longer.
The right button, called the Lock button, locks your computer so that nobody can use it without logging in (often with a password). Chapter 4, “Starting and Stopping Windows,” explains how to use these buttons and related options to turn on and off your computer as well as place it in sleep mode. (You can change the behavior of this button in your Control Panel’s Hard and Sound group’s Power Options window.)
Customizing Your Start Menu
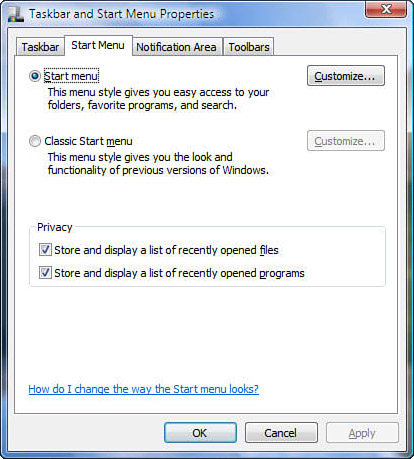
You can change the behavior and look of your Start menu so that it works best for your specific needs. To change Vista’s Start menu, right-click on the Start button and select Properties. When the Taskbar and Start Menu Properties dialog box appears, click the Start Menu tab (see Figure 3.5).
Figure 3.5. Vista enables you to customize your Start menu to perform the way you want.
Selecting the Start Menu Type and Recently Displayed Programs and Documents
The primary options on the Start menu dialog box let you select between the Start menu option and the Classic Start menu option. Unless you or someone else has changed it, the Start menu option will be selected. This allows Vista to display its Start menu to operate in the Vista style of a one-column set of programs, as explained earlier in this chapter. The Classic Start menu changes your Vista menu to perform more like the Windows XP Start menu that cascaded out to the right as you selected from submenus.
Watch Out!
If you’re new to Windows Vista, you might be tempted to select the Classic Start menu option so that the menu works the way you’re used to. Resist the temptation until after you’ve used the Vista Start menu style for a while. You’ll probably find that it won’t take long for Vista’s style to grow on you.
The Privacy section provides two options that determine whether recent documents and programs will appear on your Start menu. The default option displays the programs you’ve recently run on the Start menu’s left pane. The programs you run in the future or the submenus of other programs as you select them from the Start menu will replace the displayed programs.
The Store and Display a List of Recently Opened Files option determines whether the Recent Items entry on the Start menu’s right pane (from Table 3.1) appears on your Start menu.
Customize the Start Menu’s Right Pane
When you click the Customize button to the right of the Start menu, the Customize Start menu shown in Figure 3.6 appears.
Figure 3.6. You control just about every element that appears on your Start menu.

The top half of the Customize Start Menu dialog box determines how menus look and behave on the Start menu. You determine whether most of the items on the Start menu’s right pane display (from Table 3.1) by selecting the appropriate option next to each entry. For example, if you click Don’t Display This Item under the Control Panel entry, the Control Panel disappears from your Start menu’s right pane until you again open this Customize Start Menu dialog box and select either Display as a Link or Display as a Menu.
The difference between the two display options—Display as a Link or Display as a Menu—becomes apparent when you display the Start menu. If you selected the Display as a Menu option for any item on your Start menu’s right pane, such as the Control Panel, the Control Panel appears with a small arrow to the right of its entry. This indicates that when you point to Control Panel, a cascading menu showing the Control Panel options flies out to the right of the Start menu—not unlike the Start menu in previous versions of Windows.
Figure 3.7 shows a Start menu with several of the right pane’s entries set to display as a menu. Notice the arrows next to them that indicate a submenu will cascade out to the right when a user clicks that item (or rests the mouse pointer over the option). When the user selects an item that appears without an arrow, a folder window opens instead of a submenu flying out to the right of the entry.
Figure 3.7. You can change the Start menu’s right pane to display submenus or to open the submenu’s contents in a folder view when you select the entry.

Did you Know?
Even if you set up some of your Start menu’s right pane to display submenus instead of opening new windows, you can still open any menu option in its own window by right-clicking that Start menu option and selecting Open from the contextual menu.
Modifying Additional Start Menu Settings
The list of options in the Customize Start Menu dialog box doesn’t just support changes to the right pane’s display. Other options are useful for making your Start menu look and behave according to your preferences. Additional Start menu options in the Customize Start Menu dialog box include the following:
- Enable Context Menus and Dragging and Dropping—When selected, you can right-click a menu option to display a menu known as a context menu (sometimes called a shortcut menu or a pop-up menu). In addition, you can drag any menu or submenu option to another location on the Start menu. If you don’t like the default alphabetical order of your Start menu, drag any entry to another location by clicking and holding that option down with your mouse, and then dragging that item to another Start menu location before releasing your mouse.
- Highlight Newly Installed Programs—Highlights new entries that represent programs on your Start menu. After you install a new program, that program’s menu will be highlighted for several days until you use the program a few times or turn off the highlighting by clicking to uncheck this option.
- Open Submenus When I Pause on Them with the Mouse Pointer—Opens submenus when you pause your mouse pointer over them instead of requiring that you click your mouse to open the submenu. Some users prefer that Windows not open submenus automatically because they want more time to look at the Start menu before it changes to show the submenu. By clicking to uncheck this option, you must click a menu item before a submenu will open. This is also true of the right pane when you have set its entries to display menus instead of displaying in folder views.
- Sort All Programs Menu by Name—Ensures that all new programs and entries added to your Start menu appear alphabetically (with submenu folders on the bottom, as opposed to the default on Windows XP where the folders appeared at the top). If you uncheck this option, Vista adds new entries to the bottom of your Start menu.
- Use Large Icons—Determines whether Vista uses large or small icons to represent Start menu entries. Small icons enable you to see more items, but some displays don’t easily lend themselves to adequate viewing of the small icons.
By default, the Run command does not appear on your Start menu, but you can add it by selecting the Run Command option from the Customize Start Menu dialog box. As stated earlier in this chapter, the Run command is less necessary in Vista than in previous Windows versions because of the powerful search box that resides at the bottom of the Start menu.
The Number of Recent Programs to Display option determines how many recently run program icons Vista tacks to the Start menu’s left pane. Some users feel that the default value of eight is too many. If you routinely run only three or four programs, you might want to decrease this value to a lower number. If you increase the option’s value to a higher number, you probably will have to uncheck the Use Large Icons option to see the recent programs without having to scroll to see them all.
By the Way
The Number of Recent Programs to Display option value has no purpose if you’ve unchecked the Start menu’s Store and Display a List of Recently Opened Programs option (refer to the earlier section titled “Selecting the Start Menu Type and Recently Displayed Programs and Documents”).
Returning Your Start Menu to Its Default State
At any time, you can click the Use Default Settings button to return your Start menu settings back to their original, newly installed state. You won’t be able to put back your customizations after you click the Use Default Settings button unless you’ve backed up your computer or set a restore point (see Chapters 31, “Restoring Your Windows System to a Previous State,” and Chapter 35, “Protecting Your Data and Programs”).
Determining Your Start Menu’s Internet Browser and Mail Programs
By default, Windows Vista reserves the two top entries in its left pane for your Internet browser and email programs. For example, the user in Figure 3.8 uses Internet Explorer for Internet browsing and Windows Mail for email. You can elect not to display one or both of these and you can change the program your Start menu uses for each of these items.
Figure 3.8. You determine which browser and email programs, if any, appear at the top of your Start menu.

The reason the Start menu reserves the top spots for these two entries is because Internet browsing and email are the two most-used applications today. By putting them in the top spots, Vista ensures that they are never more than two clicks away at any time.
By the Way
You might see more than an Internet browser and email program atop your Start menu. You can pin, or attach, additional programs to this area and they will remain fixed instead of being fluid as the recent programs lower in the list are. The next section explains how to pin and unpin additional programs and folders here.
Keep the checks next to Internet Link and E-mail Link at the bottom of the Customize Start Menu dialog box if you want to keep these entries. To change the programs Vista uses for these entries, click the down arrow and select a different program. For example, if you want to use Windows Mail instead of Microsoft Office Outlook, you can click the down arrow to open the list of available email programs on your computer and select Windows Mail.
After changing any Start menu settings, click the OK button and then click it again to close the Taskbar and Start Menu Properties dialog box to put your new settings into effect.
By the Way
Your Taskbar and Start Menu Properties dialog box enables you to change the look and behavior of not only the Start menu but also those of the taskbar area at the bottom of the screen. Chapter 6 explores these additional options.
Modify Your Start Menu Without Using the Customization Dialog Box
You can make some changes to your Start menu directly from the Start menu itself without opening the Taskbar and Start Menu Properties dialog box. As you learned earlier in this chapter, you can move menu items from one place to another by dragging them with your mouse. (This works if you’ve allowed it by checking the Enable Context Menus and Dragging and Dropping option in the Customize Start Menu dialog box.) Right-clicking a program in the left pane (your recently run programs list) produces several options, as shown in Figure 3.9.
Figure 3.9. Right-click a Start menu entry to see a list of tasks you can perform related to that item.

By the Way
Different entries produce a different right-click menu when you right-click your mouse over them. For example, when you right-click over Music in the Start menu’s right pane, two options that use the Media Player appear. These options don’t appear when you right-click over other entries such as the Control Panel. Vista always tries to give you contextual help, meaning that Vista looks at what you’re doing and where you are and offers various options specific to that location.
Some common Start menu right-click options you’ll see are as follows:
- Open—Runs the program or opens the folder determined by whatever entry you right-click over.
- Pin to Start Menu—Affixes the program to the top of your Start menu’s left pane to take a fixed place among your Internet browser and email programs. You can right-click over any program pinned to the top of the Start menu and select Unpin from Start Menu to move it out of the top of the Start menu’s area. (To unpin your Internet browser and email program from atop the Start menu, you must uncheck those programs from within the Customize Start Menu dialog box, as shown in the previous section.)
- Add to Quick Launch—Places an icon for that program or folder on your taskbar’s Quick Launch toolbar. Chapter 6 explains more about your Quick Launch toolbar.
- Send To—Opens an additional submenu that enables you to select one of several locations you want to send that item to, such as to a disk, an attachment in an email, or to your desktop as a shortcut icon. This option is most useful for single documents and files such as pictures, music, and video files that you want to put somewhere else or send to someone. Generally, you cannot send programs to another location although you might want to place an icon of a program you frequently use on your desktop. After you place a program icon on your desktop, clicking that icon, which is just a shortcut or pointer to the actual program, executes that program without requiring the assistance of the Start menu.
- Remove from This List—Removes the item’s entry from that place in the Start menu’s recent programs list.
- Rename—Enables you to change the name of a Start menu entry.
As stated before the previous list, you’ll find other right-click options appear when you right-click over other Start menu programs and entries. The most common options are shown in this list. The rest should be self-explanatory as you run across them. For example, right-click on your Start menu’s email program and you’ll see the Read Mail option. Click Read Mail and your email program opens directly to your inbox.
Chapter Wrap-Up
The Start menu is your ally. With the Start menu, you have access to all your computer’s programs and data. You’re not even limited to your computer because from the Start menu you can search and browse over your network and the Internet.
Because Microsoft engineered Windows Vista to make your work more efficient, Vista attempts to help you do things more intuitively and naturally. You’ll learn in the next chapter how Microsoft changed the way Vista starts and shuts down. More security and less hassle are the welcome results of those changes.