
Chapter 15. Managing Your Entertainment Experience with Media Player
In This Chapter:
- Master Media Player’s interface
- Browse your music in different ways
- Edit music file properties
- Add album cover art to your music collection
- Create and Use playlists
- Rip Music from a CD
- Burn Music to a CD
Microsoft calls Vista’s Windows Media Player the next-generation digital music software. Media Player is more than music software, however. It’s a way to experience your music, movies, and photos from one program that puts you in control of your entertainment-related digital files.
Media Player plays CDs and DVDs. Just insert a disc and Vista can take you where you want to go. You can send CD music to your disk drive by ripping the tunes to your PC; afterward, you can store the CD with the rest of your music collection and play the files digitally from your PC or from any PC on your Vista network. The original disc stays in mint condition and acts as a backup when you need it.
Users of previous Media Player versions will be pleased with the more intuitive and considerably more attractive Media Player interface. When you want to listen to music, watch movies, or look at some family photos, you don’t want to wrangle with the program—you want to see your media. Vista’s Media Player minimizes the time you spend getting to your media and maximizes the experience.
Getting to Your Music, Videos, and Pictures
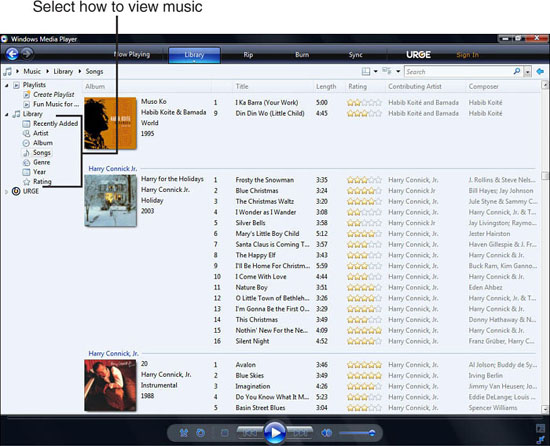
Media Player’s interface is simpler than previous versions. You will find yourself using Media Player’s menu less than before because the buttons across the top provide most routine features you’ll use. That’s why the menu is hidden by default although you can display it once more by pressing Ctrl+M. With the toolbar, the menu isn’t as important as it was in previous versions. For example, when you start Media Player and want to play music from your digital music library, click the down arrow beneath the Library button and select Music. Media Player displays the music library files from which you can select (see Figure 15.1).
Figure 15.1. Select Music from the Library drop-down button to browse your music files.
By the Way
Refer to Chapter 14, “Going Multimedia with Vista,” to learn how to add digital music files you already have on your computer and network to your Media Player library. You’ll learn how to rip CD music to digital files and burn CDs from digital music files later in this chapter.
Did you Know?
Store music, photos, and videos you want to share with others across your network—perhaps on a PC you dedicate as your media center—in your Public folder. The files in your user account’s folder are private and viewable only from your account. The Public folder and its subfolders are shareable across a network. The Public folder includes Public Documents, Public Downloads, Public Music, Public Pictures, Public Videos, and Recorded TV subfolders where you can conveniently make your media files available to other users and computers.
Double-click a song (or click the song and then click the Play button at the bottom of the screen) to listen; Media Player begins playing your selected song and continues down the list on your screen after that song ends. Double-click an album to play that album without moving to the next album or song in the list when the album finishes.
Although you’ll use Media Player for music, video, and digital pictures, the vast majority of most users’ Media Player libraries are comprised of music. You can browse, search, and play videos and show pictures using similar onscreen tools to the ones you use to browse, search, and play music.
Because music is often the library used most in Media Player, it makes sense to cover music first, and the next section begins doing just that. Keep in mind that when you learn how to browse through music files, you are learning much of what is required to browse through your digital photographs as well. Media Player works in a similar manner no matter what kind of data you want to access.
Stop, Look, and Listen the Way You Want
You might not like the way Media Player browses through your files. For example, in Figure 15.1, Media Player organizes the music by song title. You’ll notice that Songs is selected in the left column. Although it appears that Media Player organizes the music by album, that’s misleading. When you browse through a bunch of CDs or record albums, you generally look at the album covers and if one piques your interest, you look at the song list. In the default music display, shown in Figure 15.1, the songs get in the way. It’s difficult to browse through the albums because you must scroll through so many songs.
Watch Out!
If you rip only one song from a CD to your digital music collection, and later view that song, Media Player displays the album cover for that song if it’s available. This means that you also get album information such as the title and release year next to the album when you view the song in the default music list shown in Figure 15.1. When you browse by song title, it appears you have a lot of albums, but only one or a few songs will appear on some of the albums in your list.
Viewing Music in Various Ways
To browse by album covers alone, which gives you far more screen space for the album covers and eliminates the song lists on each album, click the Album entry in the left selection column. Figure 15.2 shows the result.
Figure 15.2. When you browse by albums, you see only the covers to give you more albums on the screen at one time.

From the selection column to the left, you see that you can browse your music library in these ways:
- Recently Added—Shows your songs in reverse date order based on when you added them to your collection.
- Artist—Shows album covers arranged alphabetically by artist name. If you have a Harry Connick, Jr. album and a Herman’s Hermits album in your collection, both album covers appear in the H’s.
- Album—As Figure 15.2 illustrates, the Album view arranges your albums alphabetically by album title.
- Songs—As shown in Figure 15.1, this view displays your music collection arranged by artist, showing album covers and each song from each album.
- Genre—Shows album covers arranged by genre, such as Ballad, Blues, Country, Gospel, Instrumental, Rock, and so on. As shown in Figure 15.3, if more than one album appears in a genre category, those albums are depicted as stacked one on top of another. When multiple albums appear for a genre, double-click the album icon shown to see all albums in that genre arranged alphabetically. (This also applies to the Artist, Year, and Rating views.)
Figure 15.3. When viewing by genre, an album cover shows one or multiple albums in your collection from that genre; double-click a multiple-album cover to see all albums in that genre.

- Year—Displays your music in reverse year order, beginning with the latest. If a stack of album covers appear for a year, your library includes multiple albums from that year. Double-click a stack to see all albums from that year.
- Rating—Shows music by rating based on a five-star rating scale. As you add music and albums to your library, you can rate the music according to your preference. That way you can rank your favorites as well as the duds and quickly get to your favorites. The next section, “Editing Music Properties,” shows you how to rate a song or album.
If you click to select Library in the left selection column, as opposed to clicking a specific library selection such as Rating or Artist, Media Player displays the following additional ways to sort and view your music library: by contributing artist, composer, parental rating, online store item, and folder. Not all of these values are available for every song in your library. Over time you will be able to fill in these values as appropriate, as the next section explains.
When viewing your music, video, and photo libraries in Media Player, you change views quite often, as you might imagine. Just as you can back up to a previous web page by clicking your web browser’s Back button, you can move back and forth among the various views you’ve used to browse your collections with Media Player’s Back and Forward buttons.
A breadcrumb option is available in Media Player, just as in other Vista Explorer windows. Using it, you can locate music based on location, genre, artist, or another factor. Click the arrows in the breadcrumb trail toward the top of the Media Player screen to access these viewing options.
Did you Know?
If you want to see an alphabetical list of every song you own, click the Songs selection, and then click the Title column. Every song in your music collection appears alphabetically as Figure 15.4 shows. If an album cover picture is present, a small icon shows for that album in the Album column but the album cover’s picture doesn’t consume so much screen space that you cannot see many song titles at once. Clicking a column heading such as Album, Title, Length, Rating, and Artist sorts your music selection’s display in that order. Click the same column again and get a reverse sort (arranged in descending order). Your actual music library doesn’t change or reorganize on your disk drive; you’re only changing the way Media Player offers your digital music to you.
Figure 15.4. Display a complete, alphabetical song list on your screen at one time by clicking the Title column.

There are times when you want to play a certain song. Just one song. Perhaps you want to play it for a friend and you would like to go straight to the song and not browse in any way to get to it. As with most of Vista’s programs, Media Player includes an Instant Search box. Type the first few letters of the song title, and Media Player immediately goes to work locating those letters and displays matches by artist, album, and song title. Getting to what you want has never been easier.
Editing Music Properties
After you start building your digital music library, you soon realize that regular maintenance is required. When you rip music from a CD, Media Player goes to the Internet and attempts to transfer as much information as it can find about that CD and its contents to your Media Player library. In a best-case scenario, Media Player should locate your exact CD online, download the album cover, artist, song titles, track numbers, length, contributing artist, and so on.
The reality is that most of the time, Media Player finds most of that information and most of it is accurate. For missing data, you can either ignore those fields or fill them in yourself. Obviously, no music data service can rate music for your tastes. Therefore, all music enters your collection with a generic three-star rating. Media Player colors these three stars gray to indicate that the rating was the default rating and not a rating that you or someone else with access to your computer gave the song. When you rate a song, the stars turn yellow. Therefore, a song with three yellow stars is a song that you or someone else on your computer rated as a three-star song. When you change a song’s rating, every user on your computer that accesses that song also sees the new rating.
By the Way
If you never fill in this missing data, that’s fine. Some people prefer not to mess with the rating system. Others rely on it to quickly scan their music for their all-time favorites. Others create extensive playlists, lists of songs arranged in a preferred order, that match their moods, needs, and favorite preferences and rely on them to decide what to play next. (We cover playlists in the “Create and Use Playlists” section later in this chapter.) Media Player often sorts missing data into the Other category. For example, if a song or album doesn’t have a specified genre, that item appears in the Other category when you display your music library by genre.
When you notice that music is missing data, Media Player makes it simple to fill in the missing information. For example, if you were to rip songs into your Music Library without having an active Internet connection to help identify the CD, Media Player wouldn’t be able to fill in any information about the CD’s artist or the songs on it, other than the track number. In this case, it’s up to you to fill in all the details. Most of the time, your Internet connection will be active and it might be that Media Player just isn’t able to fill in a few types of fields.
One of the easiest ways to complete details for an album is to display the album and all its songs on the same screen. As the previous section explained, when you browse by song, Media Player also shows the album cover. You can browse by album cover or artist also. No matter how you locate the album, when you double-click the album cover, it displays a list of songs (see Figure 15.5). To get to Figure 15.5’s screen, for example, you would click Artist from the Navigation pane on the left.
Figure 15.5. Editing album information is simple when you display the album and song details on the same Media Player window.

Did you Know?
Want to make your song-editing session more enjoyable? Start playing any song on the screen while you edit. Media Player plays the album while you edit its details.
The following fields are to the right of the album cover: Album Title, Artist, Genre, and Year. It will be obvious if any information is missing. If the Year field shows Unknown Year instead of an actual year, that information was unavailable when Media Player saved the album to your library.
In the song list to the right of the album appears the track number, the song title, the length in minutes of each song, your rating, and any contributing artists. (If no contributing artists appear in the data, Media Player places the artist in the contributing artist field.)
Before manually changing any data other than the song rating (which is a personal field left up to you), you might see whether Media Player can locate information about a song or album with your help. Right-click the album picture or a song, and select Find Album Info. Media Player goes to the Internet and attempts to locate a matching album. Sometimes more than one album appears, so you have to locate the album, if it appears, that matches the one in your library. Click to select that album and Media Player updates the album’s information. The information will be as complete as possible, but you still might have to fill in a field or two—especially the rating field if you want to rate the album.
Figure 15.6 shows several albums found by Media Player’s Internet search for the album titled Comin’ Right Up. Clicking the first entry in the list, the matching album in this case, causes Media Player to update the album cover picture and the rest of the data, such as the track numbers that are currently missing. (You didn’t know that Bruce Willis recorded some vocal albums a few years ago, did you? He’s very good.)
Figure 15.6. Media Player often finds several possible matches. Click the one that matches your library’s album and Media Player updates the information.

For albums and songs that Media Player cannot locate online, changing or adding new data is simple. To edit any album field, right-click the field and select Edit from the pop-up menu. For example, you would right-click Unknown Year to change the year to the album’s year. To change song information, right-click a song and select Edit. Changing a song’s rating is even easier; just click a star. If you click a song’s fourth star from the left, you’ll give that song a four-star rating.
The cover picture, when missing, requires a little more effort on your part to update. If the online update doesn’t fill in the picture, you’ll have to locate a digital picture of the album cover and paste it over the missing picture in your music library. You can scan the album or CD or take a digital picture of it. Chapter 16, “Going Digital with Your Camera or Scanner,” explains how to do just that. In addition, you might be able to locate the album cover online in an online music store such as www.CDNow.com. If you can locate an album’s picture online, right-click the album cover and select the pop-up menu’s Save Picture As option. Save the image to your disk. The default folder will be your Pictures folder.
After you save the image to your disk, copy the picture to your Windows clipboard. Media Player and Photo Gallery both handle pictures extremely well. But the fastest way to copy the picture to your clipboard, surprisingly, is to open Windows Explorer (using the Windows+E shortcut key), display your Pictures folder, right-click the album’s image, and select Copy from the pop-up menu. Return to Media Player, right-click the blank album image, and select Paste. The album cover will now appear with your music.
By the Way
That’s quite a bit of work to place the album cover but, fortunately, Media Player is often successful at locating albums and their pictures when you request the online update.
Create and Use Playlists
You now can browse your music collection, locate and play songs, and rearrange the library to see things in the way that works best for you. As you use Media Player, you’ll quickly come to realize why playlists are important to create.
Did you Know?
If you updated your computer to Windows Vista from XP, Media Player will automatically recognize any playlists you had already created.
You can create as many playlists as you want. It’s important to understand that a playlist doesn’t reorganize your actual music files, nor does a playlist change any of the data attached to music files, such as the genre or rating. A playlist is nothing more than a list of songs that you create from your music library. After you create a playlist, instead of playing music by song title, album, or date, you can play the playlist. Media Player then plays only those songs located in the playlist. You create and manage playlists from within Media Player.
When first learning of playlists, some people confuse them with genre. For example, you could create a playlist of all Classic Rock music in your music library. Depending on what you own, that might be a huge playlist. The size of a playlist isn’t a factor in whether a playlist is good or bad, but as a general rule of thumb, if a playlist grows to include 100 or more songs, it means one of two things:
- You need to break up the playlist into multiple playlists.
- You’re confusing a playlist with a genre, artist, or rating.
Most often, it’s the second problem that has occurred if your playlist becomes too long, but let’s take the first possibility first: You need to break up the playlist into multiple playlists.
Suppose that you want to create a playlist for party music. As you add to the playlist, you begin to see that the playlist has grown to a rather large number. As you’ll see in a moment, Media Player makes it easy to add songs to a playlist, so creating a playlist of 100 or more songs isn’t difficult at all. When you surpass 100 songs, you should begin to ask yourself how helpful the playlist truly is. How long will it take to play 100 songs? The party is going to have to last a long time!
When that occurs, you should consider creating multiple party playlists. For example, you might have a tropical party playlist for parties with an island theme. You might create a New Year’s Eve party playlist with Auld Lang Syne, Anthem to the New Year, and other songs appropriate for a New Year’s Eve party. You’ll end up with better playlists because each targets a particular type of party.
Did you Know?
A playlist can contain other playlists. If you know several of your party’s guests like easy listening (and your other guests won’t scream too loudly when they hear it!), you can create a new playlist for a specific New Year’s Eve party and include your New Year’s Eve playlist to bring in all those songs and add a few easy listening tunes to mix it up a bit. Media Player makes it simple to organize and even quickly delete playlists you no longer need, so creating such a one-time playlist makes sense.
More often, a person will confuse a playlist’s purpose with one of the song’s fields such as genre. For example, it would be ill-advised to create a playlist of all your jazz music and call that playlist Jazz. The genre field is better suited to label your jazz tunes. Perhaps you take your jazz seriously and you want to break your jazz collection into Jazz Vocals, Ragtime, Pre-1960s Jazz, and so on. Depending on the size of your collection, even those playlists can become huge and the genre field might be a better location to label the songs with those categories. Then, when you browse by category you can easily locate all your Pre-1960s Jazz genre music.
If every person in your 4-member family enjoys a different type of jazz, with some overlap, you might begin to see how playlists can help that situation. For example, you might create Mom’s Jazz Favorites and add all of her favorite hits to that playlist. Mom then can quickly play her playlist that will include only her favorite music. It doesn’t make sense to label the genre of those songs Mom’s Jazz Favorites because genre is a more generic field used to describe a type of music, not who likes it best. The right pane of Media Player is where you manage and create your playlists. If you don’t see the playlist area, click your Library button and select Create Playlist to add a playlist to your window. Scroll through your music library, in whatever order you want to view it, and drag songs that you want to add to your playlist to the right pane where it says Drag Items Here. You can drag complete albums to your playlist, too.
By the Way
The first song you drag will begin playing and its album cover will appear atop your playlist. Media Player isn’t naming your playlist with the album name or assigning that cover to the playlist; the playback occurs only so that you have something to listen to while you create the rest of the list. You can immediately click the control panel’s Stop button at the bottom of Media Player to stop the playback.
You can select multiple songs by holding your Ctrl key while clicking song titles and you can select an entire range of songs by clicking the first song to select it, scrolling down to the last song in the range, holding Shift, and clicking that song. Media Player selects the entire range of songs and you can drag them to your playlist in the right pane.
Feel free to drag and drop songs from your playlists to a different location. If the second song works better for you later in the list, click and drag it toward the bottom of the playlist. When you finish adding all the songs you want to add, click the Save Playlist button. Type a name for your playlist and press Enter to save it.
As Figure 15.7 shows, the playlist title appears at the top of your playlist and the new playlist is added to your selection of Playlists in Media Player’s navigation pane. Click the down arrow next to your playlist’s title button to see options in a pop-up menu that enable you to clear the list, shuffle the list randomly, rename the playlist, and save the playlist under a second name (useful for two similar playlists when you want to start with a copy of another and then modify the copy).
Figure 15.7. Your playlists specify sets of titles you want to listen to.

When you click a playlist in the left-hand pane’s selection area, that playlist fills Media Player’s large, central window pane so that you can adjust the order, rate songs, and click Play to enjoy that playlist.
Play a Music CD
Playing a CD is perhaps the easiest way to use Media Player. The only thing you have to do is insert the CD. Media Player begins playing the CD. If the CD is a common title, Media Player retrieves the album art and song titles and displays that information for you as the CD plays. You can work in other Media Player areas and create playlists from your digital music library, while listening to the CD play. You can go to the CD’s song list anytime by clicking the Now Playing button atop your Media Player window.
If Media Player does not retrieve the album information, click the Now Playing entry in Media Player’s left pane to show the missing album cover and song contents. You can right-click the album cover and select Find Album Info as described earlier in this chapter to locate and store the album information in Media Player. If the information is not found, as sometimes happens for privately produced or custom mix CDs, you can manually enter the information.
Did you Know?
If you hold down one of your Shift keys while inserting the CD into your computer, Media Player will not start playing the CD automatically.
Rip Music from a CD
If you want to rip the music from a music CD to your disk, insert the CD and retrieve or edit the album information. Although you can add the album and song details after ripping the music, you save a step or two by doing it now versus filling in the details after you rip the album.
Click the Rip button at the top of your Media Player to display the album’s information. By default, Media Player selects all the songs to rip to your disk, but you can click to uncheck certain songs if you don’t want the rip the entire album.
Click the down arrow at the bottom of the Rip button to check some options before beginning the rip process. The following options determine how your music will rip:
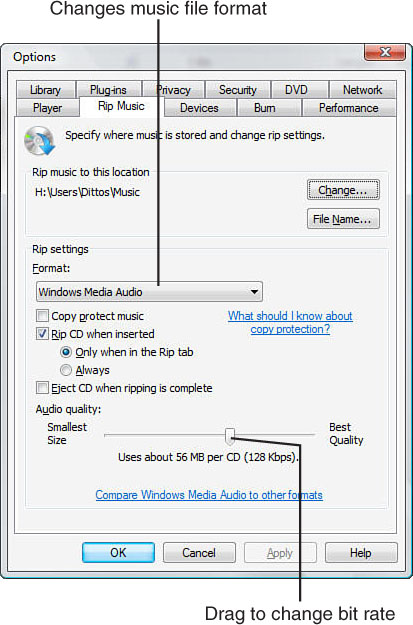
- Format—Determines the digital music format of your ripped music. The default is Media Player’s Windows Media Audio, a standard format used by Media Player and several other portable music players that use the
.wmafilename extension. Three other Windows Media options are available: Pro, Variable Bit Rate, and Lossless. Pro uses slightly less storage space, but is not as widely supported in handheld devices as the other choices. Variable Bit Rate offers superior quality, but marginally increased file sizes. Lossless offers the best quality you can get from your rip, but has monumentally larger file sizes. Only use the Lossless format if you’re an audiophile to the nth degree, with hundreds of gigabytes of free hard drive space to devote to your music collection. MP3, being the most widely accepted music format in the world, is also an option. Finally, Media Player offers the WAV Lossless format, a higher-quality format than the standard.wavfile and one that most web browsers can play with little trouble, but not a format that most will want to save their music collection. Music players often cannot play.wavfiles, so if you want to use a lossless format, go with WMA Lossless.
By the Way
Lossless versus lossy audio formats refer to the use of compression to achieve small music files sizes. Lossy formats crop out sounds that are generally outside the bounds of human hearing in order to reduce the size of music files. Lossless formats achieve minimal compression without losing any data from the recording.
- Bit Rate—Determines the quality of the music playback. The higher the bit rate, the better quality the audio playback will be, but the larger the digital music file will be too. A bit rate of 192Kbps is considered the minimum for near-CD playback quality, although 256Kbps and higher come nearer to achieving true, near-CD quality that the human ear can hardly distinguish from the original source. The format you choose determines which bit rate options appear. For example, if you select MP3, you can select a bit rate that goes as high as 320Kbps, but if you choose to save your music in the Windows Media Audio, 192Kbps is the highest bit rate available. In fairness to the
.wmaformat, 192 Kbps for.wmafiles is considered to sound about as good as MP3 files recorded at 256Kbps. Note that because a variable bit rate (VBR) WMA file automatically bases its bit rate on each individual song, you cannot specify a custom bit rate when ripping to this format; the default bit rate for WMA files is 128 Kbps. - Rip CD Automatically When Inserted—Allows you to specify when to rip CDs. Generally, you will want to rip CDs only when you click the Rip button and start the process. If, however, you have multiple CDs to rip, you might want to change this option to Always to speed up the process temporarily until you rip all the CDs you are working with.
- Eject CD After Ripping—Click to request that Media Player eject the CD after the ripping process finishes and all your music is digitally recorded to your disk drive.
- More Options—Displays the Options dialog box, shown in Figure 15.8, with multiple rip options available to you. The Options dialog box opens when you select Options from the Tools menu. Press your Alt+T to see the Tools menu if you don’t see your menu. Many of these are similar to what the Rip drop-down button gives you already, such as music format and bit rate. You can change the default location of your ripped music by clicking the Change button and entering a new disk location, and you can click the Options dialog box’s tabs to modify other Media Player options.
Figure 15.8. The Options dialog box enables you to set music-ripping options as well as other Media Player options.
Did you Know?
To ensure compatibility with as many music players and computer software programs as possible, save your audio in the MP3 format. Many audiophiles cringe at this advice, but they have to admit that no other format is supported worldwide as much as MP3. Although the other formats, especially the lossless formats, can produce better sound quality, as long as you use a decent bit rate of 192Kbps or better, most people won’t be able to tell a difference in quality when playing back an MP3 file or any other digital music format.
Watch Out!
If you use an Apple iPod portable music player, do not record your audio in any WMA format. Because the iPod is incompatible with WMA, if you use Media Player to rip your audio CDs, you have to stick with MP3.
After you set the music-ripping options, you’re ready to rip the CD contents onto your disk. Click the Start Rip button and Media Player begins saving your music. Depending on the speed of your computer and the bit rate you set, a standard CD should take only a few minutes to rip and often completes in less than five minutes.
When ripped, your music becomes part of your Media Player library and you can put your CD safely away.
Burn Music to a CD
The opposite of music ripping is music burning. When you burn music to a CD, you transfer a copy of your digital music files to a CD. Other CD players can play that CD.
By the Way
Throughout this Media Player discussion, this chapter has been discussing playing, ripping, and burning music files. Many CDs don’t contain music files. For example, audio books distributed on CDs contain recorded speech and not music. Audio is audio, and all the same concepts apply whether you’re working with a music CD or a CD with other content, such as a narrator.
You have two ways to burn music to a CD:
- Burn a standard audio CD, playable in any drive that plays CD music
- Burn a data CD
A standard CD is one that contains up to a maximum of approximately 80 minutes of content and follows the same format as any CD you’d purchase at a retail store. Such a CD is playable in any CD player, whether that CD player is a standalone music CD player in a home or car stereo or a computer’s CD drive. In addition, most DVD players can play back standard audio CDs.
A data CD is one that contains any kind of computer files. When you burn a CD with audio files and use the data CD format instead of the standard CD format, you can store about 10 hours of music (depending on the music quality). In addition, you can use the data CD to make backups of any files on your computer. If you save MP3 or other Windows Media Player files to a data CD, some CD players can recognize that the CD contains music and play back all 10 hours. This eliminates a lot of disc-swapping that takes place with regular music CDs that hold only a little more than an hour’s worth of music.
All computer CD and DVD players can play digital music files from data CDs and many car and home stereos and DVD players now can play them as well. Before creating a lot of data CDs for playback off your computer you’ll want to burn one and test it where you want to listen to the CD to ensure that your player can play music from these CDs. For example, if you’re taking a long car trip, a couple of ten-hour CDs burned with a set of MP3 or WMA files is a lot easier to manage than 20 one-hour conventional music CDs. Also, burning a couple of data CDs is less time-consuming.
When you insert a blank, recordable CD into your computer’s CD drive, the AutoPlay dialog box shown in Figure 15.9 appears.
Figure 15.9. Windows Vista asks what kind of CD you want to burn when you insert a blank CD into your computer’s CD burning drive.

After you select the kind of CD you want to burn, Media Player opens and the Burn button is selected. From here you can select the music you want to burn to the blank CD. Click the down arrow at the bottom of the Burn button to ensure that all the burn options are set to your liking. The burn options are usually less critical than the ripping options you learned about in the previous section.
Did you Know?
Media Player automatically selects the Apply Volume Leveling Across Tracks on Audio CDs option. This option helps to normalize your CD volume levels so that some tracks aren’t extremely loud whereas others are too soft to hear. Music purists might want to uncheck this option, but for most people, who simply want to enjoy music on their trip or elsewhere, volume leveling means you don’t have to adjust your CD player’s volume control throughout the music.
The Burn button’s More Options choice opens Media Player’s Options dialog box for a few additional options shown in Figure 15.10. If you find that some CDs you burn don’t play well in your CD player, you might need to slow down the burn speed by clicking the Burn Speed button and choosing Fast, Medium, or Slow as opposed to the default Fastest option. Some CD players are more sensitive than others and the slower you burn your CD, the less likely (in many cases) you’ll have trouble playing back the CD. The only drawback to slowing down the burn speed is that it will take longer to burn the CD.
Figure 15.10. Additional burn options are available, such as the burn speed.

You must now select music to burn. Media Player’s right pane will hold your burn list as you drag files to it. Just as you dragged music files from your library to this pane to create playlists, you drag songs to this pane to create a burn list for the blank CD in your drive.
By the Way
If you send more music files to your burn list than will fit on one CD (this limit differs depending on whether you elected to burn a music CD or a data CD), Media Player inserts a dividing line in the burn list and starts a new list below the first one for the next CD. Figure 15.11 shows a burn list with multiple CDs ready to burn. As you keep adding music to send to your CDs, the burn list keeps adding as many CDs as needed to hold all the files in the list. When you start the burn, Media Player burns the CDs in the order of the burn list and prompts you to insert a new CD when it’s time to burn the next one.
Figure 15.11. Your burn list holds one or more CD’s worth of music you want to burn.

Did you Know?
You can drag to rearrange the burn list order if you want to burn songs or CDs in a different order from the burn list you originally generate. You can also select and press Delete to delete selected songs that you decide against recording to the CD.
When your burn list contains all the music you want to save to the current CD (or to multiple CDs, if you’ve created a burn list that will go to several CDs), click the Start Burn. Media Player begins the burn. Depending on the burn speed you selected and your CD burning drive’s speed, the burn process can take several minutes. Usually, burning a CD takes longer than ripping music from a CD.
The Urge Music Service
Microsoft brokered a deal with MTV to create a new Media Player environment called Urge. Urge, available when you click Media Player’s Urge button, provides up-to-date news about the music industry, artist interviews and blogs, CD-quality and commercial-free online radio stations, and free music downloads, and has more than two million paid music track downloads available. Figure 15.12 shows an Urge screen within Media Player.
Figure 15.12. MTV’s Urge service gives you online access to music and artists.

Click a genre at the bottom of the Urge window to view Urge content on your favorite type of music.
The heart (and real reason) of Urge’s existence, however, is to make music available to you, giving you an online store of millions of downloadable tracks without requiring that you leave your Media Player environment. You must subscribe to Urge to download music. At the time of this writing, after you subscribe, you can purchase individual tracks to download or buy an All Access pass by paying a monthly fee and downloading as much as you want. Once you download music, Media Player automatically adds the tracks to your library and you can play the music on your portable music devices (using Media Player’s Sync button to transfer the music) or on your computer.
By the Way
Depending on the music you download, you will face Digital Rights Management (DRM) restrictions. DRM is used by vendors of online content such as music and video to control how the files can be used. For example, DRM could determine that a music file can be played only on the one computer it’s downloaded to or perhaps not copied in any form. DRM can limit the number of times the content is played, such as a digital movie you download that you can copy anywhere but it can only be played three times before it refuses to play again. The license related to the content you purchase on sites such as Urge determines what you can do with music. Windows Media Player and Media Center both honor any DRM rules they come across.
What About Video and Photos?
The chapter began by discussing how well Media Player handles music, video, and photos. The bulk of the chapter then concentrated on music and little else! This is intentional for a couple of reasons. First, music is what most people use Media Player for most of the time. Given the size of music files compared to digital video files, people who have digital content often have far more music files than the massive files required for digital videos of any size. Therefore, learning how to organize, manage, and play music as was explored throughout the earlier sections makes the most sense.
Concerning digital photographs, many computer users today have many digital pictures. Photo Gallery is the best place to manage your pictures. Media Player is a good place to view photos and you can organize and rate them from within Media Player also. But the added features of Photo Gallery mean that you’ll probably work within Photo Gallery primarily (or within another digital photo program, such as Adobe’s Photoshop Elements) when you manage your photos. You’ll use Media Player when you’re already inside Media Player doing other things, such as downloading or listening to music, but you want to look at some pictures and perhaps print or email them to others without leaving the Media Player environment.
Possibly the best reason not to include a lot of separate coverage for accessing and managing videos and digital pictures is that Media Player’s interface doesn’t really change when you view and manage videos and pictures. Figure 15.13 shows a Media Player screen displaying a video file library. You view digital files just as you view music files. Instead of album art, Media Player shows a captured image from early in the video. To watch a video, double-click it and Media Player starts playing the video. Accessing and managing digital photographs works the same way, too.
Figure 15.13. You’ll access, watch, and manage digital videos using the same tools you access, listen, and manage digital music files.

To play a DVD, insert it in your drive and Media Player starts playing the movie. All the normal DVD-related menu options work, so you can play the DVD extras or jump to a specific scene if the DVD supports those features.
Did you Know?
You can add parental controls to limit the DVD ratings that play back in Media Player. Select Tools, Options and click the DVD tab. Click the Change button in the DVD Playback Restrictions section of the Options dialog box to determine the highest rating (such as G, PG-13, and R) that can be played on Media Player.
If you have a DVD drive capable of writing to blank DVDs, you can save music and your digital video and photo library to DVDs. The capability to play that DVD in a standalone DVD player depends on many factors, such as the type of blank DVD media you use and the number of DVD formats your DVD player can read. Your DVD player’s manual should be your first step in determining whether you can play DVDs that you create in Media Player.
By the Way
One thing Media Player does not allow you to do is to rip DVDs to your digital library. Programs exist to do that, but you face copyright laws and copy protection schemes that change constantly. Is it as legal to make a backup of a DVD as it is to rip a CD to your hard disk? At first glance, there seems to be very little difference, but Microsoft chose the path of least (legal) resistance and opted not to allow DVD ripping. At the end of the day, you can do it so long as you’re not circumventing a built-in copy-protection mechanism in order to do so. Because most commercial DVDs do have built-in copy-protection, this does in fact make backing up those DVDs illegal.
DVDs hold a tremendous amount of storage, from about 6 to 20 or more times the amount of data that a data CD can hold. Therefore, using DVDs for data backup makes a lot of sense. Routinely sending your digital music, pictures, and videos to a data DVD, even if you don’t ever plan to watch that DVD on a stand-alone DVD player, serves as a good back-up for your digital media collection (and your regular data too!). You can burn your digital files to DVD using the same procedure you used to burn CD digital files in the “Burn Music to a CD” section.
Chapter Wrap-Up
You’re now a Windows Media Player pro! You learned in this chapter how Media Player acts as a repository and management system for your digital music, videos, and photographs. You can view and play music and videos easily. Browse through your photograph collection. Create playlists and go online to download new content.
Media Player’s true power comes in its ability to handle digital music. Media Player easily rips music from music CDs, burns music to CDs, and provides an electronic jukebox of music that can encompass your entire music library no matter how vast it might be.
Although Media Player enables you to view and manage your photographs, Photo Gallery does a better job because you can edit your pictures in Photo Gallery and Media Player’s music and video options don’t get in your way. The next two chapters move you away from this chapter’s music-themed discussion to cover Windows Vista’s work with digital pictures. You’ll see how to get pictures onto your computer easily, and edit and manage those pictures after they’re there.