
Chapter 22. Making Windows More Accessible
In This Chapter:
- Display the accessibility tools
- Magnify your screen
- Learn which accessibility options might benefit you the most
- Change the keyboard’s response for combining keystrokes such as Shift+E
- Replace visual screen messages with audible signals and alarms
- Set the screen’s display so that you can read enlarged letters, icons, title bars, and high-contrast screen colors
- Use your keyboard to imitate mouse moves and clicks
This chapter describes all the Windows Vista tools that provide help for users with special needs. Everyone who uses Windows Vista is a potential candidate right now for one or more of these tools because they often make a part of Windows easier to use. A good number of Windows users who wouldn’t normally consider themselves candidates for the accessibility tools will often find ways to use one or more of the accessibility tools as a shortcut to a way of working or to make something they do easier. Previous versions of Windows supported many of Vista’s accessibility features, but Vista offers more tools and makes Windows easier to use than ever before.
The Windows Vista accessibility options change the behavior of the keyboard, screen, and speakers so that they operate differently from their default behaviors. Microsoft designed Windows Vista so that everybody can take advantage of the new operating environment.
Getting to the Accessibility Tools
Open your Windows menu, select All Programs, and then select the Accessories submenu. Open the Ease of Access folder to display Vista’s accessibility tools. Vista’s menu’s Ease of Access folder lists a few individual accessibility tools, such as the Narrator, but unless you specifically know you want to use one of those tools, your first foray into Vista’s accessibility tools should begin with the Ease of Access Center. There you get an overview of what is available and you can easily select the tools you want to use.
When you select Ease of Access Center from the menu, Vista displays the Ease of Access window shown in Figure 22.1. The moment the window opens, a voice starts talking to let you know how to get additional accessibility tools and describes how to turn the window’s links into audible prompts.
Figure 22.1. You’ll locate and set Vista’s accessibility tools and options in the Ease of Access Center window.

Did you Know?
Click the Always Read This Section Aloud link if you want to hear the voice preview every time you display the Ease of Access window. The Always Scan This Section Option link, when checked, causes Vista to highlight each Ease of Access option and describe, in the narrator’s voice, each option when you display the Ease of Access window. By slowly highlighting each access option one at a time, and having each option spoken aloud when highlighted, you can turn on one or more options by pressing your spacebar when the reader describes an option you want to set.
The top half of the Ease of Access window enables you to get to common access tools quickly. There you will be able to turn on and off specific accessibility tools described in the following sections.
The bottom part of the Ease of Access window enables you to select from more general requirements you might need. For example, if you want to use your computer without a mouse or keyboard, click the Use the Computer Without a Mouse or Keyboard link. The Ease of Access window then guides you through the accessibility options related to using your computer without a keyboard or mouse, but instead using another means, such as voice control.
By the Way
As this chapter’s opening stated, just about everybody can benefit from one or more of Vista’s accessibility tools. Too many people think they don’t need the accessibility tools, so they ignore them—by doing so, those people sometimes overlook features that would help them do their work better and faster. Your author had a forced tour of duty with Windows’ accessibility tools when I temporarily lost part of my vision. I was grateful that Microsoft chose to make the accessibility tools available to Windows users. Before that experience I never expected to use them, but I ended up requiring both the speech-to-text capabilities and the text reader. I won’t go into more detail here, but my experience is completely documented in the book, Disabling America, ISBN 0-785-26225-3, Thomas Nelson Current Publishers.
Zoom with the Magnifier
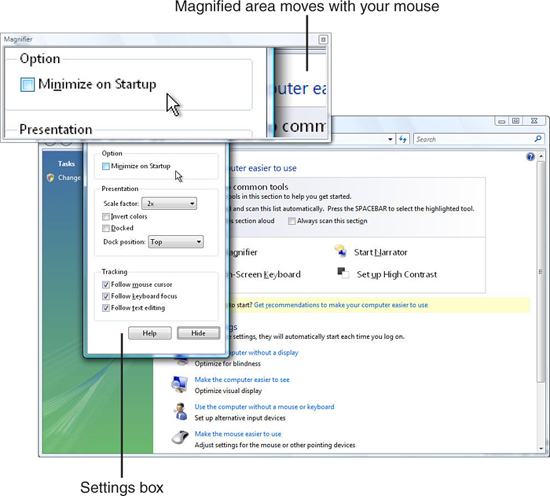
The Microsoft Magnifier is a program that magnifies part of your screen. As you move your mouse around the screen, the magnified viewer updates to show you a magnified view of your mouse cursor’s area. If you have trouble reading text on your screen, you might want to try the Magnifier. Although the Magnifier program consumes some of your screen space to show a magnified area, text is much more readable than on the standard Windows Vista screen.
When you click the Start Magnifier option, Vista displays the Microsoft Screen Magnifier dialog box shown in Figure 22.2. (Optionally, Vista reads aloud the option you just clicked to verify audibly that you wanted to select that option.)
Figure 22.2. As you move your mouse pointer around the lower part of your screen, the magnified upper window gives you a better view of the details.
Did you Know?
Click and drag the dividing line between the magnified and unmagnified portions of your screen to give more or less room to the magnified area.
In the dialog box, you can change settings such as the scale factor used to magnify parts of your screen. You can invert the screen colors that might make what you’re viewing easier to see in the magnified window pane, and determine where the magnified window pane appears: docked at the top of your screen as shown in Figure 22.2 or on one of the other screen edges. In addition, you determine how the Magnifier follows your mouse and keyboard focus so that you can zoom into text that you enter, or stay with your mouse if that works better for you.
By the Way
After you turn on the Magnifier, the magnified window pane appears as you use Windows Vista. Start Microsoft Word, for example, and you’ll see the magnified window pane. Surf the Internet and the magnified pane will be there also to help you see what you’re doing.
Use the Onscreen Keyboard
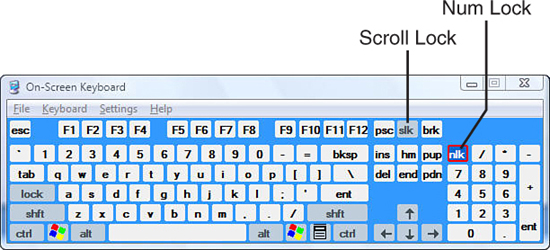
If you find it easier to use your mouse than your keyboard, or perhaps you have an alternative input device that imitates a mouse and typing on your keyboard can be problematic, you should check out the onscreen keyboard. When you click the Start On-Screen Keyboard option at the top of the Ease of Access window, Vista displays a full keyboard at the bottom of your screen as Figure 22.3 shows. The on-screen keyboard stays on your screen no matter which application you later start. To type a key, you can still use your regular keyboard, but you can also click with your mouse or other input device to imitate the typing of a keyboard key.
Figure 22.3. When you turn on the onscreen keyboard, you can imitate typing on your keyboard by clicking the on screen keyboard’s keys. The on screen keyboard stays on top of whatever program you run for easy access to the onscreen keys.
Did you Know?
To use the onscreen keyboard’s Shift, Ctrl, Alt, and Windows logo key combination, click the Shift or Ctrl or Alt or Windows key first and the key stays selected. Then click the next key that makes up the combination you want to trigger. Therefore, to click Ctrl+C, you would first click the onscreen keyboard’s Ctrl key and then click the onscreen keyboard’s letter C. The Lock key turns on Caps Lock so that what you subsequently type appears on the screen in uppercase letters until you click the Lock key once more.
Turn On a High Contrast Screen
If you have trouble separating text from a screen’s background, or if some colors bleed together for you, you can click the option labeled Set Up High Contrast to change your screen so it takes on a dramatic dark-and-light contrast as shown in Figure 22.4. (You can turn off the high contrast screen by pressing Left Shift+Alt+PrtScrn.)
Figure 22.4. The high contrast screen option changes all the text and colors on your screen to a higher-contrast set of colors that makes viewing the screen easier for some users such as those with color blindness.

By the Way
You can set multiple accessibility options at the same time. Each is explained individually throughout this chapter, but you can combine them. For example, you might want to view your screen in high contrast mode and use the onscreen keyboard also.
By changing your Windows Vista color scheme to a higher-contrast set, you make your screen’s color contrast more obvious and discernible. When viewing in a high contrast mode, Vista changes your applications to display them in a high contrast that makes it easier to distinguish between background and foreground screen elements.
If you find that the high contrast settings don’t suit you, change some of the related settings when you first select the high contrast option and see the options window shown in Figure 22.5. Here you can select a different high contrast color scheme and adjust text and icon sizes and other elements such as window border thickness. Click the dialog box’s Apply button to put that contrast scheme into effect and see whether it works for you.
Figure 22.5. You can modify the high contrast options to get better results.

Did you Know?
If you find a high contrast display that works fairly well for you, you can right-click over your desktop, select Personalize, choose Theme, and click the Save As button to enter a new name for your current display settings that you can return to again if you ever change away from them.
Surprisingly, when you turn off the high contrast mode, Vista doesn’t always return your screen to the state it was in before you entered that mode. This is a bug that’s been around since Windows XP and doesn’t seem to be fixed in Vista at the time of this writing. If, for example, you were using the Windows Vista Aero appearance settings before entering a high contrast mode, your computer probably won’t use the Windows Vista Aero appearance setting when you leave the high contrast mode.
To fix this, click the Set Up High Contrast option beneath the Ease of Access window’s Turn On High Contrast option and select the Windows Vista Aero color scheme to put your computer back the way it was originally.
Your Computer Can Read to You
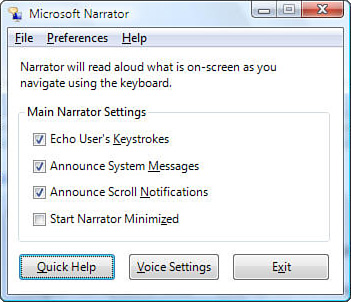
When you click to select the Start Narrator option, Vista displays the Microsoft Narrator dialog box shown in Figure 22.6 and begins reading aloud the dialog box’s contents. When reading dialog boxes, the narrator always reads the title, the main menu options, the dialog box text, the names of special elements such as check boxes and option buttons, and their selected state, when they appear.
Figure 22.6. You control the narrator’s options from the Microsoft Narrator dialog box.
Watch Out!
If you hear no narration within a few seconds of turning on the option, your speaker volume is too low, or a speaker is not plugged into your sound card’s output jack.
The narrator can read to you the following screen elements depending on your selection:
- Your keystrokes—As you type, Narrator can speak the keys to you. Typing
ABC DEFresults in you hearing, as you type, “ABC Spacebar DEF.” You’ll also hear an audible confirmation when you click a check box and perform other screen selection actions. - System messages—System messages that appear in pop-up dialog boxes, such as shutdown messages, can be read to you.
- Scroll notifications—Reads new text that appears when your screen scrolls up or down.
- Quick Help—Clicking this button reads to you help about the narrator feature. You can stop the help’s narration by pressing the Ctrl key.
By selecting the Voice Settings button, you can modify the way your computer reads onscreen text to you. You can change the speed, volume, and pitch of the voice that reads to you. If you’ve installed additional voices (available through Microsoft’s website and elsewhere), you can select a different voice to read to you.
Vista Can Suggest Accessibility Tools for You
Although the four individual accessibility tools described in the previous sections are useful and solve specific problems, you might have requirements that demand a combination of the tools. Or perhaps if you’re new to the accessibility features, you’d rather let Vista make some suggestions for you.
Previous versions of Windows offered an Accessibility Wizard that stepped users through the setup of one or more accessibility options. Vista’s Ease of Access Center provides a similar but more helpful feature. When you click the Get Recommendations to Make Your Computer Easier to Use link in the center of the Ease of Access window, Vista begins a question-and-answer session that steps you through the setup of accessibility tools customized for your specific needs.
When you click the link, Vista displays the Get Recommendations to Your Computer Easier to Use window shown in Figure 22.7.
Figure 22.7. Windows Vista can help guide you through the accessibility tools through this step-by-step question-and-answer process.
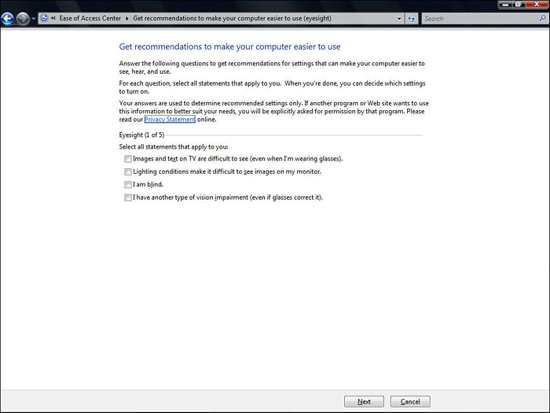
The screens help identify your needs. For example, the first window asks for visual statements that might apply to you. You can select one or more items that describe your situation. For multiple items, Vista might recommend multiple accessibility tools to work in tandem that can help make your computing experience far more useful. If none of them apply to you, don’t click any of the options before clicking the Next button to move to the next step.
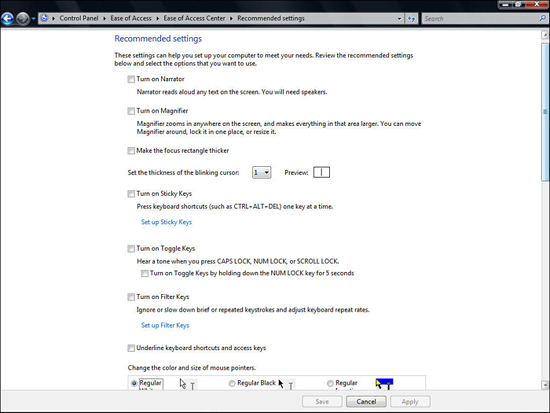
The screens collect information about you, and when you finish the five-screen process, Windows displays a customized screen (such as the one shown in Figure 22.8) to make the best use of Windows for your situation. You have the choice of selecting any of or all the options available.
Figure 22.8. Windows Vista suggests a customized set of accessibility tools just for your needs.
Accessing All the Accessibility Tools
The lower half of the Ease of Access screen provides access to all the tools Windows Vista offers that can help make your computing experience more enjoyable and productive. Keep in mind that the top set of tools shows only the most common six accessibility tools Vista provides. Several more are available and you can select from all that are available from the lower part of the Ease of Access screen.
The following list describes the collection of accessibility tools you can set up based on the settings you’ll find at the bottom of the Ease of Access screen:
- Use the Computer Without a Display—Provides tools that enable the visually impaired to work more effectively on the computer. Places emphasis on sound settings, such as narration, and reduces visually distracting animations.
Did you Know?
These audio tools include a text-to-speech setting that enables your computer to read file contents, such as Word documents, over your computer’s speakers.
- Make the Computer Easier to See—Provides tools that help improve the visual effectiveness of the Windows screens, making objects easier to see, text easier to read, removing background images when possible, and adjusting for a high contrast viewing area.
- Use the Computer without a Mouse or Keyboard—Enables you to use your computer without a mouse or without a keyboard (or either). You can use voice control to manage your computer and dictate text. Information about additional assistive technologies is available as well.
By the Way
Chapter 23, “Speaking to Your Computer,” explores Vista’s speech recognition technology.
- Make the Mouse Easier to Use—Enables you to set up special mouse-related accessibility tools, such as enlarging your mouse pointer, changing the contrast of your mouse pointer, and turning on Mouse Keys, which are specific keys on your keyboard you can press to simulate mouse movements and clicks.
- Make the Keyboard Easier to Use—Provides all of Vista’s keyboard-related tool settings—such as Mouse Keys, Sticky Keys, Toggle Keys, and Filter Keys—in one place.
- Use Text or Visual Alternatives for Sounds—Provides text and onscreen alternatives to actions where sound would normally be heard. For example, you can elect to see flashing visual warning messages and title bars when Windows system sounds would otherwise play over the speaker. A caption display also replaces spoken dialogue when programs take advantage of Vista’s caption option.
- Make it Easier to Focus on Tasks—Enables you to make overall reading and typing actions simpler by bringing together a set of tools that focus better on visual and input tasks. The Reasoning Tasks window, shown in Figure 22.9, is actually a special combination of accessibility tools, such as Filter Keys, narration, and high contrast screen options.
Figure 22.9. The Reasoning Tasks window brings visual and typing tasks into better focus.

Reviewing Two Common Keyboard Accessibility Tools
Two keyboard tools, Stick Keys and Filter Keys, have been included in the Accessibility Tools since Windows 95 and for good reason. They enable people who might otherwise have problems tackling the keyboard by making the keyboard work for them. The following sections review these tools.
Make Your Keys Sticky
Although you could pour honey on your keyboard to make your keys sticky, the Ease of Access window gives you a much more useful way to produce sticky keys. When you turn on the Ease of Access window’s Sticky Keys feature, you can press any modifier key (Shift, Ctrl, Alt, or your Windows logo key) individually instead of having to press them using combined keystrokes. Therefore, you can press Alt, let up on Alt, and then press C instead of combining the two for Alt+C.
The Sticky Keys feature enables you to type more easily using one hand or even one finger if the situation calls for it. If you find that you need the Sticky Keys feature, you don’t even have to display the Ease of Access window first. Simply press either Shift key five times and the StickyKeys dialog box shown in Figure 22.10 appears. You can also access the Sticky Keys feature by clicking the Make the Keyboard Easier to Use link on the Ease of Access Center window.
Figure 22.10. The Sticky Keys feature enables you to trigger the Ctrl+C keystroke by pressing Ctrl, letting up on Ctrl, and then pressing C.

Turn On Filter Keys
The Filter Keys Ease of Access option includes support for accessibility tools called Repeat Keys, Slow Keys, and Bounce Keys. Inadvertent errors can occur when users hold keys down too long or press keys by using a bouncing motion that can double or triple keystrokes. The Repeat Keys settings control the appearance of such extra keystrokes that can result from holding keys down too long, resulting in typing that would otherwise produce text lliiikkkkkkkee tthhhiisss. The Slow Keys option guards against keys being pressed accidentally and accepts a keystroke only if it’s held down for a specified period of time. The Bounce Keys setting helps to eliminate extra characters that might appear due to a bouncing keystroke motion.
When you select the Turn On Filter Keys option, you’ll almost always want to click the Set Up Filter Keys link to specify how the Filter Keys option is to work. The Configure Filter Keys window, shown in Figure 22.11, appears when you configure Filter Keys from the Make the Keyboard Easier to Use link and click Set Up Filter Keys.
Figure 22.11. You can control the Filter Keys settings for Bounce Keys, Slow Keys, and Repeat Keys.
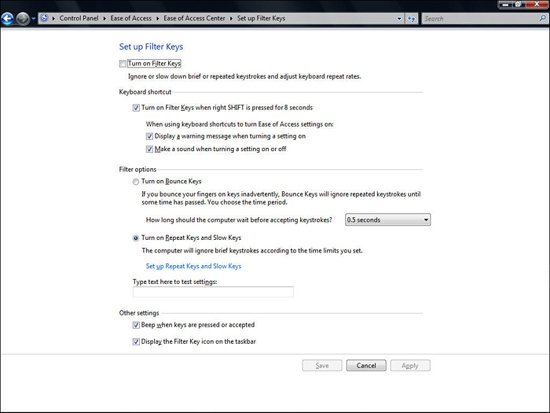
The Set Up Filter Keys window provides several options that control Vista’s Filter Keys actions. Most of the settings you might need to adjust are timing-related settings. For example, if you require the Bounce Keys feature, you should specify how long, in seconds or partial seconds, Vista should wait before accepting a keystroke. If you select one second but later bump a key that stays down for less than a second, Vista will ignore that keystroke.
Did you Know?
Users of Filter Keys often find the beep option useful. When you click to select the Beep When Keys Are Pressed or Accepted option, your computer gives you an audible short beep when it accepts a keystroke. You quickly learn to use this beeping feedback as verification that a keystroke was properly accepted.
To set up Repeat Keys and Slow Keys, you must click the link in the center of the Set Up Filter Keys window to access the options related to those features. Again, the timers are the most critical elements to adjust. You might have to try several timer settings as you use your computer before you find the timing that best meets your needs. For example, to help eliminate inadvertent key presses, you can set the Slow Keys setting to one full second. If you press a key for a second or more Vista considers that a valid keystroke.
Watch Out!
People who need the Bounce Keys settings don’t require Repeat Keys and Slow Keys and vice versa. These two sets of options are mutually exclusive because any Bounce Keys setting would negate the Repeat Keys and Slow Keys settings. Therefore, you can activate either the Bounce Keys feature, or you can activate the Repeat Keys and Slow Keys features.
Chapter Wrap-Up
This chapter explained how you can control the accessibility options inside Windows Vista. Microsoft designed Windows Vista to be accessible to virtually anyone who needs to use a computer, even if that person requires extra help with the keyboard, video display, or mouse. The accessibility options contain audible and visual clues and a step-by-step guide helps you set the options you need most. These accessibility tools are available for anyone who uses Windows, and just about every user can find something that will make his or her computer use more productive.
In the next chapter, you’ll learn about another tool that is part of the accessibility options but almost anyone can benefit from it: Vista’s speech recognition tool. You’ll learn how to control your computer and dictate into Word and other programs by speaking into your computer’s microphone. It took a few years for speech recognition to become mainstream technology, but now that it’s included with Windows Vista, it’s time to begin using this technology that science fiction writers could only imagine for most of the twentieth century.