
Chapter 39. Synchronizing Your Computer with Other Devices
In This Chapter:
- Synchronize the files among your computers and mobile devices
- Let Windows Vista update the files on your mobile device before you leave on a trip
- Learn the established communication rules to get the most out of your synchronized connections
- Use the Mobile Device Center to set up sync partnerships
- Manage your Mobile Favorites folder
- Use sync to manage multiple synchronizations
It’s an electronic world. Computers are everywhere, even in the cars driven and the televisions and stereos played. Not only are computers obvious, with laptops and desktops in homes and businesses and coffee shops and everywhere else all around the world, but small hidden computers also appear in cell phones, pocket PCs, MP3 players, watches, and calculators.
The need to have information available to use night and day prompted a growth of small, handheld computing devices, often called PDAs for Personal Digital Assistants several years ago. PDAs kept track of our appointments, phone numbers and other contacts, and held some data also. Some are little computers—with names such as Pocket PC, Treo, and Blackberry—that can access Internet web pages and show us our emails when an Internet signal is available. And they can do so even when an Internet signal isn’t readily available because many of these devices also act as cell phones that can call the nearest cell tower to access an Internet data feed when requested to do so.
In fact, it’s often difficult to distinguish between a cell phone, a PDA, and an MP3 player because they all seem to share the same subset of features in one way or another.
The key to making those small devices truly useful is that you want your information with you when you travel. This means you must transfer your desktop’s data files, such as email, contacts, and important financial and other data that you want with you, to the device before you leave your desk. Windows Vista helps keep your larger computers and your small mobile devices in sync with each other. In this chapter, you’ll see how Vista does that. It’s a short chapter, but these are small devices and synchronizing your computer and mobile devices is easy thanks to Vista.
Establishing a Mobile Device Connection
Before your computer can synchronize data with your mobile device, you must set up a sync partnership between your larger computer (which might be a desktop or your laptop) and your mobile device. That partnership defines a profile that describes how information is to pass between these devices. For example, on one of your mobile devices you might want your contacts and emails downloaded from the larger computer, but on a different mobile device you might just want a set of MP3 files. (What? You do have more than one mobile device, don’t you?)
The real problem with synchronizing information is that information can get scattered among your devices. After you send data to your mobile device and you leave for a trip, it’s not only possible but probable that you’ll update or change the data in some way while you’re gone, perhaps adding new contacts for the people you meet. Accepting Vista’s help in synchronizing data between all your computing devices will seem a welcome feature indeed. Vista helps you put changed data where it needs to go and keeps fresh data placed wherever it needs to be, even if that means that Vista uses your newer mobile device files to update your desktop computer when you get home.
By the Way
Vista uses the accepted, abbreviated term sync for the communication and reconciliation of files among computers and mobile devices.
Obviously you need a way to connect your devices together before a sync can take place. Often this means connecting a base unit for your mobile device into your computer’s USB port, or perhaps using a wireless connection such as Bluetooth so that the two devices can communicate with each other.
Watch Out!
The two devices cannot magically sync with each other unless you connect them together using a wired or wireless method. If you’re using your mobile device on vacation, your desktop computer back home won’t be synced to the changes you make while away from home until you return and sync the devices. As you might now expect, the sync rules must be set up so that the mobile device’s changes can update the desktop.
To establish a sync partnership, you must connect your mobile device to your computer. The connecting hardware that comes with your mobile device determines how you plug your mobile device into your computer. If your mobile device plugs into your computer with a USB cable, connect your cable now if you haven’t already done so. If your mobile device uses a wireless signal instead of USB, check your user manual to see the best way to set up the device so that your computer gets the signal at the appropriate time.
Did you Know?
If you connect your mobile device to your computer using a USB cable, the USB connection often acts as both a charger and as a data path for the sync partnerships you establish. If your device has no remaining charge, however, you might need to give it an initial charge and turn it on before inserting the device into the USB-based port before Vista can sense the unit. For a wireless connection, your mobile device must have some battery charge or be plugged into an AC outlet to send its signal to your desktop.
Watch Out!
If you’ve used Windows XP’s ActiveSync to synchronize your mobile devices in the past, you cannot use ActiveSync with Vista. Vista includes the Windows Mobile Device Center which replaces the ActiveSync program used in previous Windows versions.
After connecting your mobile device, turn it on. When you do, Vista senses the device’s presence and opens the Windows Mobile Device Center shown in Figure 39.1. If the Mobile Device Center doesn’t open automatically, open your Control Panel and open the Network and Internet group. Select Windows Mobile Device Center to open the program’s window. (Although the Sync Center appears earlier in the list, you’ll need to visit the Mobile Device Center the first few times you set up your device.)
Figure 39.1. Vista’s Mobile Device Center is where you manage sync partnerships between your computer and your mobile device.

The Mobile Device Center is where you manage partnerships that you establish between your computer and one or more mobile devices.
When you first plug your mobile device into your Vista-based computer, your mobile device often displays a message and shows an icon to indicate that the connection is being established or has been made. In addition, you might see an AutoPlay window open such as the one shown in Figure 39.2. This is the result of an internal Windows file called the mobile device base driver. With this base driver’s window, you get simple Explorer-like access to your device and you can copy files to and from the device.
Figure 39.2. Some mobile devices are simple and require very little interaction and no sync partnership connection.
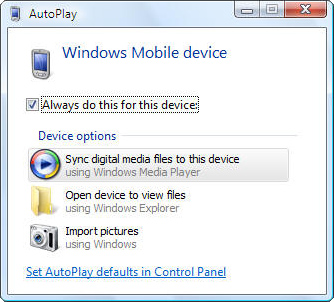
For example, you can select what you want to do if one of the AutoPlay options provides the primary reason you normally connect the mobile device to your computer.
If the device is a portable digital music player (with optional video), you might always want to sync its files with your Windows Media Player’s files, so you’d select the Sync Digital Media Files to This Device option and never use the Mobile Device Center. If the mobile device has a digital camera and you use the device to take or store pictures you get elsewhere, select the Import Pictures option. You might just select the Open Device to View Files option to open a Windows Explorer window and copy files manually to or from the device.
Leave the Always Do This for This Device option checked if you want Vista to remember your selection and never ask again. Click to uncheck this option if you want to select one of the AutoPlay options this time, but you don’t necessarily want Vista to assume that’s what you will want to do in the future.
Did you Know?
As explained in Chapter 24, “Controlling Windows Vista,” you can change any AutoPlay option you set from your Control Panel’s Hardware and Sound group.
Setting Up Your Device
If you want to do more with your device than the simple AutoPlay interface allows, you can work from the Mobile Device Center to set up more complicated partnerships. The first time you connect your mobile device to your computer and view the Mobile Device Center program window, you have to set up your device so that your computer knows what kind of partnership you want to establish.
By the Way
By the way, the Mobile Device Center’s picture won’t necessarily match your mobile device. The picture might not look like the cell phone you just plugged in. In fact, you might not have even plugged in a cell phone but, instead, connected a Pocket PC or other kind of nonphone PDA device to your computer, but the picture might show a cell phone anyway. None of that matters because the purpose of the initial Mobile Device Center picture is just to make it clear you’re working with a mobile device connected to your desktop or laptop computer.
The Mobile Device Center sees that you’ve plugged your mobile device into your computer and that you have not yet set up that device. The Set Up Your Device and the Connect Without Setting Up Your Device options make themselves available automatically in the Mobile Device Center as shown in Figure 39.1.
When you first connect a mobile device to your computer, the Set Up Your Device option appears. But after you perform the setup, that option goes away and a list of routine sync options appear that you can use to manage your mobile device’s synchronization settings.
Using the Set Up Your Device Option to Establish an Initial Partnership
When you first connect a mobile device to your computer, select the Set Up Your Device option on the Mobile Device Center and answer the prompt shown in Figure 39.3 that asks how many computers you’ll want to connect the mobile device to. Most users will be setting up a single sync partnership with their mobile device and if you’re one of them you’ll select the first, default option. If the mobile device already has a partnership set up with another computer, you will need to select the second option, No I Want to Synchronize with Two Computers, so Vista doesn’t monopolize your mobile device and remove other partnerships.
Figure 39.3. Tell Vista how this device shares partnerships with others.

Given the vast differences among computer software configurations and mobile devices, your combination of hardware and software determines what you can sync and how that takes place.
Several synchronization rules limit how much you can take advantage of Vista’s sync capabilities that Mobile Device Center offers. Among these are the following:
- To be able to access all the Mobile Device Center features, you should use a mobile device that runs Windows Mobile Operating System 5 or later. Users of devices that run operating systems such as the Pocket PC 2003 Edition can access many of the sync features, but some sync services might be more limited than available for devices running Windows Mobile 5 and later.
- One computer can have partnerships with many different mobile devices: cell phones, PDAs, and MP3 players.
- A mobile device can have a partnership with only two computers at most. For example, you can keep your contacts up-to-date among your PDA and desktop and laptop, but not a third computer.
- You can synchronize email between only one mobile device and one computer. This holds true even if you’re syncing to a computer on a Microsoft Exchange email network; only one Exchange computer can sync email with each mobile device connected to any computer on the network.
- For full syncing of Outlook data, you have to upgrade to Outlook with Business Contact Manager.
- If your mobile device connects using a wireless signal instead of a USB connection, a Change Schedule Settings option will appear on the Mobile Device Center sync data screen that you can select to determine when the sync should take place. When wired with a USB cable, the sync takes place when you connect the device.
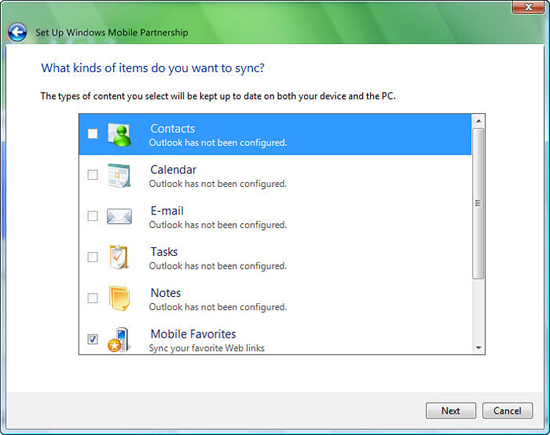
The Mobile Device Center makes you aware of any limitations you might have based on the hardware and software it sees. After clicking Next from the Set Up Windows Mobile Partnership window, for example, you’re asked what kinds of data you wish to synchronize your mobile device to and the options include Outlook email. You may run into problems, however, if everything isn’t as expected. For example, in Figure 39.4, an attempt was made to establish a sync between a Pocket PC and Outlook without Business Contacts Manager installed. It would be more helpful if the message beneath Contacts, Calendar, E-mail, Tasks, and Notes actually said the lack of the Business Contacts Manager was the reason the sync was not configured for those Outlook items, however.
Figure 39.4. You might find that you cannot synchronize all your data, depending on your software and hardware combination.
No matter what kind of software and hardware combination you have to synchronize, you can almost always sync your Mobile Favorites folder (use Windows Explorer to open your user account’s Favorites folder to see the Mobile Favorites subfolder there) and files that you select by clicking the Files link in the setup window.
Did you Know?
To keep the latest music on your mobile settings, routinely copy MP3 files that you want to listen to on your mobile device to your computer’s Mobile Favorites folder. The next time you plug your mobile device into the USB-based connector or achieve a wireless connection, Mobile Device Center will synchronize all the music in your Mobile Favorites to your mobile device. By using the Mobile Favorites folder as your only shared folder when you establish syncs with your mobile device, you achieve easier control over the files that you take with you because any synced file is in your Mobile Favorites folder.
After you check the items you want to sync for the new partnership, Mobile Device Center asks for a name to save the defined partnership under so that later you can more easily locate and remove specific partnerships you no longer need on your computer.
When you create and save a partnership, Mobile Device Center immediately synchronizes your files. That means selected data on your mobile device that doesn’t appear on your computer makes its way there, and selected items found only on your computer makes its way to your mobile device. During a sync, the message Syncing appears in your Mobile Device Center’s lower-left window corner as shown in Figure 39.5.
Figure 39.5. Mobile Device Center tells you when syncing is taking place.

After the sync finishes, a green check mark appears in place of the Syncing message and Mobile Device Center tells you the time of the most recent sync. Figure 39.6 shows this area of the Mobile Device Center window. If you want to force a manual sync because you changed some selected data and sync doesn’t recognize you did so, click the green Sync button and Mobile Device Center will review both your mobile device and desktop settings to see whether a sync needs to occur once again.
Figure 39.6. The Syncing message goes away when a sync finishes and the synchronized data is properly established on both your mobile device and computer.

By the Way
Until you change some of the files associated with a partnership, Mobile Device Center never syncs again on its own. However, the next time you connect your mobile device to your computer, a sync occurs just to make sure that everything is up-to-date in both places.
To end a partnership between your computer and a mobile device, open your Mobile Device Settings menu option and click the More link. Select the End a Partnership option and select one or more named partnerships you want to delete.
Managing an Existing Sync Partnership
After you set up your mobile device, the next time you connect your mobile device to your computer the Mobile Device Center window opens to the four options shown in Figure 39.6, described in the next few sections.
Connecting to Mobile Programs and Services
The Programs and Services option takes you to the Internet and opens a page in your web browser where you can download programs and updates from Microsoft’s Windows Mobile website shown in Figure 39.7. The website is a full-featured mobile device site from which you can download updates to your mobile device’s software, download programs you can use with your mobile device (such as games and business applications), and get support if you have trouble using your mobile device with Windows Vista.
Figure 39.7. Mobile Device Center’s Programs and Services option opens the Windows Mobile web page where you can get support and programs related to mobile computing.

Watch Out!
The Windows Mobile site is a retail site that charges for most programs you download to use with your device. You have to select the kind of device you’ll be using the programs on, such as a cell phone or Pocket PC, and not every program is available for every type of device.
Did you Know?
After you download one or more programs from the Windows Mobile website, you can manage your mobile-based programs by again selecting Programs and Services and clicking the More button. A window appears inside Mobile Device Center; from there, you can add and remove mobile device-related programs, as you might need to do to put the downloaded programs on and remove downloaded programs from your mobile device.
Connecting to Pictures, Music, and Video
By selecting Mobile Device Center’s second menu option, Pictures, Music, and Video, you can easily send or retrieve media-related content to your mobile device from your computer. The following three options appear when you select and open the Pictures, Music, and Video Mobile Device Center menu option:
- Import Pictures/Video From Your Device—If your mobile device has pictures, digital music, or digital sound, you can import that content to your computer. If Mobile Device Center doesn’t locate any media content on your mobile device, a message box tells you there is no media content found on the device that doesn’t already appear on your computer.
- Pictures/Video Import Settings—Clicking this option opens the Import Settings dialog box shown in Figure 39.8. There you determine which folders to store shared content that you grab from connected mobile devices.
Figure 39.8. Determine files, folders, and other settings to match when you move media content between your mobile device and computer.

- Add Media to Your Device From Windows Media Player—Opens Media Player where you can select music and videos, and use its Sync drop-down list to synchronize your computer and your mobile device.
Did you Know?
After Media Player opens on your computer you can play music and video stored on your mobile device from Windows Vista on your computer, using your computer’s speakers to hear the sound.
Managing Mobile Device Files
When you open the File Management menu option and click the Browse the Contents of Your Device option, a Windows Explorer window opens to reveal the contents of your mobile device. Be warned that you might see more devices than you expect. For example, Figure 39.9 shows an Explorer window open for a Pocket PC. Even though the Pocket PC is the only device attached to the computer, Mobile Device Center shows three items in the Explorer window: Memory, a Flash ROM disk, and a CF card.
Figure 39.9. All memory areas of your mobile device show in the Explorer window when you wish to view your mobile device’s contents.
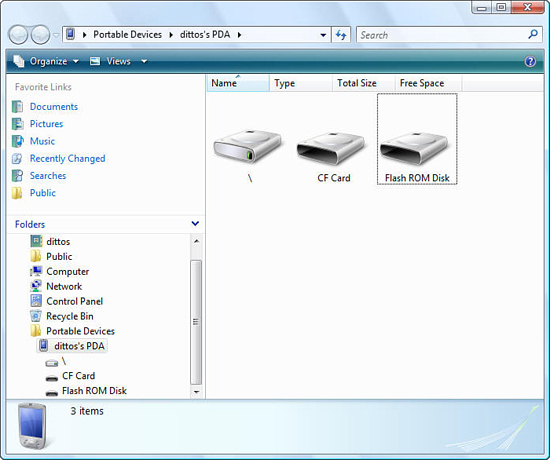
The Pocket PC attached to this computer contains both a memory to process data, internal ROM (for read-only memory) that holds the Pocket PC’s system startup and program-loader (collectively called a BIOS for basic input/output system and referred to only as in Explorer), and a removable memory card that’s the CF Card (for Compact Flash card) format. The bulk of any media content is most often stored on the removable CF Card for such a device, so double-clicking the Explorer window’s CF Card icon displays a list of any files stored on the Pocket PC’s CF Card currently installed there.
By the Way
Selecting the next Quick Connect menu, Mobile Device Settings, opens the same window as the initial Mobile Device Center’s Set Up Your Device option that you see the very first time you connect your device to your computer and no sync settings have been made.
Visiting the Sync Center
In spite of its name, Vista’s Sync Center is not where you specify and adjust your mobile device’s synchronization partnerships. Instead, the Sync Center, shown in Figure 39.10, is a central location where you can view results of your mobile device synchronization.
Figure 39.10. The Sync Center is just a shell to manage mobile device syncs.
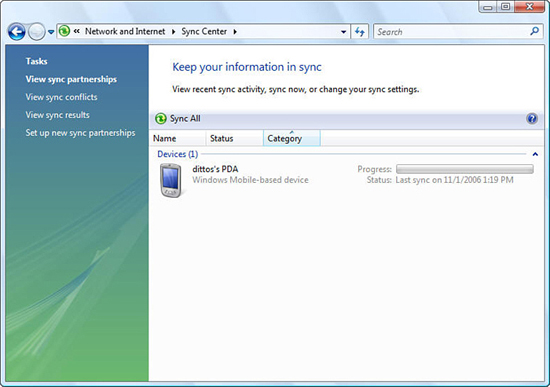
As with most users, you probably have at most one mobile device to connect to your computer. Figure 39.10 shows the same device partnership shown earlier in the chapter throughout the Mobile Device Center’s discussion.
The Sync Center has no sync software available. Sync Center only manages other synchronizing software. If you only have one mobile device and you use the Mobile Device Center to set up your partnerships, you don’t use Sync Center to change the partnership but only to trigger syncs when you need to sync and view results. For example, a problem may occur if your mobile device is set to sync to a specific file folder on your computer and you delete that folder. If this occurs, the Sync Center’s View Sync Conflicts option displays the problem that occurred.
If you happen to connect multiple mobile devices to your computer, you may find more use for Sync Center than if you just connect one. By connecting all your devices to your computer and viewing the sync results from within Sync Center, you get a bird’s eye view reporting of all that took place. The Sync Center keeps track of a synchronization history of when your syncs began and ended for each device you connect. You can view that history (from the View Sync Results option) to troubleshoot potential problems if a sync doesn’t go as expected.
Chapter Wrap-Up
Mobile devices are not only handy; they are usually fun, too. You can synchronize certain folders to include music that you want to take on a trip, and sync the tunes to your mobile device as well as with more important information such as your business contacts and email and appointments from your Outlook Calendar.
Synchronizing files and folders and Outlook data items manually takes a lot of effort. So much manual effort is required that you will rarely leave with your mobile device and have everything you need on it. By setting your mobile device’s partnership settings and periodically reviewing those settings, you can help ensure that you have whatever data you need when you leave home or the office.
The next chapter introduces you to Windows Mail, a program that manages both email and newsgroups on your Vista computer. Windows Mail is an improved version of the Outlook Express program that came with earlier versions of Windows.