
Chapter 16. Going Digital with Your Camera or Scanner
In This Chapter:
- Get pictures onto your Vista computer
- Use a network to transfer pictures
- Transfer pictures from a camera to your PC
- Import pictures to Windows Photo Gallery
- Grab pictures from your scanner
Vista’s Photo Gallery program is a welcome addition. Windows XP’s My Pictures folder didn’t allow for digital photo editing or extensive picture management. Photo Gallery enables you to organize your pictures, perform routine edits, and perform common picture tasks with your digital photos such as sending them to friends and family via email.
Before Photo Gallery can work with pictures, you must get those pictures on your computer. You might already have some pictures on your computer, but if you have a brand new PC, you’ll want to get the pictures off your other PC so that Vista can work with them. In addition, you might use a digital camera or scanner to take digital pictures and want a quick way to get pictures from those devices to your computer.
This chapter shows you how simple it is for Vista to download pictures from your camera or scanner and how to transfer pictures from your older PC, if you have any there. When the pictures arrive on your primary Windows Vista machine, you can use Photo Gallery to rate and tag them; that kind of organization allows you to find any picture you want when you need it.
Getting Pictures onto Your Computer
If you purchased a new computer with Windows Vista and want to get your older computer’s pictures to your new Vista-based machine you can transfer files by copying them from the older computer to your new one if you network them. Without a network, you’ll have to back them up to an external hard disk or a removable storage medium, such as a CD, DVD, or USB flash memory drive.
By the Way
If you installed Windows Vista as an upgrade to a previous version of Windows, any digital pictures you already had stored on that computer are still there and available to you.
The following sections explain some of the best ways to get pictures onto your Windows Vista computer.
Moving Digital Photos to Your Vista-Based Computer Over a Network
When you buy a new computer, a common question is, What do I do with the old one? You might choose to donate it to a private school or perhaps give it to charity. If your family has several members, younger members often get the computer hand-me-downs and are usually grateful when that occurs.
By the Way
Society’s come a long way hasn’t it? Hand-me-down clothing was the way families traditionally get extra life out of their needed items. Now, it’s hand-me-down computers. Computers go out of date so rapidly these days, technically, that second-hand computers aren’t worth much more money than second-hand clothing!
If you end up with multiple computers in your home, there’s no reason not to network them. You don’t even have to run cables, with wireless network hardware available at such low prices.
By the Way
This section’s procedures work not only for digital pictures but also for any files you want to transfer from one computer to another.
Before transferring your pictures from the older computer over your network to the new computer, you must make sure that the pictures are stored in a shared folder. Most Windows XP computers have a folder called Shared Documents that you can see in any Windows Explorer window.
Watch Out!
Data is relatively simple to transfer from one computer to another. Computer programs, such as Adobe Illustrator, are virtually impossible to transfer over a network from one computer to another. Programs do exist to help you transfer programs from one computer to another, but they are rarely 100% successful. The only way to ensure that you successfully transfer programs is to reinstall the program from the original program CD or downloaded installation file on your second computer. (Most copyright restrictions don’t permit you to run the program on two computers at once.)
After you connect the computers in a network, open two Windows Explorer windows in Vista. The shortcut key to open an Explorer window is to press Windows+E (or open the Start menu and click the Computer or Documents links). Adjust the windows so that each takes up half your screen. That way you can see the contents of each Explorer window. One window acts as your source window and shows the older computer’s disk contents. The other window acts as your target window and shows your new computer’s contents.
On the target computer, your new Vista machine, locate the folder where you want to store photographs. Assuming that you don’t have any security issues, the simplest location is to place them in your Public folder’s Public Pictures folder (beneath your Public folder) because your Vista machine will readily accept files there and then users on your Vista computer can grab the pictures they need from the Public Pictures folder and store them in their individual accounts’ Pictures folders. Use your Vista Explorer window’s Folder navigation pane (the Explorer window’s left window pane) to locate the folder to which you want to copy the pictures from the older computer.
Did you Know?
Even though Vista offers a custom Pictures folder for each user account on the system, you can create a new folder for the transferred pictures if you like. Locate the place where you want to store the pictures, right-click in the Explorer window, and select New, Folder. Give your folder a name, such as OldPCPics. When the new folder’s icon appears in your Explorer window, double-click it to open that folder and you can transfer your pictures there.
In your computer’s other Explorer window, the one that shows the older PC’s files that you moved into your Shared Documents folder, select Network in your Vista’s left navigation pane (in the Folders section that appears when you click the arrows to the right of the word Folders in your Navigation pane) and scroll down until you see the other computer’s name. Double-click the computer’s name to display all that computer’s shared folders. Locate the shared folder where you stored the pictures to move and double-click that folder to display the photo files it contains.
To move the pictures, simply select the pictures to move on the source computer’s Explorer window and use your mouse to drag those pictures to the target computer’s Explorer window. Figure 16.1 shows the result of such an operation. The pictures from the older, source computer in the bottom Explorer window are now on the Vista-based computer as the top Explorer window shows.
Figure 16.1. Copying between two Explorer windows is perhaps the simplest way to transfer files between computers.

By the Way
When dragging files between two network computers, Windows performs a copy and not a move. Therefore, the files still reside on your older, source computer after the operation finishes. If you want to move the files instead of copying them, use your right mouse button to drag the files to your target computer’s Explorer window. When you release your right mouse button, a pop-up menu appears. Select Move and Vista knows to remove your pictures from the older computer after they transfer to your new computer.
If you don’t have your computers networked, you will have to copy the photos and other data that you want to transfer to data CDs or DVDs. Chapter 15, “Managing Your Entertainment Experience with Media Player,” explained how to create data CDs and DVDs from within Media Player.
Getting Pictures from Your Digital Camera
If you’ve used your digital camera often, you will find that Vista quickly recognizes it and can access the pictures there with ease. When getting pictures from your camera to your computer, you generally have the following options:
- Remove your digital camera’s memory card and insert it into your computer’s card reader.
- Use a USB cable to connect your camera to your PC.
By the Way
Some digital cameras now include a wireless networking option. If yours does, your camera’s instructions explain how to get your computer’s network to recognize your camera. From there you can easily drag files from the camera’s memory to your computer’s disk using the method described in the previous section.
Transferring Pictures with a Memory Card and Card Reader
If your Vista computer has a memory card reader that can read the same memory sticks (sometimes called memory sticks or compact flash) that your camera uses, you may find that it’s faster and easier than cabling your camera to your computer. Instead, just pull out the memory card from your digital camera and insert it into your computer’s card reader. When you insert the card, Vista displays the AutoPlay dialog box shown in Figure 16.2.
Figure 16.2. The AutoPlay dialog box appears when you insert your digital camera’s card into your computer’s card reader.

If you select View Images, Photo Gallery appears and displays the first image in its viewing area. Actually, you are seeing the Photo Gallery Viewer, a version of Photo Gallery that enables you to manage single pictures at a time. You can edit, crop, resize, and do various other tasks with your pictures, as well as click the control buttons at the bottom of the Photo Gallery Viewer to see additional pictures on your camera’s memory card, but you are not working within the full-featured Photo Gallery.
You can also select the Media Center option to view your pictures. This option is nice if you’re on a computer dedicated for use as a Media Center machine and you want to show your pictures on a larger TV screen connected to the computer. You also might not want to store the pictures on the computer. For example, you might just want to show off pictures you have on your camera to friends and family using their Windows Vista PC.
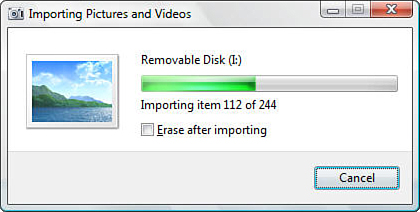
Most of the time, you will want to transfer pictures from the memory card to your computer. The Import Using Windows option is by far the easiest way to do this. Select the AutoPlay dialog box’s Import Using Windows option. If you accept all the defaults and click OK, Vista begins transferring a copy of the memory card pictures to your Pictures folder, as shown in Figure 16.3. Vista creates a new folder and names it with the current date, such as 2007-10-29. After the pictures are on your disk, you can use Photo Gallery to edit and manage them.
Figure 16.3. Vista shows the progress as the pictures transfer from your camera’s memory card to your computer.
Did you Know?
You can add tags to your imported photos now, or later in Photo Gallery. A tag is a descriptive word or set of words attached to your pictures. It acts as a property for the pictures just as the filename and file size properties do. In Photo Gallery (and in Media Player) you can view your pictures’ tags, search on tags, and organize pictures by their tags.
If you just returned from vacation in Italy, you might want to tag the pictures Italy Vacation 2007, for example. You can change and add tags later but by adding an initial tag now, you’ll be better able to tag this group of digital photos more accurately, making them easier to sort out from all your other photos. You can add multiple tags when prompted by separating the multiple tags with semicolons.
Transferring Pictures Directly from Your Camera to Your Computer
When you connect your digital camera to your computer with the camera’s USB cable, your computer should recognize your camera and treat it as a disk drive with the pictures on the camera’s memory card acting like files on a disk.
You must turn on your camera before your computer will sense your camera’s presence. When the connection is established, the AutoPlay dialog box shown in Figure 16.2 appears and you can make your selection. As when using a memory card in your computer, when connecting your camera to your computer, the Import Using Windows option is the fastest and easiest way to get the pictures onto your computer’s disk where you can work with the pictures in Photo Gallery.
Watch Out!
Email is not an effective way to transfer lots of images from one computer to another. Email often has size restrictions and if your images are large, you cannot send many of them in a single email.
Importing from Your Camera or Scanner Directly into Photo Gallery
Photo Gallery enables you to import digital pictures directly from your digital camera or scanner. If you often work within Photo Gallery, this makes more sense than using the methods in the previous sections. The methods described earlier in this chapter, however, work for everybody who wants to get digital pictures onto a Vista-based computer, whether or not they use Photo Gallery extensively. Some might feel that Media Player provides all the power they need to manage their pictures and so they open Photo Gallery only to edit photos.
If you work in Photo Gallery, though, you might as well take advantage of Photo Gallery’s import procedure. By using Photo Gallery, you can directly import pictures from your digital camera or from your scanner.
By the Way
Your digital camera can hold any number of pictures, depending on how much storage space it has. Your scanner scans one picture at a time. When importing pictures from your digital camera, you start Photo Gallery, start the import, select your camera, and then import the pictures. When you import a picture from your scanner, however, Photo Gallery doesn’t actually import a picture that’s already there. Instead, Photo Gallery starts your scanner and captures a picture of whatever you scan. Therefore, you can grab only one picture at a time, as you scan it.
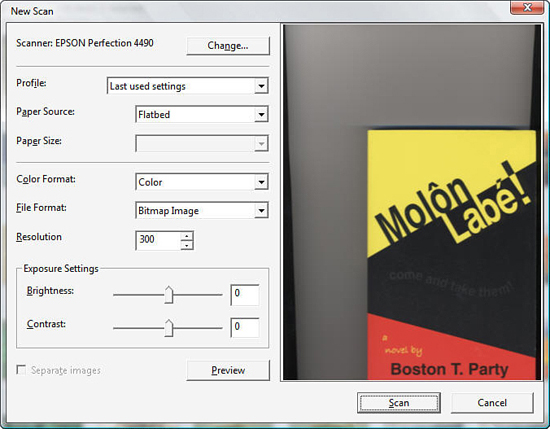
Click the File button’s down arrow and select Import from Camera or Scanner. The Import Pictures and Videos dialog box opens, and from there you can select your camera or scanner. Assuming that you want to scan pictures into Photo Gallery, select your scanner and click the Import button. Photo Gallery displays the New Scan dialog box shown in Figure 16.4.
Figure 16.4. You can scan photos directly into Photo Gallery.

Set your scanning preferences. It’s usually best to scan at one of your scanner’s highest resolutions. This ensures that the scan is as accurate as possible and you don’t lose color and crispness. Having said that, some scanners produce tremendous digital picture sizes, so you might want to work with the resolution to determine the best resolution for you.
Did you Know?
If you’re scanning items for a web page, such as you might do for an eBay auction, the default resolution is often too large because the load times for the web page with your pictures will be too long. A good resolution to scan such items is 300 dpi (dots per inch) although you’ll still have to reduce the picture size and resolution further. A 300 dpi resolution ensures that the scan is crisp and true, but not overly large (although in most cases you still should reduce the size of a 300 dpi picture if you send it as an email attachment). The higher the resolution, the longer it takes to scan an item, so you must weigh your time against your image requirements.
If you’re unsure of which settings will work well for you, the default scanning settings are not too bad and you should try them to see whether they suffice.
After setting your scanning preferences, you can get a sample of your scan by clicking the Preview button. Photo Gallery quickly scans your item and shows the scanned image in the preview area as seen in Figure 16.5. If the item is off-center or somehow not properly placed on your scanner, you can adjust the item and keep clicking Preview until you like the image.
Figure 16.5. Photo Gallery allows you to preview your scanned item.
When the preview is to your liking, click Scan and the true scan begins at the resolution and format settings you set. After the scan finishes, Photo Gallery prompts you for a tag for the scanned item in a small Importing Pictures and Video dialog box and saves the image in its gallery.
A scanned image is rarely final. You’ll want to crop the image in almost every case. As mentioned earlier in this section, you’ll probably need to reduce the picture size before sending the picture as an email attachment. As you’ll see in the next chapter, you can crop the scanned photo within Photo Gallery. Photo Gallery includes a few extras that come in handy as well, such as giving you a way to reduce the image size before sending it as an email attachment.
Chapter Wrap-Up
You can now get pictures to your Vista computer. The way you transfer pictures depends on the hardware you have. If you network your Vista computer to another computer with images, you can transfer those images (and videos) over the network. You might elect to save the images to a CD or DVD.
Getting pictures from a digital camera or scanner is simple too. You can transfer using your camera’s memory card or a USB cable connection hooked between your computer and your camera. With Photo Gallery, you don’t need standalone scanning software because Photo Gallery can grab an image from your scanner directly and store that image in your picture gallery.
Now that you’ve got pictures on your Vista computer, you’re ready to edit and organize them. The next chapter, “Modify and Share Photos,” explains how to do just that.