
Chapter 34. Saving Power with Windows Vista
In This Chapter:
- Use one of Vista’s Power Plans to save your laptop’s battery life
- Customize Vista’s power settings
- Change your computer’s response when you press the Power button
- Learn what to do if your computer stops responding
- Customize your own power settings
In today’s high-cost world of energy, it always helps when we can save some money. Windows Vista can help. Vista is able to monitor its power usage and shut down certain options after a preset time of inactivity. Vista’s energy-saving capability is most helpful when you use a battery-powered laptop or tablet PC because Vista can lengthen the amount of time between recharges.
To get the most out of your computer and to use the least amount of energy while doing so, take advantage of some of the power-saving features you’ll learn about in this chapter. Perhaps you’ll save enough money in energy costs to upgrade to the next-higher version of Vista!
Power Plan Options
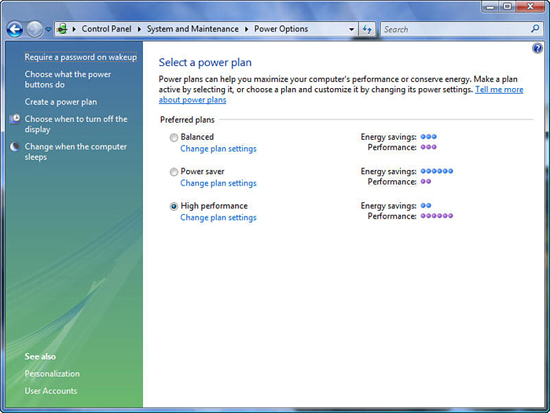
As you might expect, Vista’s power-saving options appear in your Control Panel. Open your Control Panel and select the System and Maintenance group to locate the Power Options section. Click Power Options to open the Power Options screen shown in Figure 34.1
Figure 34.1. Specify your computer’s power settings in the Power Options window.
The primary way that Windows saves power is during times of inactivity; if you stop using your computer for a while, Vista swoops in and begins to shut down various items such as hard disks and your screen. Typically, you have only to press a key to take your computer out of this power-saving state and return it in the same ready state in which you left it.
Initially, the Power Options window offers a surprisingly simple interface; just select the power plan you prefer: Balanced, Power Saver, or High Performance. Vista makes some assumptions, changes some internal power-related settings, and you’re off to saving that money (assuming that you didn’t choose High Performance, which saves the least amount of energy but maximizes your computer’s speed and performance).
By the Way
These plans are a combination of hardware and software settings. For most users, one of these plans will work just fine.
Watch Out!
Don’t look for anything called Power Schemes like those in Windows XP. Power Plans is Vista’s new name for Power Schemes.
The option you choose depends on your computing needs. If you’re running Vista on an older or slower computer that begins to get really sluggish, you might have to increase your performance at the cost of decreasing your energy savings to get the speed you need to do your work. Therefore, you will probably change your power settings over time.
Did you Know?
If energy cost is a big issue to you, select the Power Saver plan first to save as much as you can. Work with your computer a few days. If the computer’s performance is adequate, there might never be a need to change the power plan again. If, on the other hand, your computer is a little slow and cranky, upgrade your power plan to Balanced to see whether you get the performance you want. If not, select High Performance and forsake the energy savings for a more robust computing experience.
About Your Computer’s Power Consumption
Computers don’t consume a lot of power. Your printer is likely the biggest single energy consumer of your computer system, especially if you use a high-speed laser printer. If you’re like most computer users, you don’t need your printer turned on all the time, so your printer’s power consumption doesn’t have to be a primary consideration for you. In addition, printer manufacturers are getting stricter about their own products’ power consumption. A heavy-duty color laser printer from Hewlett-Packard, for example, goes into an energy-saving standby mode if the printer sits idle for 20 minutes or so. The power drain when in this idle mode is minimal.
If you use an LCD flat-screen monitor, your monitor’s power drain is far less than it was a few years ago with tube-based CRT monitors. Of course, many computer users now run two or more monitors on a single computer, doubling or tripling their monitor’s power consumption. That could be an issue for you, and you might want to turn off your monitors when you leave. By doing so, you save a little energy, but not as much as you’re used to; Vista powers down your monitors if you walk away from your computer for a while unless you instruct Vista never to do so.
Laptop manufacturers are especially cautious about balancing the power-versus-performance of the machines they sell. The length of a single battery charge is a primary consideration for many users. Travelers who use their laptops in flight, for example, want their charged laptop’s power to last during an entire cross-country flight. Although it’s true that more and more airplane seats are equipped with laptop power outlets (requiring a special power plug, not the kind that works in an automobile), being able to run on a battery without getting out the power cord is always nice.
Laptop makers realize that their users want the fastest laptop possible with the longest battery life available. Surprisingly little battery life extension has been seen since the first true laptops were sold almost two decades ago. Battery life typically runs between two and four hours, although some of the thinner and lighter laptops are beginning to widen that threshold in an effort to approach a solid eight-hour charge, as is possible with some smaller PDA devices and digital media players, such as iPods and Zunes.
Did you Know?
If you use a laptop, you don’t have to open your Control Panel to display or change your Power Plan. Click the battery icon at the right of your taskbar. Vista displays a window showing how much battery life remains, whether you’re plugged in to an AC outlet, and which Power Plan you have set. You can click any Power Plan to choose another. In addition, you can click the Windows Mobility Center to open the window shown in Figure 34.2, which displays several laptop settings related to power and your portable computer.
Figure 34.2. You can learn a lot about your laptop’s power and other settings from the Windows Mobility Center.

Customize Your Power Buttons
All computers have a power button with which you turn on and off your computer. Some computers have Sleep buttons on their keyboards that can put your computer into a low-power mode while you go do something; when you return, press any key (or perhaps Sleep, if required) to awaken your computer and you’ll be right back where you were when you put the machine into its sleep mode.
You can control what happens when you press your computer’s power or sleep button on your system unit and keyboard. To view or change what takes place when you press one of these buttons, click the Power Options window’s Require a Password on Wakeup link in the left pane. (This is one of the few Vista options that isn’t named well, but in Microsoft’s defense, it makes the same window available when you click the next link, Choose What the Power Buttons Do.) Figure 34.3’s Define Power Buttons window opens and enables you to change your button settings.
Figure 34.3. Determine what happens when you press your computer’s power or sleep buttons.

You can change the action of your power or sleep buttons to one of the following four options by selecting from the buttons’ drop-down list box:
- Do Nothing—Causes Windows to ignore any power button press. This might be useful for computers you have on display running an ad in a store or in a classroom setting, for example. Passers-by cannot turn off the computer by pressing the power button. The surprising thing about this option, however, is that it doesn’t require an Administrator user account to turn on and off; if someone has access to your computer’s keyboard he or she can change this to Shut Down and the power button will be active once again. In most situations in which the computer is being used as a display for information, however, the keyboard is often left unplugged or hidden.
- Sleep—On a desktop system, sleep mode saves all your current settings—including open windows and programs—to memory as well as to your disk drive. You can quickly resume working by pressing any key or moving your mouse, and all is back and you’re working again within seconds. If, however, the power went out and the memory shut down, the saved state of your computer will be loaded from your disk drive the next time you power on so that, within a few more seconds than normal sleep, you can be up and running again when all is restored. For a laptop, sleep mode is usually entered by closing the laptop’s lid or by pressing your laptop’s power button, if you choose that option. On desktop systems, the Start menu’s Power button causes your computer to enter sleep mode.
- Hibernate—Saves your data to your hard disk without using the quicker-to-restore memory-save feature that the sleep mode uses.
- Shut Down—Closes all windows and programs and shuts down your computer’s power.
In almost every case, it’s best to leave your desktop system unit’s power button left set to the Shut Down option so that your computer shuts down—or makes an effort to shut down—when you press the power button. Vista’s onscreen buttons in your Start menu’s right pane allow you to select exactly what you want to happen if you want to override the power button’s settings.
When you read the second half of the window, it’s obvious (now) why this window was available as Require a Password on Wakeup link in Power Options. Here, if you click the Change Settings That Are Currently Unavailable link in the top half of the window, the Require a Password and Don’t Require a Password options are activated. You can request that Vista not ask for your password when your computer wakes from sleep mode; obviously, doing so could allow anyone with access to your computer to get into your account’s files that would still be active if someone resumes your computer from a sleep mode, so use with caution.
Did you Know?
If you usually work by yourself all day at home, or perhaps with other family members such as a husband or wife with whom you share an account, you might want to turn off the password requirement when awakening from sleep mode. If you ever take your laptop on vacation, a coffee shop, or elsewhere, you should turn the password requirement back on.
Customize the Power Plans
You’re not limited to the settings in the three Power Plans you see in your Power Options window. Depending on your needs, you can customize your computer’s power settings.
You can click the Change Plan Settings link that appears beneath any of the three Power Plans to change the settings for the individual Power Plans. Click the link beneath the Balanced Power Plan and Figure 34.4’s window appears.
Figure 34.4. You can customize the settings of each Power Plan.

If you find that you often go to lunch for (at most) an hour and that sometimes you get back early and sometimes late—but you don’t want your computer automatically entering the sleep state either way—you can increase the amount of idle time that must go by before your computer enters the sleep mode by clicking the drop-down list box and selecting a different time.
If you leave your desk quite a bit during the day and don’t want others to see your files, you might want to require that your computer enter sleep more quickly for the Power Plan that you selected. In that case, you would reduce the amount of idle time required before entering sleep mode.
Watch Out!
If security is an issue, you should manually put your computer into a sleep mode or log off your user account before you leave your desk. This might be the case for employees in a payroll department, for example. It’s human nature, however, to forget to do this manually, or perhaps you get to talking, leave your office with someone, and just forget to put your computer into one of these safer states. By reducing the idle time required before your computer goes to sleep, and by requiring a password on awakening as the previous section explained, you help ensure that your computer is never logged on for very long without you.
You can also adjust the display settings to change the amount of time Vista waits before powering down your screen. If you’re really concerned about the amount of power your screen consumes, lower the time it takes to be idle before the screen goes off. When you return to your computer and press a key to awaken the machine, Vista will power on your screen again.
Watch Out!
Extremely old monitors don’t always have the capability to be turned on and off by Vista.
Far more detailed custom settings are available for you to change if you click the Change Advanced Power Settings link on the Edit Plan Settings window. The Advanced Settings dialog box, shown in Figure 34.5, offers disk drive, wireless networking cards, and more options that you can customize to turn on and off based on idle time and your needs at the time.
Figure 34.5. Several detailed settings are available to you depending on how much control over your Power Plans you wish to have.

Did you Know?
If you change something too dramatically and want to return to one of the original Power Plans and start over, click the Restore Plan Defaults button.
You’ll see that the Power Options window has two additional links in its left pane: Choose When to Turn Off the Display and Change When the Computer Sleeps. These both produce the Edit Plan Settings window shown in Figure 34.4.
Your Computer Maker Can Offer Additional Power Plans
Manufacturers are free to offer their own Power Plans to augment the three that Vista provides. Depending on what your computer maker does, you might see extra options on Vista’s power-related screens shown in this chapter. Some manufacturers might do this to take advantage of special hardware they developed or perhaps to use as some kind of “new and extended Power Plans to save you money” marketing material.
You can create your own Power Plan or Plans as well. In the previous section, you learned how to adjust each Power Plan’s details. Instead of adjusting an existing plan, you can augment them with one or more of your own. Just as you learned in the previous chapter how to create your own Sound Schemes and save them to your disk, and your own Windows Themes and save those to your disk, you can create your own Power Plans. They can enable you to change to specific power-related settings quickly and easily without having to reset and re-establish specific options each time you want to change your power settings.
To create your own plan without changing one of the existing ones, click the Create a Power Plan link in the left pane of your Power Options window. The Create a Power Plan window shown in Figure 34.6 appears. Select the existing Power Plan that most closely matches yours and then type a name for your new plan in the Plan Name text box.
Figure 34.6. To create your own Power Plan, start with the plan that most closely matches the one you want to create, give your plan a name, and specify the details you require.

After clicking Next and specifying the computer and display time settings, your new plan will appear in the list of Power Plans that you can choose from the next time you open the Power Options window. Just as you can change the advanced details of the three supplied Power Plans, you can also change your Power Plan, click the Change Advanced Power Settings link, and modify the disk, screen, wireless networking, and other settings that affect your computer’s performance and power consumption.
Chapter Wrap-Up
Finding the right balance between power and performance isn’t always easy. Usually, it’s an iterative process. You begin at the end of the scale you care about most, performance or power consumption, and you slowly change settings in the other direction until you find the final setting you can work with. For example, if you care more about a faster computer than power consumption, you should first set your computer to the High Performance Power Plan to see whether your computer performs to your liking. If it does, increase the Power Plan to a more balanced plan and see whether that works for you. If not, you might need to set your computer back to the highest-performing and lowest-energy savings possible to get the performance you want; otherwise, you’ll still have your performance but at a better energy savings.
The correct power settings are more critical for laptops where you have a limited battery life. If your battery lasts three hours at a 20% slowdown in performance, you might prefer to take the performance hit and select your laptop’s Power Saver plan even if you prefer performance over energy savings. You might do this if it means you can make it through that entire train or plane ride on a single battery charge.
In Chapter 33, “Configuring Windows Vista,” you learned about themes. After you get your computer set the way you like it, you’ll be able to store your configuration settings in a theme file that you name and can later restore. Saving multiple themes gives you the ability to change your Windows look and behavior when you want to change how—or where—you use your computer. In this chapter you learned how to create and save your own Power Plans. In the next chapter, you’ll learn to back up more than just your theme files. You’ll learn how to back up your entire computer so that you can recover from a hardware failure or other emergency that could destroy your computer’s data and programs.