
Chapter 20. Dating with Windows Calendar
In This Chapter:
- Learn to manage your schedule with Calendar
- Distinguish between appointments and tasks
- Use multiple calendars to your benefit
- Change calendar views
- Create appointments and tasks
- Set alarms for important meetings
- Invite others to your appointments
- Subscribe to online calendars
Windows Vista Calendar breaks new Windows operating system ground by offering you a calendar not tied to a specific program, such as Microsoft Outlook or Act! Contact Management software. When you use Vista, your Windows Calendar program is there waiting to record a meeting or appointment or task, willing to remind you when something is due, and displaying one of multiple calendars you can set up.
In addition to scheduling and tracking your days, Windows Calendar is also shareable; when you work with others who need access to your calendars or have family members who need to keep up-to-date, Windows Calendar can be where you need it to be. Share your calendars with others and download calendars from the Internet of scheduled items of interest to you.
Introducing Windows Calendar
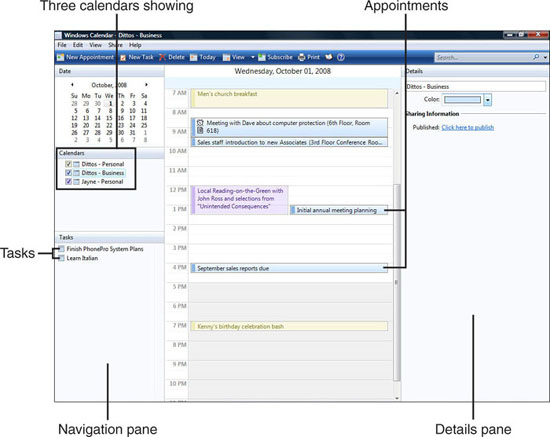
Windows Calendar, shown in Figure 20.1, tracks your schedule. Although Windows Calendar is comprehensive and supports multiple, overlaid, shareable calendars, don’t let its power sway you from using the program when your scheduling needs are simple. One of Windows Calendar’s strengths is its ease of use and its simplistic and intuitive interface. Unlike Microsoft Outlook’s somewhat bloated calendaring features, Vista’s Windows Calendar is lean enough to remain simple to use without overrunning new users with little-used, excess features.
Figure 20.1. Windows Calendar’s screen can look busy if you have a busy schedule and maintain multiple calendars, but its interface is simple and intuitive.
By the Way
Figure 20.1 shows three calendars. When Windows Calendar displays multiple calendars at once, the calendars overlay each other. Each calendar’s appointments display in a unique color so that you can easily distinguish between the calendar appointments.
Vista’s Windows Calendar works primarily with two kinds of items:
- Appointments—Items you record in a future time period that have a start and stop date and time, or perhaps lasts all day, such as meetings and parties. Appointments appear in your calendar’s screen and are attached to dates and times.
- Tasks—Items you describe that you want to accomplish at a later date. Tasks can have start and due dates, but aren’t generally linked to specific hours on a clock, as are appointments such as meetings. Tasks appear on your Navigation pane under the Tasks section header.
Did you Know?
Tasks often have start dates because Windows Calendar uses the date you create a task as its default starting date, but you can change this. Tasks don’t have to have end dates unless you want to use Windows Calendar tasks for goal-setting to achieve goals that you enter as tasks within a specific timeframe. Projects, such as business plans that have to be complete by an agreed-to time, also might be tasks for which you specify end dates.
Windows Calendar keeps its appointments and tasks in the popular iCalendar format so that you can easily share your calendars with others.
Using Multiple Calendars
If you’re the only one who uses your computer and if you want to maintain only one calendar, Windows Calendar does the job. You will work with a single calendar. All the dates that display belong to that single calendar. Even if you’re the only one who uses Windows Calendar, you can still take advantage of Windows Calendar’s multiple calendar feature when you break your own appointments into helpful categories where each category is contained in a separate calendar. For example, you might create a personal calendar and a business calendar.
Did you Know?
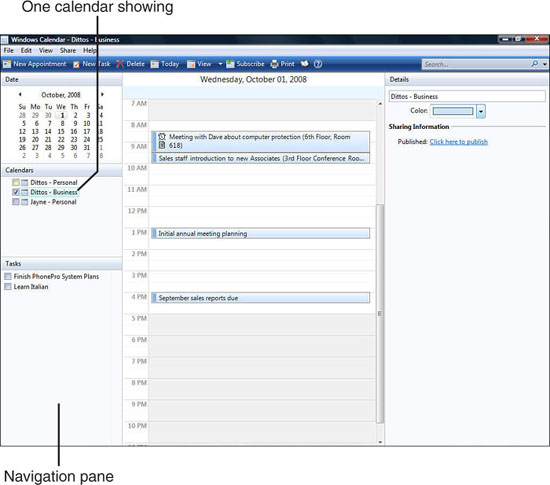
If you display multiple calendars but want to show dates from only one of them, as you might do if you want to check your personal schedule without your business calendar appointments getting in the way, just click to uncheck the calendar (or calendars) you don’t want to see. Figure 20.2 shows the same calendar shown in Figure 20.1 except only the business calendar appointment displays because the other two calendars are unchecked.
Figure 20.2. Uncheck the calendar you want to hide so that you see only the appointments you need to see.
To create a new calendar, select File, New Calendar. Windows Calendar doesn’t clear your screen of any calendars or appointments currently showing. Instead, Windows Calendar simply adds a new entry in the left window pane (called the Navigation pane) in the Calendars section and highlights the new name text, New Calendar, so that you can change it to a meaningful name such as Paula’s Personal or Mike’s Business.
By the Way
Calendar names can be long (256 characters seems to be the limit), but at most only about 27 characters will appear in the Navigation pane’s Calendars section depending on your screen’s display setting.
You can create as many calendars as you need. You’ll learn new ways to use Windows Calendar’s multiple, overlaid calendar features. Everyone in a family can create his or her own calendar on the same computer. With all the calendar’s checked and displaying, the Calendar screen shows the family’s appointments. When someone from the family wants to see only his own appointments, he has only to uncheck the other calendars.
By the Way
Deleting a calendar removes all its appointments, so do so with care. Click the calendar name in the left pane’s Calendars section and press the Delete key. After confirming the deletion, Windows Calendar deletes that calendar from your screen and removes all its appointments.
Changing Calendar Views
Now that you’ve become somewhat familiar with Calendar you’re ready to learn how to change the views of your Calendar screen. You can adjust your view to see more or less detail at any one time. For example, you can view a single day’s appointments as shown in Figure 20.2, a week’s appointments as shown in Figure 20.3, or an entire month’s appointments.
Figure 20.3. You can see as much detail as you want, including an entire week’s worth of appointments.
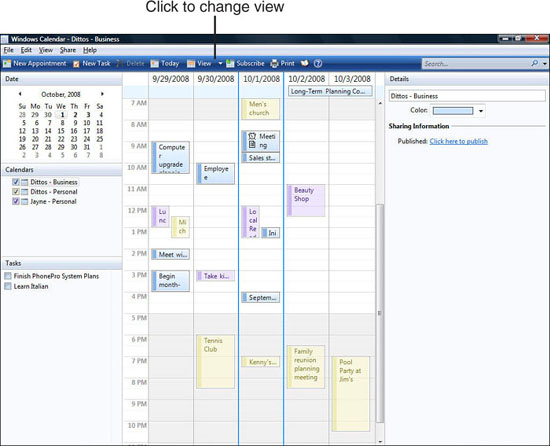
To view a week’s calendar, click the arrow to the right of the View button and select either Work Week (Monday through Friday) or Week (includes weekend days). Select Month to view an entire month calendar. In the Date Navigation pane, you can click any day to change the dates shown in the view. Click the arrows to the left or right of the Navigation pane’s month to change months.
Did you Know?
After traversing to a day, week, or month that differs from the current date, click the Today button to return to the current day’s calendar. You’ll still be viewing the current day or week or month, but today’s date will be the selected date within that view.
As when viewing a single day’s appointments, when viewing a week or month calendar, you can click to check or uncheck calendars in the Navigation pane to see only the appointments for your selected calendars.
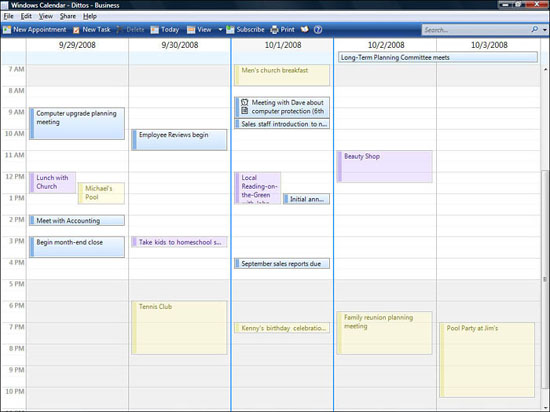
Obviously, there is not enough screen space to view all your appointments’ text when viewing a week or month at a time. You can close the Navigation pane and the Details pane by clicking the close button in the upper-right corner of either pane. Ctrl+I and Ctrl+D are the shortcut keys to close or open the Navigation pane and the Details pane, respectively. Closing one or both of these panes gives your calendar more room to display appointment text, as you can see when you compare Figure 20.4 to Figure 20.3.
Figure 20.4. When you close the Navigation and the Details panes Windows Calendar is able to show more text for each appointment.
The Details pane includes details about any selected appointment. Therefore, when viewing a week or a month view, the Details pane becomes even more important than when you view a single day where you can read more at each appointment in the calendar. Just click an appointment in any view to see the detail for that appointment. The Details pane includes the following information:
- Details—Text that describes the appointment.
- Location—The appointment’s location, such as an address or room and floor. The location appears next to the appointment’s details in parentheses.
- Calendar—The calendar this appointment belongs to.
- URL—A web address (also known as a Uniform Resource Locator) related to your meeting or appointment.
- All-Day Appointment—An option that determines whether the appointment lasts the entire work day or, when unchecked, shows that the appointment time is limited.
- Start and End—The date and time the appointment begins and ends.
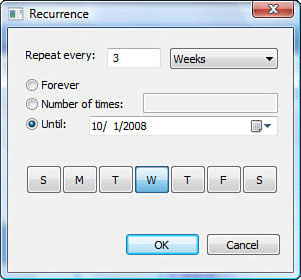
- Recurrence—An option that designates whether the appointment repeats daily, weekly, monthly, yearly, or at a less common time frame. When you select Advanced, the Recurrence dialog box shown in Figure 20.5 opens so that you can determine how often the appointment repeats, and you can limit the recurrence to a specific number of times or specify that the recurrence ends on a given date.
Figure 20.5. You can set up a recurring appointment to repeat as often as needed.
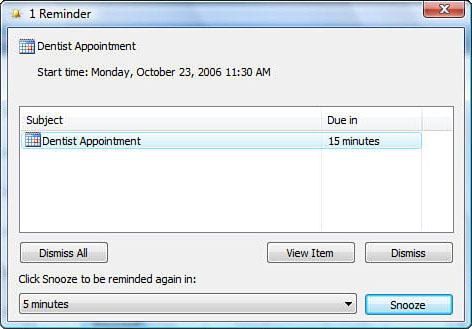
- Reminder—Determines how far in advance you want to be reminded for the given appointment. Calendar sounds an alarm and displays a reminder dialog box, such as the one shown in Figure 20.6, when it’s time to let you know about your appointment.
Figure 20.6. Calendar reminds you of your appointments.
Did you Know?
You can click a reminder’s Snooze button to get rid of the pop-up dialog box alarm temporarily and reset it to appear at the time you select for the snooze. The default is five minutes, so when a reminder dialog box sounds an alarm and pops up to remind you of an appointment, the dialog box closes when you click Snooze and reappears five minutes later. You can click Snooze as often as you want and select a snooze time to remind you of the appointment again as far away as two weeks. Obviously, for a two-week snooze time to work, the reminder must be set to remind you of an appointment farther in advance than two weeks before your appointment. You might set an important date, such as your anniversary, with a one-month reminder and then select a two-week snooze to be reminded two weeks before the date.
An alarm clock icon appears next to the details of any appointment that contains a reminder to let you know you’ll receive a reminder before the appointment is due.
- Participants—Displays the list of optional participants in your appointment and includes an Invite button to invite others from your address book (such as those found in your Microsoft Office Contacts folder or your Windows Contacts entries) to attend, with emails that include the meeting details requesting their presence.
- Notes—Detailed notes about the meeting that are too lengthy to put in the Details box. The Details box contains appointment details that appear in your calendar and reminder and the Notes text supplies more detailed information that you want to attach to the appointment for later reference but that don’t clutter your calendar or reminders.
These fields inside your appointment’s Details pane are mostly optional. Obviously, if you create an appointment that is not an all-day appointment, you have to specify a beginning and ending time for the appointment. In addition, all appointments require that you type something in the Details box so that you know what an appointment is for when you see it in your calendar or displayed in a reminder dialog box. You fill in these appointment details when you create an appointment.
By the Way
Tasks have many of the same details as appointments, but also support task-specific details such as a priority level and a completed option.
Creating an Appointment
One of the quickest ways to create an appointment is to click to select the calendar the appointment goes with. Click the daily calendar view and click the time when the appointment is to begin. When you click the New Appointment button, Windows Calendar creates a colored entry in your current calendar, displays the Details pane, uses the selected day and time for the appointment’s start time, and fills in the Details box with the text, New Appointment.
You can then type over the New Appointment text to give the appointment a meaningful description and fill in any remaining details that apply to your appointment. For example, if the appointment lasts two hours, you’ll want to override the default 30 minute appointment length and change the end time accordingly.
Did you Know?
You can change the default 30-minute appointment length on Windows Calendar’s options page. See “Adjusting Windows Calendar’s Options” later in this chapter to learn more about Windows Calendar’s options.
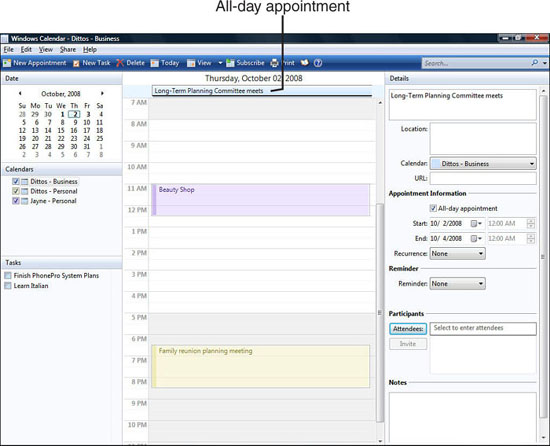
Click to check the All-Day appointment option if your appointment is to last the entire day. All-day appointments always appear at the top of the day’s calendar no matter which view you’re displaying at the time. For example, Figure 20.7 shows a day with two appointments (each for different selected calendars) and one all-day appointment, a long-term strategy session. The all-day appointment doesn’t have a specific start and stop time because its duration is the entire day. Perhaps Calendar should show such all-day appointments as long, highlighted appointments that show throughout the entire day’s calendar, but such an appointment has no start and end times and the appointment would appear to last from one minute past midnight to midnight 24 hours later and that doesn’t truly reflect the nature of an all-day appointment.
Figure 20.7. All-day appointments appear at the top of your calendar day.
By the Way
The appointment’s colored entry in your calendar expands or shrinks depending on the length of the appointment. If another calendar’s appointment overlaps your new one, you can distinguish between the appointments at a glance because each appointment is in that calendar’s default color. Windows Calendar puts multiple appointments that overlap on different calendars next to each other and will not put one appointment from one calendar on top of another.
Did you Know?
Instead of entering a stop time, you can drag an appointment’s bottom, colored edge down or up to change the appointment’s ending time.
To delete an appointment, simply click to select the appointment in any calendar view and press Delete.
Watch Out!
Windows Calendar does not support an Undo command for deleted items! If you delete an appointment or task, you must re-enter that appointment or task all over again.
To change the details of any appointment, click the appointment. Press Ctrl+D if the Details pane isn’t currently showing, and change any details related to that appointment.
To designate who is to attend, type the attendees’ names or email addresses in the Attendees text box or click the Attendees button to display a list of contacts. From the list, select one or more contacts and click the To button to add them to your meeting attendees.
If you want to invite others to your appointment, click the Invite button and select contacts that have email addresses to invite. Windows Calendar will send those persons an invitation to your appointment and include all the appointment details.
Did you Know?
Fill in as many details as possible for the appointment before you invite others. That way, Windows Calendar can include all the appointment’s details in the emailed invitations.
Creating a Task
Creating a task is similar to creating an appointment, but is even easier because tasks don’t typically start and stop at preset time intervals and you don’t invite others to attend a task as you do for appointments.
Select the calendar the task goes with. Then click any time on the day the task is to begin and click the New Task button. Windows Calendar adds a new task to your Navigation pane under the Tasks section, displays the Details pane, uses the selected day for the task, and fills in the Details box with the text, New Task.
You can then type over the New Task text to give the task a meaningful description and fill in any remaining details that apply. For example, you can assign a priority to your task: Low, Medium, High, or None. The reminder you use for tasks is far less specific than for an appointment reminder that is detailed from five minutes to two weeks. A task reminder must begin on a date you specify and the default is the task’s start date.
By the Way
Unlike upcoming appointments, your tasks always appear on your screen in the Navigation pane’s Tasks section, so task reminders might not be as critical as appointment reminders.
When you finish a task, click to select the task and its Details pane. Click to check the Completed option to show that the task is finished. You can also click to check the box to the left of the task in your Navigation pane’s Tasks section to show the task’s completion. All completed tasks remain in your Tasks list, with the completed option checked, for as long as you’ve set them to do so in Windows Calendar’s Options dialog box.
Adjusting Windows Calendar’s Options
Select File, Options to display Figure 20.8’s Options dialog box. Windows Calendar’s options relate to certain behaviors of the program, such as the default appointment length and reminder times.
Figure 20.8. You can adjust Windows Calendar’s options to modify the default values Windows Calendar uses when you create appointments and tasks.
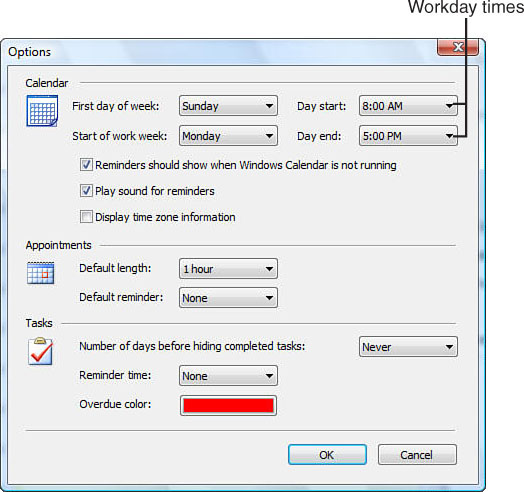
You can change the following options in the Windows Calendar program:
- Starting Day of Week—Determines the day of the week that shows first as well as the start and end times of the workday hours.
- Reminders Display Option—Determines whether reminders sound their alarm and display reminder dialog boxes whether Windows Calendar is running or not running. Just because you don’t start Windows Calendar doesn’t mean you don’t want reminders of appointments that come due. If you don’t want an audible reminder to sound when a reminder box pops up on your screen, click to uncheck the option labeled, Play Sound for Reminders.
Did you Know?
If you drag Windows Calendar to your Windows menu’s Startup folder entry, Windows Calendar will start every time you start Windows.
- Time Zone Information—An option that displays time zone information, useful especially if you travel in multiple time zones.
- Default Length and Reminders—Determines the default length of time Windows Calendar uses for new appointments and reminders for those appointments you request reminders for.
- Completed Task Duration—Determines how long checked, completed tasks appear in your Tasks list.
- Reminder Time—Determines the time of day that Windows Calendar reminds you that a task is overdue.
- Overdue Color—Determines the color used to mark overdue, uncompleted tasks.
After you change an option, click OK to close your Options dialog box and put your option settings into effect.
Searching for Appointments
After you add many appointments and tasks, finding certain ones can be difficult. As with much of Windows Vista, Windows Calendar includes a powerful Search box that quickly locates tasks and appointments you want to find.
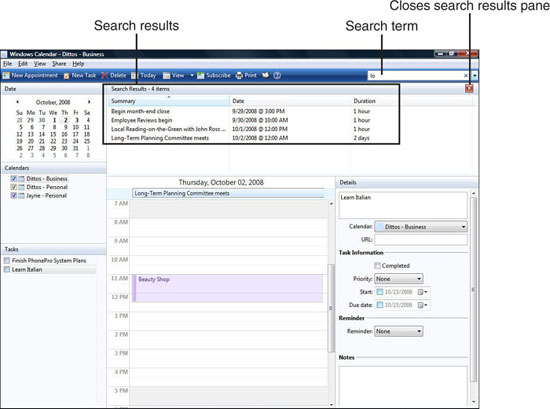
Start typing letters in Windows Calendar’s Search box that correspond to the appointment or task you want to locate and Windows Calendar immediately begins narrowing the search to appointments or tasks that contain your search term. As Figure 20.9 shows, typing the letters lo in the Search box immediately locates several appointments and tasks with those letters. You can finish typing your search term to keep narrowing down the search, but if you see the appointment or task you want to view in the search results list, double-click that entry and Windows Calendar opens that item’s day so that you can read or edit the details for that item.
Figure 20.9. As you type letters to include in your search, Windows Calendar begins matching appointments and tasks to your search term.
Sharing Calendars
To let others know about your calendars, you can share them with others on your network or in a web folder if your company’s network administrators have set up web folders for office sharing. In addition, others can share their calendars with you and you can subscribe to shared calendars of others. (The next section, “Subscribing to Calendars,” explains how to subscribe to calendars that others offer to share with you.)
By the Way
You must have set up at least one mail profile setup to announce your shared calendar to others on your network. In Windows Mail or Microsoft Outlook (or any similar mail program you might use with Vista) create a new email account if you have not done so already. Without the account, Windows Calendar has no way to get your calendars published or sent by email for others to use.
Follow these steps to share a calendar:
- Click to select the calendar you want to share (if you use multiple calendars).
- Click the Share menu option and select Publish. Windows Calendar displays the Publish dialog box shown in Figure 20.10.
Figure 20.10. You’ll publish your calendar when you want to share it with others.
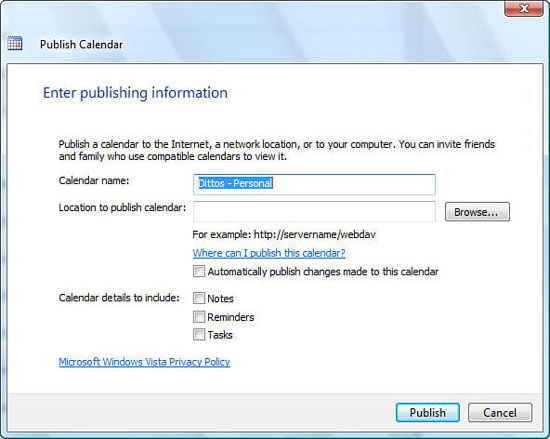
- Type a new name that others will see for your shared calendar if you want to use a different shared name from the one you use in Windows Calendar.
- Enter a location to publish your calendar. You can enter a network location for which you have access, such as a shared folder, or a web folder that people on the Internet can see. Click the Browse button to select a location to publish to. If you work in a networked, group environment in a business, you might have to contact your network administrator to determine the best location for your shared folder. It must be a location you have write access to and a location that others can read from. For home users, publishing to one of your Public folders ensures that everyone who uses your PC or who networks to your computer in a home or small office environment can subscribe to your calendar and get regular updates automatically.
- Click to check or uncheck the Automatically Publish Changes Made to This Calendar option. Any time you subsequently change the calendar that you’ve published, this option ensures that Calendar will apply that change to your published calendar as well.
- Click one or more options to select notes, reminders, or tasks you want to share with the published calendar. The notes are contained in each appointment’s Details pane.
- Click Publish to send the calendar to the shared location where others can now subscribe to it and see your calendar along with any they have created or subscribed to within their own Windows Calendar program. When it finishes sending the calendar to your shared location, Windows Calendar displays a Publish Calendar dialog box like the one shown in Figure 20.11.
Figure 20.11. Calendar lets you know when it’s time to announce your shared calendar.
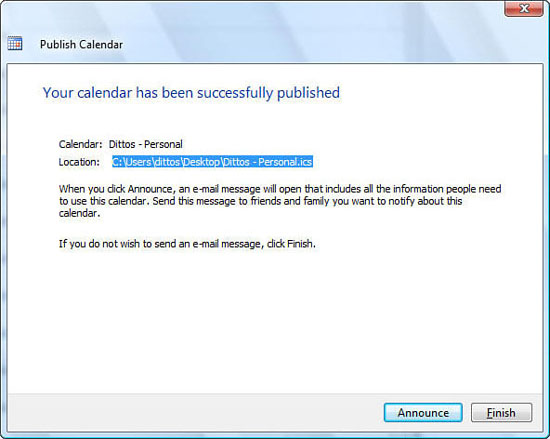
- After publishing your calendar, it’s time to let others know that they can subscribe to, or share, your calendar. Click the Announce button to send your calendar to everyone you’ve created a Calendar profile for in your Control Panel.
- Users can subscribe to your calendar directly from the email they receive or through the website you published your calendar to.
If sharing calendars with family members on your same computer or on other computers in the same household you’ll find that using the Share, Send Via E-Mail option is slightly easier to understand than using the Share, Publish option. While there is a drawback in that updates are not performed automatically, each user can still import an emailed calendar when you send one in order to get the latest updates.
Assume that you maintain a calendar of family events and you want others in your household to get a fresh copy of your calendar to overlay their own, individual calendars. To do that, follow these steps:
- Click the calendar you wish to share and select Share, Send Via E-Mail. Windows Calendar opens a new Message window and attaches the selected calendar’s .ics file.
- Fill in the recipient’s email address. If you want to send the calendar to multiple recipients in your family, separate each email address with semicolons.
- Click the Send button to send the email to all the recipients in your family.
- Upon logging into their account, each recipient will then get an email with the current family calendar. They can save the calendar to their Documents folder (or to any folder they wish to create). Even if they use the same computer you used to send the calendars they can receive and save this emailed calendar once they log onto the computer.
- Each user then selects File, Import, browses to the location of the saved calendar from your email, and clicks the Import button. The updated family calendar now appears along with their other appointments.
Watch Out!
If you or someone else imports a calendar with the same name as another calendar, as might be the case if you send a new version of a calendar that you’ve previously sent to your family members, a new copy of the calendar will appear in their calendar list. Each user can delete the old calendar when the new one arrives to replace it.
Subscribing to Calendars
As Vista matures and more people use Windows Calendar, more websites such as entertainment and sports sites will provide calendars you can subscribe to. A Marvel Entertainment site might, for example, publish calendars that show its upcoming movie release in theaters and on DVD and you need only subscribe to that calendar to know when something that you want to see is about to arrive. The calendars that you subscribe to become just another named, overlaid calendar in your Windows Calendar program window that you can monitor and work with, getting reminders when things are about to take place.
Subscribing to a published calendar on the same computer or on a network, as might be the case in a family or small business environment, subscribing is simple as long as the calendar is located where the other users can access it such as a Public folder. By publishing to a Public folder, any user on your network or who shares your computer only has to click the Subscribe button, type the location and name of your calendar, and click Subscribe to get regular and automatic updates. If you’ve sent an announcement then a link to do this appears in the announcement email they receive so they don’t have to know the exact shared location to subscribe to your calendar. They just need user access to that location.
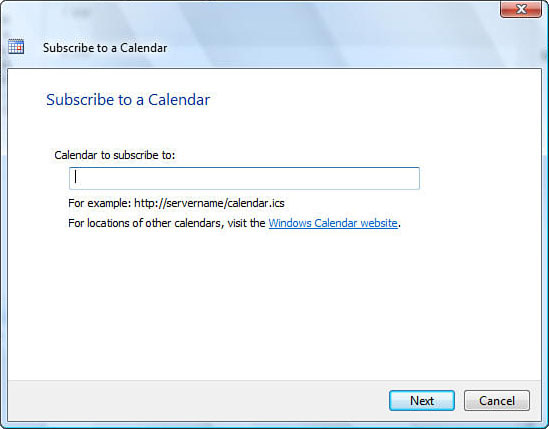
To subscribe to a calendar online, you can download a calendar from a website and then click the Subscribe button to display Figure 20.12’s Subscribe to a Calendar dialog box where you type the location of the saved calendar. Windows Calendar then imports the calendar’s appointments and tasks into your collection of calendars.
Figure 20.12. Tell Windows Calendar where the calendar you want to subscribe to is located.
Did you Know?
If you don’t know of any calendars on the Web that you can subscribe to, click the Subscribe to a Calendar dialog box’s Windows Calendar Web Site link to locate useful calendars available for you.
By the Way
If you receive an email of an available calendar you can subscribe to, the email generally has a link to download the calendar so that you don’t first have to visit a website to get the calendar.
Printing Calendars
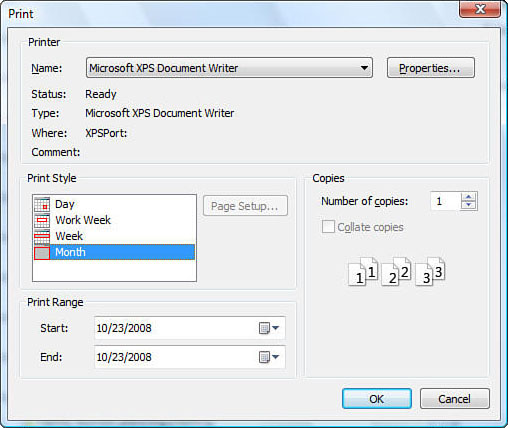
Printing a calendar is simple, but does support slightly more options than printing other items such as a word processed document. You’ll need to tell Windows Calendar how you want the printed calendar to look and what date range you want to print. When you click the Print button at the top of your Windows Calendar’s screen, the Print dialog box shown in Figure 20.13 appears. Select what you want to print, such as a day, work week, full week, or month, and then select a date range to print using that date view. When you click the OK button, Windows Calendar begins printing your calendar.
Figure 20.13. Tell Windows Calendar how you want your printed calendar to look and what date range to print.
Chapter Wrap-Up
Vista’s Windows Calendar is a full-featured calendar tool that enables you to track appointments and tasks, get reminders, invite people to meetings, and share your calendars with others. It’s the calendar sharing that turns Windows Calendar into a true, enterprisewide application; you can subscribe to calendars from websites and overlay those calendars onto your own to track multiple kinds of appointments and tasks you’re interested in.
The next chapter begins Part V, “Automating Vista,” in this book. There you will learn several ways that Vista can automate tasks such as running programs at set times without your intervention. You will also learn new ways to command and control your computer as you see the various ways that Vista’s interface stays flexible and accessible to relate to your needs and requirements.