
Chapter 21. Scheduling Tasks to Run Later
In This Chapter:
- Learn how to schedule programs to run later
- Understand the Task Scheduler’s busy screen
- Change the way a scheduled task runs
- Determine a scheduled program’s filename and location
- Use program arguments for hands-off program execution
- Set up Disk Cleanup as a scheduled task
- Run scheduled tasks even when you’re not logged on to the computer
When you want to run a program, such as Microsoft Access, you know to click the Windows Start button, locate the program on Windows Vista’s Start menu, and click the program’s menu entry. If the program’s icon resides on your desktop or on your Windows taskbar, you just click the icon to start the program.
Although you’re the catalyst that triggers most program executions, you might prefer that Vista run certain programs at certain times. For example, you might want to schedule a backup program to run in the middle of the night when you’re away from your computer. Or perhaps you want to run a disk-optimizing program like Disk Cleanup every week or two to keep your system running smoothly.
By the Way
Chapter 32, “Improving Disk Performance and Storage,” describes Disk Cleanup and explains its options.
Windows Vista includes Task Scheduler, which will run the programs you designate at the time and day you designate. You can set up recurring program executions such as scheduling a daily backup of your data files and a monthly backup of your entire system. In this chapter, you learn how to start Task Scheduler and schedule programs to start when you want them to run. Using Task Scheduler to schedule a program isn’t difficult, but some programs that you schedule require extra options that aren’t always obvious. This chapter uses the Disk Cleanup program as an example of how to schedule programs to run at specific times, and you can apply what you learn here with Disk Cleanup to any program you want to run regularly, such as a backup program.
Opening Task Scheduler
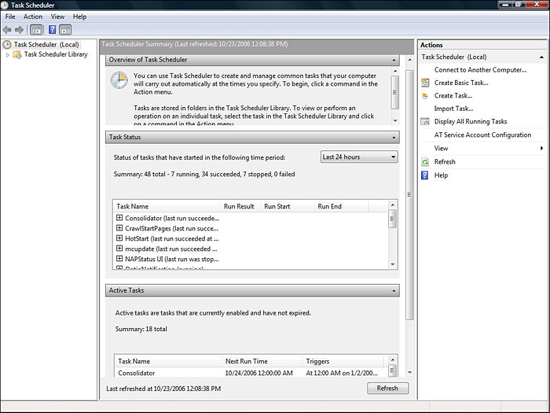
You access Task Scheduler from the Start menu’s Accessories, System Tools folder or from your Control Panel’s System and Maintenance group. The opening Task Scheduler program window is shown in Figure 21.1.
Figure 21.1. The Task Scheduler program window can get busy.
By the Way
You might have to click Continue to verify that you give Windows permission to start Task Scheduler. Only users with Administrator privileges can start Task Scheduler, although if you’re the sole user of your computer, your account is probably designated as an Administrator account.
When you start Task Scheduler for the very first time, you might be surprised by the number of programs listed in the center window pane, titled Task Status. The list of programs might not even look familiar; you’ll find entries such as CrawlStartPages. These are system tasks that Vista has scheduled to run automatically, at various times, depending on your system settings. You don’t need to concern yourself with them unless you want to adjust the way one of the system programs behaves or cancel a system program’s automatic execution altogether.
Watch Out!
It probably goes without saying, but you should never remove a Task Scheduler program that you’re unfamiliar with and that you did not add yourself. The system programs listed in Task Scheduler by default can be crucial for the proper execution of Windows Vista.
Generally, you’ll want to add a few programs of your own to Task Scheduler’s task list. As you learn more about Vista’s offerings and as you add new programs to your computer over time, you will revisit Task Scheduler to add and change the programs that run automatically.
Creating a Task Scheduler Task
When you want to add a program to Task Scheduler, you add a new task to the Task Scheduler program. It might seem as though a better name for Task Scheduler would be Program Scheduler, but Task Scheduler can do more than just start programs at specific times.
For instance, Task Scheduler supports specialized features that enable it to send emails to an email address you specify if a certain system problem occurs. Although this feature is rather specialized for typical users, it indicates the nature of Task Scheduler and shows that it’s more than a system routine that only runs programs at specific times. Task Scheduler can even run programs after you run other programs, such as Media Player or Internet Explorer. Such events are not linked to a specific time interval, but are triggered by an event such as starting one of those programs.
Watch Out!
Vista cannot run a task if your computer is not turned on. Your computer must be turned on before Task Scheduler can properly execute the tasks you set up. Task Scheduler will still run tasks at scheduled times when your computer is in Sleep mode.
Most of the time you will create a basic task in Task Scheduler. A basic task, as you might guess, is most often a program you want to run at a certain time. To the right of the Task Scheduler program window is a window pane labeled Actions. Select the Create Basic Task entry in the Actions pane and Task Scheduler begins collecting information about the program you want to run in the Task Scheduler Wizard dialog box, shown in Figure 21.2.
Figure 21.2. The Task Scheduler Wizard screens walk you through the setup of a task.
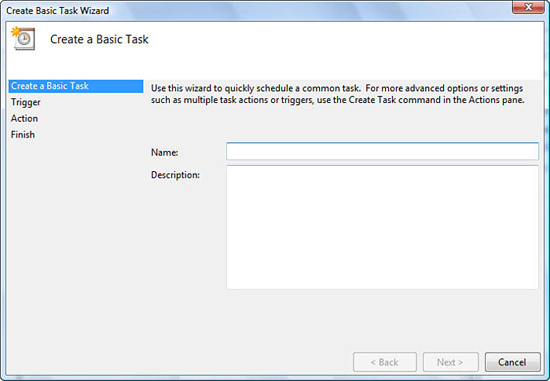
Enter a name and optional description for the task you want to set up. It’s best to spend some time creating a descriptive name and an ample description so that you know exactly what the purpose of this task is when you later look through a listing of multiple tasks you’ve created over time. Click Next to continue with the wizard.
The Task Trigger window, shown in Figure 21.3, now opens. This window is where you designate the frequency of the task you are scheduling.
Figure 21.3. You will designate how often you want the program to run.
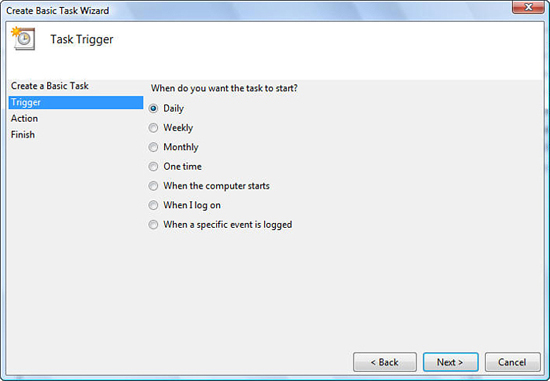
The Task Trigger window covers almost every possibility. For example, you can request that Vista run your task every day, week, or month. You can also request that Vista execute the task once at a specific date and time, or perhaps when a certain event takes place, such as when you log in to your Windows user account.
By the Way
The task trigger you select determines what you’ll see next. For example, if you designate that you want a task to execute monthly, the Task Scheduler Wizard asks for the day you want the task executed on each month. If you specify that you want to create a task that executes when a specific event occurs, such as when you start Internet Explorer, the Task Scheduler Wizard prompts you for that event trigger.
Because most Windows users create tasks to execute programs at specific times, the rest of this description assumes that is what you want to learn to do. Any deviation from scheduling tasks to run at specific time intervals changes the task setup procedure only slightly.
To run the Disk Cleanup program every week, you click to select Weekly and then click Next to designate the day and time in the Weekly window that appears next. Figure 21.4 shows the Weekly window.
Figure 21.4. You must tell Task Scheduler the day and time each week you want to schedule the program to run.
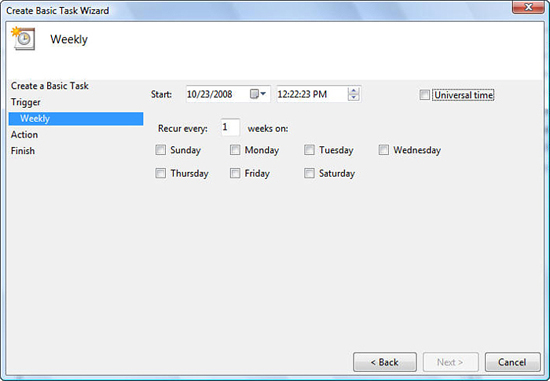
For timed scheduling, such as daily, weekly, and monthly, you must tell Task Scheduler when to begin. The default start date will be the current date, but perhaps you don’t want the program to begin running on its schedule until a certain date in the future. You must also enter the time you want the program to start and designate the day of the week for the program to begin. Click Next to see the Task Action screen shown in Figure 21.5.
Figure 21.5. Let Task Scheduler know if you want a program to run, an email to be sent, or a message to be displayed.

The Task Action screen includes the following three actions from which you can select:
- Start a Program—Task Scheduler runs a program when the time or event takes place.
- Send an E-mail—Task Scheduler sends an email to any recipient you designate when the time or event takes place. The email can contain an attached file if you elect to use an attachment.
- Display a Message—Task Scheduler displays a dialog box with a message you request when the time or event takes place.
The window you next see depends on the action you selected. For example, if you elected that Vista send an email when a certain event or time takes place, Task Scheduler asks for the email information such as the From, To, Subject, Text, and Attachment (if any) fields as well as the SMTP server to use (this is available from your email provider).
Did you Know?
You can specify multiple recipients for the email if you separate the To field’s email addresses with semicolons.
If you elected to show a message when a certain event takes place, Task Scheduler prompts you for the title and message text that will ultimately appear in a dialog box that pops up when it’s time for the action to occur.
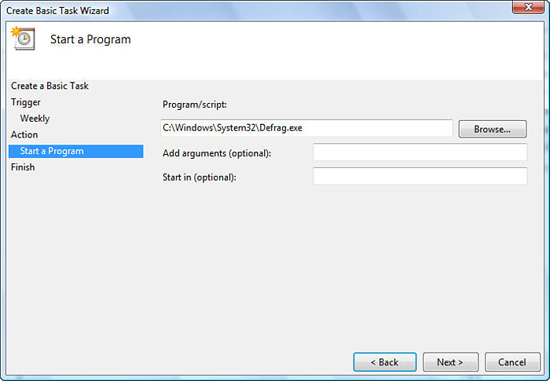
If you’ve requested that a program run, Task Scheduler requests the program information in a Start a Program window such as the one shown in Figure 21.6.
Figure 21.6. Task Scheduler needs to know which program to run.
Determining a Program’s Filename and Location
One of the tricky parts of task scheduling now awaits you. You must know the filename of the program you want to execute as well as the location on your disk where the program resides. For typical Vista utility programs, such as the Disk Cleanup program, the program will reside in a Windows folder’s subfolder named system32.
By the Way
The reason you must have Administrator privileges to use Task Scheduler is because some programs access parts of the system that should not be available to all users. Many programs in the system32 Windows folder, for example, access security settings or disk management aspects that could cause problems if they are executed without a full understanding of their operation.
Knowing the actual program name can be a challenge. For example, if you click the Start a Program window’s Browse button, Task Scheduler opens a file-browsing window for your system32 folder. Scrolling down through the files shows some programs you might recognize (such as SoundRecorder), whereas others are likely unfamiliar system programs (such as shrpubw and mblctr). Many of the items in your system32 folder aren’t even programs!
How can you tell the name of the program you want to run and where it’s located? It takes some detective work. One would think the Disk Cleanup program’s filename would begin with the letter D and perhaps have a name something like DiskClean or DiskCleanup. Nevertheless, you can look through every file in the system32 folder that begins with the letter D and never locate the Disk Cleanup program.
One way to locate the name and location of a program is to open your Windows Start menu and right-click over the program you want to schedule. Right-clicking over the Disk Cleanup program in the Accessories, System Tools menu produces a pop-up menu. Selecting Properties from the context menu produces the Properties dialog box shown in Figure 21.7.
Figure 21.7. Use some detective work to locate the scheduled program’s filename and location.

The dialog box’s Target field displays the program’s location and filename. The filename is to the right. In the case of the Disk Cleanup program, the filename is cleanmgr.exe, although the .exe typically won’t show in a file list. The folder location is the system32 folder on your system’s disk drive in the Windows folder. Instead of showing a nice drive letter and Windows folder location, such as C:Windows, you’ll see %SystemRoot%. That’s a shortcut that means wherever your Windows folder is located, that’s where %SystemRoot% appears. Some shortcut, huh?
Generally, analyzing the program’s properties in this way gives you insight into where the program is located and what its filename is. Therefore, when you click the Task Scheduler’s Start a Program window’s Browse button, you’ll either keep the default system32 folder or select another depending on where the program you want to schedule resides. Then you’ll select the program from that folder.
In the case of the Disk Cleanup program, select the cleanmgr filename in the system32 folder and click Open to let Task Scheduler know you want to schedule the Disk Cleanup program. You now must decide whether the program requires user intervention of any kind, and if so, you must locate arguments that bypass such intervention as the following section explains.
Locating and Using Program Arguments
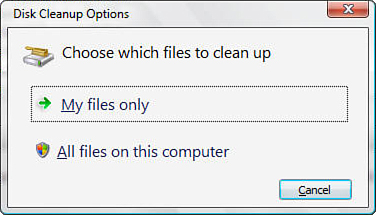
Arguments often pose another problem for most that use Task Scheduler. Some programs require user intervention. Disk Cleanup, although a great program to schedule in the wee morning hours you’re away from your computer, is a program that typically requires user intervention before it runs. Disk Cleanup needs to know which disk drive you want to clean up and which kinds of files you want it to wash from your computer. Figure 21.8 shows what happens if you, or Task Scheduler, run Disk Cleanup without using any arguments, as you do when you run Disk Cleanup from the Windows Start menu. The dialog box prompts the user to learn how much of the disk—the current user’s folders or all disk locations—the cleanup is to cover.
Figure 21.8. Some programs require extra information before they execute on their own.
System and other programs often accept arguments, or program control options, that tell the program how to behave if no user is present. For example, one argument is the disk drive letter. If you run Disk Cleanup from within Task Scheduler using the /d c: argument, for example, you’re telling Disk Cleanup that it’s drive letter C: you want it to clean. When run with that argument, Disk Cleanup won’t require you to sit there and select your C: drive, but will instead know that you want it to clean your C: drive.
Almost every program you assign to Task Scheduler needs this added information. For example, if you want Task Scheduler to run a backup of disk files every so often, you have to tell the backup program which disk drive or drives you want to back up and where the backup program is to back up to. When you run such programs manually from the Windows Start menu, specifying this kind of information requires only a few mouse clicks. Telling Task Scheduler how to handle such options, however, requires more work using the program’s arguments.
Disk Cleanup requires more arguments than just the drive letter to clean. The program needs to know whether you want to clean up one or more of the following file sets:
- Temporary setup files
- Old Chkdsk files
- Recycle Bin files
- Setup log files
- Temporary files
Depending on your user privileges and Windows Vista version, you might see additional file options that Disk Cleanup can clean. (Again, you can read more about Disk Cleanup in Chapter 32.) Most of these files are unneeded; for example, after you install a program successfully, its log files just consume disk space. The Setup log files provide a record of an installation so if the install doesn’t work properly, the program’s technical support team can trace the problem.
Disk Cleanup allows you to create sets of arguments—each uniquely identified with a number—that determine how you want Disk Cleanup to perform. You create a Disk Cleanup set using the sageset argument. The following describes how to do so.
By the Way
To set up arguments for Disk Cleanup, you temporarily leave Task Scheduler and work with your Windows Vista Start menu. Don’t close Task Scheduler’s window; leave it open. After you get the proper Disk Cleanup arguments, you’ll finish the Task Scheduler entry.
Setting Up Disk Cleanup Argument Sets
Here is how you create a Disk Cleanup argument set. After you create and assign a number to a Disk Cleanup set, you’ll specify that argument set in Task Scheduler so that Task Scheduler won’t require any user intervention from you when it runs Disk Cleanup.
To create a Disk Cleanup argument set, press Windows+R. This opens the Run dialog box. Type the following: cleanmgr /sageset:1. Your Run window will look like the one in Figure 21.9.
Figure 21.9. Use the Windows Run dialog box to create a Disk Cleanup argument set.
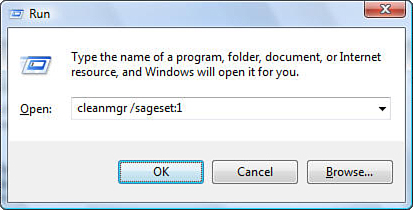
The Run dialog box tells Windows Vista to run the Disk Cleanup program. The default folder is the system32 folder for the Run dialog box. The /sageset:1 entry is an argument that tells Disk Cleanup the following:
Run Disk Cleanup and watch which options I select. Save all those options to an argument set that I’ll call #1. In the future, when I run Disk Cleanup using that argument set, or when Task Scheduler runs Disk Cleanup using that argument set, don’t ask me for any option but go ahead and select the save option I am about to choose and run the program without my intervention.
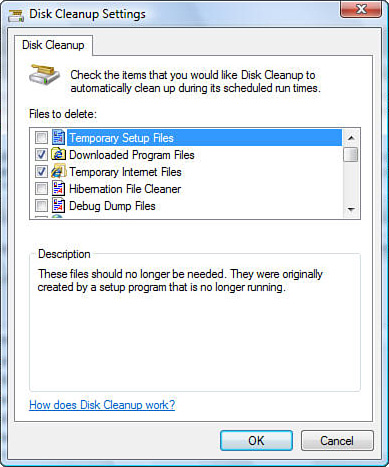
Click OK to start Disk Cleanup. Run the program and select all the options you want Task Scheduler to select when you’re not present. Select the files you want Disk Cleanup to clean from the Files to Delete list, as shown in Figure 21.10. When you specify the files you want to clean, click OK.
Figure 21.10. Select the files you want Disk Cleanup to clean.
Did you Know?
If you want to specify different Disk Cleanup options to execute at different times, just run through this process again and create an argument set numbered 2, and then one numbered 3, and so on. Each set is a unique set of arguments. After you create an argument set, you can run that argument set from the Windows+R run box or from Task Scheduler as shown next.
After you click OK, Disk Cleanup will not run. Instead, Disk Cleanup saves that argument set which, in this case, is called 1. The sageset:# argument is a special argument that tells Disk Cleanup to create a new argument set with the number you specify.
Finishing Task Scheduler’s Disk Cleanup Entry
Now you’re ready to finish the Task Scheduler’s Disk Cleanup entry. Before taking this Disk Cleanup argument detour, you were well on your way to making Disk Cleanup run automatically. You now have all the work done to complete Disk Cleanup’s Task Scheduler entry. You created a Disk Cleanup argument set and it’s named 1.
By the Way
In the future, you’ll want to work out which arguments your Task Scheduled program will use before starting Task Scheduler and adding the program. It made sense in this chapter to begin Task Scheduler first so that you’d know where you were heading, and then taking this Disk Cleanup detour when it was required to finish the Task Scheduler entry.
To request that Disk Cleanup use that argument set when Task Scheduler runs Disk Cleanup, return to the Task Scheduler session that you began earlier. In the Add Arguments (Optional) text box, type /sagerun:1 so that Task Scheduler sends that argument to Disk Cleanup when the program runs. This argument tells Disk Cleanup to use the argument set number 1 when it runs. (From the Windows+R run dialog box, you would achieve the same effect manually if you typed cleanmgr /sagerun:1 and clicked OK.)
Did you Know?
If you create multiple Disk Cleanup argument sets, perhaps with one cleaning only your Recycle Bin and another cleaning more, the number you use after the /sagerun: argument determines which one runs when Task Scheduler schedules it.
That’s all you have left to do to make Task Scheduler run Disk Cleanup without your intervention. Click Next and then Finish to save the Task Scheduler entry for Disk Cleanup. Task Scheduler will run Disk Cleanup at the time you specified as long as your computer is turned on and you’re logged on.
Did you Know?
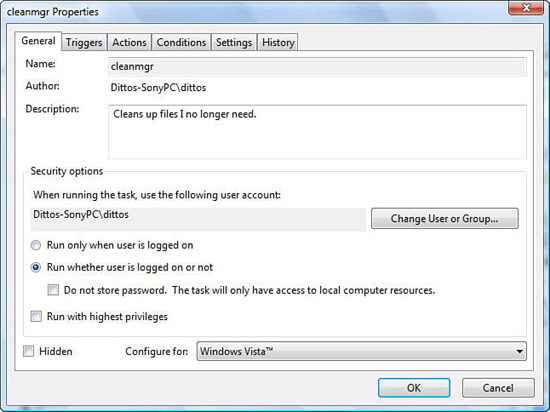
If you want Task Scheduler to run a task whether or not you’re logged on, you can schedule it as long as your computer is powered on at the time Task Scheduler needs to run the program. From the center of the Task Scheduler window where your tasks appear, double-click to open any task you want to run during those times you won’t be logged on. Click the Properties button in the right pane inside the Selected Item section to display Figure 21.11’s Properties dialog box. Click to select the option labeled Run Whether User Is Logged On or Not. If you click to check the Do Not Store Password option, any task you run affects only your user account’s files and folders. If you click to uncheck the Do Not Store Password option, the task uses your user account’s password to run programs that affect all files and folders you have access to. Therefore, if you have an Administrator account and you don’t click the Do Not Store Password option, Task Scheduler can use your Administrator privilege to run your task as needed.
Figure 21.11. You can specify that a task should run even if you’re not logged on at the time.
Remember, Disk Cleanup is being used here only as an example of how to set up any program you want to run at a specified time. Hardly any space is used to describe Disk Cleanup because it’s Task Scheduler that is our focus here. Task Scheduler is one of the first Vista applications you’ve seen described in this book that requires more extensive setup and knowledge just to use, but don’t let that deter you from learning about the program. The technical aspects of Task Scheduler’s scheduled programs almost always center on the program’s user interface. You can’t schedule programs to run automatically unless they provide some kind of argument-based program execution, so you don’t have to be there when Task Scheduler starts the program.
Most programs do require some kind of user intervention, such as Disk Cleanup, that must know which drive and options you want it to use. You’ll have to search the program’s documentation for command line arguments to learn how to specify arguments for each program you add to Disk Scheduler.
Running Disk Defragmenter with Task Scheduler
Fortunately, you can schedule some programs to run regularly without going through the motions of locating the program and finding its arguments. Disk Defragmenter, a program that keeps your disk drive running at its peak efficiency (as Chapter 32 explains), will add itself to Task Scheduler and you can modify the Task Scheduler time without even opening Task Scheduler itself.
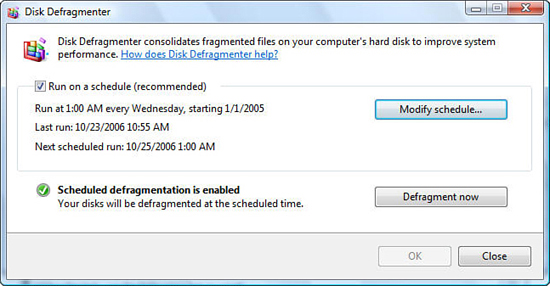
Windows Vista normally runs Disk Defragmenter automatically, as it was set up when you installed or upgraded to Windows Vista. When you start Disk Defragmenter from your Start menu, the opening window (shown in Figure 21.12) shows that Disk Defragmenter is already set up to run automatically. This means that your Task Scheduler will have an entry for the program. If you want to modify when Disk Defragmenter runs, you can do so from that program by clicking the Modify Schedule button and changing the scheduled program execution. Chapter 32 goes into more detail about how to schedule Disk Defragmenter.
Figure 21.12. Select how you want Disk Defragmenter to organize your disk.
For this purposes of this chapter, it’s important to note that by including this scheduling option in the Disk Defragmenter program itself, you don’t need to locate its hands-off, command-line options and set them up through the Task Scheduler. (It’s too bad that Disk Cleanup doesn’t have this option, considering the effort Task Scheduler can require in setting up Disk Cleanup command-line options as explained in the previous section.)
Watch Out!
Obviously if you or someone else has edited Disk Defragmenter’s settings from within that program or within Task Scheduler, Disk Defragmenter won’t be set up to run automatically as in Figure 21.12.
Chapter Wrap-Up
This chapter explained how you can make Windows Vista run programs for you at specified times you choose. Much more is possible with Task Scheduler, but most of the time, the majority of users want to run a program such as a backup or disk-related program at a particular time. Even with the simplest of Task Scheduler routines, setting up your programs to run unattended requires more technical work than you might expect at first. You must be able to locate the program and set it up to run using special arguments that eliminate all user intervention that would otherwise be required.
Even though this was a far more technical chapter than the ones that came before it—and more technical than most chapters that come later—the advantages of Task Scheduler outweigh the slight effort needed to set it up.
In the next chapter, you’ll learn about the accessibility options that enable you to control Windows Vista’s environment in ways you might not have considered. Although the accessibility options were designed for users with special needs, almost anyone can benefit from some of the options that make Windows easier to use.