In this recipe, we will learn how to make predictions with an AWS ML service for binary classification using AWS CLI by going through the following steps:
- Prepare the data as a CSV and upload it to S3. Amazon ML requires a CSV with each row corresponding to an observation that may be used for training or testing. Each column also needs a name, which you can specify as the first row or specify separately using a schema file. You may also split data into multiple CSV files within the same bucket. If you have multiple files, you should provide a path ending with a forward slash (/).
As mentioned in the Getting ready section, we will reuse the sample data available in AWS, which is already uploaded to S3 at s3://aml-sample-data/banking.csv.
- Create the data source.
We can create an S3 data source object using the aws machinelearning create-data-source-from-s3 command by going through the following steps:
-
- Create a sample JSON input using the generate-cli-skeleton subcommand, as follows:
aws machinelearning create-data-source-from-s3
    --generate-cli-skeleton input
-
- Prepare the input JSON with actual values, as follows:
{
    "DataSourceId": "my-first-s3-ds-id",
    "DataSourceName": "My First S3 DataSource",
    "DataSpec": {
        "DataLocationS3": "s3://aml-sample-data/banking.csv",
        "DataRearrangement": "{"splitting":{"percentBegin":10,"percentEnd":60}}",
        "DataSchemaLocationS3": "s3://aml-sample-data/banking.csv.schema"
    },
    "ComputeStatistics": true
}
Save this file as create-data-source-from-s3-cli-input.json.
-
- Execute the aws machinelearning create-data-source-from-s3 command, providing the input JSON file, as follows:
aws machinelearning create-data-source-from-s3
 --cli-input-json file://create-data-source-from-s3-cli-input.json
 --region us-east-1
 --profile admin
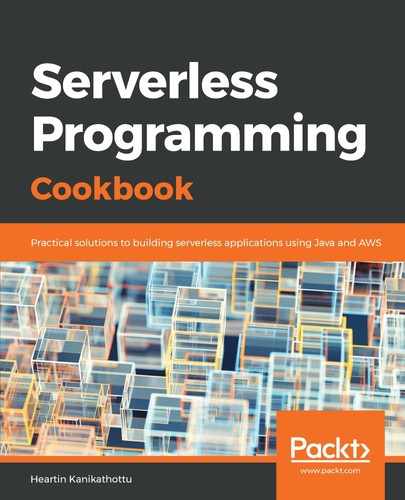
This command works asynchronously, and immediately returns the data source ID, as shown in the following screenshot:

You can check the status of your data sources with the describe-data-sources subcommand, as follows:
aws machinelearning describe-data-sources
    --region us-east-1
    --profile admin
Once completed successfully, you should see the following response:
Initially, when you run the commands, you will see the status as INPROGRESS until it is completed.
Alternatively, you can use the get-data-source subcommand to get the details for a particular data source.
- Create a ML binary model based on the data source by using the following command:
aws machinelearning create-ml-model
 --ml-model-id 'my-first-ml-model-id'
 --ml-model-name 'My First ML Model'
 --ml-model-type 'BINARY'
 --training-data-source-id 'my-first-s3-ds-id'
 --region us-east-1
 --profile admin
This command works asynchronously and immediately returns the ML model source ID, as shown in the following screenshot:

You can check the status of your data sources with the describe-ml-models subcommand, as shown in the following code:
aws machinelearning describe-ml-models
    --region us-east-1
    --profile admin
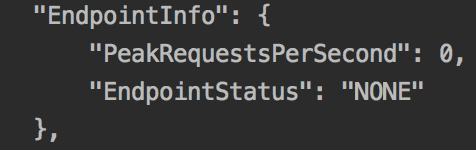
Once completed successfully, you should see the following response. The first part of the response contains the status and basic timestamp information:

Initially, when you run the commands, you will see the status as INPROGRESS until it is completed.
The response also contains additional information of the model, including the defaults, as shown in the following screenshot:

Alternatively, you can use the get-ml-model subcommand to get the details for a particular ML model.
- Create an evaluation to verify your dataset. As mentioned before, I will be using the same dataset to keep things simple, as the aim of this recipe is to understand the process and syntax. However, you should always split your data into two sets and create two data sources, one for training and one for evaluation.
We can create an evaluation set using the aws machinelearning create-evaluation command, as follows:
aws machinelearning create-evaluation
    --evaluation-id 'my-first-ml-evaluation-id'
    --evaluation-name 'My First ML Evaluation'
    --ml-model-id 'my-first-ml-model-id'
    --evaluation-data-source-id 'my-first-s3-ds-id'
    --region us-east-1
    --profile admin
Once completed successfully, you should see the following response:

The closer the value of BinaryAUC is to 1, the better the model is. We got a very good result since we used the same dataset for training and evaluation.
Alternatively, you can use the get-evaluation subcommand to get the details of a particular evaluation.
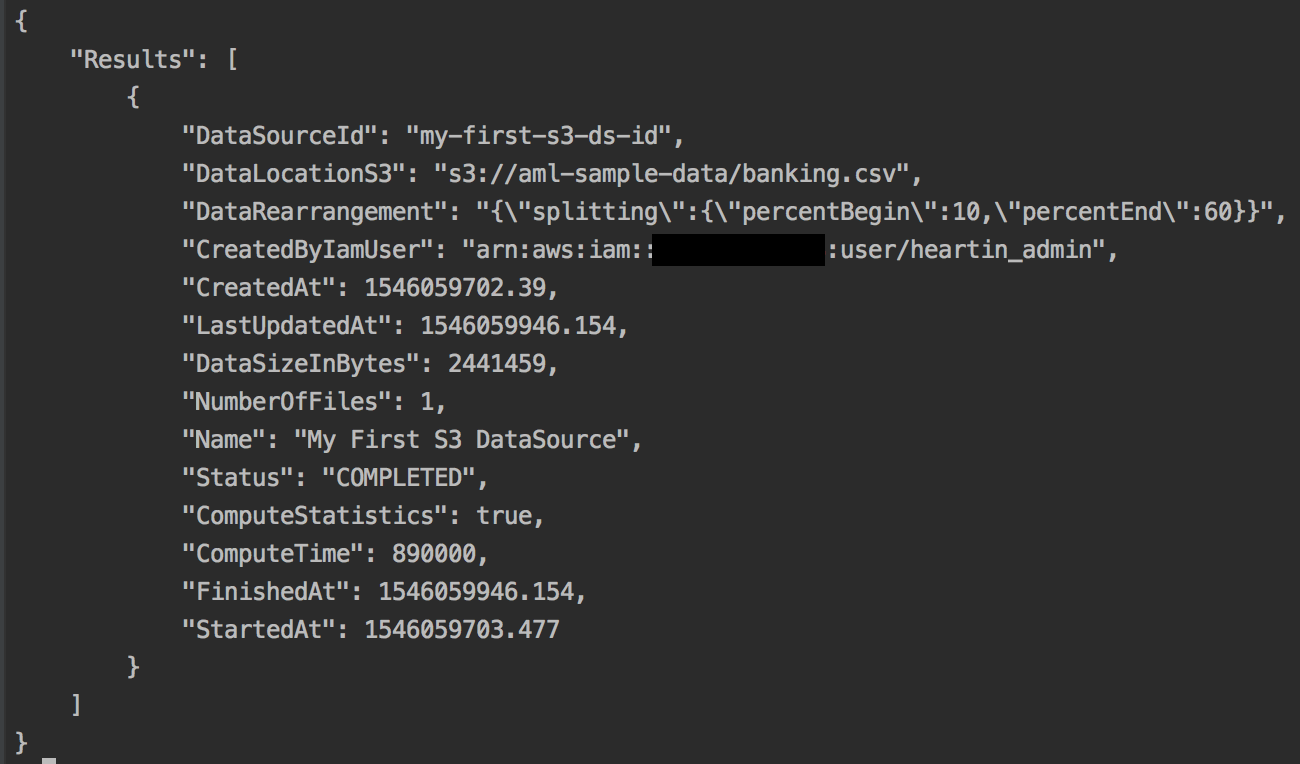
- Predictions can be real-time or batch. In this recipe, we will make a real-time prediction. First, we need to generate an endpoint.
Execute the get-ml-model subcommand as follows:
aws machinelearning get-ml-model
    --ml-model-id 'my-first-ml-model-id'
    --region us-east-1
    --profile admin
The response will contain an endpoint section, shown in the following screenshot, denoting that no endpoint is generated:
-
- Create the real-time endpoint using the following code:
aws machinelearning create-realtime-endpoint
    --ml-model-id 'my-first-ml-model-id'
    --region us-east-1
    --profile admin
This will immediately return an endpoint with a status of UPDATING, as shown in the following screenshot:

You can use the get-ml-model subcommand as we did earlier in this section to get the details of the ML model, including the endpoint status. Once completed, the status and endpoint details should look as follows:
The response will also contain additional information, such as TrainingParameters, InputDataLocationS3, MLModelType (which in our case is Binary), LogUri, ComputeTime, FinishedAt , and StartedAt.
-
- You can predict the target field (0 or 1 for Binary) using the endpoint of the predict subcommand to provide the other record fields, as shown in the following code:
aws machinelearning predict
    --ml-model-id 'my-first-ml-model-id'
    --record 'age=44,job=blue-collar,marital=married,education=basic.4y,default=unknown,housing=yes,loan=no,contact=cellular,month=aug,day_of_week=thu,duration=210,campaign=1,pdays=999,previous=0,poutcome=nonexistent,emp_var_rate=1.4,cons_price_idx=93.444,cons_conf_idx=-36.1,euribor3m=4.963,nr_employed=5228.1'
    --predict-endpoint 'https://realtime.machinelearning.us-east-1.amazonaws.com'
    --region us-east-1
    --profile admin
This will return the following response:

I just picked up a record from the data that we have. However, you can create a random record or pick one based on your use case and apply the preceding syntax.