Creating Mailing Labels with the Label Wizard
To create mailing labels from a table that contains names and addresses, follow these steps:
Open the database you want to work with and click the Reports tab.
Open the drop-down list at the bottom of the box and select the table or query from which to pull the names and addresses. Then click OK. The first screen of the Label Wizard appears (see Figure 24.1).
Figure 24.1. Label Wizard starts out by asking you what size labels you'll be using.

Choose the label type from the list. If there are only a few labels listed, make sure the Show Custom Label Sizes check box is deselected. (It must be deselected to see the standard label types.)
If you don't know the Avery number for your label, move through the labels listed until you find one with dimensions that match those of your labels. You can also create a custom label.
Click Sheet feed or Continuous. Sheet-fed labels are single sheets; continuous labels are joined to the previous and next sheet at the top, and have perforated strips on the side that feed through a dot-matrix printer.
Click Next > when you've entered your label information.
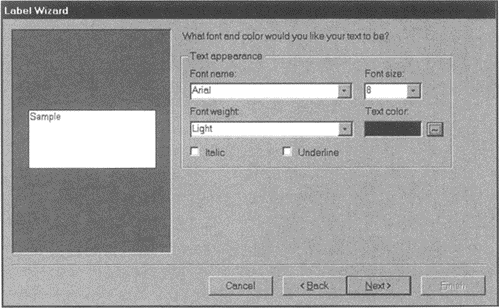
Next choose a font from the Font name drop-down list, and a font size from the Font size drop-down list (see Figure 24.2)
Figure 24.2. Choose settings for the text to be printed on the labels.

Don't make the Font Too Big!
If you need to print multiple lines on each label, make sure that the font size you select is small enough that all lines will fit. For mailing labels, 8 or 10 point type works well; it is large enough to be read by U.S. Postal Service machines, but small enough that you can fit several lines on each label.
With some fonts, you can choose a font weight. Open the Font weight drop-down list and choose a weight. Normal will work well in most cases.
Avoid Light Colors!
If you're making labels to be sent through the U.S. Postal Service, keep in mind that their machines can't read light-colored ink like yellow.
Next, Access asks which fields to include on the label. Select a field from the Available Fields list and click the > button to move it to the Prototype label (see Figure 24.3).
Adding Other Text
If there is text that you want to appear on every label, you can type it as you enter fields. One example is a comma to separate the City and State fields.
If you would like your labels sorted by a particular field, select it on the next screen that appears (see Figure 24.4) and click the > button to move it to the Sort by list. For instance, some bulk mailings require you to sort by ZIP code (or PostalCode). Click Next > to continue.
Figure 24.4. Select which field(s) you want to sort by, if any.

Order Is Important!
If you pick more than one field to sort by, Access sorts the records first by the first field you select, then by the second, and so on. So it's important to choose the field that you want to sort by first. If they're in the wrong order, click the <<button to remove them all from the Sort by list; then start over.
In the last screen, you're asked for a title. Enter one and click Finish. Your labels appear in Print Preview, just like any other report. Mine are shown in Figure 24.5.
Figure 24.5. Mailing labels created by the Label Wizard, in Print Preview.


