
Cloning Away Distractions
The Clone Stamp tool has been the tool of choice for removing distracting or other unwanted objects in photos for years now. Although the Healing Brush in many ways offers a better and more realistic alternative, there are certain situations where the Clone Stamp tool is still the best tool for the job. Here’s an example of how this workhorse removes unwanted objects:
Step One:
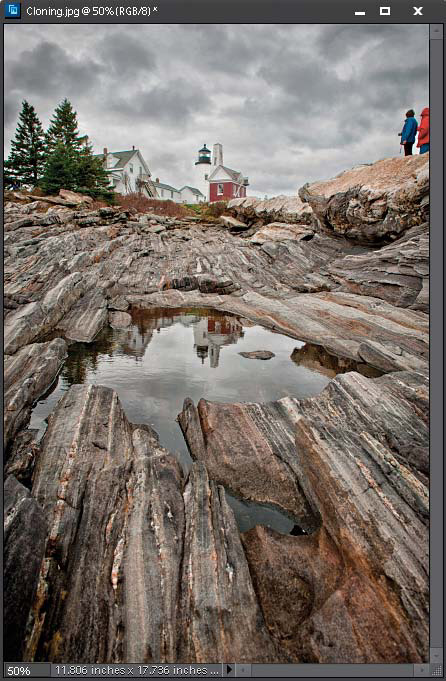
Nothing ruins a nice shot like distracting objects or people. Here we have a nice photo of a lighthouse, but the people in the top right take away from the photo. I don’t want to crop them out, because I like the rocks in that area so we’ll use the Clone Stamp tool to remove them.
MATT KLOSKOWSKI
Step Two:
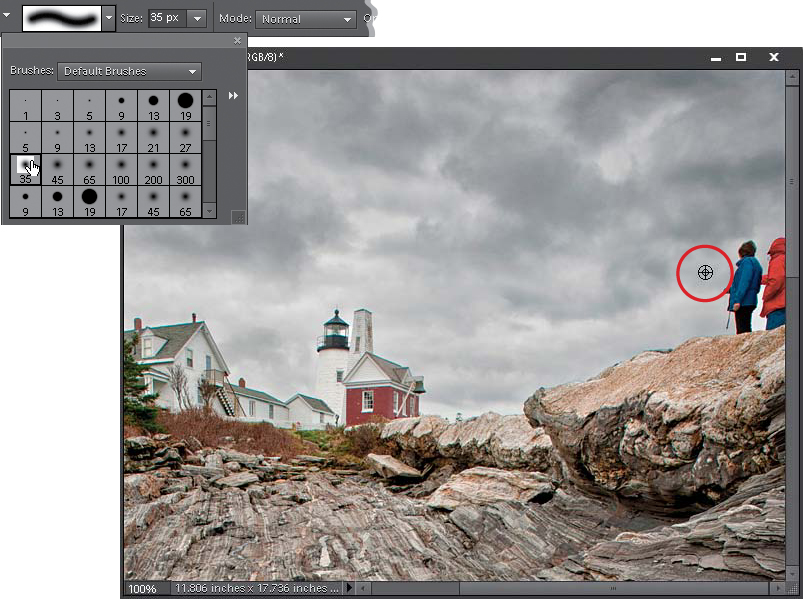
Use the Zoom tool (Z) to zoom in if you need to. Then, press S to get the Clone Stamp tool. In the Options Bar, click on the brush thumbnail to the left of the Size pop-up menu and choose a small, soft-edged brush in the Brush Picker. Now, press-and-hold the Alt (Mac: Option) key and click once in an area to the left of the people. This is called “sampling.” You just sampled a clean area of clouds, and in the next step, you’re going to clone that area over the people to completely cover them. (By the way, when you sample, a little “target” cursor appears letting you know you’re sampling, as you see here.)
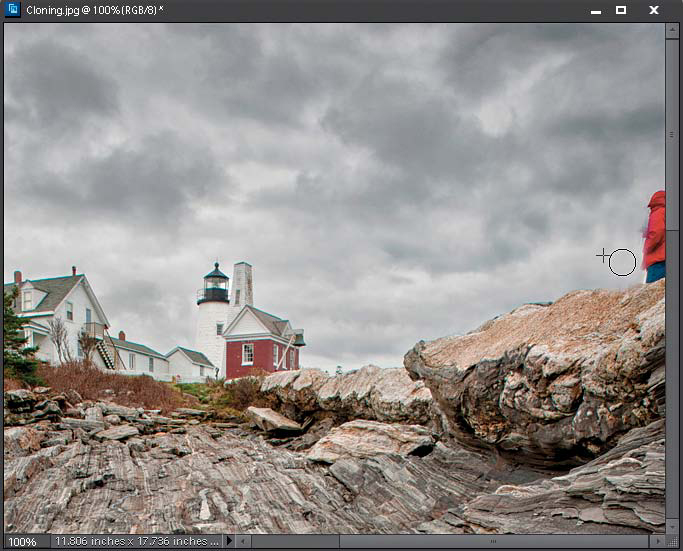
Move directly over the person on the left and begin painting with the Clone Stamp tool. As you paint over them, the clouds you sampled are cloned right over them, so it looks like they have disappeared. But what if you’re not able to clone the whole distraction in one brush stroke? Read on to the next page, and I’ll show you a little trick.
The key technique to remember is to sample in an area where the basic light and texture are the same (next to the people), then move straight over the people. Note: The little plus-sign cursor (the area where you sampled) is immediately to the left of the circular brush cursor (where you’re painting now). By keeping them next to each other, you’re making sure you don’t pick up patterns or colors from other parts of the photo that would make your cloning look obvious (you’ll want to Alt-click [Mac: Option-click] in different but near by areas to sample the same overall brightness and texture).

Now, what happens if you can’t clone all the way over the people in one brush stroke? This actually happens a lot. In my example here, if I continue to paint with one brush stroke over the person on the right, my sample point starts going over the original person on the left and I wind up cloning over the person on the right with more of the person on the left.

Step Five:
Here’s the trick: You’ll need to release your mouse button and click to paint again. Each time you release your mouse button, Elements resamples the area you’re cloning from and basically resets it. This lets you paint a little more of the clouds over the people each time. Just keep an eye on that little crosshair as you’re cloning. If it starts going over a part of the people where they once existed, then weird things are going to happen. So, release the mouse button often, let the source reset itself on the clean clouds, and paint smaller areas at a time, instead of one large area.

One more thing: You’ll want to sample from an area similar to what you’re removing. For example, try this: Alt-click (Mac: Option-click) at the very top of the photo where the clouds are darker. Then go back and start cloning over the people. Look how much darker (and more obvious) the cloning looks (as shown here). That’s why you usually have to sample very close to where you clone. If not, it’s a dead giveaway. And you want to sample often, so you don’t get a repeating pattern from using the same sample point each time you paint.

