
The SalesForceApp project contains forms, which would usually be regarded as part of the presentation and logic-level tier, and so it may seem a little strange that we're covering this in a data tier chapter. The forms that you will be particularly looking at, however, have a lot to do with the managing, installing, and registering of the database plugins that you have created, and so constitute an important part of the data tier. Let us take a quick look at what these forms are supposed to do.
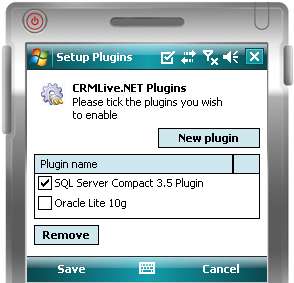
When we first launch our SalesForceApp project, we will encounter the form as in the following screenshot. This form allows the user to install or remove a plugin. For instance, if the user wanted to have Oracle Lite and SQL Server CE support on his mobile device, he or she would have to install both the OracleLitePlugin and SQLServerPlugin plugins in this window.

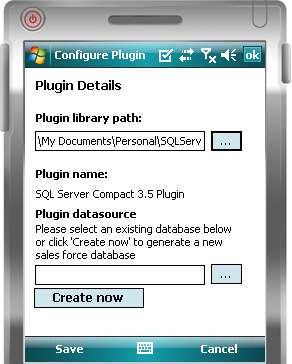
When a user clicks on the New plugin button, this will open the window shown in the following screenshot. The user will have to key in the path of the plugin DLL (or browse for the file using the button next to the field). Upon selecting a plugin that conforms to the IDataLibPlugin interface, the plugin's full name will be shown in the same window.
The user would then be required to specify the connection settings to an existing database in the Plugin datasource field. When installing a plugin for the first time, the sales force database does not exist. A Create now button will, therefore, be provided to allow the user to generate a new sales force database (together with its schema) on the mobile device. After that, it will automatically point the Plugin datasource field to this newly created database. When this has been done, the user will need to click on the Save button to finally install this plugin.
Although the user can add multiple database plugins to his or her mobile device, only one plugin can be active at any one time. The user can select the active plugin by placing a tick in the checkbox next to the plugin, as shown in the following screenshot:
Before you start to create the forms shown previously, you will first need to create a couple of classes—a PluginCollection class to store this list of plugins and a PluginManager class to manage that list. Both classes will be created in the CRMLiveFramework project.
The PluginCollection is a small class that inherits from the System.Collections.HashTable object. The purpose of this class is to maintain a list of IDataLibPlugin objects. You need to inherit from the System.Collections.HashTable class because it allows you to refer to a stored object in its list using the plugin's full name.
Add a new class to the CRMLiveFramework project and name it PluginCollection:
public class PluginCollection : Hashtable
{
//=========================================================
//This Add() function allows us to add a plugin object
//to the collection, using the plugin name as the key
//=========================================================
public IDataLibPlugin Add(IDataLibPlugin PluginObject)
{
if (base.Contains(PluginObject.PluginFullName) == false)
{
base.Add(PluginObject.PluginFullName, PluginObject);
return PluginObject;
}
else
{
return null;
}
}
}
The PluginManager class will make use of a single instance of the PluginCollection object to hold a list of plugins that are installed on the framework. It will also contain functions that handle the installation of new plugins or the removing of existing ones. More importantly, this class will also need to be able to persist the PluginCollection to disk and to also load it back from disk.
This class is expected to use .NET reflection and XML services, so you will need to import the references to these libraries. Let's take a look at the following skeleton code of this class:
using System.Reflection;
using System.Xml;
public class PluginManager
{
private PluginCollection _plugins;
//========================================================= //This function simply returns the _plugins collection
//=========================================================
public PluginCollection GetPluginsList()
{
return _plugins;
}
//========================================================= //This function accepts a plugin name and returns the //corresponding plugin object from the _plugins collection
//=========================================================
public IDataLibPlugin GetPluginObject(string PluginName)
{
return _plugins.Item(PluginName);
}
}
Let's create an AddPlugin function that will load a DLL given its path, and add an instance of the plugin to the PluginCollection object. The AddPlugin function takes in the full path of the DLL plugin file and the plugin data source (connection string). You will use .NET reflection to dynamically load the DLL and create an instance of the plugin class.
public IDataLibPlugin AddPlugin(string PluginPath, string
PluginDatasource, bool Active)
{
Assembly _AssemblyObject;
IDataLibPlugin _PluginObject;
_AssemblyObject = Assembly.LoadFrom(PluginPath);
_PluginObject = (CRMLive.IDataLibPlugin)
(_AssemblyObject.CreateInstance("CRMLive.PluginClass"));
_PluginObject.Datasource = PluginDatasource;
_PluginObject.PluginPath = PluginPath;
_PluginObject.Active = Active;
_plugins.Add(_PluginObject);
return _PluginObject;
}
Note
The Assembly class is part of the System.Reflection namespace. It provides the functions that allow you to load and instantiate a class contained in an external library file.
Let's also create the opposite function, the RemovePlugin function. Its job is to simply remove the desired plugin from the PluginCollection object:
public void RemovePlugin(string PluginName)
{
_plugins.Remove(PluginName);
}
Your PluginManager class will also need to persist the PluginCollection to disk. You will create a SaveAllPlugins function that serializes the list of plugins in PluginCollection into XML and then saves it to the plugins.xml file. For this purpose, you will use the System.Xml library. The three important attributes of each plugin that you need to save to disk are:
- Plugin path
- Data source
- Status of the plugin (whether it is active or not)
public void SaveAllPlugins()
{
int _counter = 0;
IDataLibPlugin _pluginObject;
string _activePluginName = "";
XmlDocument _xmlDoc;
XmlElement _xmlRoot;
XmlElement _xmlPlugin;
_xmlDoc = new XmlDocument();
_xmlRoot = _xmlDoc.CreateElement("Root");
_xmlDoc.AppendChild(_xmlRoot);
foreach (IDataLibPlugin _pluginObject in _plugins.Values)
{
_xmlPlugin = _xmlDoc.CreateElement("Plugin");
_xmlPlugin.SetAttribute("PluginPath",
_pluginObject.PluginPath);
_xmlPlugin.SetAttribute("Datasource",
_pluginObject.Datasource);
_xmlPlugin.SetAttribute("Active",
(string)_pluginObject.Active);
_xmlRoot.AppendChild(_xmlPlugin);
}
_xmlDoc.Save("plugins.xml");
}
Now that you can save the collection to disk, you will need to create a LoadAllPlugins function that does the opposite task. It reads XML from the plugins.xml file and reconstructs the PluginCollection object using stored plugin information:
public void LoadAllPlugins()
{
string _pluginPath = null;
string _pluginDatasource = null;
bool _active = false;
int _counter = 0;
XmlDocument _xmlDoc;
XmlElement _xmlPlugin;
XmlElement _xmlRoot;
_plugins = new PluginCollection();
_xmlDoc = new XmlDocument();
try
{
_xmlDoc.Load("plugins.xml");
}
catch (Exception ex) {
return;
}
_xmlRoot = (System.Xml.XmlElement)
_xmlDoc.ChildNodes.Item(0);
for (_counter = 0; _counter <= _xmlRoot.ChildNodes.Count-
1; _counter++)
{
_xmlPlugin = (System.Xml.XmlElement)
_xmlRoot.ChildNodes.Item(_counter);
_pluginPath = _xmlPlugin.GetAttribute("PluginPath");
_pluginDatasource = _xmlPlugin.GetAttribute
("Datasource");
_active = bool.Parse(_xmlPlugin.GetAttribute("Active"));
AddPlugin(_pluginPath, _pluginDatasource, _active);
}
}
You're almost done. There is still one thing you need to do, which is to have your PluginManager class automatically call the LoadAllPlugins() function when it loads up. You can do this in the constructor of your class:
public New()
{
//Load all the plugins from file to memory
LoadAllPlugins();
}
Now it's time for you to build the Plugin Manager UI. Add a new project to the existing solution and name the project SalesForceApp. Choose Smart Device Project as the project type and use the Device Application template when prompted. Lastly, add a reference to the CRMLiveFramework project and change the namespace of the project to CRMLive.
You will need to have a global class to store a global PluginManager object that can be used throughout the SalesForceApp project. Add a new class named GlobalArea to your project:
public class GlobalArea
{
private static PluginManager _PluginManager = new PluginManager();
public static PluginManager PluginManager {
get { return _PluginManager; }
}
}
The ConfigurePlugin form is a dialog window that lets the user choose a plugin DLL and then subsequently allows him or her to set its data source (connection string). It also allows the user to create a new database if one does not exist.
Navigate to the Project | Add New Item menu item and create a new item based on the Windows Form template. Name this form ConfigurePlugin. The ConfigurePlugin form uses the following controls:
|
Control name |
Description |
|---|---|
|
|
This is the full path to the |
|
|
This button makes use of .NET's |
|
|
This is a .NET |
|
|
This is a label control that will display the full name of the plugin selected by the user using the |
|
|
This text control allows the user to key in the full data source (connection string) to an existing database if one exists. Similarly the user can use the adjacent |
|
|
This button makes use of .NET's |
|
|
The Create Now button requests the plugin to generate a new database (together with schema) on the mobile device. |
|
|
This is a panel that is initially invisible. Once a valid DLL plugin has been selected by the user, this panel will be made visible. |
|
|
We make use of the menu bar at the bottom of the form to provide a Save and Cancel feature. |

We will now write code to imbue functionality to the form. Before we proceed further, let's take a brief look at the skeleton code for this preceding class. The _PluginObject variable will hold a live instance of the plugin when its respective DLL file has been selected by the user.
using System.Reflection;
public class ConfigurePlugin
{
private string _PluginDatasource;
private string _PluginLibPath;
private IDataLibPlugin _PluginObject;
public string PluginDatasource {
get { return _PluginDatasource; }
set { _PluginDatasource = value; }
}
public string PluginLibPath {
get { return _PluginLibPath; }
set { _PluginLibPath = value; }
}
//=========================================================
//The Save function saves the user's input and closes the
//form with an 'OK' dialog result
//=========================================================
private void Save(System.Object sender, System.EventArgs e)
{
_PluginDatasource = txtDatasource.Text;
_PluginLibPath = txtLibraryPath.Text;
this.DialogResult = Windows.Forms.DialogResult.OK;
this.Close();
}
//=========================================================
//The Cancel function ignores the user's input and simply //closes the form with a 'Cancel' dialog result
//=========================================================
private void Cancel(System.Object sender, System.EventArgs e)
{
this.DialogResult = Windows.Forms.DialogResult.Cancel;
this.Close();
}
}
Now, let's consider what happens when the user clicks on the btnLibraryPathBrowse button. This button should launch an OpenFileDialog control so that users can search for their DLL plugin files. Once located, it should also attempt to load an instance of the plugin class, and then access its full name through the IDataLibPlugin interface. You can achieve the above using the following piece of code:
private void LibraryPathBrowse(System.Object sender,
System.EventArgs e)
{
Assembly _AssemblyObject;
ofdFileBrowser.Filter = "DLL files(*.dll)|*.dll";
ofdFileBrowser.FileName = txtLibraryPath.Text;
if (ofdFileBrowser.ShowDialog ==
Windows.Forms.DialogResult.OK)
{
txtLibraryPath.Text = ofdFileBrowser.FileName;
try
{
_AssemblyObject = Assembly.LoadFrom
(txtLibraryPath.Text);
_PluginObject = _AssemblyObject.CreateInstance
("CRMLive.PluginClass");
lblPluginFullName.Text = _PluginObject.PluginFullName;
pnlPluginDetails.Visible = true;
}
catch (Exception ex) {
MessageBox.Show(ex.Message, "Loading Plugin",
MessageBoxButtons.OK, MessageBoxIcon.Exclamation,
MessageBoxDefaultButton.Button1);
}
}
}
Next you will look at what happens when the user clicks on the btnCreateDatabase button. The idea of this function is to use the IDataLibPlugin interface to call the plugin's CreateSalesForceDatabase method. Depending on whether the Oracle Lite plugin or SQL Server CE plugin was loaded, the appropriate CreateSalesForceDatabase implementation would be called. You can achieve this using the following code snippet:
private void CreateDatabase(System.Object sender, System.EventArgs e)
{
if (_PluginObject.CreateSalesForceDatabase() == true)
{
txtDatasource.Text = _PluginObject.Datasource;
MessageBox.Show("Database successfully created", "Create database");
}
}
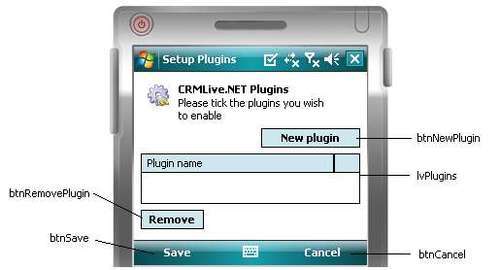
The PluginsSetup form is the main startup form of the SalesForceApp project. The purpose of this form is to provide plugin management functionality. You can create the PluginsSetup form as shown in the following screenshot by navigating to the Project | Add New Item menu item and creating a new item based on the Windows Form template. The PluginsSetup form uses the following controls:
|
Control name |
Description |
|---|---|
|
|
The New plugin button that allows the user to install a new plugin |
|
|
The Remove button that allows the user to remove the currently selected plugin from the list |
|
|
A ListView control that has its |
|
|
We make use of the menu bar at the bottom of the form to provide a Save and Cancel feature |
Let's take a look at the following skeleton code for this class. This form contains a single instance of the PluginManager class that you've created earlier, which handles all plugin-related logic.
public class PluginsSetup
{
//========================================================
//The Save function on this form will write the full list //of plugins in memory (held in GlobalArea.PluginManager) //to disk via the SaveAllPlugins() method call
//=========================================================
private void Save(System.Object sender,
System.EventArgs e)
{
GlobalArea.PluginManager.SaveAllPlugins();
this.DialogResult = Windows.Forms.DialogResult.OK;
this.Close();
}
//========================================================= //The cancel button simply closes the form (without saving
//the list of plugins to disk)
//=========================================================
private void Cancel(System.Object sender,
System.EventArgs e)
{
this.DialogResult = Windows.Forms.DialogResult.Cancel;
this.Close();
}
//=========================================================
//When we launch this form, we will automatically populate
//the lvPlugins ListView with the list of plugins in //GlobalArea.PluginManager
//=========================================================
public PluginsSetup()
{
// This call is required by the Windows Form Designer.
InitializeComponent();
RefreshPluginsList();
}
}
Let's take a look at how you can implement this RefreshPluginsList() function. By directly retrieving the PluginCollection object from the PluginManager, you can iterate through this collection and add the names of each plugin to the lvPlugins Listview control:
private void RefreshPluginsList()
{
PluginCollection _pluginsCollection;
IDataLibPlugin _pluginObject;
int _counter = 0;
ListViewItem _listviewItem;
lvPlugins.Items.Clear();
_pluginsCollection =
GlobalArea.PluginManager.GetPluginsList();
foreach (IDataLibPlugin _pluginObject in
_pluginsCollection.Values)
{
_listviewItem = new
ListViewItem(_pluginObject.PluginFullName);
_listviewItem.Checked = _pluginObject.Active;
lvPlugins.Items.Add(_listviewItem);
}
}
Next we will explore what you need to do when the user clicks on btnNewPlugin. This button must launch the ConfigurePlugin form that you've created earlier. If ConfigurePlugin returns an OK dialog result, we will add the plugin to the PluginManager object. You can perform the operation with the following code. Take note that after adding the plugin, you can refresh the Listview control by issuing another call to RefreshPluginsList().
private void Newplugin(System.Object sender, System.EventArgs e)
{
ConfigurePlugin _ConfigurePlugin;
_ConfigurePlugin = new ConfigurePlugin();
if (_ConfigurePlugin.ShowDialog() == Windows.Forms.DialogResult.OK)
{
GlobalArea.PluginManager.AddPlugin
(_ConfigurePlugin.PluginLibPath,
_ConfigurePlugin.PluginDatasource, true);
RefreshPluginsList();
}
_ConfigurePlugin.Dispose();
_ConfigurePlugin = null;
}
You can also remove a plugin via the code shown as follows:
private void RemovePlugin(System.Object sender, System.EventArgs e)
{
string _pluginFullName;
if (lvPlugins.SelectedIndices.Count == 0)
{
MessageBox.Show("Please select a plugin from the list to
remove", "Remove plugin", MessageBoxButtons.OK,
MessageBoxIcon.Exclamation,
MessageBoxDefaultButton.Button1);
}
else
{
_pluginFullName = lvPlugins.Items
(lvPlugins.SelectedIndices.Item(0)).Text;
GlobalArea.PluginManager.RemovePlugin(_pluginFullName);
RefreshPluginsList();
}
}
When the user checks or unchecks the checkbox next to each plugin in the Listview control, you must set the Active flag of the plugin to either true or false. You can do so with the following code snippet:
private void PluginChecked(object sender,
System.Windows.Forms.ItemCheckEventArgs e)
{
string _selectedPluginName;
IDataLibPlugin _selectedPluginObject;
_selectedPluginName = lvPlugins.Items(e.Index).Text;
_selectedPluginObject =
GlobalArea.PluginManager.GetPluginObject
(_selectedPluginName);
if (e.NewValue == CheckState.Checked)
{
_selectedPluginObject.Active = true;
}
else
{
_selectedPluginObject.Active = false;
}
}
At this point, you can try running your first .NET CF application! Run the SalesForceApp project. Visual Studio will build your project and prompt you to choose a target device to run the application (shown in the following screenshot):
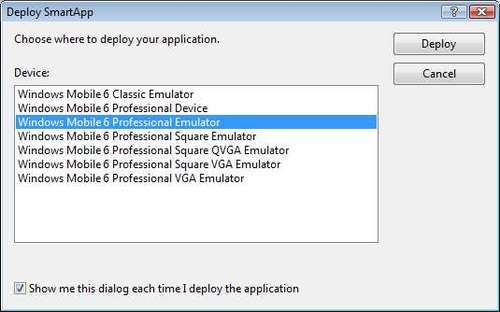
You should test your applications using the Windows Mobile 6 Professional Emulator. Choose this item and click Deploy. Your application files will be copied over to the emulator and run automatically.
You should now be able to see the PluginsSetup form you've created earlier. Try clicking the New Plugin button to see the ConfigurePlugin form. You can also see the OpenFileDialog window in action by clicking the button next to the Plugin library path, though at this point you won't have any plugins to load yet.
In the next section, you will learn how to build these plugins.