Many applications on the mobile device today come with tools that let the user download patches or latest updates from a remote server (when an Internet connection is available) and directly install them on the mobile device. This can help to take the load of maintenance and upkeep of the mobile application off the systems administrator. An automated update service ensures that mobile end users can freely apply patches and updates to their mobile device at the click of a button.
Your application should be no different. In a nutshell, this auto-update service will consist of two parts, one part being the server side and the other the mobile device side. At the server side, you will use web services. Your web service will do the following:
- Host the latest updates (in the form of CAB files)
- Provide a method that the mobile device code can call to retrieve information on the latest updates (such as version number, download size of the update, and so on)
At the mobile device side, your updater service should do the following:
- Call the web service to retrieve information on the latest updates
- Check the current version number of the application against the latest version number retrieved from the web service and decide whether an update is required
- If an update is required, download the new CAB file and automatically deploy it
- Update the application's current version number on the mobile device
We choose web services because it is relatively easy to set up and connect to. Create an ASP.NET web service project and name it SalesForceAutoUpdateService. Add a new Web Service (.asmx) file to your project named UpdateService.asmx, and delete the automatically created Service1.asmx file.
You will need to store information about the latest application updates somewhere on the server. Setting up a whole database for this seems like overkill, so the best way is to store it in an XML file. Add a new XML file (named SalesForceAppVersion.xml) to your project. The XML file only needs to store information about the latest version of the application. It is recommended to store at least the following details:
- CAB filename
- Latest version number
- Latest version date
- Name of application
Write the following contents in the XML file:
<?xml version="1.0" encoding="utf-8" ?>
<Applications>
<SalesForceApp UpdatesCabFile="salesforceapp2.0.cab"
LatestVersion="2" VersionDate="12/Jan/2010" />
</Applications>
Every time you need to make a new version of the application available to all your mobile users, you will need to place a copy of the latest CAB file on your server and then update this XML file.
Now let's create a web method that reads from this XML file and returns the information to the calling program. Take note that this web method assumes that the CAB file containing the updates is stored in a folder named UpdateFiles in your web service folder. The information about the latest updates is returned as a comma-separated string of values.
[WebMethod]
public string GetApplicationVersionInfo(string ApplicationName)
{
try
{
String _data="";
//Load the XML file
XmlDocument _xml = new XmlDocument();
_xml.Load
(AppDomain.CurrentDomain.BaseDirectory.TrimEnd('')
+ "\SalesForceAppVersion.xml");
//Retrieve the application node
XmlNodeList _xmlNodeList =
_xml.GetElementsByTagName("Applications");
XmlElement _xmlAppRootNode =
(XmlElement)_xmlNodeList.Item(0);
XmlNodeList _xmlAppNodeList =
_xmlAppRootNode.GetElementsByTagName
(ApplicationName);
if (_xmlAppNodeList.Count == 0) return "";
XmlElement _xmlApplicationNode =
(XmlElement)_xmlAppNodeList.Item(0);
//Get the full path to the CAB file on the server
String _cabFileName =
_xmlApplicationNode.GetAttribute("UpdatesCabFile");
String _cabFilePath =
AppDomain.CurrentDomain.BaseDirectory.TrimEnd('') +
"\UpdateFiles\" + _cabFileName;
//Calculate the filesize of the CAB file
FileInfo _file = new FileInfo(_cabFilePath);
String _packageSizeInBytes =
Convert.ToString(_file.Length);
//Place all the details in a comma-separated string and
//return this string
_data +=
_xmlApplicationNode.GetAttribute("LatestVersion") +
"," + _packageSizeInBytes + "," +
_xmlApplicationNode.GetAttribute("VersionDate") + ","
+ _cabFileName;
return _data;
}
catch (Exception)
{
return "";
}
}
That's all you need for the web service. Your next step is to place a dummy .CAB file in the<Webservicefolder>UpdateFiles folder. Copy the CAB file you've created earlier into the UpdateFiles folder. Rename this CAB file salesforceapp2.0.cab.
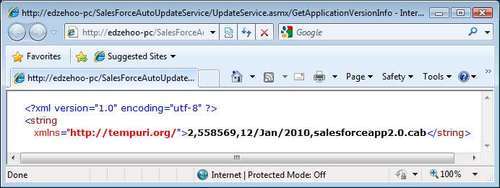
Register this web service with IIS by creating a virtual folder that points to this web service. Test your web service by navigating to the following URL in any browser on your PC.
http://localhost/SalesForceAutoUpdateService/UpdateService.asmx
You should be able to see your web service and its list of methods show up in your browser. You can even test out your web method. Click on the GetApplicationVersionInfo link, key in SalesForceApp as the Application argument, and click the Invoke button. You will see the following data returned:
In the next section, you will learn how to create the client-side part of the equation.
The updater service at the client-side is a separate application with an interface that allows the user to trigger the update process. Create a new Smart Device Application project, and design the following form:
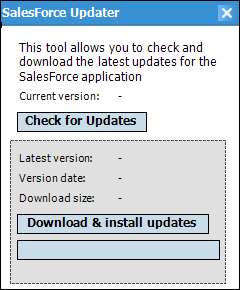
The gray panel (pnlRemoteFiles) is initially invisible. When a user clicks the Check for Updates button, this will initiate a check against the web service on a remote server. It will check if the local copy of the application needs an update (by checking the local version number against the latest version number available from the web service). If an update is needed, the gray panel is shown (together with the details of the latest updates). The user can then download and install these updates by clicking the Download & install updates button. There is also a progress bar below this button that shows the file download progress.
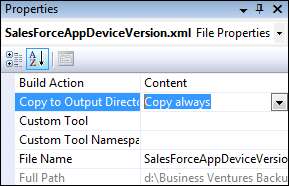
You will also need a place to store the current application version on the mobile device. You can use an XML file for this purpose. Add a new XML file to your project and name it SalesForceAppDeviceVersion.xml. Write the following contents in this file:
<?xml version="1.0" encoding="utf-8" ?>
<Applications>
SalesForceApp CurrentVersion="1" />
</Applications>
In your project, ensure that you set the Copy to Output Directory property to Copy always in the property window of the XML file (as shown below).
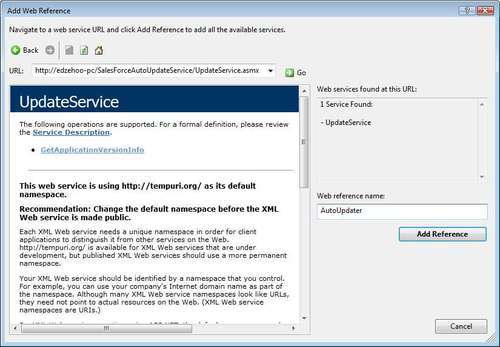
As the updater service will need to connect to the remote web service on your PC, you need to add a web reference to the web service. Right-click on the project and click the Add Web Reference menu item. Key in the full URL to the web service in the pop-up window. Take note that this web service will be called from your mobile device, so you should avoid using localhost in the URL. Refer to the web service using the full machine name of your PC (shown in the next screenshot). Name this web reference AutoUpdater.
In your form, you first need to declare a few global variables to store version details:
using System.Net;
using System.IO;
//Local version information
private int _currentVersion;
//Remote version information
private int _remoteVersionNo;
private DateTime _remoteVersionDate;
private string _updatesCabFile;
private int _updatesCabFileSize;
In the load event of the form, you need to parse the XML file and retrieve the local version information.
public void Updater_Load(object sender, System.EventArgs e)
{
//Get Local Version information
LoadLocalVersion();
}
private void LoadLocalVersion()
{
XmlDocument _xml = new XmlDocument();
_xml.Load(GetCurrentApplicationPath().TrimEnd("\".ToCharAr
ray()) + "\SalesForceAppDeviceVersion.xml");
XmlNodeList _xmlNodeList =
_xml.GetElementsByTagName("Applications");
XmlElement _XmlAppRootNode = (System.Xml.XmlElement)
(_xmlNodeList.Item(0));
XmlNodeList _xmlAppNodeList =
_XmlAppRootNode.GetElementsByTagName("SalesForceApp");
XmlElement _xmlApplicationNode = (System.Xml.XmlElement)
(_xmlAppNodeList.Item(0));
_currentVersion = int.Parse(
_xmlApplicationNode.GetAttribute("CurrentVersion"));
lblCurrentVersion.Text = _currentVersion.ToString();
}
In the click event of the Check for Updates button on your form, you need to call the web service, retrieve the latest version information, and then compare it against the local version information retrieved earlier. You can do this via the following code:
public void btnCheckUpdates_Click(System.Object sender,
System.EventArgs e)
{
AutoUpdater.UpdateService _service = new
AutoUpdater.UpdateService();
string _data;
string[] _versionInfo;
//Call the web service
_data =
_service.GetApplicationVersionInfo("SalesForceApp");
//Since the returned data is a comma-separated string, we
//split it into its constituent data fields
_versionInfo = _data.Split(','),
_remoteVersionNo = int.Parse(_versionInfo[0]);
_updatesCabFileSize = int.Parse(_versionInfo[1]);
_remoteVersionDate = DateTime.Parse(_versionInfo[2]);
_updatesCabFile = _versionInfo[3];
//Checks the version retrieved from the webservice against
//the current version
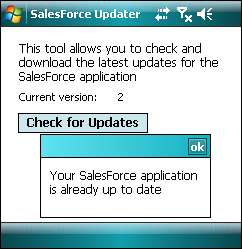
if (_remoteVersionNo > _currentVersion)
{
//If a latest update is available, display its
//details in the gray panel and make it visible
lblLatestVersion.Text = _remoteVersionNo.ToString();
lblDownloadSize.Text =
String.Format("{0:0,0}",_updatesCabFileSize) + " bytes";
lblVersionDate.Text = _remoteVersionDate.ToString();
pnlRemoteFiles.Visible = true;
}
else
{
//If an update is not required, display a message
MessageBox.Show("Your SalesForce application is already
up to date");
}
}
When the user clicks the Download & install updates button, you will need to download the update CAB file from the remote server. You can programmatically download a file using the System.Net.HttpWebRequest class. Using this class consists of the following steps:
- Call
HttpWebRequest.Create(URL)to create a request object on the desired file specified by the URL - Call
HttpWebRequest.GetResponse()to get a response object - Call
WebResponse.GetResponseStream().BeginRead()andWebResponse.GetResponseStream().EndRead()repeatedly to download chunks of the file asynchronously
You first need to declare a few additional global variables for the web request.
//Variables used to download the updates CAB file
private byte[] _downloadBuffer;
private int _downloadChunkSize = 65536;
private int _totalBytesDownloaded = 0;
private FileStream _fileStreamObj;
private WebResponse _webResponse;
private HttpWebRequest _webRequest;
private string _localCabPath;
In the click event of the Download and install updates button, write the following code:
public void btnDownloadAndInstall_Click(System.Object sender,
System.EventArgs e)
{
_webRequest = (HttpWebRequest)
(HttpWebRequest.Create("http://edzehoo-
pc/SalesForceAutoUpdateService/updatefiles/" +
_updatesCabFile));
_webResponse = _webRequest.GetResponse();
//Initialize the download buffer. The download buffer
//ideally should be a 64Kb chunk
_totalBytesDownloaded = 0;
_downloadBuffer = new byte[_downloadChunkSize + 1];
//Initialize the progressbar
pbDownload.Minimum = 0;
pbDownload.Maximum = _updatesCabFileSize;
pbDownload.Value = 0;
//Initialize the File stream object that receives the file
//data
_localCabPath =
GetCurrentApplicationPath().TrimEnd("\".ToCharArray())
+ "\" + _updatesCabFile;
_fileStreamObj = new FileStream(_localCabPath, FileMode.Create);
//Start the asynchronous file download download the first
//64Kb chunk
_webResponse.GetResponseStream().BeginRead(_downloadBuffer,
0, _downloadChunkSize, new AsyncCallback(DataReceived), this);
}
In the previous code, you are referencing an asynchronous callback function named DataReceived. This callback function is automatically invoked when the amount of data specified (via _downloadChunkSize) has been downloaded successfully. In this callback function, you retrieve the downloaded data, write it to the file stream object, update the progress bar, and then initiate another asynchronous read (of the next 64 KB chunk of data). This process repeats itself until there is no data left to read.
private void DataReceived(IAsyncResult Data)
{
int _downloadedSize =
_webResponse.GetResponseStream().EndRead(Data);
//Write the downloaded data into the file stream object
_fileStreamObj.Write(_downloadBuffer, 0, _downloadedSize);
_totalBytesDownloaded += _downloadedSize;
//Update the progress bar
pbDownload.Invoke (new EventHandler (UpdateProgress));
//Check if all bytes downloaded
if (_totalBytesDownloaded < _updatesCabFileSize)
{
//Download the next chunk
_webResponse.GetResponseStream().BeginRead
(_downloadBuffer, 0, _downloadChunkSize, new
AsyncCallback(DataReceived), this);
}
else
{
//Close the file
_fileStreamObj.Close();
//Asks the user for confirmation if he or she wants to
//install the downloaded updates
if (MessageBox.Show("Updates downloaded. Would you like
to install the updates now?", "Install?",
MessageBoxButtons.YesNo, MessageBoxIcon.Question,
MessageBoxDefaultButton.Button1) ==
System.Windows.Forms.DialogResult.Yes)
{
//Launch the cab file
Process.Start(_localCabPath, "");
//Update local version information
UpdateLocalVersion();
}
}
}
//Updates the progress bar
private void UpdateProgress(Object sender, EventArgs e)
{
pbDownload.Value = _totalBytesDownloaded;
client-side updater tool, automated update serviceaboutApplication.DoEvents();
}
//Retrieves the current application path
private string GetCurrentApplicationPath()
{
string _path =
System.Reflection.Assembly.GetExecutingAssembly()
.GetName().CodeBase;
return System.IO.Path.GetDirectoryName(_path);
}
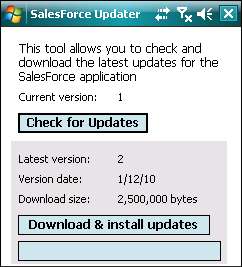
Your updater service is now complete! To test this application, ensure that an ActiveSync connection is properly set up first. When your application loads, you will notice that the current version is set to 1. Clicking the Check for Updates button retrieves the latest version information from the web service and displays it in the gray panel (shown as follows):
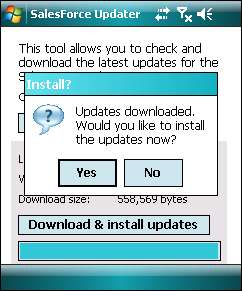
When you click the Download & install updates button, this will initiate the download process. Once the download is complete, you will be prompted to install the updates (shown in the following screenshot).
After installing the CAB updates, the current version number in your XML file is automatically updated. If you launch the application again from your mobile device, you will notice that the current version now displays the value 2.
Tip
Don't launch the application from Visual Studio this time, as doing so will deploy the original XML file over to your mobile device and overwrite the copy on the device.
If you click Check for Updates now, it will prompt you with a message notifying that the application is already up to date.