
The main menu serves as a launch pad to the various modules in your sales force application. We will implement an icon-based menu using the ListView control. Let's start by adding a new form named MainMenu to your project.
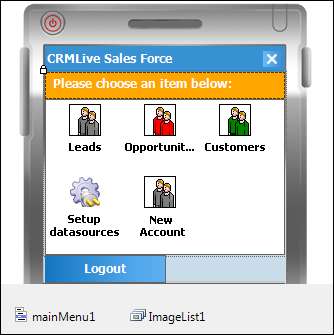
Drag a ListView control to the form and set the Dock property to Fill. This will expand your ListView control to fill up the screen. You will need to represent the various modules of your application using different icons. Drag an ImageList control to the form. Highlight the ImageList instance and set the ImageSize property to 32 (indicating an icon width and height of 32 pixels respectively). Click on the Images property, and add five icon files of the same size to this list. You can use your own set of icons or the ones provided in the downloadable source code for this book.
After doing that, select the ListView instance on the form, and set its LargeImageList property to the name of the ImageList instance you've just created. This provides the ListView control with a library of icons that it can use for display. Next, set the Activation property of the ListView control to TwoClick. This means that the user has to click or tap the icon twice to indicate that he has selected that item.
You should now add some items to your main menu. Expand the Items property of your ListView control, and add five items. We will use the Tag property to identify each item. Use the same name for both the Tag and Text properties. Make sure you select the appropriate icon for each item.

When a user double-clicks on one of these five menu items, we will check to see which item was selected, read its Tag property, and then call the NavigationService class to launch the corresponding form associated with the tag. The following shows how this is done in code:
public void lstMainMenu_ItemActivate(object sender, System.EventArgs e)
{
if (lstMainMenu.SelectedIndices.Count > 0)
{
string _tag = System.Convert.ToString
(lstMainMenu.Items
[lstMainMenu.SelectedIndices[0]].Tag);
NavigationService.ShowDialog(_tag, null);
}
}
You will now need to create a button that allows your users to exit the application. In the menu bar of this form, add a menu item with the caption Logout. Double-click on this menu item, and add some code to close the window:
public void mnuLogout_Click(System.Object sender,System.EventArgs e)
{
this.DialogResult = DialogResult.Cancel;
this.Close();
}
You will now add code to launch this main menu in your Navigationservice class:
public static DialogResult ShowDialog(string DialogName,object Arg1)
{
DialogResult _dialogResult = DialogResult.Cancel;
switch (DialogName)
{
case "SetupDatasources":
PluginsSetup _PluginsSetup = new PluginsSetup();
_dialogResult = _PluginsSetup.ShowDialog();
_PluginsSetup.Close();
_PluginsSetup.Dispose();
_PluginsSetup = null;
break;
case "MainMenu":
MainMenu _MainMenu = new MainMenu();
_dialogResult = _MainMenu.ShowDialog();
_MainMenu.Close();
_MainMenu.Dispose();
_MainMenu = null;
break;
}
return _dialogResult;
}
In Chapter 2, the SalesForceApp project would automatically run the PluginsSetup form every time you ran the project. You will now change the startup object for this project from a form to a class instead. The .NET framework supports using a Main() method as the initial point of entry to an application, so let's create this method.
First add a new class called Application to your project. This class will provide the methods to manage the application lifecycle as well as to house global-scope functions.
using System;
using System.Windows.Forms;
using System.Data;
namespace CRMLive
{
public class Application
{
//Application entry point
public static void Main()
{
InitializeApp();
NavigationService.ShowDialog("MainMenu", null);
DeInitializeApp();
}
//Initializes the application
public static void InitializeApp()
{
try
{
GlobalArea.PluginManager.GetActivePlugin.ConnectDatabase();
}
catch (Exception ex) {}
}
//Deinitializes the application
public static void DeInitializeApp()
{
try
{
GlobalArea.PluginManager.GetActivePlugin.DisconnectDatabase();
}
catch (Exception ex) {}
}
}
}
You will also notice in the InitializeApp() method that we just saw, you requested the active plugin object to establish a connection to the database. The sales force application will open and maintain a single connection to the database throughout its entire life.
Tip
Connected or disconnected state?
A constantly connected database state is possible and, in fact, better suited for a mobile application. This is due in part to the expectation that there is only one user using the local database on the mobile device at any one time.
The Main() method must be declared as a static method so that it can be used as the startup object for this project. To change the startup object, navigate to the Project Properties menu. In the Application tab, select Sub Main in the Startup object drop-down list.
Let's test what you have built so far. Run the SalesForceApp project. You will immediately see your main menu form show up instead of the PluginsSetup form. Click on the Logout menu item to exit the application.
Now let's set up the logic tier—the business objects that encapsulate the raw datasets retrieved from the database.