
When you build mobile applications, it is quite likely that you will have to handle file attachments one way or another. When deciding on a strategy for file handling on the mobile platform, it is usually a good idea to consider how these files will be synced to your enterprise server at the end of the day. There are generally two approaches:
- Storing physical files as binary data in the database
- Storing physical files in the filesystem with a link to the file in the database
Generally speaking, if your intention is to make file handling as painless as possible without much regard to performance, then you're probably better off with the first approach. Storing physical files in the database has the benefit of not having to do any additional work during sync—the file is treated like any other ordinary table column.
The following table lists the main considerations for each approach:
|
Storing physical files in the database |
Storing physical files in the filesystem |
|---|---|
|
Use this approach if performance is not a strong consideration and you want to employ a file handling approach that is quick and easy to set up |
Use this approach if performance is a concern and you need more control over how files are synced |
|
Typically limited to the database size limit of 4 GB |
Storage size is not limited by database but by device |
|
Security is provided via database encryption |
Files stored on disk are not protected—you will usually need to implement your own encryption routines |
As performance is an important consideration for the sales force application, we will use the second approach. We will start by first building a file manager class to handle the uploading of files to the sales force application and their internal storage.
The core concept of a file manager has to do with maintaining a file repository (usually a folder or drive) on the mobile device that is internally used to store all files uploaded via the application. This file repository is never accessed directly from the rest of the application; only the file manager can access this repository. In this sense, the file manager serves as a broker that services all file upload/download requests initiated by the application.
Let's take a look at the skeleton code for this file manager class. When this class is created, the first step would be to ensure that the file repository (in this case the \Attachments folder) exists, and if it does not, to create it.
using System.Diagnostics;
using System;
using System.Data;
using System.IO;
namespace CRMLive
{
public class FileManager
{
public FileManager()
{
if (System.IO.Directory.Exists("\Attachments") ==
false)
{
try
{
System.IO.Directory.CreateDirectory
("\Attachments");
}
catch (Exception) {}
}
}
}
}
You will now create the Store() function, which allows users to upload an on-disk file to the repository. You cannot simply make a copy of the uploaded file in the root repository folder because it is highly likely that two files with the same name will be uploaded on the same device. This will lead to one file overwriting the other in the shared repository folder.
We must therefore assign each uploaded file a unique GUID of its own. Every time a new upload is made, a folder is created with this GUID as its name. The physical file is then copied to this folder, and the full path returned (so that it can be used as a link to refer back to this file).
In other words, when a file named Contract.docx is uploaded to the sales force application, it would end up in:
\Attachments2a2c1726-24b3-4c3f-82ba-893933971f9fContract.docx
The code to do this is as follows:
public string Store(string FilePath)
{
string _newFileGUID;
string _finalPath;
_newFileGUID = Guid.NewGuid().ToString();
_finalPath = "\Attachments\" + _newFileGUID;
try
{
Directory.CreateDirectory(_finalPath);
_finalPath = _finalPath + "\" +
Path.GetFileName(FilePath);
File.Copy(FilePath, _finalPath);
return _finalPath;
}
catch (Exception)
{
return "";
}
}
The sales force user would likely need to pull out documents from the repository via the application, edit them, and then subsequently save them (and hopefully not have to re-upload the file again). The easiest way to achieve this is to simply open the file directly from the repository using its associated viewer. This means that opening a .docx file would automatically launch Microsoft Word, a .pdf file would launch Adobe Reader, and so on. Doing this is much easier than it sounds. The Process class in the System.Diagnostics namespace allows you to do all that with a single line of code:
When you build mobile applications, it is typical to provide file upload functionality in many different screens in your application. So it would make a lot of sense to create a FileUpload user control that is reusable.
Note
A user control, unlike an inherited custom control, can be designed using the Visual Studio designer. If you intend to create a control that is a composite of multiple controls, creating it as a user control would be a better alternative than an inherited custom control.
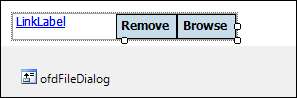
The FileUpload user control consists of a LinkLabel, a Remove and Browse button, and an OpenFileDialog control. You will need to set the Filter property of the OpenFileDialog control to All files|*.* so that it will display all file types in the file dialog window.
Let's take a look at the following skeleton code for this user control. You will need to create a custom event called Changed, which is raised by the user control every time the file attachment is changed. To do this, you will need to declare an event handler for the Changed event using the delegate keyword. Take note that this is usually done outside the class declaration. Inside the class, we declare the event as follows:
using System;
using System.Windows.Forms;
namespace CRMLive
{
public delegate void ChangedEventHandler(string
NewFilepath);
public partial class Fileupload
{
private bool _editMode;
private FileManager _FileManager;
private string _filepath;
public event ChangedEventHandler Changed;
public bool EditMode
{
get
{
return _editMode;
}
set
{
_editMode = value;
}
}
public string Datasource
{
get
{
return _filepath;
}
set
{
_filepath = value;
llFilepath.Text =
System.IO.Path.GetFileName(_filepath);
//Here we raise the changed event
Changed(_filepath);
}
}
public Fileupload()
{
// This call is required by the Windows Form
//Designer.
InitializeComponent();
// Add any initialization after the
//InitializeComponent() call.
_FileManager = new FileManager();
}
}
}
You will now need to implement the code for the various constituent controls. The following code will make use of the FileManager class you have created earlier to store and launch uploaded files.
//Click event handler for the Link Label
public void llFilepath_Click(System.Object sender, System.EventArgs e)
{
if (MessageBox.Show ("Are you sure you wish to launch the
file now?","Launch file?",MessageBoxButtons.YesNo
,MessageBoxIcon.Question ,MessageBoxDefaultButton.Button1
)==DialogResult.Yes )
{
_FileManager.Launch(_filepath);
}
}
//Click event handler for the Browse button
public void btnBrowse_Click(System.Object sender,
System.EventArgs e)
{
if (ofdFileDialog.ShowDialog() == DialogResult.OK)
{
Datasource = _FileManager.Store(ofdFileDialog.FileName);
}
}
//Click event handler for the Remove button
public void btnRemove_Click(System.Object sender,
System.EventArgs e)
{
Datasource = "";
}
Finally, you need to set up a Datagrid to show a listing of the files for each account. Add a new Files tab to your AccountViewer form.

Drop a Datagrid control onto this tab and add another line of code in the SetupBindings() method to bind the Datagrid to the BaseAccount.Files property.
public void SetupBindings()
{
if (_account != null)
{
AccountBindingSource.DataSource = typeof(BaseAccount);
AccountBindingSource.Add(_account);
.
.
.
dgFiles.DataBindings.Add(new Binding("DataSource",
AccountBindingSource, "Files", true));
}
}
You will now need to build the FileDetailViewer form, which shows the detail for each file attachment record. This form is shown as follows:

This form consists of a text box for the file name, a label to display the file size, and the FileUpload control you created earlier.
Let's take a look at the following code required to set up data binding for this form. The path of the uploaded file will need to be stored in the database. You can achieve this by data-binding the FileUpload.Datasource property to the Attachment field of the File class.
private void SetupBindings()
{
this.FileBindingSource.DataSource = typeof(File);
this.FileBindingSource.Add(_Datasource);
txtFilename.DataBindings.Add(new Binding("Text",
FileBindingSource, "AttachmentName", true));
fuAttachment.DataBindings.Add(new
Binding("Datasource", FileBindingSource,
"Attachment", true));
DisplayAttachmentSize(_Datasource.AttachmentSize);
}
In the event handler of the Changed event for the FileUpload field, retrieve the file size of the file and display it in the same window using the following code:
public void fuAttachment_Changed(string NewFilepath)
{
if (System.IO.File.Exists(NewFilepath) == true)
{
System.IO.FileInfo _file = new
System.IO.FileInfo(NewFilepath);
DisplayAttachmentSize(_file.Length);
}
}
private void DisplayAttachmentSize(long AttachmentSize)
{
lblFileSize.Tag = AttachmentSize;
lblFileSize.Text = String.Format("{0:###,###,###,###}",
AttachmentSize) + " bytes";
}
Run the sales force application again. Navigate to the Files tab, and try uploading a new file by clicking the New button. You should be able to see the FileDetailViewer form. After uploading the file and clicking the Save button, you should be able to see the file item displayed in the Datagrid.
If you navigate to the \Attachments folder on your device, you should be able to see that a new folder has been created by the file manager, with your uploaded file stored inside.