
The Smart Device Framework consists of a set of controls and classes that exposes a broad range of mobile device functionality to the .NET programmer. One of these controls is the Signature control, which allows the end user to perform freehand drawing (using the mobile device stylus). Let's take a look at how you can use this control in your sales force application to capture the customer's signature.
When the end user saves the signature, it will be saved as a PNG image file, and will eventually need to be committed to the AccountFiles table. As you already have a facility to load and save file attachments in your AccountViewer form, let's take advantage of this existing functionality.
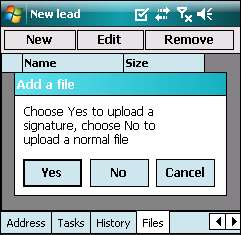
You will need to make some changes so that when the user clicks on New in the Files tab, the user is prompted to choose if he or she wants to upload a signature or a normal file. If the end user chooses No, it will launch the default FileDetailViewer form that you've built. If the user chooses Yes, it will launch the new signature-capturing form.
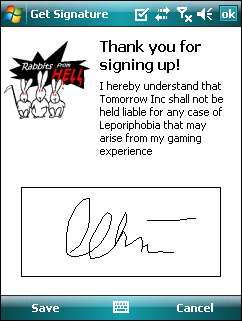
The signature-capturing form will display the Smart Device Framework's Signature control in the bottom half of the screen, with some text and images at the top. When the user clicks on Save, the signature is saved into a PNG image file. It will output a File object just like any other ordinary file attachment and can, therefore, be easily integrated into your sales force application.
Now that you have an idea how this works, let's start building the functionality. The first thing you need to do is to install the Smart Device Framework. You can download the Smart Device Framework from the following URL by clicking the Download the Community Edition (free) link:
http://opennetcf.com/CompactFramework/Products/SmartDeviceFramework/tabid/65/Default.aspx
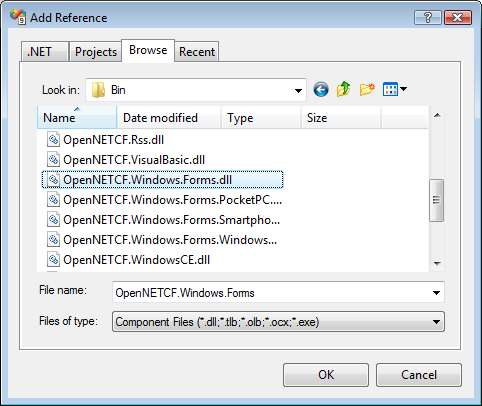
After you've installed the Smart Device Framework, add a reference to the OpenNETCF.Windows.Forms.dll library. This is typically located in the installation folder of the Smart Device Framework.
Once you have done this, you should now create the signature-capturing form. Name this form GetSignature.
Tip
Visual designing support for the Smart Device Framework
If you are using the free version of the Smart Device Framework, one of its limitations is that you will not be able to visually drag and drop the control onto the form as you normally would. You will have to create and add the control to the form using code.
Let's take a look at the code for this form:
using System;
using System.Windows.Forms;
using System.Drawing.Imaging;
using System.IO;
using System.Reflection;
using OpenNETCF.Windows.Forms;
namespace CRMLive
{
public partial class GetSignature
{
private File _File;
private FileManager _FileManager;
private Signature _signature = new Signature();
//Constructor for the form. Take note that we will pass //in a File object to this form
public GetSignature(File FileObject)
{
InitializeComponent();
_File = FileObject;
_FileManager = new FileManager();
}
The following code in the form load event generates the control and places it at the desired coordinates:
public void GetSignature_Load(object sender,
System.EventArgs e)
{
_signature.Name = "Signature1";
_signature.Location = new System.Drawing.Point
(20, 160);
_signature.Size = new System.Drawing.Size(200, 90);
this.Controls.Add(_signature);
}
When the user clicks the Save button, you will first need to save the contents of the Signature control to a PNG image file. After that, you will use the FileManager class you've created earlier in Chapter 2 to upload the file and return a relative file path. You will need to then fill in the File object passed in to this form with the details of the signature file.
public void mnuSave_Click(System.Object sender,
System.EventArgs e)
{
string _filePath;
FileInfo _fileinfo;
string _tempPath;
_tempPath =
System.IO.Path.GetTempPath().TrimEnd(''),
_filePath = _tempPath + "\" +
Guid.NewGuid().ToString() + ".png";
_signature.ToBitmap().Save(_filePath,
ImageFormat.Png);
_fileinfo = new System.IO.FileInfo(_filePath);
_File.Attachment = _FileManager.Store(_filePath);
_File.AttachmentName = "Signature";
_File.AttachmentSize = (int) _fileinfo.Length;
this.DialogResult =
System.Windows.Forms.DialogResult.OK;
this.Close();
}
public void mnuCancel_Click(System.Object sender,
System.EventArgs e)
{
this.DialogResult =
System.Windows.Forms.DialogResult.Cancel;
this.Close();
}
}
}
Now, let's take a look at the changes required in the AccountViewer form. Look at the btnNewFile_Click function in the AccountViewer form. The changes required for this function are highlighted in the following code snippet:
public void btnNewFile_Click(System.Object sender,
System.EventArgs e)
{
File _File;
DialogResult _dialogResult;
_dialogResult=MessageBox.Show("Choose Yes to upload a
signature, choose No to upload a normal file", "Add a
file", MessageBoxButtons.YesNoCancel,
MessageBoxIcon.Question,
MessageBoxDefaultButton.Button1);
switch (_dialogResult)
{
case DialogResult.Yes:
_File = _account.NewFile();
GetSignature _Signature = new GetSignature(_File);
if (_Signature.ShowDialog() ==
System.Windows.Forms.DialogResult.OK)
{
_account.Files.AddFile(_File);
dgFiles.DataSource = null;
dgFiles.DataSource = _account.Files;
}
_Signature.Close();
_Signature.Dispose();
_Signature = null;
break;
case DialogResult.No:
_File = _account.NewFile()
FileDetailViewer _EditView = new
FileDetailViewer(_File);
if (_EditView.ShowDialog() == DialogResult.OK)
{
_account.Files.AddFile(_File);
dgFiles.DataSource = null;
dgFiles.DataSource = _account.Files;
}
_EditView.Close();
_EditView.Dispose();
_EditView = null;
break;
}
}
After you have done this, try creating a new file in your AccountViewer form, and choose Yes to capture your signature. You will find that it is saved to the database like any other file attachment.