
The two plugin projects (SQLServerPlugin and OracleLitePlugin) are standalone Class Library projects. They are compiled as DLL files and are meant to be deployed separately from the main sales force application. They are simply 'plugged in' to the framework when required.
Both plugins implement the IDataLibPlugin interface that you've created earlier. Let's start by building the SQLServerPlugin project. Within the same CRMLiveFramework project, navigate to the File | Add | New Project menu item. Use the Smart Device Project type and Class Library template and create a project with the name SQLServerPlugin. Like before, change the namespace of the project to CRMLive.
Your plugin would need to implement the IDataLibPlugin interface, so you need to add a reference to the CRMLiveFramework project. As both projects are created in the same solution, you can easily do this by navigating to the Projects tab in the Add Reference window and selecting the CRMLiveFramework project.

In addition to this, we also need to add a reference to the System.Data.SqlServerCe library under the .NET tab in the same preceding window.
Visual Studio provides a Resource Editor that allows you to store resources such as strings, bitmaps, and icons in an embedded resource file in your project. We can make use of this facility to store DDL (Data Definition Language) such as the CREATE TABLE statements in a resource file.
You can add a resource file to your project by navigating to the Project | Add New Item menu item and adding a new item based on the Resources File template. Name your resource TableSchema.
Upon doing so, you will be prompted with the resource editor window, from which you can add your CREATE TABLE statements.
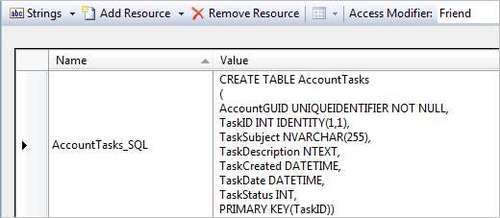
Let's add some of the SQL statements below to the resource editor. In the next section, we will explore how we can use .NET's Resourcemanager class to retrieve these SQL statements from the resource file.
Tip
The UniqueIdentifier field type
In the SQL code, we assign a UNIQUEIDENTIFIER field type to the primary key of the Accounts table. A UNIQUEIDENTIFIER is a 16-byte value that is guaranteed to be globally unique. You can generate this value in SQL using the NEWID() function or programmatically using System.Guid.NewGuid().
|
Name |
Description |
|---|---|
|
|
|
|
|
|
|
|
|
|
|
|
|
|
|
We will now add the main plugin class to the project. Navigate to Project | Add New Item and add a new class named PluginClass to your project. You will first need to add a reference to the System.Data.SqlServerCE library. This library contains all the managed classes you will need to connect to SQL Server CE. Include the following imports at the top of your class:
using CRMLive;
using System.Data;
using System.Data.SqlServerCe;
using System.Resources;
using System.Reflection;
Now that we have all the library references we need, we can implement the IDataLibPlugin interface:
public class DataLibPlugin : IDataLibPlugin
{
}
Upon typing this line of code, Visual Studio will automatically generate the entire skeleton of the interface in your class. We will need to implement some of the basic methods of the interface. The PlugInFullName method for instance, allows external code to retrieve the full name of the plugin. We can implement this function quite easily below:
public string PluginFullName {
get { return "SQL Server Compact 3.5 Plugin"; }
}
We will also implement the Datasource, Active, and PluginPath properties of the interface. These three properties are used at run-time and need to be stored in the instance of the object. We simply create a member variable for each of these properties and expose them through the property:
private string _connectionString;
private string _pluginPath;
private bool _active;
public string Datasource {
get { return _connectionString; }
set { _connectionString = value; }
}
public bool Active {
get { return _active; }
set { _active = value; }
}
public string PluginPath {
get { return _pluginPath; }
set { _pluginPath = value; }
}
Microsoft provides two different providers to connect to the SQL Server Compact database:
- Microsoft .NET Compact Framework Data Provider for SQL Server Mobile (SqlCeConnection)
- Microsoft .NET Compact Framework Data Provider for OLEDB (OleDbConnection)
Tip
It is recommended to use SqlCeConnection whenever possible, as these are native SQL Server CE providers. The OledbConnection provider is a generic provider that will perform data type conversions and other operations under the hood and so its performance will be slower than that of SqlCeConnection.
You can connect to your SQL Server CE database using the following code:
Let's take a look at the CreateSalesForceDatabase method. This method is expected to create a database named SalesForce in SQL Server CE and to generate all the sales force application tables automatically. On implementing this function, we will employ the use of the following technologies:
- We will use the
SqlCeEngineclass to generate the new database. - We will use the
SqlCeConnectionclass to connect to the database. - We will store all the SQL statements (that define the table schemas) in a Visual Studio generated resource file and retrieve them during realtime.
- We will make use of .NET reflection to obtain the current folder path.
In the CreateSalesForceDatabase implementation, we first need to declare a few function-scope variables:
SqlCeEngine _engine;
SqlCeConnection _connection;
SqlCeCommand _command;
resourcemanager _ResourceManager;
string _dbcreationstring;
string _SDFPath;
bool _dbcreationsuccess = false;
Next, we will use .NET reflection to retrieve the current path. We will use that to build your full connection string:
_SDFPath = System.IO.Path.GetDirectoryName(Assembly.GetExecutingAssembly().GetName().CodeBase) + "\salesforce.sdf";
_dbcreationstring = "Data Source='" + _SDFpath + "';LCID=1033;Password='admin123';Encrypt=FALSE;"
We then use the SqlCeEngine class to create the database using the connection string you've built earlier. We put this whole block of code under a Try...Catch block so that if this part of the code fails, we will simply exit the function:
_engine = new SqlCeEngine(_dbcreationstring);
try
{
_engine.CreateDatabase();
_dbcreationsuccess = true;
}
catch (Exception ex) {
MessageBox.Show(ex.Message, "Create database",
MessageBoxButtons.OK, MessageBoxIcon.Exclamation,
MessageBoxDefaultButton.Button1);
}
finally
{
_engine.Dispose();
}
if (_dbcreationsuccess == false) return false;
Now that the database .SDF file has been created, we will attempt to connect to it and execute the SQL statements stored in the TableSchema.resx resource file to build the entire schema required for the sales force application. We start by first opening a connection to your newly created database:
_connectionString = "Data source='" + _SDFPath + "';Password=admin123;";
_connection = new SqlCeConnection(_connectionString);
try
{
_connection.Open();
}
catch (Exception ex)
{
MessageBox.Show(ex.Message, "Connecting to database",
MessageBoxButtons.OK, MessageBoxIcon.Exclamation,
MessageBoxDefaultButton.Button1);
return false;
}
We latch .NET's ResourceManager class on to your TableSchema.resx resource file. You will need to provide the full base name for your resource file, which is CRMLive.TableSchema:
Lastly, we create the SqlCeCommand object to run each of the SQL statements retrieved from the resource file. This will create all the tables we need for the application:
_command = _connection.CreateCommand();
_command.CommandText = _ResourceManager.GetString("Accounts_SQL");
_command.ExecuteNonQuery();
_command.CommandText = _ResourceManager.GetString("AccountTasks_SQL");
_command.ExecuteNonQuery();
_command.CommandText = _ResourceManager.GetString("AccountHistories_SQL");
_command.ExecuteNonQuery();
Also don't forget to close and dispose of the database connection at the end:
_connection.Close();
_connection.Dispose();
_connection = null;
return true;
It is now time to test your plugin! Compile your plugin project. This will output a DLL assembly. Copy the output DLL assembly to a folder on your mobile device.
Tip
Alternatively, you can also add a project reference to SQLServerPlugin inside your SalesForceApp project. This will ensure that the DLL generated from the SQLServerPlugin project will always be deployed together with your SalesForceApp application when you run it.
You can do so by right-clicking your SalesForceApp project, navigating to the Projects tab in your Add Reference menu, and selecting the SQLServerPlugin project.
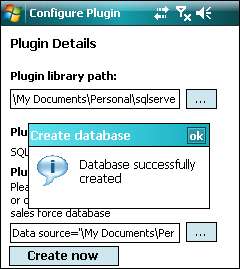
Run the SalesForceApp application. Click the New Plugin button, and then browse for your plugin DLL. Once you've selected it, the name of the plugin will appear. Without filling in anything else, click the Create now button. This will call the create CreateDatabase method of your plugin to create the SQL Server database.
When the SQL Server CE product is installed on your mobile device, it installs a tool called the Query Analyzer. You can think of it as a useful lightweight equivalent of the SQL Server Enterprise Manager tool. In this section, we will explore how we can use the Query Analyzer to browse the database and tables you've generated earlier.
When you install the sqlce.dev.* .cab file, a tool called the Query Analyzer 3.5 is created in your device's Programs window. This tool is represented by the icon below:

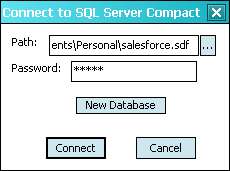
After you launch the Query Analyzer tool, you will be presented with a window containing four tabs. The first tab (Objects) allows you to see the databases registered with the tool. You can register a database by clicking the button highlighted in the red box as follows:
This will open up a window that allows you to browse for your database file (with the extension .SDF). Locate this file on your mobile device, and type in the password (which you've designated as admin123 at the moment). Click the Connect button to connect to the database.
Once you've done this, you will be able to see the list of tables shown in the main panel of the tool. You can browse the columns of each table by expanding the Columns folder.
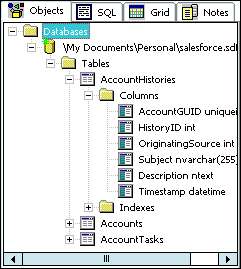
You can also run SQL queries against the database via the SQL tab. The Query Analyzer tool is handy for situations when you need to debug your application. For example, you might want to check the database to see if data was correctly inserted from your application.
Let's revisit the SQLServerPlugin project. You will now explore how you can add functionality to retrieve data from the database you've created into an ADO.NET dataset object. The GetAccountDetails() method's job is to take in the unique identifier of a particular account (AccountGUID) and then retrieve all the relevant account details (including tasks, histories, and file attachments) from the database. It will place the data from each table in a separate Datatable object in the Dataset.
To begin, let's declare some of the variables you will need to use:
public DataSet GetAccountDetails(Guid AccountGUID)
{
SqlCeConnection _connection;
SqlCeDataAdapter _adapter;
SqlCeCommand _command;
DataSet _Resultset;
}
Assuming that a connection to the database has already been opened, you are now ready to create an ADO.NET command object. You can use the CreateCommand() method in the SqlCeConnection class to generate one. After doing so, assign the SQL statement you want to execute to the command object. Create an SqlCeDataAdapter object to run the command and fill the dataset created earlier with the retrieved data. Take note that you should specify the name of the resulting Datatable object to the Fill() method. This allows you to create multiple tables containing different data in the same Dataset object:
_command = _connection.CreateCommand;
_command.CommandText = "SELECT * FROM Accounts WHERE
AccountGUID='" + AccountGUID + "'";
_Resultset = new DataSet();
_adapter = new SqlCeDataAdapter(_command);
_adapter.Fill(_Resultset, "Accounts");
Repeat the same thing for the other three related tables, filling in different Datatables in the same DataSet object:
_command.CommandText = "SELECT * FROM AccountTasks WHERE
AccountGUID='" + AccountGUID + "' ORDER BY TaskDate DESC";
_adapter.Fill(_Resultset, "AccountTasks");
_command.CommandText = "SELECT * FROM AccountHistories WHERE
AccountGUID='" + AccountGUID + "' ORDER BY TimeStamp DESC";
_adapter.Fill(_Resultset, "AccountHistories");
_command.CommandText = "SELECT * FROM AccountFiles WHERE
AccountGUID='" + AccountGUID + "' ORDER BY AttachmentID
DESC";
_adapter.Fill(_Resultset, "AccountFiles");
Dispose of all of the used objects and return the Dataset object from the function.
_adapter.Dispose();
_command.Dispose();
_adapter = null;
_command = null;
return _resultset;
You will be able to test your data retrieval function in Chapter 3, Building the Mobile Sales Force Module, when you create the rest of the application.
Data manipulation requires a little bit more work. The logic tier will make use of the Dataset retrieved from GetAccountDetails() to display accounts data to the end user. The user can manipulate the data in this Dataset through the Sales Force UI (for instance adding a new task or deleting a file attachment). After that, the same Dataset is passed to the SetAccountDetails() method, which updates each table accordingly.
You will use the ADO.NET command objects to achieve this. Another important consideration is that because you are updating four different tables, there may be cases where the database could be partially updated (for instance, the first three tables are updated successfully, but the last one fails).
You can prevent this through the use of the SqlCeTransaction class. All four updates are collectively treated as a transaction—either all four tables are updated successfully or none at all. You will see how you can implement this in the following code.
We first declare the variables we will need:
public bool SetAccountDetails(Guid AccountGUID, System.Data.DataSet Account)
{
SqlCeDataAdapter _adapter;
SqlCeTransaction _transaction;
}
Assuming that a connection to the database has already been opened, the next piece of code will mark the beginning of a transaction using the BeginTransaction() method call.
_transaction = _connection.BeginTransaction();
You will need to then create an ADO.NET UpdateCommand, InsertCommand, and DeleteCommand object for each table. The reason or this is that when a Dataset arrives at your SetAccountDetails method, it may contain a list of changes that include updated fields, deleted rows, or newly inserted rows. The adapter object will therefore need to be fed the corresponding UPDATE, INSERT, and DELETE SQL statements.
This also gives you some flexibility in the sense that your UPDATE statement, for instance, can selectively update desired fields in the table. You can use the Parameters collection of the command object to tell the adapter object which columns in the Dataset to retrieve the data from. The adapter object will plug the actual values into your UPDATE SQL statement when it commits the data.
_adapter = new SqlCeDataAdapter();
try
{
//=========================================================
//UPDATING THE ACCOUNTTASKS TABLE
//=========================================================
//Here we create an Update command for the AccountTasks //table. Take note that we include this command as part of
//the transaction
_adapter.UpdateCommand = new SqlCeCommand("UPDATE
AccountTasks SET TaskSubject=@TaskSubject WHERE
AccountGUID=@AccountGUID", _connection, _transaction);
_adapter.UpdateCommand.Parameters.Add("@TaskSubject",
SqlDbType.NVarChar, 255, "TaskSubject");
_adapter.UpdateCommand.Parameters.Add("@TaskDescription",
SqlDbType.NText, 16, "TaskDescription");
_adapter.UpdateCommand.Parameters.Add("@TaskDate",
SqlDbType.DateTime, 8, "TaskDate");
_adapter.UpdateCommand.Parameters.Add("@TaskStatus",
SqlDbType.Int, 4, "TaskStatus");
_adapter.UpdateCommand.Parameters.Add("@TaskID",
SqlDbType.Int, 4, "TaskID");
//Here we create the Delete command for the AccountTasks table
_adapter.DeleteCommand = new SqlCeCommand("DELETE FROM
AccountTasks WHERE TaskID=@TaskID", _connection, _transaction);
_adapter.DeleteCommand.Parameters.Add("@TaskID",
SQL Server CE databasedata, manipulatingSqlDbType.Int, 4, "TaskID");
//Finally we create the Insert command for the AccountTasks table
_adapter.InsertCommand = new SqlCeCommand("INSERT INTO
AccountTasks(AccountGUID, TaskSubject, TaskDescription,
TaskCreated, TaskDate, TaskStatus) " + "VALUES
(@AccountGUID, @TaskSubject, @TaskDescription,
GETDATE(), @TaskDate, @TaskStatus)", _globalConnection, _transaction);
//Take note that you usually need to insert a foreign key
//value into child tables (like AccountTasks). You can pass
//the foreign key value in this case directly into your
//Insert Command
_adapter.InsertCommand.Parameters.Add("@AccountGUID",
AccountGUID);
_adapter.InsertCommand.Parameters.Add("@TaskSubject",
SqlDbType.NVarChar, 255, "TaskSubject");
_adapter.InsertCommand.Parameters.Add("@TaskDescription",
SqlDbType.NText, 16, "TaskDescription");
_adapter.InsertCommand.Parameters.Add("@TaskDate",
SqlDbType.DateTime, 8, "TaskDate");
_adapter.InsertCommand.Parameters.Add("@TaskStatus",
SqlDbType.Int, 4, "TaskStatus");
//Perform the update on the AccountTasks table. This
//method goes through all changes in the specified table
//and applies the appropriate Insert, Update and Delete commands
_adapter.Update(Account.Tables("AccountTasks"));
SQL Server CE databasedata, manipulating//=========================================================
//REPEAT FOR ALL OTHER TABLES
//=========================================================
.
.
.
The Commit() function of the transaction object will formally commit the transaction. You may have noticed that the entire chunk of code above was placed in a try...catch block. In the event that any part of the update operation fails, it will call the Rollback() function in the transaction object to roll back all changes made to the database.
_transaction.Commit();
}
catch (Exception ex) {
_transaction.Rollback();
}
_transaction.Dispose();
_transaction=null;
_adapter.Dispose();
_adapter=null;
You will be able to test data manipulation in Chapter 3 when you create the rest of the application.
A GUID (Globally Unique IDentifier) is a 16-byte unique number generated by the system that is guaranteed to be globally unique. It is commonly used to uniquely identify records. As you will be using GUIDs frequently in your sales force application, you need to know how they will be stored in the database.
SQL Server CE and Oracle Lite handles GUID storage differently. SQL Server CE can store a GUID using the UNIQUEIDENTIFIER data type. This data type is directly compatible with the .NET Compact Framework System.Guid object. This means that explicit conversion of data types is not required when reading from or writing to a UNIQUEIDENTIFIER column.
As you've read earlier, the GUIDToNative() and NativeToGUID() methods defined in the IDataLibPlugin interface are used to convert the .NET Compact Framework System.Guid object to the native format used by the database to store GUID values, and vice versa.
As no explicit conversion is necessary, we can simply return the objects in the same form as they are passed in:
As with the SQL Server CE plugin, Oracle DDL statements can also be stored in the resource file.
You can add a resource file to your Oracle Lite plugin project by navigating to the Project | Add New Item menu item and adding a new item based on the Resources File template. You can use the same name for your resource—TableSchema.
Upon doing so, you will be prompted with the same resource editor window, from which you can add your SQL statements. Take note that Oracle Lite SQL statements vary slightly from SQL Server CE SQL statements in terms of the data types available and how certain functionality is implemented.
Note
For example, Oracle Lite does not support the UNIQUEIDENTIFIER column. To store GUID values, a binary data type (RAW) with a size of 16 bytes is used instead. Oracle Lite also does not support IDENTITY columns, but provides similar auto-increment functionality through the use of SEQUENCES.
Let's see how the AccountTasks table you've covered earlier under SQL Server CE can be declared in Oracle:
|
Name |
Description |
|---|---|
|
|
|
|
|
|
The first thing you will immediately notice is that you have an additional SQL statement named AccountTasksSeq_SQL. Because Oracle Lite does not support IDENTITY columns, you need a way to make the TaskID column an auto-incrementing number. Oracle Lite allows you to create independent SEQUENCES, which is a running counter that produces a running number starting with a defined value and a defined increment value.
When a record is inserted into the AccountTasks table using SQL, you will have to explicitly insert AccountTasksSeq.NEXTVAL into the TaskID column. This is how we can make use of an Oracle sequence to generate auto-incrementing numbers.
INSERT INTO AccountTasks(TaskID) VALUES(AccountTasksSeq.NEXTVAL)
The other things you will notice from the SQL above are the slight differences in data type names. For example, INT data types are declared as INTEGER in Oracle Lite, whereas NTEXT data types are defined as LONG.
For the sake of brevity, we will not cover all the tables again in this section. However, to run the Oracle code samples in this chapter, you will need to define and store the SQL for the rest of the tables in the resource file.
The Oracle plugin class should be named PluginClass (as the SQL Server CE plugin). You will now need to add a reference to the Oracle Lite managed library. This library is located at:
ORAHOMEMobileSdkado.netwincev2.xOracle.DataAccess.Lite.dll
This DLL is available on your development machine when you install the Oracle Lite Mobile Development Kit. After doing so, you will need to include the following imports:
using CRMLive;
using System.Data;
using Oracle.DataAccess.Lite;
using System.Resources;
using System.Reflection;
You will implement the same IDataLibPlugin interface. The first function you need to implement is the PlugInFullName method, which identifies your class:
public string PluginFullName {
get { return "Oracle Lite 10g Plugin"; }
}
We will also implement the Datasource, Active, and PluginPath properties of the interface the same way as we did for SQL Server CE.
Let's take a look at the CreateSalesForceDatabase method equivalent for Oracle Lite. It does what it says, which is to create a database named SalesForce in Oracle Lite and to generate all the sales force application tables automatically. The differences now are that:
- You will be using the
OracleEngineclass to generate the new database - You will be using the
OracleConnectionclass to connect to the database
In the CreateSalesForceDatabase implementation you will first need to declare a few function-scope variables:
OracleConnection _connection;
OracleCommand _command;
ResourceManager _ResourceManager;
The CreateDatabase method in OracleEngine is a shared function, so you can call the method directly to create the salesforce DSN and database, and set the database password to admin123:
try
{
OracleEngine.CreateDatabase("salesforce", "salesforce",
"admin123");
}
catch (Exception ex)
{
MessageBox.Show(ex.Message, "Create database",
MessageBoxButtons.OK, MessageBoxIcon.Exclamation,
MessageBoxDefaultButton.Button1);
return false;
}
Now that the database has been created, you will attempt to connect to it and execute the SQL statements stored in the TableSchema.resx resource file to build the entire schema required for the sales force application. You can start by first opening a connection to your newly created database:
_connectionString =
"Database=SALESFORCE;DSN=SALESFORCE;uid=SYSTEM;pwd=admin123;";
_connection = new OracleConnection(_connectionString);
try
{
_connection.Open();
}
catch (Exception ex)
{
MessageBox.Show(ex.Message, "Connecting to database",
MessageBoxButtons.OK, MessageBoxIcon.Exclamation,
MessageBoxDefaultButton.Button1);
}
Now latch .NET's ResourceManager class on to the TableSchema.resx resource file like this:
_ResourceManager = new ResourceManager("CRMLive.TableSchema", Assembly.GetExecutingAssembly());
Lastly, create the OracleCommand object to run all the SQL statements retrieved from the resource file. This will create the tables together with their corresponding sequences needed for the application to run:
_command = _connection.CreateCommand();
_command.CommandText = _ResourceManager.GetString("AccountTasks_SQL");
_command.ExecuteNonQuery();
_command.CommandText = _ResourceManager.GetString("AccountTasksSeq_SQL");
_command.ExecuteNonQuery();
.
.
.
And, of course, don't forget to close and dispose of the database connection at the end!
When you install the Oracle Lite tools.language.device.processor.cab file, a few tools are created in your device's Programs folder:
|
Tool name |
Description |
|---|---|
|
Oracle Msql |
Allows you to create databases, view tables, view data views, and execute SQL statements. This tool can be somewhat thought of as Oracle's equivalent of Microsoft's Query Analyzer tool. |
|
Oracle DM |
Allows the user to register the device with a Mobile Server (for data synchronization and centralized device management). |
|
Oracle MSync |
Allows the user to initiate a sync with a Mobile Server. |
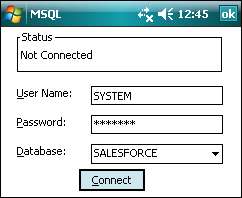
When you launch the Oracle Msql tool, a window will appear that allows you to select the database you wish to connect to. You should be able to see your SALESFORCE database in this list (shown in the following screenshot):
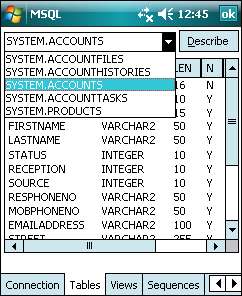
Once logged in, you can browse through the tables and columns in your SALESFORCE database via the Tables tab as shown in the following screenshot. (You need to first choose a table from the list and click the Describe button).
The MSql tool also provides an area for you to run SQL queries against the database. This can be done via the SQL tab.
You can try your hand now at retrieving data from the Oracle Lite database. We will look at the GetAccountDetails method again. To begin, you can declare some of the variables you will later use:
OracleDataAdapter _adapter;
OracleCommand _command;
DataSet _Resultset;
The OracleConnection class also supports the CreateCommand method. The logic here is the same as that of the SQL Server CE plugin. The only difference here is that you need to use the OracleDataAdapter class instead of the SqlCeDataAdapter class to retrieve data. In this function, you can also assume that a connection has already been established to the database.
_command = _connection.CreateCommand;
_command.CommandText = "SELECT * FROM Accounts WHERE
AccountGUID='" + AccountGUID + "'";
_Resultset = new DataSet();
_adapter = new OracleDataAdapter(_command);
_adapter.Fill(_Resultset, "Accounts");
You will also need to repeat the same thing for the other three related tables, filling in different Datatables in the same DataSet object.
Data manipulation logic in Oracle Lite behaves in much the same way as SQL Server CE. The only core differences are the syntax and data type differences between the two databases.
We first declare the variables we will need in this section. Take note that the transaction class name is IDbTransaction.
OracleDataAdapter _adapter;
IDbTransaction _transaction;
Assuming a connection to the database has already been established, the next piece of code marks the beginning of a transaction using the BeginTransaction() method call:
_transaction = _connection.BeginTransaction();
You will now need to create the UpdateCommand, InsertCommand, and DeleteCommand objects for the AccountTasks table succeeding. Take note that Oracle Lite does not use the @fieldname notation. Instead, use the question symbol (?) to denote a parameter.
_adapter = new OracleDataAdapter();
try
{
//=========================================================
//UPDATING THE ACCOUNTTASKS TABLE
//=========================================================
//Here we create an Update command for the AccountTasks table. //Take note that we include this command as part of the transaction
_adapter.UpdateCommand = new OracleCommand("UPDATE
AccountTasks SET TaskSubject=?, TaskDescription=?,
TaskDate=?, TaskStatus=? WHERE TaskID=?" ,
_connection, _transaction);
_adapter.UpdateCommand.Parameters.Add("TaskSubject",
DbType.String , "TaskSubject");
_adapter.UpdateCommand.Parameters.Add("TaskDescription",
DbType.String, "TaskDescription");
_adapter.UpdateCommand.Parameters.Add("TaskDate",
DbType.DateTime, "TaskDate");
_adapter.UpdateCommand.Parameters.Add("TaskStatus",
DbType.Int32, "TaskStatus");
_adapter.UpdateCommand.Parameters.Add("TaskID",
DbType.Int32, "TaskID");
//Here we create the Delete command for the AccountTasks table
_adapter.DeleteCommand = new OracleCommand("DELETE FROM AccountTasks WHERE TaskID=?", _connection, _transaction);
_adapter.DeleteCommand.Parameters.Add("TaskID",
DbType.Int32, "TaskID");
//Notice that we insert AccountTasksSeq.NEXTVAL into the //TaskID column. We use the SEQUENCE we created earlier to //generate a running number of the TaskID column each time //we insert a new AccountTasks record
_adapter.InsertCommand = new OracleCommand ("INSERT INTO
AccountTasks(TaskID, AccountGUID, TaskSubject,
TaskDescription, TaskCreated, TaskDate, TaskStatus)
VALUES (AccountTasksSeq.NEXTVAL, ?, ?, ?, SYSDATE, ?,
?)", _connection, _transaction);
_adapter.InsertCommand.Parameters.Add("AccountGUID",
GUIDToHex(AccountGUID));
_adapter.InsertCommand.Parameters.Add("TaskSubject",
DbType.String, "TaskSubject");
_adapter.InsertCommand.Parameters.Add("TaskDescription",
DbType.String, "TaskDescription");
_adapter.InsertCommand.Parameters.Add("TaskDate",
DbType.DateTime, "TaskDate");
_adapter.InsertCommand.Parameters.Add("TaskStatus",
DbType.Int32, "TaskStatus");
//Perform the update on the AccountTasks table. This
//method goes through all changes in the specified table
//and applies the appropriate Insert, Update and Delete
//commands
_adapter.Update(Account.Tables("AccountTasks"));
//=========================================================
//REPEAT FOR ALL OTHER TABLES
//=========================================================
.
.
.
_transaction.Commit();
}
catch (Exception ex) {
_transaction.Rollback();
}
As the last step, we dispose of the objects we have created:
_transaction.Dispose();
_transaction=null;
_adapter.Dispose();
_adapter=null;
In Oracle Lite, the RAW(16) binary data type is typically used to store a GUID value. When you try to retrieve data from a column defined as RAW and apply the TO_CHAR() function to it, the data retrieved will be returned in the form of a hexadecimal string. The following is an example of such an SQL statement:
SELECT TO_CHAR(AccountGUID) FROM Accounts
The retrieved data cannot be directly read into a System.Guid object. The hexadecimal string must first be converted into a byte array, and then fed into the System.Guid (byte()) constructor to obtain a System.Guid object. Likewise, if you wanted to write to a RAW column in the database, you have to first convert your System.Guid object into a byte array and then into a hexadecimal string.
We will not go into the details of converting between hexadecimal strings and byte arrays. (These functions GUIDToHex() and HexToGUID() are provided in this book's companion source code.)
The GUIDToNative() and NativeToGUID() implementations will need to call the conversion functions in the following fashion:
public object GUIDToNative(System.Guid AccountGUID)
{
return GUIDToHex(AccountGUID);
}
public System.Guid NativeToGUID(object AccountGUID)
{
return HexToGUID(AccountGUID);
}