Now that you have everything set up on both sides, it's time to create the support case application. As explained earlier in the overview, your server-side application will attempt to broadcast a new job to all connected mobile devices when it is created. For this purpose, you will be sending data from the server to a queue on each mobile device remotely.
The code to send a message to a remote queue remains the same as the one you've written earlier for the local queue. The only difference is that your queue name now takes on the following format:
FormatName:DIRECT=TCP:192.168.0.128\private$\devicejobqueue
The preceding IP address shown is the target device's IP address on the network. If you want to refer to the device by name, you can also use the following format:
FormatName:DIRECT=OS:MYPOCKETPC\private$\devicejobqueue
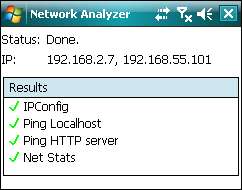
For your testing purposes, you will most likely need the IP address of your mobile device. You can retrieve this information via the Windows Mobile Network Analyzer PowerToy tool, which can be downloaded from the Microsoft website at the following location:
This tool allows you to view useful network settings such as the IP address of the device (a rough equivalent of the ipconfig tool on the PC).
Create a new project, named SupportCaseServerApp, and add a new class to your project, named JobClass. This will be the business object that holds the details of each job.
using System;
public class JobClass
{
private string _JobID;
private string _JobSubject;
private DateTime _JobDate;
private string _JobRemarks;
private string _JobStatus;
public string JobStatus
{
get
{
return _JobStatus;
}
set
{
_JobStatus = value;
}
}
public string JobSubject
{
get
{
return _JobSubject;
}
set
{
_JobSubject = value;
}
}
public string JobRemarks
{
get
{
return _JobRemarks;
}
set
{
_JobRemarks = value;
}
}
public DateTime JobDate
{
get
{
return _JobDate;
}
set
{
_JobDate = value;
}
}
public string JobID
{
get
{
return _JobID;
}
set
{
_JobID = value;
}
}
}
Add a form to your project named AddNewJob. This form is the interface that allows you to modify the properties of a JobClass object.
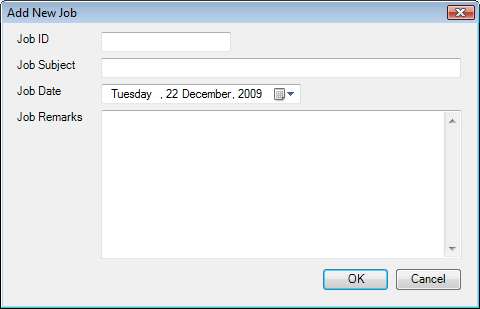
Write the following code in the code behind of this form:
using System;
using System.Windows.Forms;
public partial class AddNewJob
{
private JobClass _jobObj;
public JobClass Datasource
{
get
{
return _jobObj;
}
set
{
_jobObj = value;
}
}
public void OK_Button_Click(System.Object sender,
System.EventArgs e)
{
_jobObj.JobID = txtJobID.Text;
_jobObj.JobSubject = txtJobSubject.Text;
_jobObj.JobRemarks = txtJobRemarks.Text;
_jobObj.JobDate = datJobDate.Value;
_jobObj.JobStatus = "OPEN";
this.DialogResult = DialogResult.OK;
this.Close();
}
public void Cancel_Button_Click(System.Object sender,
System.EventArgs e)
{
this.DialogResult = DialogResult.Cancel;
this.Close();
}
}
Now, add another form (named Main) to your project. This will be the main form of your application. Place a Datagrid, listbox, and two buttons on the form in the following fashion. Key in the IP address of your mobile device/emulator (retrieved earlier) in the Recipients listbox.
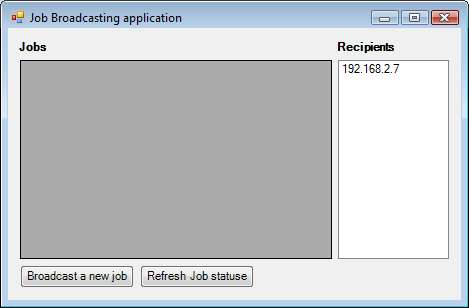
In the click event of the Broadcast a new job button, you will need to launch the AddNewJob form, obtain the details of the new job from the user (and place it in the JobClass object), then broadcast it to the list of recipients.
//The list of jobs on the server
private List<JobClass> _Jobs = new List<JobClass>();
public void btnBroadCastNewJob_Click(System.Object sender, System.EventArgs e)
{
AddNewJob _frmAddNewJob = new AddNewJob();
JobClass _jobObject = new JobClass();
_frmAddNewJob.Datasource = _jobObject;
if (_frmAddNewJob.ShowDialog() == DialogResult.OK)
{
_Jobs.Add(_jobObject);
RefreshGrid();
//Broadcast this new job to all devices
SendJobToAllQueues(_jobObject);
}
_frmAddNewJob.Dispose();
_frmAddNewJob = null;
}
//Loop through all recipient IP addresses and sends the same //message for each one
private void SendJobToAllQueues(JobClass JobObject)
{
int _counter;
string _subject;
_subject = "Job ID : " + JobObject.JobID;
for (_counter = 0; _counter <= lbRecipients.Items.Count
1; _counter++)
{
SendMSMQMessage(_subject, JobObject,
lbRecipients.Items[_counter].ToString());
}
}
//Sends an MSMQ message containing a JobClass object to a //target IP address
message sending, server to remote mobile deviceserver-side application, creatingprivate void SendMSMQMessage(string Label, JobClass JobObject,
string TargetIP)
{
string _targetAddress = "FormatName:DIRECT=TCP:" + TargetIP
+ "\private$\devicejobqueue";
try
{
MessageQueue _mq = new MessageQueue(_targetAddress);
Message _m = new Message();
_m.Label = Label;
_m.Body = JobObject;
_mq.Send(_m);
_mq.Close();
}
catch (Exception ex)
{
MessageBox.Show(ex.ToString());
}
}
//Refreshes the list of jobs displayed on the grid
private void RefreshGrid()
{
dgJobs.DataSource = null;
dgJobs.DataSource = _Jobs;
}
You can try running the preceding code at this point. Ensure that your mobile device/emulator is not connected to your PC. After creating a new job (via the Broadcast a new job button), you will be able to see the job appear in your Datagrid.
More importantly, you will notice that MSMQ has internally created an outgoing queue (via the Computer Management tool). You can see the details of the message by double-clicking on it in the right pane of the tool.
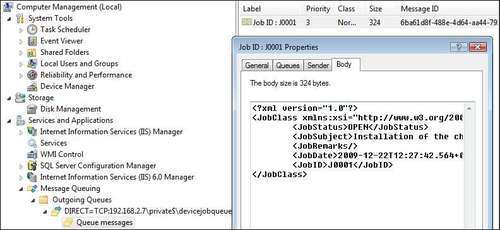
When the mobile device reconnects with your PC, the message will be automatically sent out to the remote queue, and will be removed from this Outgoing messages area.
Now you will need to create the client-side application so that you can retrieve these incoming messages from the devicejobqueue queue on the mobile device. Add the same JobClass class to the same SupportCase smart application project you've created earlier in this chapter.
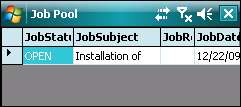
Add a new form named JobPool to your project. This form will contain a Datagrid control and some menu options. The following is the layout:

Upon loading, this form should check to see if the private$devicejobqueue queue is present, and if not, create it. It should then check to see if there are any messages in this queue. You can do this via the MessageQueue.GetAllMessages function, which returns an array of Message objects found in the queue. Take note that this function will not remove the message from the queue. To remove it, you must explicitly call the MessageQueue.ReceiveByID method. Let's see how it all looks in the following code:
//The list of jobs retrieved from the server
message sending, server to remote mobile deviceclient-side application, creatingprivate List<JobClass> _Jobs = new List<JobClass>();
//The currently selected row in the Datagrid
private int _currentRow = - 1;
public void JobPool_Load(object sender, System.EventArgs e)
{
//Initialize MSMQ service on the device
if (Generic.InitializeMSMQ() == false)
{
MessageBox.Show("Could not initialize MSMQ");
return;
}
//Creates the private$devicejobqueue queue if its not
//present
CreateJobQueue();
//Reads from the Job Queue
ReadFromJobQueue();
}
//Creates the private$devicejobqueue queue if it does not //exist
private void CreateJobQueue()
{
string _queueName = ".\private$\devicejobqueue";
try
{
if (! MessageQueue.Exists(_queueName))
{
MessageQueue.Create(_queueName);
}
}
catch (Exception ex)
{
MessageBox.Show(ex.ToString());
}
}
//Reads any messages (if available) from the queue. Notice //that you need to inform MSMQ that the payload of the message //is no longer a String object, but a JobClass object
private void ReadFromJobQueue()
{
string _queueName = ".\private$\devicejobqueue";
try
{
MessageQueue _mq = new MessageQueue(_queueName);
_mq.Formatter = new XmlMessageFormatter(new Type[]
{typeof(@JobClass)});
//Retrieve all messages from the queue
Message[] _messages = _mq.GetAllMessages();
int _counter;
for (_counter = 0; _counter <= (_messages.Length - 1);
_counter++)
{
Message _currentMsg = _messages[_counter];
JobClass _jobObject = (JobClass)(_currentMsg.Body);
_Jobs.Add(_jobObject);
//You must do a Receive for each message to remove it
//from the queue
_mq.ReceiveById(_currentMsg.Id);
}
RefreshGrid();
}
catch (Exception ex)
{
MessageBox.Show(ex.ToString());
}
}
//Refreshes the grid display with the latest list of jobs
private void RefreshGrid()
{
dgJobs.DataSource = null;
dgJobs.DataSource = _Jobs;
}
//store the index of the currently selected row
public void dgJobs_CurrentCellChanged(object sender,
System.EventArgs e)
{
_currentRow = dgJobs.CurrentCell.RowNumber;
}
//Refreshes the grid by reading again from the message queue
public void mnuRefresh_Click(System.Object sender, System.EventArgs e)
{
ReadFromJobQueue();
}
You can try running your application at this point. Ensure that your mobile device/emulator is connected to your PC. Start both the server-side and client-side applications. Create a new job at the server side. After you have done that, click on the Refresh menu in the client-side application on your mobile device. You will be able to see the newly created job show up in the data grid.