An MSI file has the .msi extension. This deployment method, unlike a CAB file, is initiated from a PC. An MSI installation still requires an ActiveSync connection to be readily established between the mobile device and the PC, but it does away with the tedious process of having to manually copy the CAB files to your mobile device.
The MSI installer also provides the standard wizards that make the deployment of your mobile application "feel" more like a typical PC application installation. The process involved in creating an MSI file is a bit different from that of a CAB file. In a nutshell, you need to do the following:
- Create an INI file
ActiveSync handles mobile application installations initiated from the PC via a tool called
CeAppMgr.exe. In this fi rst step, you must create an INI fi le that informsCeAppMgr.exeabout your application. - Create a Custom Action DLL
You need to programmatically launch
CeAppMgr.exeand pass your INI file to it in order to register your application with ActiveSync. One way to do it is via a custom action DLL. The MSI project allows you to insert custom actions (through DLL fi les) so that you can run custom code at certain points in time during the installation. - Create an MSI project
The last step is to create the MSI project itself, and to include all the necessary files.
As mentioned earlier, all mobile application installations initiated from the PC are handled by ActiveSync (or more particularly, a component called CeAppMgr.exe). Your deployment project must make your application known to ActiveSync by passing an INI file to CeAppMgr.exe. You can create this file manually using any text editor program. The contents of this file should look something like the following:
[CEAppManager]
Version = 1.0
Component = SalesForceApp
[SalesForceApp]
Description = Sales Force Application
CabFiles = SalesForceApp.cab
The first two lines denote that this is a CEAppManager INI file, and are usually fixed. The Component keyword specifies the name of your application. This same name must then be declared in its own section (on the fifth line). The Description keyword specifies the description of your application (this will be shown on the screen when you run the installation wizard). In the last line, CabFiles denote the CAB files included in this installation.
Save this INI file as SalesForceApp.ini. In the next section, you will pass this file to the CeAppMgr.exe program in a custom installation action DLL.
The MSI installer, like most installer tools, allows you to write custom code that runs at certain points in time during the installation. This allows the developer to do additional things like registering a freshly installed web site with IIS, or to register a file with the Global Assembly Cache (GAC), or even pop up your own configuration windows after an installation is complete. This custom code is usually written as a DLL and then "hooked" onto MSI installation events such as BeforeInstall (before an installation) or AfterInstall (after an installation).
In your case, before the installation proceeds, you need to programmatically launch the CeAppMgr.exe file and pass it to the INI file you've created earlier. You can make use of the custom action feature of the MSI installer to do this.
Your first step is to create the custom action DLL (your code will go in there). Add a new Class Library project to the SalesForceAppInstaller solution you've created earlier. Name this library SalesForceCustomAction.

Instead of the usual class, you will need to add a new type of class to your project—an Installer Class. Name this class CustomActionInstaller.

Remember to also remove the auto-generated Class1.cs file from the project. Now, open the CustomActionInstaller class. You will first notice that this class inherits from the Installer class, denoting that this is an MSI installer class.
In the constructor of this class, you need to register your own handlers against the various MSI installation events:
public CustomActionInstaller()
{
InitializeComponent();
//Before an installation
this.BeforeInstall += new
InstallEventHandler(BeforeInstallationHandler);
//After an installation
this.AfterInstall += new
InstallEventHandler(AfterInstallationHandler);
//Before an uninstallation
this.BeforeUninstall += new
InstallEventHandler(BeforeUninstallationHandler);
}
Let's first take a look at the first handler: BeforeInstallationHandler. What you need to do in this event handler is:
- Get the path of the ActiveSync folder from the registry of the PC
- Copy your installation files into the ActiveSync folder
- Get the path of the
CeAppMgr.exeprogram from the registry of the PC - Launch
CeAppMgr.exeand pass it your INI file as an argument
The path of the ActiveSync folder is stored in the following registry entry:
To retrieve the path of the ActiveSync folder, you can write the following code. Take note that when you return the installation path, you include the name of your application (highlighted as follows). This name must be the same name that you've configured under the Component keyword of the INI file earlier.
private string GetInstallationPath()
{
RegistryKey _ActiveSyncKey =
Registry.LocalMachine.OpenSubKey
("SOFTWARE\Microsoft\Windows CE Services");
if (_ActiveSyncKey != null)
{
string _ActiveSyncPath =(string) _ActiveSyncKey.GetValue
("InstalledDir");
_ActiveSyncKey.Close();
return _ActiveSyncPath.TrimEnd('') +
"\SalesForceApp";
}
else
{
return "";
}
}
You also need to import the following libraries to work with registry keys and file paths:
using Microsoft.Win32;
using System.IO;
Take note that the full path of the CeAppMgr.exe tool is stored in the following registry entry:
SOFTWARE\Microsoft\Windows\CurrentVersion\App
Paths\CEAPPMGR.EXE
Write the following code in the BeforeInstallationHandler event:
void BeforeInstallationHandler(object sender, InstallEventArgs e)
{
string _installationPath = GetInstallationPath();
//Create a folder for your application in the ActiveSync folder
Directory.CreateDirectory(_installationPath);
//Copy the installation files into the ActiveSync folder
foreach (string _fileItem in
Directory.GetFiles(Environment.SystemDirectory +
"\TEMP\SalesForceApp"))
{
string _fileName = Path.GetFileName(_fileItem);
string _targetPath = Path.Combine(_installationPath, _fileName);
File.Copy(_fileItem, _targetPath, true);
}
//Get the full path of the CeAppMgr.exe program
RegistryKey _CeAppMgrKey = Registry.LocalMachine.OpenSubKey
("SOFTWARE\Microsoft\Windows\CurrentVersion\App Paths\CEAPPMGR.EXE");
string appMgrPath = (string)_CeAppMgrKey.GetValue(null);
_CeAppMgrKey.Close();
//Launch CEAppMgr.exe and pass in the full path of your INI
//file as an argument
System.Diagnostics.Process.Start(appMgrPath, """ +
Path.Combine(_installationPath, "SalesForceApp.ini") + """);
}
You're done! Now, for the AfterInstallationHandler event. In this event, you just need to do some cleaning up after yourself—you need to delete the temporary files from the following folder:
Environment.SystemDirectory + "\TEMP\SalesForceApp"
You can write the AfterInstallationHandler event as follows:
void AfterInstallationHandler(object sender, InstallEventArgs e)
{
foreach (string _fileItem in
Directory.GetFiles(Environment.SystemDirectory +
"\TEMP\SalesForceApp"))
{
File.Delete(_fileItem);
}
}
Last is the BeforeUninstallationHandler event. When someone uninstalls your MSI file from the PC, it doesn't automatically remove the files from the ActiveSync folder. This makes sense, considering that those files were put there via custom code. You must, therefore, provide custom code to do the opposite—removing these files from the ActiveSync folder during an uninstallation of the MSI. This can be done using the following code:
void BeforeUninstallationHandler(object sender, InstallEventArgs e)
{
string _installationPath = GetInstallationPath();
foreach (string _fileItem in
Directory.GetFiles(_installationPath))
{
File.Delete(_fileItem);
}
Directory.Delete(_installationPath);
}
We now move on to the last section—creating the MSI project itself.
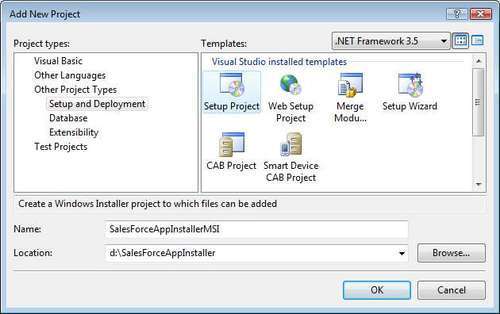
Visual Studio provides a template to create MSI installers called the Setup Project. In the same solution that you've created earlier, add another project. Look for the Setup Project template under the Other Project Types | Setup and Deployment category. Name the project SalesForceAppInstallerMSI. Again, try to add an MSI suffix to the project name to differentiate it from the CAB project.
Add the SalesForceCustomAction project you've created in the previous section to the solution— you will need to reference this project later.
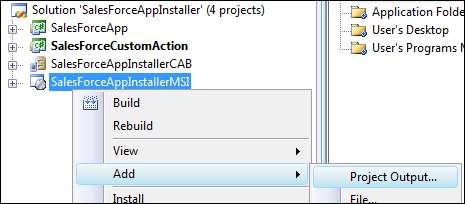
Now you must define what to include in your MSI project. Right-click on the MSI project and choose the Add | Project Output menu item.
Select the SalesForceAppInstallerCAB project from the drop-down list in the ensuing pop-up dialog. Ensure the Built Outputs item is selected, and click OK to add it to the list. This tells the MSI project to include the CAB output from the CAB project you've created earlier.
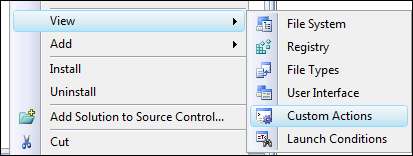
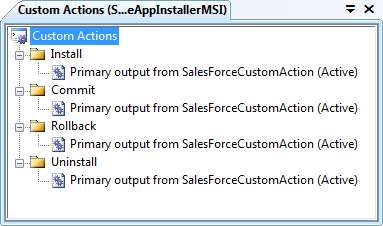
After this, you need to hook the MSI project to the custom action DLL you've created earlier. You can do this by right-clicking on the MSI project, and choosing the View | Custom Actions menu item (shown as follows):
When you've done this, you will see a new dialog window pop up. Open the Application Folder item, and click the Add Output... button. The familiar Add Project Output Group dialog window will pop up. Choose the SalesForceCustomAction project, and choose the Primary output output group. When you've clicked the OK button, you should now see the following window:

Click the OK button again to close this window. You will now see that Visual Studio has automatically hooked up the custom action handlers in your DLL to the various installation events. You can see this in the Custom Actions tab:
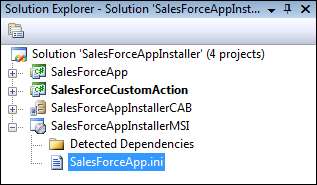
The last step is to ensure that your INI file is included together with the MSI project. To do this, right-click on your MSI project, choose the Add | Existing Item menu item and browse for your INI file. After doing this, you should see the following screen:
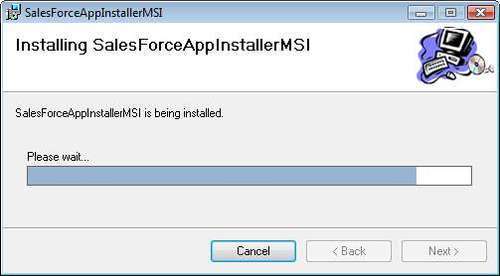
Your MSI installer is now complete! Build the solution. If you navigate to the output folder of your MSI project, you will now find your generated SalesForceAppInstaller.msi file. You can try out your MSI file by first ensuring that your mobile device/emulator is connected to your PC through ActiveSync, and then running the MSI file. You should see the wizard shown as follows, which will automatically install your .CAB file to the mobile device over an ActiveSync connection.