
The Oracle Mobile Server can be a bit tedious to set up for first time beginners. Once you get going, however, it can be a powerful tool that can manage not only database synchronization but also mobile application deployment.
In the following steps, you will see how you can configure Oracle Mobile Server to perform a database sync without writing a single line of code in your program.
The Oracle Mobile Server requires an existing Oracle Database server to function. You can install the latest version of the Oracle Database software on your desktop for testing purposes. Download the latest Oracle Database software (for Windows) from the following location:
http://www.oracle.com/technology/software/products/database/index.html
Install the database software using the default settings and create a database with the SID crmlive. After that is done, you will need to install the Oracle Mobile Server. The Oracle Mobile Server is included in the Oracle Lite 10g installation package that you've downloaded earlier in Chapter 2.
During the setup, you may be prompted to select the type of installation. In Chapter 2, you selected the Mobile Development Kit option. This time, you will need to select the Mobile Server option.
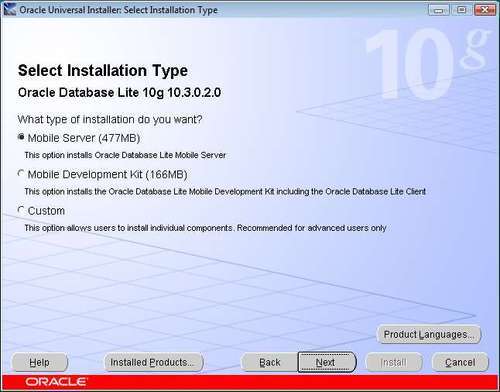
After this step, you can use the default settings throughout most of the installation. There are a few settings you should take note of:
- Mobile Server Standalone TCP/IP Port configuration
OC4J TCP/IP Port : 81: This is the port used to host the mobile server. For the rest of this chapter, we will assume you are using port 81
- Launch Repository Wizard?
YES: You will need to set up a mobile repository after your installation
- Install the Demo applications?
YES
An Oracle Mobile repository makes use of an existing Oracle database to store the server-side data for your mobile applications. After you install Oracle Mobile Server, you will need to create at least one repository. The Mobile Server Repository Wizard will automatically run after your first installation of Oracle Mobile Server.
Tip
You can also manually run the Mobile Server Repository wizard from the following location: OLITE10GHOMEMobileServeradmin
epwizard.bat
In the first screen of the Oracle Mobile Repository Wizard, specify the details of an existing and valid Oracle database.

In the next few screens, you will be brought through the configuration of the following details. You will need to specify an appropriate password for each setting.
- Mobile Server Repository Password
Schema name : MOBILEADMIN
Deploy demo applications : YES
- Mobile Server Administrator
Administrator name : Administrator
- Username and Password for Demo Schema
Schema name : master
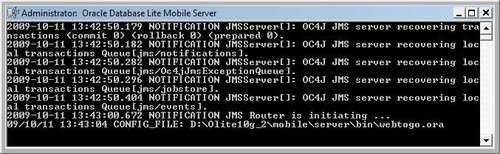
At the end of the wizard, your mobile repository will be generated. To ensure that it was generated successfully, run the Mobile Server from the Start | All Programs | Oracle Database Lite 10g | Mobile Server menu. A command prompt window will open. Since this is your first time running the Mobile Server, it will request you to specify the password for the OC4J administrator. Specify an appropriate password.
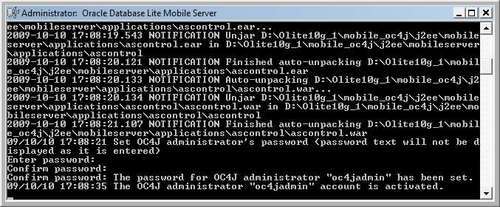
You should not see any errors displayed in this command prompt window. Keep this window open—the moment you close it, the Mobile Server service goes offline.
To double-check that your mobile repository is set up successfully, navigate to the following URL in any web browser (replace the section within the brackets with your server name or IP address):
http://<your_server_name_or_ip_address>:81/webtogo
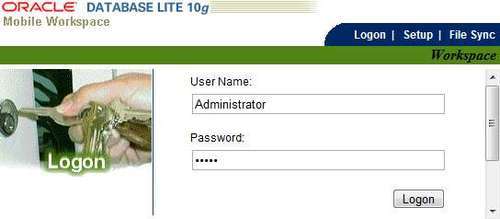
You should be able to see the WebToGo portal login screen (shown as follows):
As you've read earlier, the tables at the server side are called the master tables, and the copy in the database on the mobile device is called the snapshot. As you have not setup the master tables yet, let's create them now.
You can reuse all the CREATE TABLE DDL statements you've created in Chapter 2. Let's take a look at how we can create these tables using the SQL*Plus tool.
Tip
Managing the Oracle database
The Oracle suite of products provides many ways to manage your database. You can either do it visually through the desktop-based SQL Developer tool or the web-based Oracle Enterprise Manager tool. You can also do it via the text-based SQL*Plus tool.
Here's the SQL for the Accounts table fromChapter 2. There are a few things you need to consider. You need to specify the Master schema when creating each table. This is because Oracle uses the schema tied to the user account (used to log in to SQL*Plus) by default. For instance, if you have logged in to SQL*Plus under the SYSTEM account, the table would be created under the System schema, which is not appropriate from a security viewpoint.
CREATE TABLE Master.Accounts (
AccountGUID RAW(16) NOT NULL,
AccountType INTEGER,
DateCreated DATE,
FirstName VARCHAR2(50),
LastName VARCHAR2(50),
Status INTEGER,
Reception INTEGER,
Source INTEGER,
ResPhoneNo VARCHAR2(50),
MobPhoneNo VARCHAR2(50),
EmailAddress VARCHAR2(100),
Street VARCHAR2(255),
City VARCHAR2(50),
State VARCHAR2(50),
Zipcode VARCHAR2(10),
Country VARCHAR2(50),
Website VARCHAR2(50),
InterestedProds VARCHAR2(255),
PRIMARY KEY(AccountGUID));
Launch SQL*Plus from Start | All Programs | Oracle11g_home | Application Development | SQL*Plus. Log in to SQL*Plus using your SYSTEM account and password. After login, you will see the SQL> prompt. You can now copy and paste each CREATE TABLE statement in succession at this prompt to execute them.
Tip
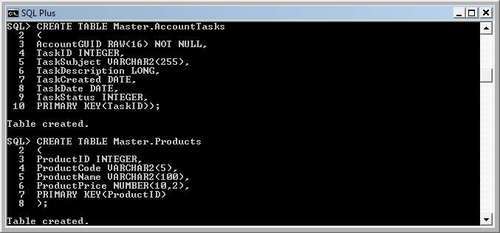
Take note that SQL*Plus doesn't execute each statement until it encounters the semicolon (;) character. You will need to ensure that each statement is terminated using the semicolon (highlighted in the sample SQL above).
The following screenshot shows the SQL*Plus output:
A publication represents an application (and its database) in the Oracle mobile server. You can create a publication through the Mobile Database Workbench tool provided with Oracle Mobile Server.
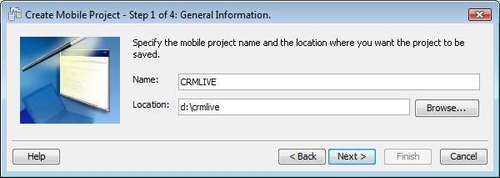
Launch the Mobile Database Workbench tool from Start | All Programs | Oracle Database Lite 10g | Mobile Database Workbench. Create a new project by clicking on the File | New | Project menu item in the Mobile Database Workbench window. A project creation wizard will run. Specify a name for your project and a location to store the project files.
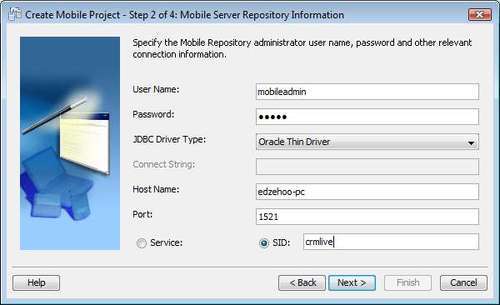
The next screen will request you to key in mobile repository particulars. Specify your mobile repository connection settings, and use the mobile server administrator password you specified earlier to log in.
In the next step, specify a schema to use for the application. As you've created the master tables in the MASTER schema, you can specify your MASTER account username and password here.

The next screen will show a summary of what you've configured so far. Click the Finish button to generate the project. If your project is generated successfully, you should be able to see your project and a tree list of its components in the left pane.
Each publication item corresponds to a database table that you intend to publish. For example, if your application contained five tables, you will need to create five publication items. Let's create the publication items now for the Accounts, AccountTasks, AccountHistories, AccountFiles, and Products tables.
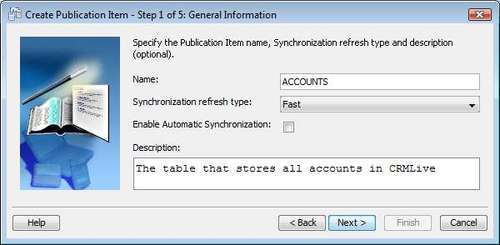
Click on the File | New | Publication Item menu item to launch the Publication Item wizard. In the first step of the wizard, specify a name for the publication item (use the table name as a rule of thumb). There are two options here worth noting:
- Synchronization refresh type
This refers to the type of refresh used for a particular table:
- Fast
This is a type of incremental refresh—only the changes are synced down from the server during a sync. This is the most common mode of refresh used.
- Complete
In this type of refresh, all content is synced down from the server during each sync. It is comparatively more time consuming and resource intensive. You might use this option with tables containing small lists of data that change very frequently.
- Queue based
This is a custom refresh in that the developer can defi ne the entire logic for the sync. It can be used for custom scenarios that may not exactly require synchronization—for instance you might need to simply collect data on the client and have it stored at the server. In such a case, the queue-based refresh works better because you can bypass the overhead of confl ict detection.
- Fast
- Enable automatic synchronization
Automati c synchronization allows a sync to be initiated automatically in the background of the mobile device when a set of rules are met. For example, you might decide to use automatic synchronization if you wanted to spread out synchronization load over time and reduce peak-out on the server.
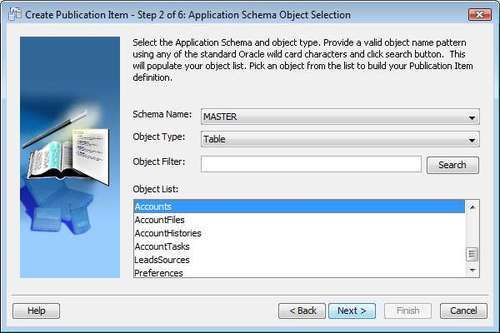
In the next step, choose the table that you want to map the publication item to. Select the MASTER schema, and click the Search button to retrieve a list of the tables under this schema. Locate the Accounts table and highlight it.
In the next screen, you will need to select all the columns you need from the Accounts table. As you need to sync every single column from the snapshot to the master table, include all columns. Move all columns from the Available list to the Selected list using the arrow buttons and click on the Next button to proceed.
The next step is one of the most important steps in creating a publication item. The SQL statement shown here basically defines how data is retrieved from the Accounts table at the server and synced down to the snapshot on the mobile device. This SQL statement is called the Publication Item Query. The first obvious thing you need to do is to edit the default query. You need to include a filter to sync down only the accounts owned by the specific mobile device user. You can easily use a filter that looks like the following:
WHERE OwnerID = :OwnerID
The following screenshot shows how your Publication Item Query will look after editing. If any part of it is defined or formatted incorrectly, you will receive a notification. Click on Next after that to get to the summary screen, then click on the Finish button to generate the publication item.

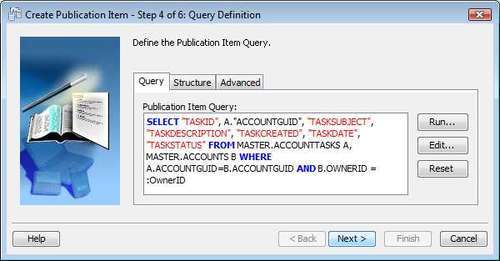
After creating the publication item for the Accounts table, let's move on to a child table—the AccountTasks table. Create another publication item in the same fashion that maps to the AccountTasks table. At Step 4 of the wizard, the Publication Item Query that you need to specify will be a little bit different.
The AccountTasks table does not contain the OwnerID field, so how do we filter what gets synced down to each specific mobile device? You obviously don't want to sync down every single record in this table—including those that are not meant to be accessible by the specific mobile device user.
One way to still apply the OwnerID filter is to use a table join with the Accounts table. You can easily specify a table join in the following manner:
SELECT "TASKID", A."ACCOUNTGUID", "TASKSUBJECT",
"TASKDESCRIPTION", "TASKCREATED", "TASKDATE", "TASKSTATUS"
FROM MASTER.ACCOUNTTASKS A, MASTER.ACCOUNTS B WHERE
A.ACCOUNTGUID=B.ACCOUNTGUID AND B.OWNERID = :OwnerID
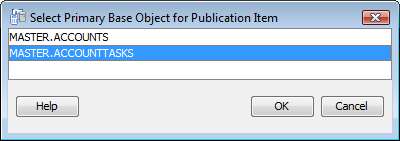
If you try to save the Publication Item Query above in the Edit Query box, it may prompt you to select the primary base object for the publication item (as shown in the following screenshot). This should be set to AccountTasks because we are creating a publication item that maps to this table.
Tip
If you choose the Accounts table again, you will end up with two publication items that map to the same Accounts table. This will cause problems when you attempt to add both items to a publication.
If you have typed in everything correctly, you will be able to see your Publication Item Query show up in the Query tab shown as follows. You can then click on the Next and Finish buttons to complete the wizard.
Now that you've seen how to create a publication item based on a child table, repeat the same steps above for the other child tables—AccountFiles and AccountHistories.
The last table—the Products table deserves a special mention because it's different. You do not need a filter for this table, simply because every mobile device user will need to see the full list of products. You can, therefore, use the default Publication Item Query for the Products table:
SELECT "PRODUCTID", "PRODUCTCODE", "PRODUCTNAME", "PRODUCTPRICE" FROM MASTER.Products
After you've done this, you can now move on to creating the "sequences" necessary in this mobile application.
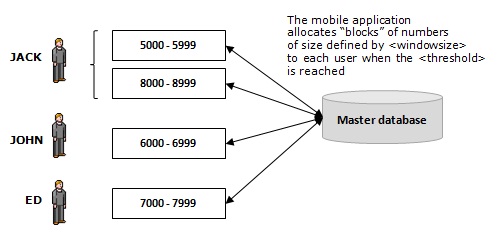
When you are working with multiple mobile devices, you have to keep in mind that records from multiple devices will be synced into one single table on the server. If each mobile device uses its own set of running numbers, you may end up with duplicate numbers when the records from each device are synced to the server.
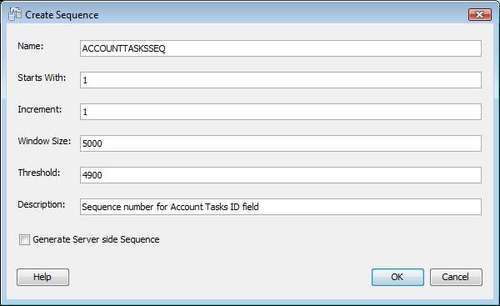
Oracle Mobile Server helps you manage sequence numbers by allocating a set of numbers that never overlap for each separate mobile device user. Let's see how this can be configured for the AccountTasks sequence number for example. Launch the Create Sequence window by clicking on the File | New | Sequence menu item. Fill in the name of the sequence (use the same name as the sequence names you've created in Chapter 2). There are three fields worth noting:
- Window Size
The window size defi nes the size of each new block of numbers that is allocated to each mobile user.
- Threshold
Once the allocated number has reached the threshold, a new block of numbers of size defi ned by the Window size property is allocated. The threshold value is usually a few hundred numbers smaller than the Window size.
- Generate Server side Sequence
In some cases, you might also be using sequences on the server side to create new records. In such a case, Oracle Mobile Server prevents any confl ict by assigning all even numbers to the server and odd numbers to the mobile clients. If you don't need to use sequences on the server side, avoid selecting this option, because the mobile user will only be able to use half the numbers allocated to him or her.
The following screenshot shows the Create Sequence user interface:
After you've created three sequences—one for each of the AccountTasks, AccountHistories, and AccountFiles tables, your project should now contain the following items:

Now that you have created all the items you need, you can begin to create the publication itself. Click on the File | New | Publication menu item. In the General tab of the ensuing pop-up window, specify the name of the publication and the client database.
Note
The Client Database Name field will become the name of the database generated on the mobile device when the mobile application is synced down to the device.

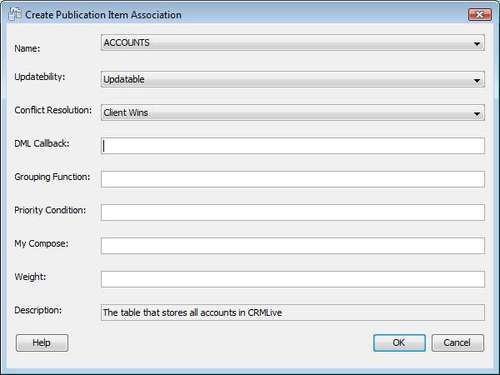
In the Publication Item tab, you can add a list of existing publication items to this publication. Click the Add button to add a publication item. You will be presented with a screen similar to the one shown below. There are a few fields worth noting in this screen:
- Name
You can see the list of all your publication items in the Name field. Select the Accounts publication item.
- Updateability
An updatable publication item means that the sync for this item is bidirectional. A read-only item means that the sync for this item is from master table (server) to snapshot (client) only.
- Conflict resolution
Client Wins means that in the event of a confl ict (updates done on the same record at both the server side and client side), the client-side changes will always override the server-side changes. Server Wins means exactly the opposite.
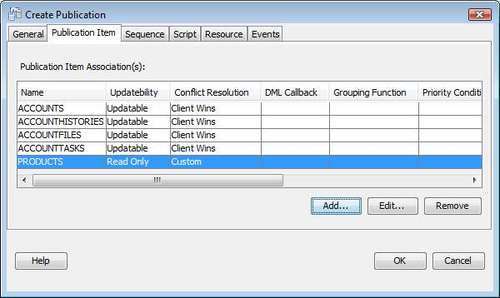
Add the publication item in the same fashion for each of the Accounts, AccountTasks, AccountHistories, and AccountFiles tables.
For the Products table, you will never need to update the server with the list of products from the client device, so the sync will usually be unidirectional (from server to client). You will, therefore, need to set Updatebility to read-only. Since Conflict Resolution is also no longer applicable, set its value to Custom.
When you're done, you should have the following in your publication items list.
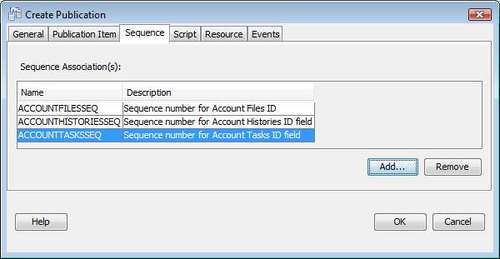
It is now time for you to add the sequences you've created earlier to the Sequence tab of the publication. Click on the Add button to add an existing sequence to the publication. When you're done, you should see three sequences show in the list as follows:
The other tabs are not relevant and will not need to be filled in. Click on the OK button to create the publication item. You can also opt to save your publication at this point by clicking on the File | Save menu item.
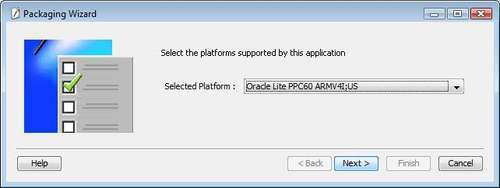
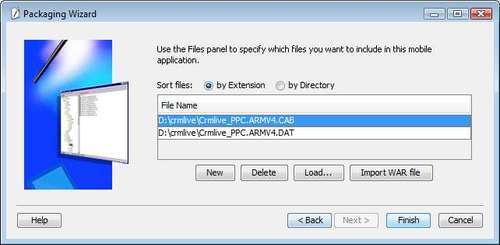
Your mobile application will not be accessible without first publishing it. Click on the Tool | Package menu item to launch the Packaging Wizard. In the first step, choose to create a new application definition. Click Next to advance to the next window.
In the next window, choose the target platform for your mobile application. As you are targeting Windows Mobile 6 on the Pocket PC, choose the Oracle Lite PPC60 ARMV4I;US option.
In the next window, choose a name for your application. This will be the name displayed in Oracle Mobile Server. Specify a virtual path, description, and local application directory. You must then specify the name of the publication you've created earlier in the Publication Name field.

In the next window, you can add any additional files you wish to include with the mobile application. These can be images, resource files, and so on. You would usually include the .CAB installation files of your application here. The idea is that when an application is synced to the mobile device, it would not only sync the database, but also everything the mobile device needs to get your application up and running.
Note
We will cover more on generating .CAB installation files when we touch on application deployment in Chapter 13. For now, you can just leave this section empty.
When you're done, click on the Finish button. You will now see a pop-up window that allows you to choose from a list of actions. Choose to Publish the current application. You will be prompted with the following window. Specify the URL of your WebToGo site as well as the Mobile Server Administrator username and password to proceed.
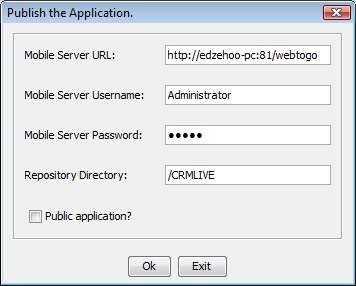
When that's all done, your application will be published to the mobile server and you will see the following message.

You will now need to define the users that can access your mobile application. You can do this via the WebToGo portal.
The first thing you need to do before you can log in to the WebToGo portal is to start the Oracle Mobile Server service. The Mobile Server service can be started by clicking on the Start | All Programs | Oracle Database Lite 10g | Mobile Server menu item. A command prompt window will appear. You will need to have this command prompt window running in the background.
Navigate to the WebToGo portal by directing your browser to the following location:
http://<server_name>:<mobileserverportnumber>/webtogo
You can log in to the WebToGo portal using the Mobile Server Administrator password. After login, click on the Mobile Manager to view the list of registered mobile servers. Click on the link with your server name. In the ensuing window, click on the Users tab. You will be presented with a list of registered mobile users. Add a new user by clicking on the Add User link. You can key in the details for a new user (shown as follows).
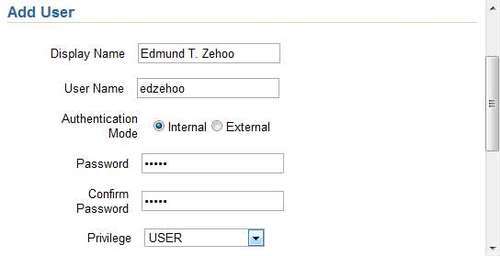
After clicking OK, you will be able to see your user account added to the list (shown as follows).

The next thing you need to do is to make sure that this user has access to your CRMLIVE mobile application. Click on the main Applications tab. You will be able to see a list of all the mobile applications registered with Oracle Mobile Server. You should be able to spot the application you've just published.
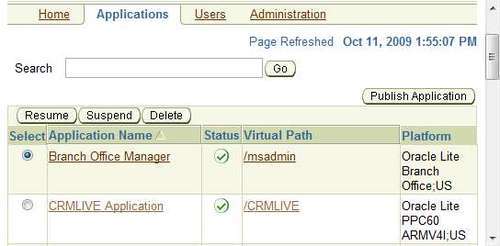
Click on your application. You will now be brought to the application details page. Navigate to the Access tab. Here you will be presented with a checklist of user accounts which have access to your application. Ensure that the user account you've just added is granted access by placing a tick in the checkbox next to it. Grant access to a few other users (sample users installed together with the Mobile Server demo) as well as the Administrator.

The last step you need to carry out is to configure Data Subsetting. Data Subsetting does what it says—it allows you to set filters for each user account so that only subsets of the data are synced down for each user.
You probably recall that you've used an OwnerID parameter earlier when creating the Publication Item Queries for each table. This section is where you will set the value for the OwnerID parameter for each user account. Click on the Data Subsetting tab. You will see a list of every mobile user that has access to your application.
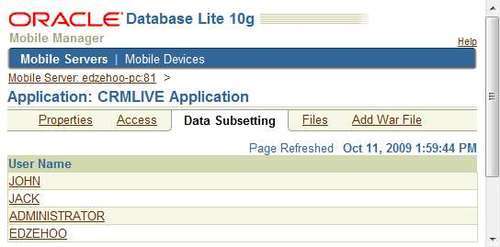
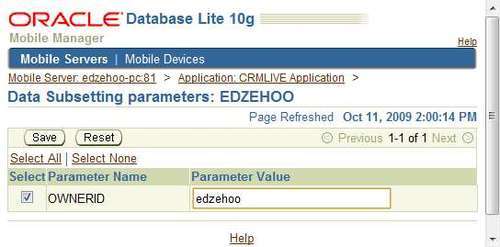
Click on the account you've just created. You will be presented with the following screen. Notice that your OwnerID parameter shows up automatically in this list. In fact, any number of parameters that were configured in your Publication Item Queries will show up as a list in this area.
Set the parameter value to a value that identifies the owner of the record. We might decide to use the username field. In the following example, we use the username edzehoo. What you've configured is a bit like saying: "For the EDZEHOO user account, sync down all records where the OWNERID is equal to edzehoo."
Each mobile user for your application can have the OwnerID value configured this way. This, therefore, allows you to sync down different sets of data for different user accounts.
You will need to register the mobile device with the Oracle Mobile Server before you can perform the initial sync-down. Launch your Mobile Device Emulator and establish an ActiveSync connection between your desktop and the emulator.
Tip
Do ensure that you have also enabled the NE2000 PCMCIA network adapter on the emulator by going to the File | Configure | Network tab screen in the emulator window. This allows your emulator to connect to the WebToGo server hosted on your desktop. Ensure that any firewall used is turned off as well. (You will be using port 81 to communicate with the WebToGo server)
You can test if your connection to the WebToGo server is running fine by opening the Mobile Internet Browser on the device and navigating to the following location:
http://<your_server_name_or_ip_address>:81/webtogo.
If you are able to see the login page of the WebToGo portal, then you're all set.
In the programs area of the emulator, launch the Oracle DM tool. Fill in the details of the mobile user that will be using your application (shown in the following screenshot's left screen). Take note to fill in the correct WebToGo server URL as well. Click the OK button when you're done. This will initiate the registration process. If the registration has succeeded, you will see the screen shown at the right the next time you launch the Oracle DM tool.

You can finally perform your first sync down from the Oracle Mobile server. In the Programs area, launch the Oracle MSync tool. You will need to key in the mobile user account details again. Tick the Save Password checkbox so that you don't have to specify the same details again for the next sync.

When you're done, launch the sync by clicking the Sync button. The Sync progress bars will show you the progress of the sync.

When the sync has completed, you can check to see if the Oracle tables have been created on the mobile device. If you launch the Oracle Msql tool, you will see that a new database, crmlive, has been created on the device. You can connect to it using the SYSTEM user account and password. All the five tables with their corresponding columns will have also been created in this database.
You can try a sync by pointing the connection string of your Sales Force application to the crmlive database and then creating a new Lead account in this database. Run the Oracle MSync tool again to sync this record to the server. If you run a SELECT query on the MASTER.Accounts table on your desktop through SQL*Plus, you will be able to see the record you've keyed in from the mobile device.
Tip
Managing a sync programmatically in Oracle Lite
One question that's probably lingering in your mind by now is: Am I able to programmatically manage a sync from within my application? The answer is yes, but unfortunately, you need to use the Mobile Sync Client APIs, which are only accessible through COM or C/C++. This will not be covered in this book.