
Master-detail forms are a common occurrence in any software application. Using the tasks list as an example, the main lead record would be the Master, and the list of associated tasks would comprise the Detail. Master-detail records have a 1:many relationship, and detail records are usually represented in a grid or table, which is usually editable.
Desktop applications provide specialized grid controls that support in-grid editing, allowing the user to edit data directly on the grid itself. Unfortunately, the Datagrid control provided by the .NET Compact Framework does not support such a feature. You will therefore need to launch a separate Details form whenever the user needs to edit or create a detail record.
Let's take a look at how you can build a Datagrid to display the list of tasks for the account.

Add a Tasks tab to the AccountViewer form and place a Datagrid control in the tab frame. You will also need to place three buttons: New, Edit, and Remove at the top of this Datagrid. The New and Edit buttons will launch the TaskDetailViewer form that you will create later.
To populate the Tasks Datagrid control, simply bind the BaseAccount.Tasks property to the Datasource property of the Datagrid. This will feed a TaskCollection object to the grid, which will render every row of data in this collection nicely for you.
public void SetupBindings()
{
if (_account != null)
{
AccountBindingSource.DataSource = typeof(BaseAccount);
AccountBindingSource.Add(_account);
.
.
.
dgTasks.DataBindings.Add(new Binding("DataSource",
AccountBindingSource, "Tasks", true));
}
}
Notice that you have not yet specified which columns of the Task object to show (and how to format them) on the grid. You can do this by selecting the Datagrid in the Visual Studio designer and expanding the TableStyles property. Upon doing so, you will be presented with the following window:

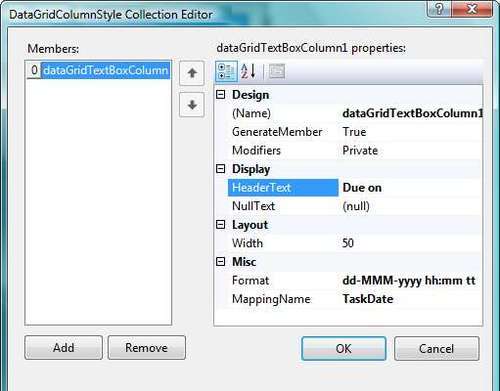
Specify the type name of the data source for the Datagrid in the MappingName field. This would be your TaskCollection object. Expand the GridColumnStyles property. You will now be prompted with yet another window that allows you to define column styles and mappings.
In this window you can define the columns that are visible in the grid. You can map each column to any property in the Task object by providing the exact property name in the MappingName field. You can also specify a format mask (for date or numerical fields).
The TaskDetailViewer form takes in a Task object; you will need to write code to bind the controls of this form to the properties of the Task object.
You can use a DateTimePicker control for the Due On field (which is the date and time the task is due), a Combobox control (with some preloaded data in the Items property) for the Status field, and text boxes for the Subject and Description fields. Drag a BindingSource control to the form, and name it TaskBindingSource. The binding source control allows you to manage the editing lifecycle of the data bound controls. Finally, add the Save and Cancel menu buttons to allow the user to either save his or her changes or to discard them.

The following is the code you have to write for this form. In the constructor of the form, call the SetupBindings() method to setup the data binding. The Save and Cancel menu buttons will call the EndEdit() and CancelEdit() methods of the TaskBindingSource control respectively to either save or discard the user's changes.
using System;
using System.Windows.Forms;
namespace CRMLive
{
public partial class TaskDetailViewer
{
private Task _Datasource;
private void SetupBindings()
{
this.TaskBindingSource.DataSource = typeof(Task);
this.TaskBindingSource.Add(_Datasource);
dtpDueOn.DataBindings.Add(new Binding("Value",
TaskBindingSource, "TaskDate", true));
txtSubject.DataBindings.Add(new Binding("Text",
TaskBindingSource, "TaskSubject", true));
txtDescription.DataBindings.Add(new Binding("Text",
TaskBindingSource, "TaskDescription", true));
cbStatus.DataBindings.Add(new
Binding("SelectedIndex", TaskBindingSource,
"TaskStatus", true));
dtpDueOn.Value = _Datasource.TaskDate;
}
public void btnSave_Click(System.Object sender,
System.EventArgs e)
{
this.TaskBindingSource.EndEdit();
this.DialogResult =
System.Windows.Forms.DialogResult.OK;
this.Close();
}
public void btnCancel_Click(System.Object sender,
System.EventArgs e)
{
this.TaskBindingSource.CancelEdit();
this.DialogResult =
System.Windows.Forms.DialogResult.Cancel;
this.Close();
}
public TaskDetailViewer(Task Datasource)
{
// This call is required by the Windows Form
//Designer.
InitializeComponent();
// Add any initialization after the
//InitializeComponent() call.
_Datasource = Datasource;
SetupBindings();
}
}
}
When the user decides to create a new task, you will need to:
- Create a new task object using the
BaseAccount.NewTask()method - Pass the task object to the
TaskDetailViewerform, and launch the form - If the form returns an OK dialog result, call the
AddTask()method to add the task object to theBaseAccount.Taskscollection
The following code shows how this is done:
public void btnNewTask_Click(System.Object sender, System.EventArgs e)
{
Task _task;
_task = _account.NewTask();
TaskDetailViewer _EditView = new TaskDetailViewer(_task);
if (_EditView.ShowDialog() == DialogResult.OK)
{
_account.Tasks.AddTask(_task);
dgTasks.DataSource = null;
dgTasks.DataSource = _account.Tasks;
}
_EditView.Close();
_EditView.Dispose();
_EditView = null;
}
To edit a selected task, you will need to:
- Get the
CurrentRowIndexproperty of the Datagrid to get the currently selected row index - Use this row index to retrieve the corresponding
Taskobject - Pass in this
Taskobject into theTaskDetailViewerform for editing - If the form returns an OK dialog result, refresh the Datagrid (to reflect the latest changes)
The following code shows how this is done:
public void btnEditTask_Click(System.Object sender, System.EventArgs e)
{
if (dgTasks.CurrentRowIndex == - 1)
{
return;
}
Task _task = _account.Tasks[dgTasks.CurrentRowIndex];
TaskDetailViewer _EditView = new TaskDetailViewer(_task);
if (_EditView.ShowDialog() == DialogResult.OK)
{
dgTasks.DataSource = null;
dgTasks.DataSource = _account.Tasks;
}
_EditView.Close();
_EditView.Dispose();
_EditView = null;
}
Run the sales force application again. This time, you should be able to see the Tasks tab. Try creating a new task by clicking the New Task button. As soon as you've keyed in the task details and clicked Save, your task will be displayed in the Datagrid. You can edit it by selecting the Datagrid row and clicking the Edit Task button. After you're done, fill in the details in the General tab, and click the Save button.
If you query your database again using the database tools provided, you should be able to see your task records successfully created in the AccountTasks table.