
The following sections describe how you can set up the Sales Force application to sync with a similar set of tables on the server side using the Microsoft Synchronization Services Framework. The steps involved in performing this sync are roughly outlined as follows:
- Create the
CRMLivetables in the server-side database. - Create a WCF Service Library hosted at the server side to listen for requests from the mobile device.
- Create a local database cache in the WCF Service Library project.
- Use the Microsoft Synchronization Services Framework wizards to generate the relevant .NET classes required for the sync in the Sales Force and WCF Service Library projects. You will also need to tweak the default settings for some of these generated classes.
- Define appropriate filters for the sync—so that only a subset of the data is synced (instead of all records in a table).
- Add some code to your Sales Force project to initiate the sync.
To perform a sync, you need to have a server-side database. If you don't have the full standard version of Microsoft SQL Server, you can install the freely available Microsoft SQL Server Express 2008 database for your testing. You can download and install this database engine using the following URL:
The next step is to install the Microsoft Synchronization Services for ADO.NET package. This package allows you to synchronize between a server database and an SQL Server CE database running on Windows Mobile 5 or 6. You can download this package using the following URL:
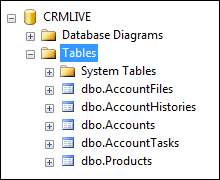
You will need to first recreate the CRMLive tables at the server side. Using the SQL Server Management Studio tool on your desktop, create a new database named crmlive. You can reuse the CREATE TABLE DDL statements you've created in Chapter 2 in the SQLServerPlugin project to recreate your tables in this database.
Copy and paste each CREATE TABLE statement in the SQL Server Management Studio and run them against the crmlive database. After you've done this, you should have a total of five tables in your crmlive database.
As you've read earlier, the local database cache on the mobile device can be made to sync with the backend server through a WCF service. This WCF service will run off the server (or in your case, your development machine).
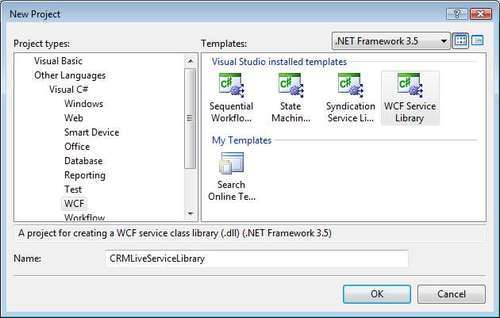
You can begin by adding a new WCF Service Library project to your Sales Force solution. Name this project CRMLiveServiceLibrary.
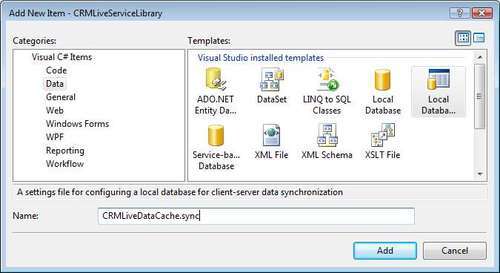
After doing this, add a new Local Database Cache item to this new project (shown in the following screenshot). Name this item CRMLiveDataCache. This step creates a local SDF database in your project, after which you will be able to set up synchronization settings through a wizard.
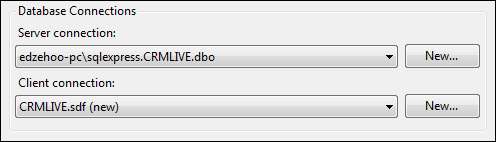
Once you have added the Local Database Cache item, you will immediately be prompted with the Configure Data Synchronization wizard. The first thing you need to do in this window is to configure the server and client connections. Configure the server connection to point to the crmlive database you've created earlier. As for the client connection, leave it as the default (CRMLIVE.sdf). This will let the wizard generate a new database in the mobile device project. After configuring these connections, you should have the following settings in the Database Connections section.
You will now need to include some tables in the sync. Click on the Add button at the bottom of the cached tables list. A new dialog window will appear. Tick all the five tables in the crmlive database in this window (shown as follows).
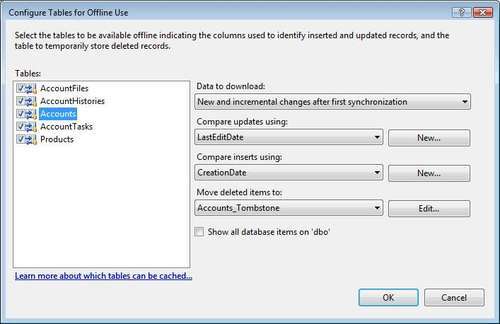
Although you can use the default values for most of the settings in this screen, the Data to download field is worthy of note. This field allows you to choose between two refresh options:
- New and incremental changes after first synchronization
This is an incremental refresh—only the changes are synced down to the local database.
- Entire table each time
This option syncs down the entire table during each sync. You can use this option on small tables that change frequently.
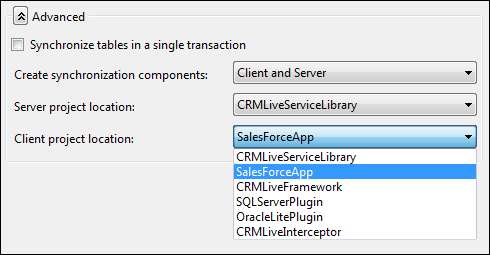
After you've added the tables to the cached list, you need to expand the Advanced section. You will notice that both the server and client project location are set to the same project. Change the client project location to the SalesForceApp project. The client project is usually a WinForms application. This step allows the wizard to generate the database .SDF file in the SalesForceApp project.
Click on the OK button to start generating the files required for the sync. You may be prompted to Update the server for incremental changes and to Save the SQL scripts in the project for later use. Select both options if prompted. At the end of this process, you will find new files added to both your CRMLiveServiceLibrary and SalesForceApp projects.
You will also immediately notice that two new fields—LastEditDate and CreationDate have been automatically added to each table in your crmlive database. You don't have to worry about this—these two fields are managed by SQL Server and will allow the Synchronization Framework to decide on the records that have changed and need to be synced down.
The first thing you can do is to delete both the Service1.cs and IService1.cs files from your CRMLiveServiceLibrary project. These two files are default files generated together with the project, and will not be used.
After that, open the CRMLiveDataCache.SyncContract.cs file. Look for the ICRMLiveDataCacheSyncContract interface definition. You will need to add the XMLSerializerFormat() attribute here (highlighted as follows). This is important because the .NET Compact Framework does not support the WCF default DataContractSerializer when serializing data for transfer over the network. The XMLSerializer, on the other hand is supported by the .NET Compact Framework.
[ServiceContractAttribute() , XmlSerializerFormat ()]
public interface ICRMLiveDataCacheSyncContract {
[OperationContract()]
SyncContext ApplyChanges(SyncGroupMetadata groupMetadata,
DataSet dataSet, SyncSession syncSession);
.
.
.
Note
Serializers are classes that convert an object and its current state into a stream or buffer of bytes (for storage or transport purposes).
Next, scroll to the top of this same file. There is a bunch of commented app.config settings that you need to copy and paste into the app.config file in this project. You need to perform the following changes to your app.config file:
- Copy the commented
<service>block into theapp.configfile, overwriting the existing<service>entry under the<system.serviceModel><services>tag. Don't forget to uncomment this block after that! - Copy the commented
<behavior>block into theapp.configfile, overwriting the existing<behavior>entry under the<behaviors><serviceBehaviors>tag. Uncomment this block of code as well. - Change the
binding="wsHttpBinding"property tobinding="basicHttpBinding".This is important because the .NET Compact Framework does not supportwsHttpBinding. - Change the base address from
http://localhost:8080to reflect your actual server name or server IP (for example,http://192.168.2.4:8080).
Your app.config file should now look something like this:
<?xml version="1.0" encoding="utf-8" ?>
<configuration>
<configSections>
</configSections>
<connectionStrings>
<add
name="CRMLiveServiceLibrary.Properties.Settings.
ServerCRMLIVEConnectionString"
connectionString="Data Source=EDZEHOO-
PCSQLEXPRESS;Initial Catalog=CRMLIVE;Persist Security
Info=True;User ID=sa;Password=admin123"
providerName="System.Data.SqlClient" />
</connectionStrings>
<system.web>
<compilation debug="true" />
</system.web>
<system.serviceModel>
<services>
<service
name="CRMLiveServiceLibrary.
CRMLiveDataCacheSyncService"
behaviorConfiguration="CRMLiveServiceLibrary.
CRMLiveDataCacheSyncServiceBehavior">
<host>
<baseAddresses>
<add baseAddress
="http://192.168.2.4:8080
/CRMLiveDataCacheSyncService/"/>
</baseAddresses>
</host>
<endpoint address ="" binding="basicHttpBinding"
contract="CRMLiveServiceLibrary.
ICRMLiveDataCacheSyncContract"/>
<endpoint address="mex" binding="mexHttpBinding"
contract="IMetadataExchange" />
</service>
</services>
<behaviors>
<serviceBehaviors>
<behavior name="CRMLiveServiceLibrary.
CRMLiveDataCacheSyncServiceBehavior">
<serviceMetadata httpGetEnabled="True" />
<serviceDebug
includeExceptionDetailInFaults="False" />
</behavior>
</serviceBehaviors>
</behaviors>
</system.serviceModel>
</configuration>
When you sync down Accounts data from the server to the mobile device, you obviously don't need to sync down every single record from the server. Only the accounts owned by the mobile user need to be synced down. This same rule extends to all the accounts-related tables—Accounts, AccountTasks, AccountHistories, and AccountFiles.
As each account record has an OwnerID column, we can easily filter the records using this column. Open the CRMLiveDataCache.Designer.cs file in Visual Studio. This file contains all the DataAdapter classes (one for each table to be precise), which determines how your data is extracted for the sync job.
Let's take a look at how we can implement this filter, starting with the Accounts table. Navigate to the InitializeCommands() method of the AccountsSyncAdapter in the Visual Studio designer, shown as follows :
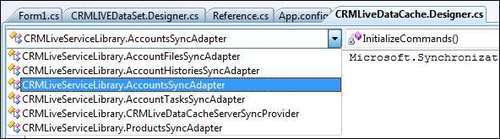
Look for the SelectIncrementalInsertsCommand object. The default SQL for this command object retrieves newly created records from the Accounts table. You will need to make the following changes to the SQL (highlighted as follows). Take note that you can use the @OwnerID parameter in your SQL. The actual value will be passed in from the client front-end later.
this.SelectIncrementalInsertsCommand = new
System.Data.SqlClient.SqlCommand();
this.SelectIncrementalInsertsCommand.CommandText = @"SELECT
[OwnerID], [AccountGUID], [AccountType], [DateCreated],
[FirstName], [LastName], [Status], [Reception], [Source],
[ResPhoneNo], [MobPhoneNo], [EmailAddress], [Street],
[City], [State], [Zipcode], [Country], [Website],
[InterestedProds], [LastEditDate], [CreationDate] FROM
dbo.Accounts WHERE ([CreationDate] >
@sync_last_received_anchor AND [CreationDate] <=
@sync_new_received_anchor AND OwnerID=@OwnerID)";
Now let's move on to a child table—the AccountFiles table. You need to filter these records by the OwnerID field as well, but the AccountFiles table does not contain this field. So how do we get around this?
As the OwnerID is located in the Accounts table, you can do an inner join with the Accounts table to create this filter. The highlighted code below illustrates how this can be done:
this.SelectIncrementalInsertsCommand = new
System.Data.SqlClient.SqlCommand();
this.SelectIncrementalInsertsCommand.CommandText = "SELECT
a.[AccountGUID], a.[AttachmentID], a.[AttachmentName],
[AttachmentSize], a.[Attachment], a.[Keywords],
a.[LastEditDate], a.[CreationDate] FROM dbo.AccountFiles a,
dbo.Accounts b WHERE (a.AccountGUID = b.AccountGUID AND
a.[CreationDate] > @sync_last_received_anchor AND
a.[CreationDate] <= @sync_new_received_anchor AND
b.OwnerID=@OwnerID)";
You will need to repeat this for the AccountTasks and AccountHistories tables. As for the Products table, you will not need to change the query. This is because every mobile user will need to see the same list of products. No filter is required for this table.
Now that you've successfully configured the WCF service, you need to configure the smart device client project. In the SalesForceApp project, you can access the WCF service like any normal web service. You can therefore add a reference to the WCF service in the same way (through the Add Web Reference menu in Visual Studio).
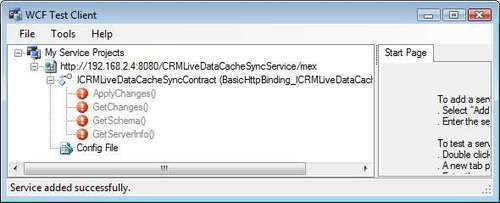
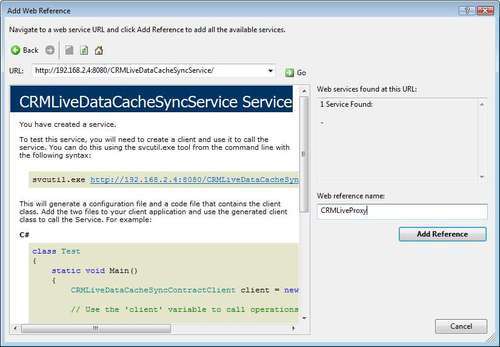
Before you can add the reference, the WCF service must be running in the first place. We can easily do this by first running the WCF service library project in non-debug mode. Select the CRMLiveServiceLibrary project in the Solution Explorer window, and press Ctrl+F5. This will launch the WCF Test Client, which will host the WCF service for as long as it is open.
Keep the window open, and add a web reference to your SalesForceApp project. Specify the full URL of your WCF library in the URL field and click on the Go button. If the WCF service was found, you will see the screen shown as follows. Specify CRMLiveProxy as the web reference name and click on Add Reference to add the reference.
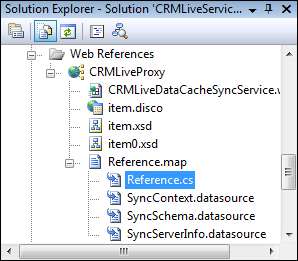
After adding the WCF reference, you will need to make some changes to the Reference.cs file of the generated CRMLiveProxy. To see this file, you will need to use the Show All Files option in the Solution Explorer for this project.
Open the Reference.cs file and import the Microsoft.Synchronization.Data namespace (highlighted):
namespace SalesForceApp.CRMLiveProxy {
using System.Diagnostics;
using System.Web.Services;
using System.ComponentModel;
using System.Web.Services.Protocols;
using System;
using System.Xml.Serialization;
using System.Data;
using Microsoft.Synchronization.Data;
After you have done that, you will need to scroll down the same file and remove everything beginning from (and including) the following section:
//REMOVE ALL CODE BELOW
[System.Diagnostics.DebuggerStepThroughAttribute()]
[System.ComponentModel.DesignerCategoryAttribute("code")]
[System.Xml.Serialization.XmlTypeAttribute (Namespace="http://tempuri.org/")]
public partial class SyncGroupMetadata {
.
.
.
[System.Xml.Serialization.XmlTypeAttribute (Namespace="http://tempuri.org/")]
public enum SyncDirection {
/// <remarks/>
DownloadOnly,
/// <remarks/>
UploadOnly,
/// <remarks/>
Bidirectional,
/// <remarks/>
Snapshot,
}
This step is necessary because the Add Web Reference wizard has generated a set of Sync Services classes that are already defined in the Sync Service assemblies referenced by the client project. This conflict can be fixed by removing the previous code.
To perform a sync you will need to write the following code. Since you only need to sync down the records owned by the current mobile user, you can filter the data by passing in the username of the mobile user to the following function.
This username (the OwnerID) is passed in as a SyncParameter to the server, where it will be used in the SQL filters you've modified earlier. The code to do this is highlighted in the following:
using Microsoft.Synchronization.Data;
private void Synchronize(string userName)
{
try {
var webSvcProxy = new
CRMLiveProxy.CRMLiveDataCacheSyncService();
var serverProvider = new ServerSyncProviderProxy
(webSvcProxy);
var syncAgent = new CRMLiveDataCacheSyncAgent();
syncAgent.RemoteProvider = serverProvider;
//Take note that we only need unidirectional sync for
//the Products table
syncAgent.Accounts.SyncDirection =
SyncDirection.Bidirectional;
syncAgent.AccountTasks.SyncDirection =
SyncDirection.Bidirectional;
syncAgent.AccountHistories.SyncDirection =
SyncDirection.Bidirectional;
syncAgent.AccountFiles.SyncDirection =
SyncDirection.Bidirectional;
syncAgent.Products.SyncDirection =
SyncDirection.DownloadOnly;
//Pass in the username of the mobile device user
//as the OwnerID parameter value. This will only
//sync down records belonging to this user.
syncAgent.Configuration.SyncParameters.Add
(new SyncParameter("@OwnerID", userName));
//Synchronize the database
var stats = syncAgent.Synchronize();
MessageBox.Show("Sync complete!");
MessageBox.Show("Changes Downloaded: " +
stats.TotalChangesDownloaded.ToString() +
Constants.vbCrLf + "Changes Uploaded: " +
stats.TotalChangesUploaded.ToString());
}
catch (Exception ex)
{
Interaction.MsgBox(ex.ToString);
}
}
To test the sync code you've created, run the SalesForceApp project (in debug mode). You will notice that the crmlive database SDF file is automatically deployed to the project folder on your mobile device. The WCF service is also automatically started in the background.
Configure the connection string for your Sales Force application to point to this new SDF file. Create a new lead account in your Sales Force application, and then run the sync code. A message box will pop up showing the number of changes uploaded to the server.
You can verify that the data was uploaded to the server by running an SQL SELECT query against the crmlive database on the backend server (your development machine) through SQL Server Management Studio. If the sync was successful, you should be able to see the record you've created from your mobile device.
There may be occasional scenarios where you have made changes to the same record at both the server and client side. A conflict will arise when you attempt a sync on this record. In such a case, you can write your own custom code to handle this conflict.
The CRMLiveDataCacheServerSyncProvider class in the CRMLiveDataCache.Designer.cs file provides an event that is raised whenever a conflict arises. This event is the ApplyChangeFailed event. Let's take a look at how you can write an event handler to handle this conflict.
//Constructor for CRMLiveDataCacheServerSyncProvider
public CRMLiveDataCacheServerSyncProvider()
{
.
.
.
//Add the event handler for the ApplyChangeFailed event
this.ApplyChangeFailed += new
System.EventHandler<Microsoft.Synchronization.Data.
ApplyChangeFailedEventArgs>
(ApplyChangeFailedEventHandler);
}
//The ApplyChangeFailed event handler
public void ApplyChangeFailedEventHandler(object sender,
Microsoft.Synchronization.Data.ApplyChangeFailedEventArgs
e)
{
System.Data.DataTable clientChanges =
e.Conflict.ClientChange;
System.Data.DataTable serverChanges =
e.Conflict.ServerChange;
//Here you can write your own custom logic to compare the
//server-side and client-side record
if ((System.DateTime)clientChanges.Rows[0]["ModifiedDate"]
> (System.DateTime)serverChanges.
Rows[0]["ModifiedDate"])
{
//If you want the client record to overwrite the server
//record, set the RetryWithForceWrite value as the
//final action.
e.Action =
Microsoft.Synchronization.Data.ApplyAction.
RetryWithForceWrite;
}
}
You can control how the conflict is handled by setting the e.Action variable to one of the following values:
- RetryWithForceWrite
The client "wins"—this action will overwrite the server record with the client record.
- Continue
The server "wins"—the client changes are not applied to the server
- RetryApplyingRow
This action will attempt a re-sync of the record. This option is usually used when you've made changes to the data and wish to try a re-sync in the hope that a confl ict no longer occurs.