Most people are accustomed to thinking of a table as a means of displaying data in a quick, easy-to-grasp format. But tables can also serve to organize your pages in creative ways. For example, suppose you want to display two tables next to each other. The simplest way to do this is to first create a table with one tall row and two wide columns and no gridlines. You can then insert one table in the first cell and the other table in the second cell. These nested tables then appear to be arranged side by side.
As with regular tables, you can create a nested table from scratch, by formatting existing information, or by inserting Excel data. And just like other tables, you can format a nested table either manually or using one of Word’s ready-made table styles.
Tip
Tables can be used to organize a mixture of elements such as text, tables, charts, and diagrams. For more information, you might want to consult Advanced Documents Inside Out (Microsoft Press, 2007).
When creating a table to contain other elements, you might want to take advantage of the Word table-drawing feature. If you click Draw Table below the grid displayed when you click the Table button, the pointer changes to a pencil with which you can draw cells on the page. You can set up the container table visually, without having to fuss with dialog boxes and precise dimensions while you are designing the layout. Then after everything is set up the way you want it, you can use the Table Properties dialog box to fine-tune the table specifications.
In this exercise, you will draw a table to contain two other tables. You will then insert and format the nested tables.
Note
USE the 06_Loan workbook and the 06_Memo and 06_TableAsLayout documents. These practice files are located in the Chapter04 subfolder under SBS_Office2007.
BE SURE TO display non-printing characters before starting this exercise.
OPEN the 06_Loan workbook in Excel, and then open the 06_Memo document and the 06_TableAsLayout document in Word.
Before you begin, save a copy of the 06_TableAsLayout document in the Chapter04 subfolder as My Nested Tables.
In the My Nested Tables document, on the Insert tab, in the Tables group, click the Table button, and then click Draw Table.
The pointer becomes a pencil.
Point below the last paragraph mark in the document, and drag across and down to create a cell about 3 inches wide and 1 1/2 inches tall.
Point to the upper-right corner of the cell (you don’t have to be precise), and drag to create another cell about the same size as the first.
When you release the mouse button, Word joins the two cells to create the structure of a table.
On the View tab, in the Window group, click the Switch Windows button, and then click 06_Memo.
Scroll to the bottom of the page, click anywhere in the Payment Schedule table, and on the Layout tab, in the Table group, click Select, and then click Select Table.
On the Home tab, in the Clipboard group, click the Copy button.
Switch to the My Nested Tables document, right-click the first cell in the table, and then click Paste as Nested Table.
Word inserts the table you copied into the cell and adjusts the size of the container table to fit the size of the nested table.
On the Windows taskbar, click the Microsoft Excel button to activate Sheet1 of the 06_Loan workbook, select cells A1:B8, and then on the Home tab, in the Clipboard group, click the Copy button.
Switch back to the My Nested Tables document, click the second cell in the table, and then on the Home tab, in the Clipboard group, click the Paste button.
Word inserts the worksheet data as a nested table in the cell.
Move the pointer to the selection area adjacent to the container table, and then click to select its two cells.
On the Home tab, in the Paragraph group, click the Borders arrow, and then in the list, click No Border.
Word removes the borders from the container cells.
Click anywhere in the left table, and on the Design contextual tab, in the Table Style Options group, select the Header Row and Total Row check boxes, and clear all the other check boxes.
In the Table Styles group, display the Table Styles gallery, and click the thumbnail of a table style that you want to apply to the nested table.
We used Light List – Accent 4.
Repeat Steps 13 and 14 to format the right table, perhaps using a similar table style with a different color.
We used Light List – Accent 6.
Turn off non-printing characters to see the results.
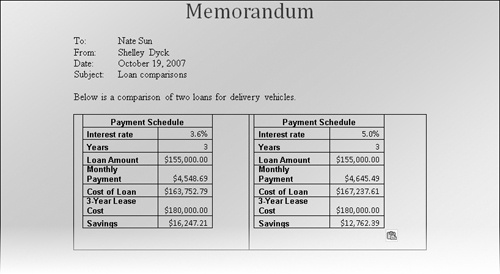
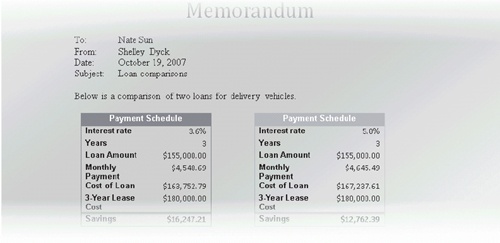
The nested tables now look as shown at the beginning of this topic.