In this chapter, you will learn to: | |
✓ | Change the layout of a slide. |
✓ | Rearrange slides in a presentation. |
✓ | Apply a theme. |
✓ | Switch to a different color scheme. |
✓ | Use colors that are not part of the scheme. |
✓ | Add shading and texture to the background of a slide. |
In Chapter 14, you looked at ways to work with the text on your slides. In this chapter, you will step back and focus on big-picture issues that can affect the success of a Microsoft Office PowerPoint 2007 presentation.
For each slide to accomplish its purpose, it needs to present its content in the most effective way. The layout of individual slides and the order of slides in the presentation contribute significantly to the logical development of your message. And an overall consistent look, punctuated by variations that add weight exactly where it is needed, can enhance the likelihood that your message will be well received and absorbed by your intended audience.
In this chapter, you will change the layout of a slide, rearrange slides in a presentation, and apply a theme to a presentation. You will also switch to a different color scheme and use colors that are not part of the scheme. Finally, you will add shading and texture to the background of a slide.
See Also
Do you need only a quick refresher on the topics in this chapter? See the Quick Reference entries at the beginning of this book.
Important
Before you can use the practice files in this chapter, you need to install them from the book’s companion CD to their default location. See "Using the Book’s CD" at the beginning of this book for more information.
Troubleshooting
Graphics and operating system–related instructions in this book reflect the Windows Vista user interface. If your computer is running Microsoft Windows XP and you experience trouble following the instructions as written, please refer to the "Information for Readers Running Windows XP" section at the beginning of this book.
When you add a new slide to a presentation, you can specify which of several predefined layouts you want to use, or you can add a blank slide and create a custom layout. If you decide after you create a slide that you want it to have a different predefined layout, you can change the layout by displaying the slide, clicking the Layout button in the Slides group on the Home tab, and then making a selection.
See Also
For information about adding slides, see "Creating a Presentation Based on a Ready-Made Design" in Chapter 13.
If the slide already contains content, you can add the elements of a different layout to the existing layout without disturbing the existing content. For example, if you decide to add a chart to a slide that already contains a title and a bulleted list, clicking the Layout button and then clicking the Two Content layout adds a content placeholder to the right of the bulleted list placeholder.
If you make changes to the layout of a slide—for example, by sizing or moving a placeholder—but then decide you want to revert to the original layout, you can reapply the layout (without losing text you have already entered) by clicking the Reset button in the Slides group on the Home tab.
In this exercise, you will change the layout of a slide, change the size of the layout’s placeholders, and then restore the layout.
Note
USE the 01_Layout presentation. This practice file is located in the Chapter15 subfolder under SBS_Office2007.
BE SURE TO start PowerPoint before beginning this exercise.
OPEN the 01_Layout presentation and display the Outline tab.
Display Slide 3, and then on the Home tab, in the Slides group, click the Layout button.
The Layout gallery includes the same layouts that are available for new slides.
Click Two Content layout.
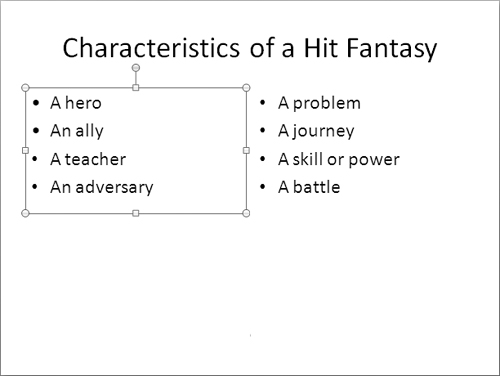
PowerPoint adds a placeholder to the right of the bulleted list.
Click the bullet in the placeholder on the right side of the slide, and then type the following bullet points, pressing
 after each one except the last:
A problem
A journey
A skill or power
A battle
On the Outline tab, the bullet points are grouped to indicate that they appear in different placeholders.
Drag the bottom middle handle of the right placeholder upward until the placeholder is big enough only for its bullet points.
Repeat Step 4 for the left placeholder.
Now suppose you want to add more bullet points to each placeholder. You could manually enlarge the placeholders, but here’s a quicker way.
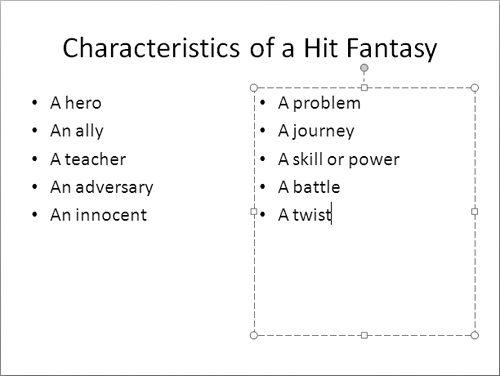
On the Home tab, in the Slides group, click the Reset button.
The placeholders expand to their original size.
Click to the right of adversary in the left placeholder, press
 , and then type An innocent.
Click to the right of battle in the right placeholder, press
 , and then type A twist.


