In this chapter, you will learn to: | |
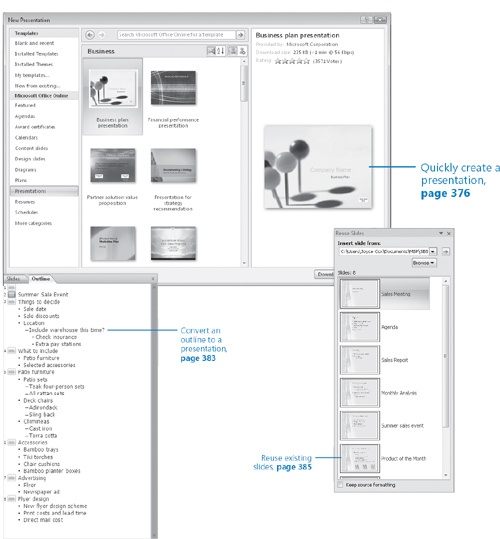
✓ | Quickly create a presentation. |
✓ | Create a presentation based on a ready-made design. |
✓ | Convert an outline to a presentation. |
✓ | Reuse existing slides. |
To work efficiently with Microsoft Office PowerPoint 2007, you must be able to decide the best way to start a presentation. The New Presentation window provides several options for creating a new presentation:
If you need help with both the presentation’s content and its look, you can download a complete presentation from Microsoft Office Online and then customize it to meet your needs.
If you have already created a presentation that is close enough in content and design to be a good starting point, you can use that presentation as the basis for the new one.
If you have content ready but need help with the look of the presentation, you can base your presentation on one of the design templates that comes with PowerPoint. These templates include graphics, colors, fonts, and styles. You can also base your presentations on your own custom templates.
If you have created an outline of a presentation in Microsoft Office Word, you can import the outline into PowerPoint to create an instant slide show.
If you know what your content and design will be and you want to build the presentation from scratch, you can start with a blank presentation.
This chapter will help you become familiar with these methods so that you can decide the best approach for each new presentation you create.
In this chapter, you will create several new presentations: one based on an example from Office Online, one based on a practice file stored on your hard disk, one based on a design template, and one based on a Word outline. You will also add slides to a presentation and insert slides from one presentation into another.
See Also
Do you need only a quick refresher on the topics in this chapter? See the Quick Reference entries at the beginning of this book.
Important
Before you can use the practice files in this chapter, you need to install them from the book’s companion CD to their default location. See "Using the Book’s CD" at the beginning of this book for more information.
Troubleshooting
Graphics and operating system–related instructions in this book reflect the Windows Vista user interface. If your computer is running Microsoft Windows XP and you experience trouble following the instructions as written, please refer to the "Information for Readers Running Windows XP" section at the beginning of this book.
When you first start PowerPoint, a blank presentation is displayed in the presentation window, ready for you to enter text and design elements. If you want to create a presentation from scratch, this is the place to start.
Tip
If you are already working in PowerPoint, you can open a new blank presentation by clicking the Microsoft Office Button, clicking New, and then in the New Presentation window, double-clicking Blank Presentation.
However, creating presentations from scratch is time-consuming and requires quite a bit of skill and knowledge about PowerPoint. Even people with intermediate and advanced PowerPoint skills can save time by capitalizing on the work someone else has already done. In the New Presentation window, you can preview and download presentations that are available from Office Online and then customize these templates to meet your needs. You can also use any presentation that you have already created and saved on your hard disk as the basis for the new presentation.
When you create a new presentation based on a template, you are not opening the template; instead you are creating a new file that has all the characteristics of the template. The new file is temporary until you save it.
In this exercise, you will create two new presentations: one based on an example from Office Online, and the other based on a practice file stored on your hard disk.
Troubleshooting
Be sure your computer is connected to the Internet before starting this exercise. If it is not, you can read through the steps below but you won’t be able to access the presentations available on Office Online.
Note
USE the 01_Creating presentation. This practice file is located in the Chapter13 subfolder under SBS_Office2007.
BE SURE TO start PowerPoint before beginning this exercise.
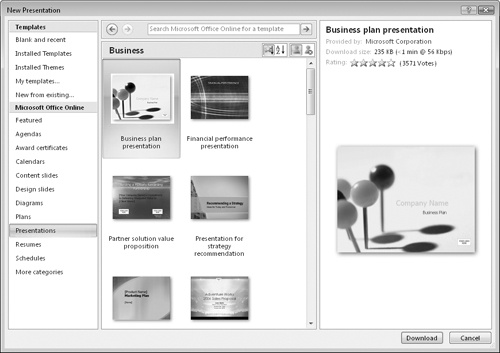
Click the Microsoft Office Button, and then click New.
The New Presentation window opens.
In the left pane, under Microsoft Office Online, click Presentations.
The center pane now lists categories of presentations that are available from Office Online.
In the center pane, click Business.
The center pane now displays images of all the ready-made business presentations that are available from Office Online. The selected presentation is indicated by an orange frame, and information about that presentation appears in the right pane.
Scroll the center pane, noticing the wide variety of presentations available.
About half way down the pane, click the Company meeting presentation image, and then in the lower-right corner of the window, click Download.
A message box tells you that you can download templates from Office Online only if you are running a genuine version of PowerPoint.
Click Continue.
Tip
If you don’t want this message box to appear every time you download a template, click the Do Not Show This Message Again check box before you click Continue.
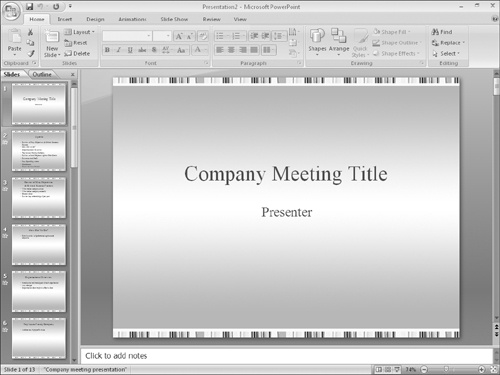
After your version of PowerPoint is validated, a presentation based on the selected template opens on your screen in Normal view. The Slides tab shows thumbnails of the slides, and the title slide appears in the Slide pane.
Below the scroll bar on the right side of the screen, click the Next Slide button repeatedly to display each slide of the presentation in turn.
The slides contain generic instructions about the sort of information that you might want to include in a presentation for a company meeting. You can replace these instructions with your own text.
On the Quick Access Toolbar, click the Save button.
PowerPoint suggests the title of the first slide as the name of the file.
Navigate to your DocumentsMSPSBS_Office2007Chapter13 folder, and save the presentation with the name My Company Meeting.
The title bar now displays My Company Meeting as the name of the open presentation.
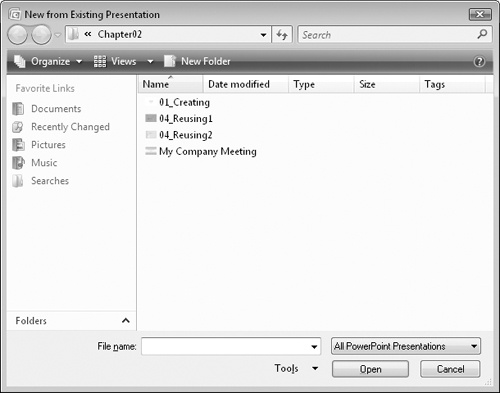
Display the New Presentation window again, and then in the left pane, under Templates, click New from existing.
The New From Existing Presentation dialog box opens.
With the contents of the Chapter13 subfolder displayed, double-click the 01_Creating file.
A quick glance at the title bar tells you that instead of opening the 01_Creating presentation, PowerPoint has opened a new presentation based on 01_Creating.
On the Quick Access Toolbar, click the Save button.
Because this presentation is a new file, PowerPoint displays the Save As dialog box so that you can name the presentation.
Save the file in the Chapter13 folder with the name My Sales Meeting.
The title bar now displays My Sales Meeting as the name of the active presentation.