Discovering the drawing tools
Drawing and editing shapes and paths
Introducing corner effects
Working with fills and layers
Many of the tools that you find in the InDesign toolbox are used for drawing lines and shapes on a page. This means you have several different ways of creating interesting drawings for your publications. You can create anything from basic shapes to intricate drawings inside InDesign, instead of having to use a drawing program like Illustrator. Even though InDesign doesn't replace Illustrator (see Book III), which has many more versatile drawing tools and options for creating intricate drawings, InDesign is adequate for simple drawing tasks. In this chapter, you discover how to use the most popular InDesign drawing tools and how to add colorful fills to your illustrations.
When you're creating a document, you may want drawn shapes and paths to be a part of the layout. For example, you may want to have a star shape for a yearbook page about a talent show or to run text along a path. Whatever it is you need to do, you can draw shapes and paths to get the job done.
Paths can take a few different formats. They can either be open or closed, with or without a stroke:
Path: The outline of a shape or object. Paths can be closed and have no gaps, or they can be open like a line on the page. You can draw freeform paths, such as squiggles on a page, freely by hand.
Stroke: A line style and thickness that you apply to a path. A stroke can look like a line or like an outline of a shape.
Figure 3-1 shows the different kinds of paths and strokes that you can create.

Paths contain points where the direction of the path can change. (You can find out more about points in the following section, "Points and segments".) You can make paths by using freeform drawing tools, such as the Pen or Pencil tools, or by using the basic shape tools, such as the Ellipse, Rectangle, Polygon, or Line tools.
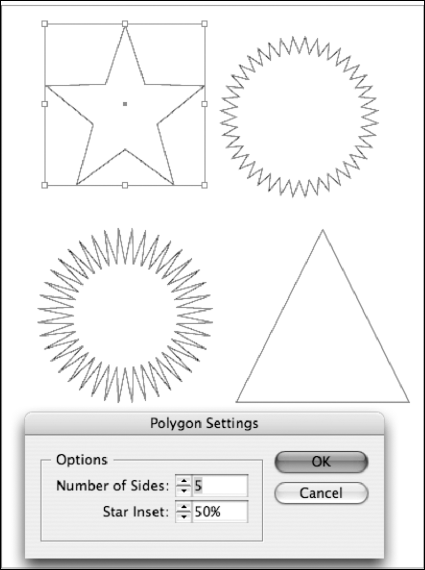
The shape tools create paths in a predefined way so that you can make basic geometric shapes, such as a star or ellipse. All you need to do is select the shape tool, drag the cursor on the page, and the shape is automatically drawn. Creating shapes this way is a lot easier than trying to manually create them with the Pen or Pencil tool! See Figure 3-2 for shapes drawn with the shape tools found in the toolbox.
You can change shapes into freeform paths, like those drawn with the Pencil or Pen tools. Similarly, you can make freeform paths into basic shapes. Therefore, you don't need to worry about which tool you initially choose.
Tip
We created the stars and starburst shown in Figure 3-2 by double-clicking the Polygon tool and changing the options. Read more about the Polygon tool in the "Drawing Shapes" section, later in this chapter.

Paths are made up of points and segments:
Point: Where the path changes somehow, such as changing direction. There can be many points along a path that are joined with segments. Points are sometimes called anchor points. You can create two kinds of points:
Segment: A line or curve connecting two points — kind of like connect the dots!
Figure 3-3 shows corner points and curve points joined together by segments.

The following subsections introduce you to tools that you'll probably use the most when creating drawings in your publications. When you draw with these tools, you're using strokes and fills to make designs. The following subsections show you what these common tools can do to help you create basic or complex illustrations in InDesign.
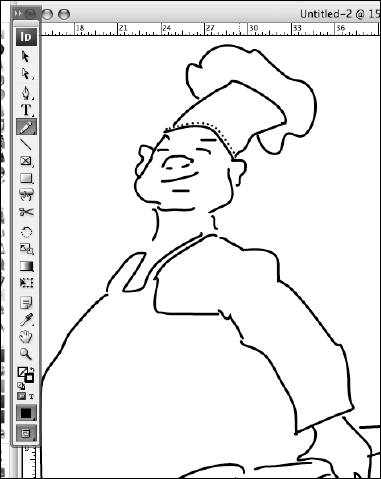
The Pencil tool is used to draw simple or complex shapes on a page. Because the Pencil tool is a freeform tool, you can freely drag the Pencil tool all over the page and create lines or shapes, instead of having them automatically made for you like when you use basic shape tools. The Pencil tool is a very intuitive and easy tool to use. You find out how to use the pencil tool in the section "Drawing Freeform Paths", later in this chapter.
The Pen tool is used to create complex shapes on the page. The Pen tool works together with other tools, such as the Add, Remove, and Convert Point tools. The Pen tool works by adding and editing points along a path, thereby manipulating the segments that join them.
Drawing with the Pen tool isn't easy at first. In fact, it takes many people a considerable amount of time to use this tool well. Don't get frustrated if you don't get used to it right away — the Pen tool can take some practice in order to get it to do what you want it to. You find out how to use the Pen tool in the "Drawing Freeform Paths" section, later in this chapter.
Basic shapes are preformed shapes that you can add to a document by using tools in the toolbox. The basic shape tools include the Line, Rectangle, Ellipse, and Polygon tools.
You can also draw these shapes and turn them into frames (containers that hold content in your document) if you want. You can use a frame as a text frame or as a graphic frame used to hold pictures and text. Draw a basic shape and then convert the shape to a graphic or text frame by choosing Object
Note
The frame and shape tools look the same and can even act the same. Both can hold text and images, but look out! By default, shapes created with the Frame tool have a 1-pt black stroke around them. Many folks don't see this on the screen but later discover that they have strokes around their text boxes when they print. Stick with the shape tools, and you'll be fine.
InDesign allows you to create basic shapes in your document. You can easily create a basic shape by following these steps:
Create a new document by choosing File
New.
When the New Document dialog box appears, click OK.
A new document opens.
Select the Rectangle tool in the toolbox.
Click anywhere in the page and drag the mouse diagonally.
When the rectangle is the desired dimension, release the mouse button. You've created a rectangle.
That's all you need to do to create a basic shape. You can also use these steps with the other basic shape tools (the Line, Ellipse, and Polygon tools) to create other basic shapes. To access the other basic shapes from the toolbox, follow these steps:

A menu with all the basic shapes opens.
Release the mouse button.
The menu remains open, and you can mouse over the menu items. The menu items become highlighted when the mouse pointer is over each item.
Select a basic shape tool by clicking a highlighted menu item.
The new basic shape tool is now active. Follow the preceding set of steps to create basic shapes using any of these tools.
Tip
To draw a square shape, use the Rectangle tool and press the Shift key while you drag the mouse on the page. The sides of the shape are all drawn at the same length, so you get a perfect square. You can also use the Shift key with the Ellipse tool if you want a perfect circle — just hold down Shift while you're using the Ellipse tool. Make sure that you release your mouse before the Shift key for this constrain shape trick to work!
Dragging on the page to create a shape is easy, but making a shape with precise dimensions using this method requires a few more steps. If you want to make a shape that's a specific size, follow these steps:
Select the Rectangle tool or the Ellipse tool.
The tool is highlighted in the toolbox.
Click anywhere on the page but don't drag the cursor.
This point becomes the upper-right corner of your Rectangle or Ellipse bounding box (the rectangle that defines the object's vertical and horizontal dimensions). After you click to place your corner, the Rectangle or Ellipse dialog box appears.
In the Width and Height text fields, enter the dimensions you want the shape to be created at.
Click OK.
The shape is created on the page, with the upper-right corner at the place where you initially clicked the page.
A polygon is a shape that has many sides. For example, a square is a polygon with four sides, but the Polygon tool enables you to choose the number of sides you want for the polygon you create. When you're using the Polygon tool, you may not want to create a shape with the default number of sides. You can change these settings before you start drawing the shape.
To customize the shape of a polygon, follow these steps:
Select the Polygon tool in the toolbox by selecting the Rectangle tool and holding down the mouse button until the menu pops up.
Double-click the Polygon tool in the toolbox.
The Polygon dialog box opens.
In the Number of Sides text field, enter the number of sides you want the new polygon to have.
If you want to create a star instead of a polygon, enter a number in the Star Inset text field for the percentage of the star inset you want the new shape to have.
A higher percentage means the sides will be inset farther toward the center of the polygon, creating a star. If you want a regular polygon and not a star, enter 0 in the Star Inset text field. If you want a star, enter 50%; for a starburst, enter 25%.
Click OK.
Move your cursor to the page and click and drag to create a new polygon or star.
Your new polygon or star appears on the page.
Figure 3-4 shows what a few different polygons and stars with different settings look like.
You can edit basic shapes using several panels in InDesign. This means you can create original shapes and craft exactly the kind of design you require in your page layout. You aren't stuck with the predetermined shapes, such as a square or oval. You can make these forms take on much more complicated or original shapes.
You can edit basic shapes in InDesign in only a few ways. You can edit shapes and manipulate their appearance in other ways. We cover some of these ways, such as editing fills, in the later section "Using Fills".
You can change the size of a shape by using the Transform panel. Here's how:

When the shape is selected, a bounding box appears around it. You can see a selected shape in Figure 3-5.
Open the Transform panel by choosing Window
Object and LayoutTransform.In the Transform panel that appears, enter different number values in the W and H fields to change the size of the shape.
The shape automatically changes size on the page to the new size dimensions that you specify in the Transform panel.

To resize a selected object with the Free Transform tool follow these steps:
Make sure that the object, and only the object that you want to resize, is selected.
Tip
Group multiple objects together if you want to resize several objects simultaneously. Group objects by selecting one object and Shift-clicking to add to the selection, and then press Ctrl+G (Windows) or

Select the Free Transform tool.
A bounding box appears around the selected object(s).
Click any corner point and drag to resize the object.
Tip
Hold down the Shift key while dragging to keep the object(s) constrained proportionally as you resize.
You can change the stroke of shapes you've created. The stroke is the outline that appears around the edge of the shape. The stroke can range from no stroke to a very thick stroke, and it's measured in point sizes. Even if a shape has a stroke set to 0 points, it still has a stroke! You just can't see the stroke.
Follow these steps to edit the stroke of your shapes:
Select a shape on the page.
A bounding box appears around the selected shape.
Select a new width for the Stroke using the Stroke Weight drop-down list on the Control panel.
As soon as a value is selected, the stroke automatically changes on the page. This number is measured in points. You use some of the other options in the following step list.
You can click in the Stroke text field and manually enter a numerical value for the stroke width. The higher the number you enter, the thicker the stroke. You can also change the style of the stroke with the Stroke panel by following these steps:
With a basic shape selected, select the stroke type from the drop-down list on the Control panel and select a new line.
As soon as a value is selected, the stroke automatically changes.
Choose a new line weight from the Stroke Weight drop-down list.
For example, we chose 10 points. The shape updates automatically on the page.
Tip
Want to create custom dashes? See more options by choosing Window
Add special ends to the lines with the Start and End drop-down lists. For example, you can add an arrowhead or a large circle to the beginning or end of the stroke. The Cap and Join buttons allow you to choose the shape of the line ends, and how they join with other paths when you're working with complex paths or shapes. For more information on creating and editing lines and strokes, see Book I, Chapter 6.
You can change the shear of a shape by using the Transform panel. Skew and shear are the same thing — they mean that the shape is slanted, so you create the appearance of some form of perspective for the skewed or sheared element. This transformation is useful if you want to create the illusion of depth on the page.
Follow these simple steps to skew a shape:
With a basic shape selected, choose Window
Object and LayoutTransform.Select a value from the Shear drop-down list in the lower-right corner of the Transform panel.
After selecting a new value, the shape skews (or shears), depending on what value you select. Manually entering a numerical value into this field also skews the shape.
You can change the rotation of a shape by using the Transform panel. The process of rotating a shape is very similar to how you skew a shape (see the preceding section):
With a basic shape selected, choose Window
Object and LayoutTransform.The Transform panel opens.
Select a value from the Rotation drop-down list.
After selecting a new value, the shape rotates automatically, based on the rotation angle you specified. You can also manually enter a value into the text field.
You can use different tools to draw paths. For example, you can use the Pencil tool to draw freeform paths. These kinds of paths typically look like lines, and you can use the Pencil and Pen tools to create simple or complex paths.
The Pencil tool is perhaps the easiest tool to use when drawing freeform paths (see Figure 3-6). Follow these steps to get started:
Choose File
New and then click OK in the New Document dialog box that appears to create a new document.Select the Pencil tool in the toolbox.
Drag the cursor around the page.
You've created a new path by using the Pencil tool.
Using the Pen tool is different from using the Pencil tool. When you start out, the Pen tool may seem a bit complicated — but after you get the hang of it, using the Pen tool isn't too hard after all. The Pen tool uses points to create a particular path. You can edit these points in order to change the segments between them. Getting control of these points can take a bit of practice.
To create points and segments on a page, follow these steps:
Close any existing documents and create a new document by choosing File
New Document.Click OK in the New Document dialog box that appears.
A new document opens with the default settings.
Select the Pen tool in the toolbox.
Click anywhere on the page and then click a second location.
You've created a new path with two points and one segment joining them.
Ctrl-click (Windows) or
-click (Mac) on an empty part of the page to deselect the current path.After you deselect the path, you can create a new path or add new points to the path you just created.
Add a new point to a selected segment by hovering over the line and clicking.
A small + icon appears next to the Pen tool cursor. You can also do the same thing by selecting the Add Anchor Point tool (located in the menu that flies out when you click and hold the Pen icon in the toolbox).
Repeat Step 6, but this time click a new location on a line segment and drag away from the line.
This creates a curved path. The segments change and curve depending on where the points are located along the path. The point you created is a curve point.
Even the best artists sometimes need to make changes or delete parts of their work. If you've made mistakes or change your mind about a drawing, follow the steps in this section to make your changes.
In order to change a path segment, select a point with the Direct Selection tool. When a point is selected, it appears solid; unselected points appear hollow.
Tip
Select the Direct Selection tool by pressing the A key.
All you need to do to select a point is use your cursor to click the point itself. Then you can use the handles that appear when the point is selected to modify the segments as follows:
Select the Direct Selection tool from the toolbox and then click a point.
The selected point appears solid. If you select a curve point, handles extend from it.
A curved point and a corner point edit differently when you select and drag them. Curve points have handles that extend from the point, but corner points don't.
Drag the point where you want it; to edit a curve point, click a handle end and drag the handle left or right.
The path changes, depending on how you drag the handles.
Suppose you have a corner point that you want to make a curve point. You can do just that with the Convert Direction Point tool. To understand how the Convert Direction Point tool works the best, you should have a path that contains both straight and curved segments. Follow these steps to change a corner point into a curved point and vice versa:
Select the Convert Direction Point tool.
This tool resides in a menu under the Pen tool in the toolbox. Hold the mouse button down over the Pen tool icon until a menu appears; select the Convert Direction Point tool from the menu.
Click a curved point with the Convert Direction Point tool.
The point you click changes into a corner point, which changes the path's appearance.
Click and drag a corner point with the Convert Direction Point tool.
The point is modified as a curved point. This changes the appearance of the path again.
This tool is handy when you need to alter the way your path changes direction. If you need to manipulate a point in a different way, you may need to change its type by using the Convert Direction Point tool.
You can use corner effects on basic shapes to customize the shape's look. Corner effects are great for adding an interesting look to borders. You can be very creative with some of the shapes you apply effects to or by applying more than one effect to a single shape. Here's how to create a corner effect on a rectangle:
Select the Rectangle tool and create a new rectangle anywhere on the page.
Hold the Shift key when using the Rectangle tool if you want to create a square.
With the Selection tool, select the shape and then choose Object
Corner Options.The Corner Options dialog box opens.
Choose an effect from the Effects drop-down list and enter a value into the Size text field.
For example, choose the Drop Shadow option to create a soft shadow behind an object, or choose Bevel and Emboss to give a 3D effect to an object.
Click OK.
The corner effect is applied to the shape.
A fill is located inside a path. You can fill your paths and shapes with several different kinds of colors, transparent colors, or even gradients. Fills can help you achieve artistic effects and illusions of depth or add interest to a page design.
You may have already created a fill. The toolbox contains two swatches: one for the stroke (a hollow square) and one for the fill (a solid box). (Refer to Figure 2-4 in Chapter 2 of this minibook to locate the Fill and Stroke boxes.) If the Fill box contains a color, your shape will have a fill when it's created. If the Fill box has a red line through it, the shape is created without a fill.
You can create a basic fill in several different ways. One of the most common ways is to specify a color in the Fill swatch before you create a new shape. To create a shape with a fill, follow these steps:
Make sure the Fill box is selected so that you aren't adding color to the stroke instead.
Open the Color panel by choosing Window
Color.Select a color in the Color panel.
You can enter values into the CMYK (Cyan, Magenta, Yellow, Black) fields manually or by using the sliders. Alternatively, you can use the Eyedropper tool to select a color from the color ramp at the bottom of the Color panel. For more information on color modes (such as CMYK and RGB [Red, Green, Blue] color modes), see Book I, Chapter 7.
Tip
Use the Color panel menu to select different color modes if CMYK isn't already selected. Click and hold the arrow button and select CMYK from the Color panel menu.
The Fill box in the toolbox is updated with the new color you've selected in the Color panel.
Create a new shape on the page.
Select a shape tool and drag on the page to create a shape. The shape is filled with the fill color you chose.
Tip
As in the other Creative Suite 4 applications, you can create tints of a color built with CMYK by holding down the Shift key while dragging any color's slider. All color sliders then move proportionally.
You can also choose to use color swatches to select a fill color by using the Swatches panel (choose Window
Perhaps you already have a shape without a fill, and you want to add a fill to it. Select the shape, and with the Fill box in the toolbox selected, select a color from the Color or Swatches panel. A new fill color is applied to the shape.
Tip
You can drag and drop a swatch color to fill a shape on a page, even if that shape isn't selected. Open the Swatches panel by choosing Window
Fills that are partially transparent can create some very interesting effects for the layout of your document. You can set transparency to more than one element on the page and layer those elements to create the illusion of depth and stacking.
Follow these steps to apply transparency to an element on the page:
With the Selection tool, select a shape on the page.
A bounding box appears around the selected shape.
Open the Effects panel by choosing Window
Effects.Use the Opacity slider to change how transparent the shape appears.
Click the arrow to open the slider or click in the text field to manually enter a value using the keyboard. The effect is immediately applied to the selected shape.
Select Stroke or Fill in the Effects panel to apply a separate opacity to each.
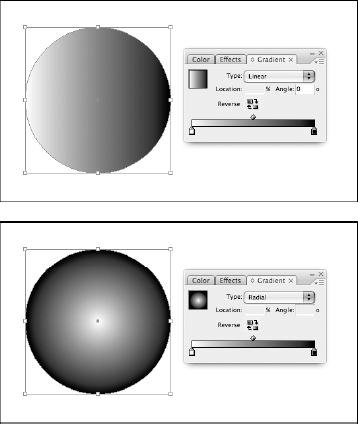
A gradient is the color transition from one color (or no color) to a different color. Gradients can have two or more colors in the transition.
Gradients can add interesting effects to shapes, including 3D effects. Sometimes you can use a gradient to achieve glowing effects or the effect of light hitting a surface. The two kinds of gradients available in InDesign are radial and linear, as shown in Figure 3-7:
Radial: A transition of colors in a circular fashion from a center point radiating outwards.
Linear: A transition of colors along a straight path.
You can apply a gradient to a stroke, a fill, or even text. To apply a gradient to a stroke, simply select the stroke instead the fill.
Warning
Even though you can apply a gradient to the stroke of live text, you'll create a printing nightmare ...use these features sparingly!
Here's how to add a gradient fill to a shape:
With the Selection tool, select the object that you want to apply a gradient to and then choose Window
Swatches.The Swatches panel opens.
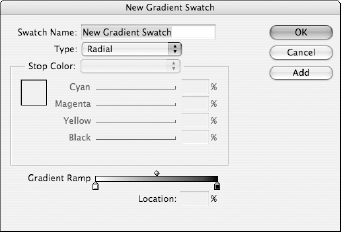
Choose New Gradient Swatch from the Swatches panel menu.
The New Gradient Swatch dialog box opens (see Figure 3-8).
Type a new name for the swatch in the Swatch Name field.
Sometimes giving the swatch a descriptive name, such as what the swatch is being used for, is helpful.
Choose Linear or Radial from the Type drop-down list.
This option determines the type of gradient the swatch will create each time you use it. We chose Radial from the drop-down list in Figure 3-8.
Manipulate the gradient stops below the Gradient Ramp to position each color in the gradient.
Gradient stops are the color chips located below the Gradient Ramp. You can move the diamond shape above the Gradient Ramp to determine the center point of the gradient. You can select each gradient stop to change the color and move them around to edit the gradient. When the gradient stops are selected, you can change the color values in the Stop Color area by using sliders or by entering values in each CMYK text field.
Tip
You can add a new color to the gradient by clicking the area between the gradient stops. Then you can edit the new stop just like the others. To remove the gradient stop, drag the stop away from the Gradient Ramp.
Click OK when you're finished.
The gradient swatch is created and applied to the selected object.
Note
To edit a gradient, double-click the gradient's swatch. This step opens the Gradient Options dialog box, which allows you to modify the settings made in the New Gradient Swatch dialog box.
Removing fills is even easier than creating them:
Select the shape with the Selection tool.
A bounding box appears around the shape.
Click the Fill box in the toolbox.
Click the Apply None button located below the Fill box.
This button is white with a red line through it. The fill is removed from the selected shape, and the Fill box is changed to no fill. You'll also see the None fill on the Swatches and Color panels.
Tip
If you're using a single row toolbox, you don't see the Apply None button unless you click and hold down on the Apply Gradient (or Color) button because the button is hidden beneath it.
Layers are like transparent sheets stacked on top of one another. If you add layers to your drawings, you can create the appearance that graphics are stacked on top of one another. The Layers panel allows you to create new layers, delete layers you don't need, or even rearrange them to change the stacking order. Use layers to create alternate versions of InDesign files, or just to replace logos. Here's how you work with layers in InDesign:
Open the Layers panel by choosing Window
Layers.This panel allows you to create, delete, and arrange layers.
Draw a shape on the page using a shape tool.
Create the shape anywhere on the page. Create it large enough so that you can easily stack another shape on top of part of it.
Click the Create New Layer button in the Layers panel to create a new layer.
A new layer is stacked on top of the currently selected layer and becomes the active layer.
Tip
Double-click a layer to give it an appropriate name, or even better yet, hold down the Alt (Windows) or Option (Mac) key and click the New Layer button to bring up the Layer Options dialog box before the layer is created.
Warning
Make sure that the layer you want to create content on is selected before you start modifying the layer. You can tell what layer is selected because the selected layer is always highlighted in the Layers panel. You can easily accidentally add content to the incorrect layer if you don't check this panel frequently. (If you add an item to the wrong layer, you can always cut and paste items to the correct layer.)
Make sure a shape tool is still selected and then create a shape on the new layer by dragging the cursor so that part of the new shape covers the shape you created in Step 2.
The new shape is stacked on top of the shape you created in Step 2.