Whether you're creating a Web site, presentation, or game, a truly interactive experience is one in which your users can control the action. If you want to take your movies to the next level, ActionScript can help. Flash's built-in scripting language has come a long way and can do anything from controlling movie playback to creating complex games.
This chapter introduces you to ActionScript and shows you how to use it to create interactive elements, such as clickable buttons, in your movies.
ActionScript is a powerful scripting language that you can incorporate into your movies to control playback, navigation, and imported media, such as images, video, and audio. ActionScript is written as a series of commands (or actions) that are placed on the Timeline, buttons, movie clip, and external files using the Actions panel. Think of ActionScript as a set of instructions that you can give your movie to tell it how to behave and add abilities.
ActionScript is often used for timeline control so that your animations can be told when and where to stop, loop, play, or jump to other points along a Timeline. You can also make truly interactive movies by adding ActionScript to buttons on the stage so that your users can control the animation, too!
All ActionScript throughout your movie is placed using the Actions panel (see Figure 7-1), which acts as a wizard, reference book, and script editor all in one. You can add actions from the Actions toolbox using a categorized tray or drop-down list, or you can type them directly into the script editor. A handy Script Assist mode (see the next section) is available so that you can add and modify actions without typing the code by hand (we highly recommend the Script Assist mode for new users).

To launch the Actions panel, choose Window
To place an action on a frame, select the frame on the Timeline and launch the Actions panel. To place an action on a button or movie clip (ActionScript 2.0 only), select the button or movie clip instance on the stage and launch the Actions panel.
For users who are new to ActionScript, the Script Assist mode is a wizard that lets you use a series of menus, buttons, and text boxes to build your scripts without getting into the nuts and bolts of the code itself. Script Assist mode helps prevent time-consuming errors so that you spend more time being creative and less time troubleshooting.
Throughout this chapter, you use Script Assist mode while you become more familiar with ActionScript and how it works.
To enable Script Assist mode, click the Script Assist button in the upper-right corner of the Actions panel.
ActionScript is understood and processed by the Flash Player, so some scripted movies need tested by choosing Control
ActionScript Version 3.0 brings many new major changes and improvements to the way ActionScript performs, as well as how it's created within your movies. ActionScript 3.0 requires the placement of actions on the Timeline or within external files (you can no longer place actions directly on movie clips or buttons) to make the code as modular as possible.
Warning
For first-time coders or users who aren't familiar with the principles of Object Oriented Programming (OOP) languages, these concepts may present a significant learning curve.
ActionScript 2.0 doesn't take advantage of the new methods, abilities, and speed improvements of ActionScript 3.0, but it does allow for more flexibility by allowing scripts to be added directly on buttons and movie clips. In addition to a smaller learning curve, ActionScript 2.0 is still utilized in movies created in earlier versions of Flash.
Note: ActionScript 3.0 support is available only in Flash Player versions 9 and 10. However, these later versions continue to support ActionScript 2.0 as well.
This chapter illustrates both versions wherever possible to give you the ability to work with movies published for either version. This is especially true of legacy (or older) files that you may need to update.
Depending on whether you choose to use ActionScript 2.0 or 3.0, you'll need to adjust the ActionScript version in your publish settings to match the version you choose to work in. In most cases, you can't publish newer 3.0 scripts in a version 2.0 movie, and vice versa. To choose the appropriate ActionScript version, choose File
Tip
You can also open the Publish Settings dialog box from the Property inspector by making sure no objects or frames are selected and then clicking the Edit button in the Publish section.
To add actions to a specific point on the Timeline, create a keyframe that you can put your ActionScript in. You can add ActionScript to keyframes with existing content, but it's always a good practice to separate your scripts from visual elements on the stage by creating a dedicated layer for your ActionScript. This layer prevents accidentally selecting the wrong thing when you try to add ActionScript to a keyframe or symbol.
The following sections use basic ActionScript to control a new tween on your Timeline. Before getting started, you need to create a new graphic symbol from artwork or typography on your stage.
The stop() action does exactly what it sounds like: stops the Timeline at whatever frames the action's placed on. A common use of stop() is to keep a movie from looping, which is the default behavior for the Flash Player.
Follow these steps to create a stop action in your movie:
On a new layer, create a motion or shape tween from frames 1–24 and press Enter/Return to play back and preview the animation.
For more information on creating tweens, see Chapter 3 of this minibook.
Click the New Layer button below the Timeline to create a new layer and name it Actions. If necessary, drag the layer upwards so it's the topmost layer in the stack.
This dedicated layer is where you add ActionScript to control your new motion tween.
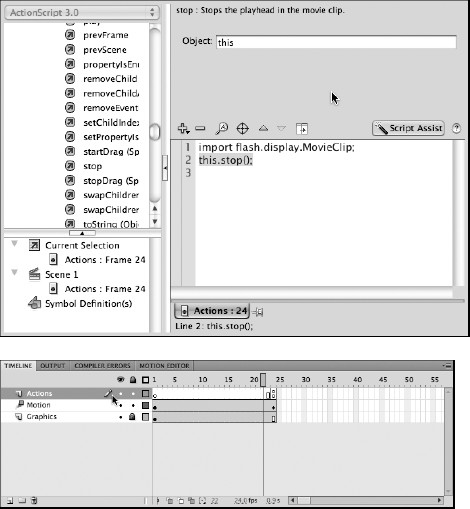
Add a keyframe on frame 24 of the new Actions layer with the F6 shortcut key.
Select the keyframe and choose Window
Actions to launch the Actions panel.
In the Actions panel, locate the Script Assist button and click it.
The top panel expands, and you're now working in Script Assist mode.
Add a
stopmethod, which stops the Timeline of a movie clip (including the main Timeline).Here's how:
In ActionScript 3.0: Click the plus sign at the top of the Actions panel and choose flash.display
import flash.display.MovieClip;
   this.stop();
In ActionScript 2.0: Click the plus sign at the top of the Actions panel and choose Global Functions
Take a look at your Timeline and you'll notice that a lowercase a now appears inside the keyframe, which indicates that ActionScript on the keyframe. These scripts run when the playhead passes that keyframe.
Choose Control
Test Movie to preview your movie.The animation plays until frame 24 and then stops.
To loop a movie or to send the playhead to a different point on the Timeline, you can tell your movie to jump forward or backward to a specific frame with one of two variations of the goto action: gotoAndPlay() and gotoAndStop(). Each of these two actions requires a frame name or number so that the action knows where to send the playhead. When placed on a frame, these actions send the playhead forward or backward to the specified frame and stop, or they resume playback from that point.
To use gotoAndStop, follow these steps:
On the Actions layer, select and create a new keyframe at frame 23.
Choose Window
Actions to open the Actions panel.Apply a
gotoAndStopaction on this frame to send the playhead to a specific frame and have it stop.Here's how:
In ActionScript 3.0: Click the plus sign and choose flash.display
import flash.display.MovieClip;
   this.gotoAndStop(1);
In ActionScript 2.0: Click the plus sign and choose Global Functions
gotoAndStop(1);
Choose Control
Test Movie to preview your movie.The tween plays and jumps to the first frame, where it stops.
Follow these steps to use gotoAndPlay():
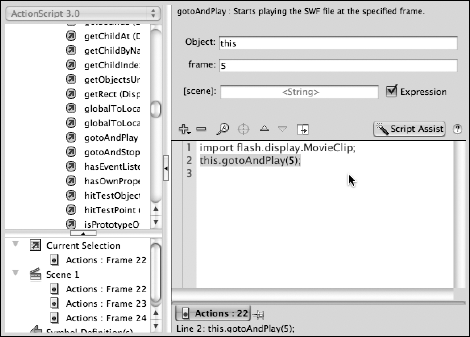
Select and create a new keyframe at frame 22 on your Actions layer and launch your Actions panel.
Apply a
gotoAndPlayaction at frame 22 to create a loop between this frame and frame 5 of your movie.Here's how:
In ActionScript 3.0: Click the plus sign and choose flash.display
import flash.display.MovieClip;
   this.gotoAndPlay(5);
In ActionScript 2.0: Click the plus sign and choose Global Functions
gotoAndPlay(5);
Choose Control
Test Movie to preview your movie.The animation plays until frame 22 and loops between frames 5 and 22.
In everyday life, buttons give you control over your world, whether it's switching on a light or your TV at home or navigating through Web pages and e-mail messages online. To make your movies better, you can use buttons to give your users control over the action with Timeline control and navigation.
In Flash, buttons are special symbol types built to respond to mouse or keyboard interaction, such as clicks, rollovers, and specific key presses. When paired with ActionScript, buttons can be used for just about any navigation or control task. Buttons are created in the same way as other symbol types, and you can easily drag instances to the stage from your library to create more buttons.
Like graphic symbols, you can create buttons from existing content on the stage or as new empty symbols to which you can add content later.
Follow these steps to create a new button symbol from existing content:
On a new layer in your document, create a new, solid shape on the stage that you want to use as a button and select the shape with the Selection tool.
Choose Modify
Convert to Symbol.The Convert to Symbol dialog box appears.
Enter a name for your new button in the Name text box and choose Button from the Type drop-down list.
Click OK to create the button.
Choose Window
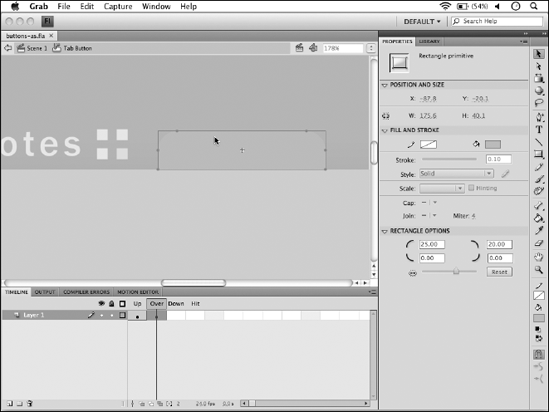
Take a look inside your button by double-clicking it on the stage or in the Library panel; its unique Timeline contains four specially marked frames: Up, Over, Down, and Hit. Each frame represents a button state, or the appearance of a button, as it interacts with a mouse in different ways.
Each frame, or state, can contain unique artwork so that your button can change appearance as it's clicked, pressed, or released. You can even add layers inside your button to stack artwork for more creative flexibility. Here are the states and what they represent:
Up: The appearance of your button when it's not pressed or rolled over. This is the state you see most of the time as the button sits on the stage.
Over: The appearance of the button when the mouse pointer rolls over it. Adding unique content to this frame creates the rollover effect many people know and love from Web buttons.
Down: The appearance of the button when it's clicked and the mouse button is held down.
Hit: The contents of this frame aren't actually visible but set the hot spot, or clickable area, of your button. If the Hit frame is empty, it uses the shape on the last available state by default. You can create a more specific clickable area if you want to give the user more or less area to work with or simplify usability for odd-shaped buttons.
Tip
Use a filled shape in the Hit frame so that the end user has no problem interacting with your button.
You can add content to each frame of your button to make it complete as follows:
If it's not already open, edit your new button by double-clicking it on the stage or in the Library panel.
You should have some content on the Up state from when you created the button. Now you can define content for remaining states as well.
Select the Over frame on the button's Timeline and add a new keyframe with the F6 shortcut key.
Use the Selection tool, Property inspector, or additional drawing tools to modify the artwork on the Over frame (see Figure 7-4).
Select the Down frame and insert a new keyframe with the F6 shortcut key.
Modify or add content to the Down frame.
This determines how the button appears when the user clicks and holds down the mouse button.
Select the Hit frame and create a new keyframe by pressing the F6 shortcut key.
Use the existing artwork that is copied to this keyframe, or one of the shape tools to fill this frame with a large, filled Hit area.
Exit the button by clicking Scene 1 above the stage.
Choose Control
Test Movie to preview your movie.Rollover and click your new button to see the different states in action.
Although choosing Control
Note
Keep in mind that buttons can't be selected or modified on the stage in this mode; you need to disable Enable Simple Buttons to apply actions or transformations, or to edit the button in place.
Individual button instances can each have unique transformations and color effects applied, just like graphic symbol instances. In addition, each button can have a unique ActionScript applied to it, so you can use several instances of a single button symbol to create an entire menu or control bar.
Here's how you add and modify additional instances of your button on the stage:
Choose Window
Library to make sure that your Library panel is visible.Drag two more instances of your button symbol onto the same layer as your existing button instance.
If necessary, position the buttons so that they're spread apart from each other.
Select one of the button instances and choose Window
Properties.The Property inspector opens.
Choose Tint from the Style drop-down list in the Color Effect section.
Select a color and set the tint percentage to 100 percent.
The button becomes tinted with the chosen color.
Select a different button instance, choose the Transform tool from the Tools panel, and use the Transform tool to resize or rotate the selected button.
Preview your buttons by choosing Control
The real power of buttons is realized when you combine them with ActionScript. In ActionScript 2.0, you can apply actions directly to button instances; in ActionScript 3.0, you define button actions and the events that trigger them on the Timeline or in external ActionScript files.
The tasks described in the following sections take place in ActionScript 3.0. Before you get started, make sure your publish settings are set to ActionScript Version 3.0. Choose File
In the following sections, you get a chance to define actions for your button, as well as the event handlers that trigger them. An event handler tells your button what actions to perform if and when a certain event occurs, such as clicks, rollovers, and key presses.
Unlike frame-based actions, which always occur at the same time and only respond to the playhead, you can use buttons at any time (or not at all) and respond to several different types of user interaction. For this reason, as you place actions on buttons in Script Assist mode, event handlers are added automatically.
To get rolling (or clicking), you can use the button instances you've already placed as controls for the tween on your Timeline. You can add unique scripts to each of these buttons to tell the Timeline to stop, play, or jump to specific points on it.
Note
An important step you need to take before trying to connect actions to a button is assigning that button an instance name. Instance names are how ActionScript can identify a specific object on the stage.
Before you get started, make sure that you remove and re-create the Actions layer if you've created one (described in the earlier section, "Using stop()"); the actions on this layer will conflict with your button actions.
To create a stop button, follow these steps:
Create a new Flash document.
Add some basic animation to the Timeline by creating a symbol, placing it on a new layer, and creating a Motion tween.
Create a new button and drag it from the library to a new layer on the Timeline.
Select the button instance on the stage and in the Property inspector, enter a name (such as stop_btn) for the button instance in the text box to the right of the button icon (see Figure 7-5).
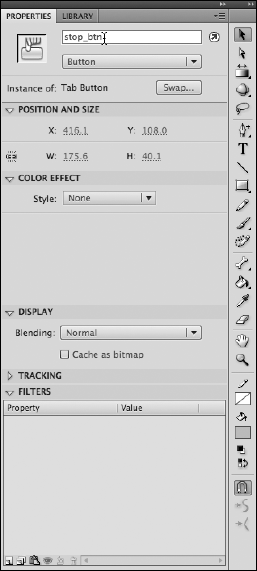
Figure 7-5. Assign a button instance a name with the Property inspector; ActionScript can't control the button without it.
Before you can control this button with ActionScript, assign it an instance name. You use this name from this point in your ActionScript to refer to and to control this specific button instance.
Create a new layer on the Timeline, and name it Actions.
Select the first keyframe of the new Actions layer and choose Window
Actions to open the Actions panel if it's not already open.In the upper-right corner, make sure the Script Assist button is turned off.
Click in the Script window and enter the following:
function stopAnim(evt:Event):void {
stop();
}
This code represents the event handler — the instructions that respond when the stop button is clicked. Just as described earlier in this chapter, you're using the same basic
stop()action, but this time, it runs in response to the button click and not at any specific point when the movie plays back.Here, the event handler is given the arbitrary
stopAnimname, but it could be named just about anything. Thefunctionstatement lets ActionScript know that all the code that follows is grouped understopAnim.A
functionis a group of related ActionScript statements. Just like how you can physically group together graphics on the stage, afunctionstatement virtually groups together multiple lines of ActionScript code that need to run together for a common purpose.Assign this new block of code to a specific button instance on the stage — in this case, the button you assigned an instance name to in Step 1.
Press Enter/Return a few times to move down a few lines under the code you just typed and enter the following line of code:
stop_btn.addEventListener("click",stopAnim);This code assigns an event listener, which tells the button to wait for a click, and when clicked, to respond using the new
stopAnimevent handler you created. You'll notice that ActionScript can now refer to your button by its new instance name,stop_btn, and assign code directly to it this way.Save your file.
Choose Control
Test Movie and click your stop button to test it.Any animation in your movie comes to a halt.
Warning
If you receive compiler errors in the Compiler Errors window, make sure to check spelling, casing, and look for the presence of any odd characters in your code. ActionScript is extremely sensitive to case and spelling, so this is the first place you look when troubleshooting. Compare your code to the code shown in the preceding steps. Also, make sure that the instance name you gave your button matches exactly with the name you're referring to in ActionScript.
Unlike the stop or play actions, which park or resume playback at the current frame, you can use goto to jump forward or backward on the Timeline. You can use one of two variations: gotoAndPlay() or gotoAndStop() to resume or stop playback from the selected frame, respectively.
To use goto in your movie, follow these steps:
Place a new button instance on the stage and select it.
Make sure it's selected by verifying that its options are displayed in the Property inspector.
At the top of the Property inspector, assign the new button an instance name by typing in the text box to the right of the button icon.
For example, we entered rewind_btn for the instance name.
Select the first keyframe of the Actions layer you created in the steps in the previous section; choose Window
Actions to open the Actions panel.Press the Enter/Return key to make a few lines of room underneath any code already in the Script window.
Type the following on a new line in the Script window:
function rewindAnim(evt:Event):void {
gotoAndStop(1);
}
This new event handler,
rewindAnim, instructs the Timeline to return to the first frame and stop.Below the new event handler code, make a new line and enter the following:
rewind_btn.addEventListener("click",rewindAnim);An event listener has been assigned to the button instance you named
rewind_btn, instructing it to run the code inrewindAnimwhen it's clicked.Choose Control
Test Movie.Clicking the rewind button on the stage now forces the playhead to frame 1 and playback stops.
Many actions often reference exact frame numbers to move backward and forward on the Timeline. If you happen to change the placement of something on your Timeline, however (such as the start or end of an animation), frame numbers may become inaccurate. For cases like these, assign names directly to keyframes on the Timeline that you can call directly from ActionScript.
Frame labels are familiar names that you can assign to any keyframe (such as start, end, or big_finale). You can then tell ActionScript to jump to these frames by name as an alternative to using a frame number. If the location of the named frame changes, scripts still function as long as the label name is the same. When you move a keyframe, the label you assign to it moves with it.
Here's how you can modify a button to use a frame label instead of a frame number:
On an animation layer, select frame 1 of your current Timeline.
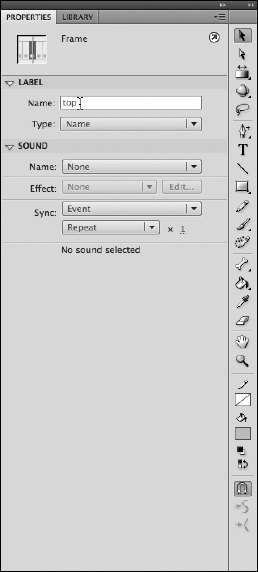
Enter a name for your frame label in the Name text box in the Label area of the Property inspector, as shown in Figure 7-6.
For example, we assigned this keyframe the label name of
top.Select frame 1 of your Actions layer and choose Window
Actions to open the Actions panel (if it's not already open).If you haven't already, follow the steps in the previous section, "Using goto", to create the
rewindAnimfunction (or event handler).Locate the line that reads
gotoAndStop(1). Replace 1 with the name of your new frame label in double quotes.The code now reads
function rewindAnim(evt:Event):void {gotoAndStop("top");}Choose Control
Test Movie to preview your changes.Click the rewind button and you'll see the animation jumps to the beginning just as it did earlier. This time, however, the code uses a frame label instead of an absolute frame number.
Now, no matter where you move the keyframe, the script follows automatically as long as the frame label remains the same.