Adding comments to PDF files
Working with comments
One of the fantastic features of Acrobat is the capability to mark up documents electronically with virtual sticky notes, or comments. You can mark up text to indicate changes and add annotations and drawing comments to a PDF (Portable Document Format) file. The Acrobat commenting tools don't change the original file, and you can remove the comments at any time, which means you can disable comments for printing or viewing at any time. In this chapter, we describe these great features and show you how to put them to work for you.
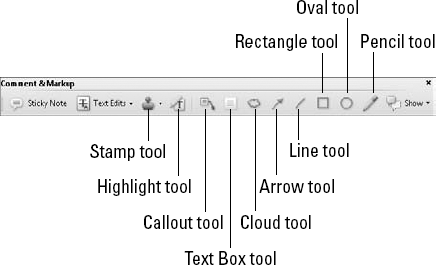
You can easily add annotations to PDF files, including stamps, text highlights, callouts, and electronic sticky notes by using the Comment & Markup toolbar, which you can access by clicking the Comment option in the Tasks toolbar. You can then choose Show the Comment & Markup Tools.
Tip
You can also access the Comment & Markup toolbar by choosing View
The Comment & Markup toolbar, as shown in Figure 5-1, provides several tools for adding comments to PDF documents. It also includes a Show menu to help manage comments and the process of adding comments. We discuss these tools in the following sections.
Use the Sticky Note tool to add electronic sticky notes to your files. You can click the location where you want the note to appear within a PDF document. An icon, representing the note, appears, along with a window where you can enter text. After entering text in the sticky note, close the window so that the document isn't hidden beneath it.
You can change the icon and color used to represent the note by right-clicking (Windows) or Control-clicking (Mac) the note and choosing Properties from the contextual menu. In the Properties dialog box that appears, make the changes to the note icon or color and then click Close.
The Text Edits tool is actually six separate text commenting tools. Use these tools to replace selected text, highlight selected text, add a note to selected text, insert text at cursor, underline selected text, and cross out text for deletion.
To use the Text Edits tool, follow these steps:
Choose the Text Edits tool and drag to select text that requires a change or comment.
Click the arrow to the right of the Text Edits tool to access the drop-down list containing your six choices.
Choose an option from the list of available editing choices:
Replace Selected Text: Replaces the selected text.
Highlight Selected Text: Highlights the selected text.
Add a Note to Selected Text: Allows you to add a note to the selected text.
Insert Text at Cursor: Places a cursor at the end of the selected text.
Underline Selected Text: Underlines the selected text.
Cross Out Text for Deletion: Crosses out the selected text.
Your selected text changes, depending on what you choose from the list.
Tip
After selecting the text that requires a comment, you can press the Delete or Backspace key to indicate a text edit to remove the text. Similarly, you can start to type, and Acrobat will create an insertion point. Also, if you right-click (Windows) or Control-click (Mac) after selecting the text, you can select the type of edit or comment you want to insert from the contextual menu.
You can use stamps to identify documents or to highlight a certain part of a document. Common stamps include Confidential, Draft, Sign Here, and Approved.
The stamps are grouped into sections. Some stamps automatically add your default username along with the date and time you applied them to the document; these stamps are available under the Dynamic category in the Stamps menu. The more traditional business stamps, such as Confidential, appear under the Standard Business category. You can access each of the different categories by clicking the arrow to the right of the Stamp tool in the Comment & Markup toolbar, as shown in Figure 5-2.

To apply a stamp to your document, follow these steps:
Select the Stamp tool from the Comment & Markup toolbar.
Click the arrow to the right of the Stamp tool and from the menu, choose the stamp you want to apply to the document.
Drag within your document at the location where you want the stamp to appear.
The Highlight Text, Cross Out Text, and Underline Text tools provide the same functionality and options that are available with the Text Edits tool, but with easier access. If you want to delete the highlighted, crossed-out, or underlined formatting to your text, just click the formatted area and hit the Delete or Backspace key. Your text will remain, but the formatting will disappear.
To highlight text, follow these steps:
Select the Highlight Text tool from the Comment & Markup toolbar.
Drag over the text that you want highlighted.
The text is now highlighted.
To underline text, follow these steps:
Select the Underline Text tool by selecting Tools
Comment & Markup Tools Underline Text.
Drag over the text that you want underlined.
The text is now underlined.
To cross out text, follow these steps:
Select the Cross Out Text tool by choosing Tools
Comment & Markup ToolsCross Out Text Tool.Drag over the text that you want crossed out.
The text is now crossed out.
With the Attach File tools, you can attach an existing text file, a sound file, or any file copied to the Clipboard from your computer (or computer network) and attach it to the PDF.
Follow these steps for file and sound attachments:
Choose Comments
Comment & Markup ToolsAttach a File as a Comment.A pushpin icon appears.
Click where you want the attachment noted.
The Add Attachment dialog box appears.
In the Add Attachment dialog box, browse to the file that you want to attach and click the Select button.
You can attach text, graphic, or sound files.
Select the type of icon to represent the attached file and then click OK.
Several types of icons can represent the attached file. You can select a paperclip, a graph, a pushpin, or a tag. Whatever icon you select appears on your document to denote that another file is attached. When you roll over the icon, a little annotation appears telling you the filename.
With the Record Audio Comment tool, you can share a verbal comment by using a microphone and a recording a message directly into the PDF. The sound is added as a comment.
Note
The file(s) that you attach with the Attach File tools becomes embedded within the PDF file. The attached file remains in its original file format, even if the attached file isn't a PDF file. For example, you can attach an Excel spreadsheet to a PDF document.
There are three shape tools, two line tools, and a pencil in the Comment & Markup toolbar. Use the drawing tools to add lines, ovals, rectangles, and other shapes to your PDF file. These shapes can call attention to specific portions of a document.
To use the Cloud Shape tool, follow these steps:
Select the Cloud Shape tool from the Comment & Markup toolbar.
Click in your document to begin the shape.
Click again in another position to set the length of the first part of the cloud and then click again to begin shaping your cloud.
Click as often as you like to create your shape.
When you're finished with your shape, double-click to close the cloud shape.
While the Cloud Shape tool is selected, click the shape you created and drag the corner points to resize, if necessary.
After creating the cloud shape, right-click (Windows) or Control-click (Mac) the shape and choose Properties from the contextual menu to change the color and thickness of the line values; when you're finished, click OK.
You can also use the Style drop-down list in the Properties dialog box to change the appearance of a selected comment. Instead of the cloud edges, you can change them to dotted lines, dashed lines, and so on.
To use the rectangle and oval shapes, follow these steps:
Select either the Rectangle or Oval Shape tool from the Comment & Markup toolbar.
Click and drag in your document to draw the shape.
While the drawing tool you chose is selected, click the shape you created and drag the corner points to resize, if necessary.
After creating the shape, right-click (Windows) or Control-click (Mac) the shape and choose Properties from the contextual menu to change the color and thickness of the line values; when you're finished, click OK.
You can also use the Style drop-down list in the Properties dialog box to change the appearance of the shape.
When creating notes that you want to prominently display on a document, you can use the Text Box tool.
Follow these steps to add a text box to hold your comments:
Select the Text Box tool from the Comment & Markup toolbar.
A text field is placed directly on the document.
Drag to add the comment.
Right-click (Windows) or Control-click (Mac) and choose Properties from the contextual menu to set the color of the text box that contains the note.
Make your choices to modify the appearance of the text box and then click OK.
Tip
You can select the text box and move it to another position any time you want. You can resize the text box by dragging an anchor point.
The Callout tool creates a callout text box that points to a section of your document with an arrow. The callout text box is made up of three parts: the text box, the knee line, and the end point line. You can resize each part individually to customize the callout area of your document.
To use the Callout tool, follow these steps:
Select the Callout tool from the Comment & Markup toolbar.
Click where you want the arrowhead point to be.
Drag up or down or to the side to position the text box and begin typing.
You can click the text box and then use the anchor points on the line to resize the box.
Right-click (Windows) or Control-click (Mac) and choose Properties from the contextual menu to set the color of the callout text box.
You can change the size, color, and font characteristics of the text in the callout text box.
Make your choices to modify the appearance of the callout text box and then click OK.
Tip
You can select the callout text box and move it to another position any time you want. You can resize the text box by dragging an anchor point.
With the Pencil tool, you can create freeform lines on your documents. These lines can be useful when you're trying to attract attention to a specific portion of a page. Just follow these steps:
Select the Pencil tool from the Comment & Markup toolbar.
Click and drag to draw on your document.
Edit the color and thickness of lines created with the Pencil tool by right-clicking (Windows) or Control-clicking (Mac) the line and choosing Properties from the contextual menu.
Alternatively, you can press Ctrl+E (Windows) or

Make your choices and click OK.
Tip
By right-clicking (Windows) or Control-clicking (Mac) the Pencil tool, you can choose the Pencil Eraser tool. Use the Pencil Eraser tool to remove portions of lines that had previously been created with the Pencil tool.
One of the most powerful features of PDF commenting is the ability to easily manage and share comments and annotations among reviewers. For example, you can determine which comments are displayed at any time, and you can filter the comments by author or by the type of commenting tool used to create the comment. In addition, you can indicate a response to a comment and track the changes that may have been made to a document based upon a comment. Also, you can consolidate comments from multiple reviewers into a single document.
You can use any of several methods to see a document's list of comments:
Click the Comments tab along the bottom left side of the document window in the Navigation panel.
Choose Comment
Choose View
No matter which method you use, the Comments List window that shows all the comments in the document appears along the bottom of the Document window. You can see the author of each comment and any notes entered by reviewers. By clicking the plus sign to the left of a comment, you can view more information about it, such as what type of comment it is and the date and time it was created.
Tip
If you've clicked the plus sign to the left of the comment to expand the view, it changes to a minus sign, which you can then click to return to the consolidated view showing only the author and the initial portions of any text from the note.
To the right of the plus sign is a check box that you can use to indicate that the comment has been reviewed or to indicate that a certain comment needs further attention. Use these check boxes for your own purposes; their status doesn't export with the document if you send the file to others, so they're for your personal use only.
Acrobat makes it easy to indicate whether a comment has been reviewed, accepted, or has additional comments attached to it.
To change the status of a comment, follow these steps:
Choose Comments
Show Comments List to see the entire list of comments and the status of each one.You can also click the Comments tab located on the bottom left side of the screen to display the comments.
In the Comments List, right-click (Windows) or Control-click (Mac) a comment and choose Set Status
Review from the contextual menu.Select Accepted, Rejected, Cancelled, or Completed, depending on what's appropriate to your situation.
The comment you modified appears in the list, showing the new status you assigned to it.
You can right-click (Windows) or Control-click (Mac) a comment in the Comments List and choose Reply from the contextual menu to add a follow-up note to the comment. This way, new comments can be tied to existing comments. If your documents go through multiple rounds of review, adding a reply allows a secondary or final reviewer to expand on the comments from an initial reviewer. This also allows an author or designer to clearly respond to the suggestions from an editor.
Because the Comments List can become rather large, you can choose to collapse all comments so that only the page number on which comments appear is displayed in the list. To do so, click the Collapse All button in the upper left of the Comments List window; it has a minus sign next to it. To view all comments, click the Expand All button in the same location; this button has a plus sign next to it.
To hide all the comments within a document, click and hold the Show button on the Commenting toolbar and choose Hide All Comments. You can then click the Show button in the Comments toolbar and choose to show comments based upon
Type of comment, such as note, line, or cross out
Reviewer, such as Bob or Jane
Status, such as accepted or rejected
Checked State, which can be checked or unchecked
Use these filtering options to view only those comments that are relevant to you.
You can share your comments with other reviewers who have access to the same PDF document by following these steps:
Make sure that the Comments List is visible by clicking the Comments tab on the bottom left of the Document window.
Select the comment that you want to export by clicking it (Shift+click for multiple selections).
From the Comments List window, choose Options
Export Selected Comments.The Export Comments dialog box appears.
Browse to the location where you want the comments to be saved and give the saved file a new name.
You now have a file that includes only the comments' information, and not the entire PDF file.
You can share your file with reviewers who have the same PDF file, and they can choose Options
You can compile a list of all the comments from a PDF file into a new, separate document. To summarize comments, follow these steps:
From the Comments List window, choose Options
Summarize Comments.The Summarize Options dialog box appears.
Create a listing of the comments with lines connecting them to their locations on the page by selecting the radio button from the top — Document and Connector Lines on a Single Page.
In the Include section, you can choose which comments should be summarized.
Click the Create PDF Comment Summary button.
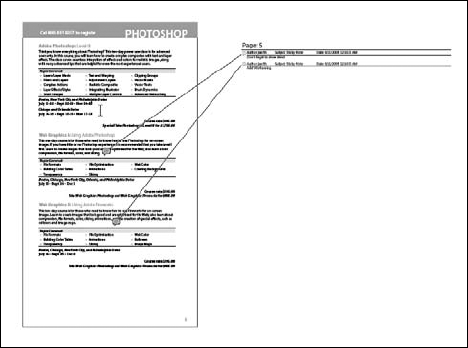
This step creates a new PDF document that simply lists all the comments, as shown in Figure 5-3.