Working with the improved panel workspace
Experimenting with nondestructive adjustment layers
Experimenting with 3D
Photoshop CS4 includes significant improvements to the workspace, editing tools, and 3D tools. In this chapter, you take a quick tour of some of the most exciting new capabilities. The features you see depend on the version of Photoshop CS4 that you have (Standard or Extended).
This quick rundown of what's new and exciting in Photoshop CS4 is a help to you when you start experimenting with the new tools and features.
Tip
If you really want to dive into the new features, choose Window
You have to give it to the Adobe Photoshop engineers; they hear the pleas of the average users and they're trying to help. Help with what you ask? Understanding the Photoshop terminology and unique names of their tools and controls. Many people who have been using Photoshop for years feel quite at ease with the unique terminology, but new users seem to have a more difficult time finding the tools and options that they want to use.
Palettes are now panels, like the rest of the CS4 applications. The panels are collapsed to a compact view and represented by space-saving icons. This workspace makes focusing on the images easier, and the tools become a natural extension of your work.
Photoshop continues to make extensive use of panels. To activate a panel in this new version, simply click the appropriate panel icon. If you select another panel icon, its panel is brought to the front of the display. You can return panels to icons by clicking the Collapse to Icons bar at the top of the panel docking area. When an icon is dragged to the work area, it automatically expands and then returns to an icon when dragged back into the docking area.
Showing and hiding all your tools and panels is easy. Press the Tab key to hide all your tools and panels. To cause them to reappear, move your cursor over the left or right side of your screen and pause when you see the vertical gray bar appear — the toolbar or panels then appear!
Other improvements to the workspace include
Tool options are easier to find. This is partly because some of the tools and panels now have relevant names. For example, the Control palette in earlier versions is now more appropriately the Options panel. If you want to make your brush bigger or smaller, or change the color of your text, simply choose Window

You can change the one-column toolbar to two columns by clicking the gray bar at the top of the toolbar.
You can select layer features, such as Auto Align and Auto Blend right from the Layer menu (choose Layer
Auto Align or LayerAuto Blend).
The new Adjustments panel makes non-destructive editing changes quick and easy. Use the new Adjustments panel to apply one new adjustment layer after another to your image, without affecting the original image. Adjustment layers have been a fabulous feature that's existed in the last several versions of Photoshop. Far too few people seem to take advantage of them, but when you do, it'll be hard to imagine using any other method to change your image.
Here's an overview of how to use the new Adjustments panel in Photoshop CS4:
Open an image in Photoshop.
If the Layers panel isn't open, choose Windows
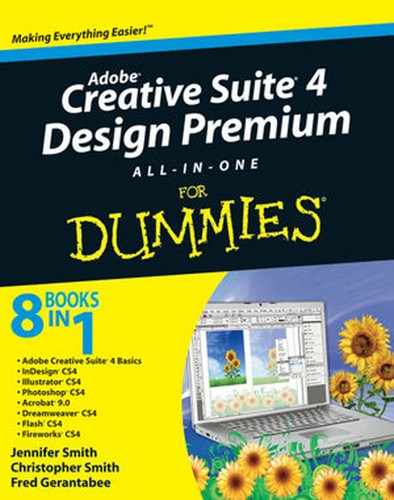
Layers.Click the Create New Fill or Adjustment Layer button, and select an adjustment that you want to apply to the active layer (which can also include the layers below), as shown in Figure 1-1.
The Adjustments panel appears, as shown in Figure 1-2.
For this example, the Black & White adjustment was selected because it shows a drastic change to the underlying layers,
Choose a preset from the Preset drop-down list or make your changes with the sliders.
A new adjustment layer is added on top of the last active layer.

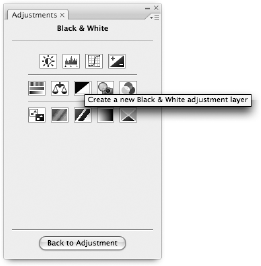
Turn off the visibility icon to the left of the new adjustment layer in the Layers panel, and the adjustment no longer occurs. Double-click the adjustment layer, and the Layer Style dialog box appears so that you can make changes. Drag the adjustment layer to the trash can, and it's like you never did anything to the image.
In earlier versions of Photoshop, you could open and make some slight editing changes on 3D files. Now, in CS4 you not only can open 3D files, but you can also take standard layers in Photoshop and convert them to 3D layers. This gives you the opportunity to convert virtually anything into a 3D image.
To experiment, open any image in Photoshop to experiment with the different methods of converting to 3D layers. Choose 3D
Rotate and revolve your 3D layer by using two new tools that are added to the toolbar — the 3D Rotate and 3D Orbit tools, as shown in Figure 1-4.
Tip
By double-clicking the icon in the 3D layer in the Layers panel, you can edit the 3D layer, and experiment with different texture and lighting rendering methods.

We could write an entire book on just the new 3D options, but the reality is that for the scope of this book, we'll just have to recommend that you experiment ...a lot! The 3D options are definitely worthy new features.
Advanced color users in Illustrator could take advantage of the Kuler feature since CS3, but now Photoshop can use this incredible color themed-based application. With Kuler, you can easily generate color combinations to experiment and apply to your artwork. Whether you're creating Web sites, brochures, patterns, or logos, you can experiment quickly with color variations.