In This Chapter
You can easily import graphics into Fireworks from the other Creative Suite 4 applications or create your own graphics. Fireworks comes with a full set of tools for creating both bitmap and vector images. This chapter briefly discusses bitmap and vector graphics; you can find out more by reading Book I, Chapter 6.
Create a new document by choosing File
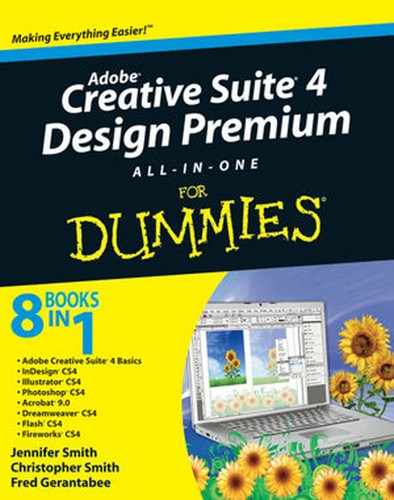
Web Layer is reserved for Web objects, such as hotspots, slices, and other interactive objects. You can't delete, duplicate, or rename objects in this layer. You find out more about the Web Layer in Chapter 6 of this minibook.
You also have Layer 1 as a default layer. Everything that you create or import, whether it's a bitmap or a vector graphic, lands here, essentially becoming a sublayer of Layer 1.
You can rename both main layers and sublayers. You can also reposition, delete, and duplicate them by using the tools at the bottom of the Layers panel (see Figure 2-1).
Understanding this layer organization and how it relates to drawing in Fireworks is important. When you use bitmap tools to paint and create pixels, everything falls onto one layer, much as you would expect. But when you start creating vector shapes, every new shape lands on a new layer. This arrangement makes it easier for you to move the shapes independently but can be confusing to new Fireworks users at first.
If you haven't read enough about vector versus bitmap graphics before this minibook, you get even more information in this section.
Fireworks lets you work in a painterly fashion with the bitmap tools. These tools work like the brush and retouching tools in Photoshop, in that they are pixel based. You can use the bitmap tools to create smoother transitions and more realistic contours and shapes.
So why not use bitmap images for all your artwork? One drawback is that bitmap images tend to be a little larger in file size than vector images. Also, bitmap images aren't scalable, as vector graphics are. Sometimes, it's fairly clear when to use a bitmap instead of a vector image; see Figure 2-2 for an example.
Most designers use bitmap images for more realistic artwork, such as photorealistic renderings, and vector images for more graphical artwork, such as stylized buttons and logos.

The first set of tools that we investigate in this chapter are the bitmap tools: Marquee, Lasso, Magic Wand, Brush, Pencil, Eraser, Blur, and Rubber Stamp. We cover these tools briefly, focusing on the differences between using them in Fireworks and in other bitmap applications, such as Photoshop. If you don't see the Tools panel, choose Window
The selection tools let you grab hold of pixels. You use the Marquee tool, for example, to select a section of pixels that you want to move, clone, or change in some way. To experiment with the Marquee tool, follow these steps:
Choose File
New to create a new Fireworks document.
The New dialog box appears.
Type 500 in both the Width and Height text boxes; leave Canvas set to White; then click OK.
A new blank document opens.
With the Marquee tool, click and drag in the workspace from top left to bottom right to create a rectangular marquee.
Choose File
Swatches to open the Swatches panel.Click any color you want to use for the fill of your selection.
Click the Paint Bucket tool (in the Colors section of the Tools panel) and then click inside your selection marquee to fill it with your selected color.
You've successfully created a bitmap graphic in Fireworks. In the next section, you use other bitmap tools to make changes in this artwork.
In this section, you use the Marquee tool to move the pixels to another location. If you're a Photoshop user, notice that the Marquee tool works just like the selection tools in Photoshop.
To move the graphic you just selected, follow these steps:
With the Marquee tool, click and drag over the bottom of your bitmap rectangle.
Select the Pointer tool and then drag the marquee down, as shown in Figure 2-3.

If you've followed along, you know how to select and move pixels and you're ready to change the way selected pixels appear. To do that, follow these steps:
Choose Select
Deselect, or use the keyboard shortcut Ctrl+D (Windows) or+D (Mac), to make sure that there are no active selections.
Hold down the Marquee tool to select the hidden Oval tool.
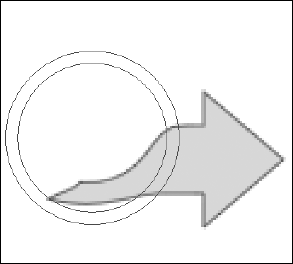
Holding down the Alt (Windows) or Option (Mac) key, click and drag from the center of the rectangle that you created (see the top of Figure 2-4).
Tip
Many of the shortcuts you use in Illustrator and Photoshop also work in Fireworks ...but not all. Finding compatible shortcuts is sort of hit-or-miss when you're in the beginning stage with Fireworks. You can choose Help
To feather (soften) the edges of the selection, choose Feather from the Edge drop-down list in the Properties panel and set a feathering value (10 pixels is the default) in the combo box to the right of the Edge drop-down list, as shown in the middle of Figure 2-4.
The bottom of Figure 2-4 shows the result.

You'll also use some additional bitmap tools:
Brush: The Brush tool lets you paint just like you would in Photoshop, and you can mix it up with the selection tools to create interesting artwork.
Options for the Brush tool — such as size, softness, and transparency — are located in the Properties panel at the bottom of the workspace. Unfortunately, not all the great brush shortcuts in Photoshop work in Fireworks, so you may have to access the Properties panel in Fireworks more often than you may be used to.
Editing tools: Because you are working with pixels, you can edit those pixels rather easily.
Rubber Stamp: The Rubber Stamp tool is similar to the one in Photoshop, and you use it the same way. Simply Alt-click (Windows) or Option-click (Mac) a bitmap source that you want to clone; then release the Alt/Option key and start painting somewhere else in the image area. The source is re-created or cloned as you paint with the Rubber Stamp tool.
If you make a mistake, you can undo multiple steps in Fireworks by pressing Ctrl+Z (Windows) or
The Vector tools in Fireworks are similar to the ones you may be used to in Illustrator or Photoshop. What you should notice right off the bat in Fireworks is that every time you create a new vector shape with one of the vector tools (such as Line, Pen, Shape, or Type), Fireworks creates a new sublayer automatically. This arrangement lets you move the shapes freely and independently.
Warning
Before repositioning or making other transformations in your vector images, confirm which sublayer is active by looking for the highlighted sublayer in the Layers panel. Otherwise, you may unexpectedly move the wrong image.
To use a shape tool, simply click it and drag in the workspace. A shape is created, and a new sublayer is added automatically in the Layers panel.
In addition to the basic shape tools, Fireworks has more shapes that are useful for designing buttons, icons, and other Web graphics. To find these shapes, click and hold the Rectangle tool in the Tools panel. Hidden shape tools appear such as stars, arrows, and beveled rectangles, to name a few.
After you create a shape using a shape tool, you can edit it by using the Pointer and Subselection tools as follows:
Pointer: If you need to reposition the shape, select the Pointer tool, and click and drag it to a new location. You can also grab the highlighted anchor points to resize the shape.
Subselection: If you need to make more defined shape changes (such as changing the corner radius, bevel, or overall shape of the vector graphic), you want to switch to the Subselection tool. This tool works very much like the Select and Direct Select tools in Illustrator and Photoshop.
The most popular vector tool in most applications is the Pen tool. Using this tool in a freeform manner, you can create any shape you want (including the type you need to make a button look like it has a reflection, for example) or create your own custom graphics.
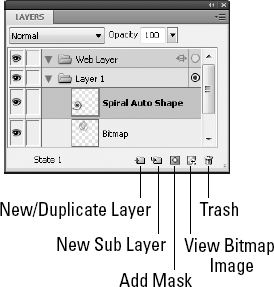
Fireworks offers three types of path tools, as shown in Figure 2-5:
The Pen tool works much like other Pen tools. You create a path by clicking from one location to another (creating anchor points) or by clicking and dragging to create curved sections of paths.
The Vector Path tool lets you click and drag in a painterly fashion to create a path.
The Redraw Path tool lets you reshape a path (by dragging it over an existing path) while maintaining the original stroke information.
If you have a hard time using the Pen tool or want to make freeform adjustments, you can get really great results by using the Freeform tool.
Note
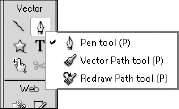
When you use the Freeform tool or some of the other hidden path tools (refer to the "Using shape tools" section, earlier in this chapter), you may get a warning message, essentially indicating that you could get unexpected results, as shown in Figure 2-6. Click OK, and cross your fingers.
To use the Freeform tool with an existing path active (select it with the Pointer tool), follow these steps:
Click the Freeform tool to select it; then click and drag in the workspace to change the way the path looks.
You can bend the path in different smooth directions.
In the Properties panel, set options to specify the width of the change.
Another tool hidden in the Freeform tool is the Reshape Area tool, which is handy for reshaping existing paths (see Figure 2-7). This tool lets you set a reshape size area in the Properties panel and then edit selected paths by clicking and dragging over them.
The additional path-scrubber tools let you edit paths that have pressure-sensitive strokes. In fact if you did not have paths created using a pressure-sensitive device, you cannot use these tools.
Feel free to scale your text to your heart's delight; text is vector! To create text in your image area, simply select the Text tool, click to set your insertion point, and then start typing. Use the Properties panel to change the font and size, as well as other text attributes. Chapter 4 in this minibook discusses text and its formatting capabilities.
You can mask in Fireworks, but you don't use quite the same method that you'd use in Photoshop, Illustrator, or InDesign. The result is essentially the same, however.
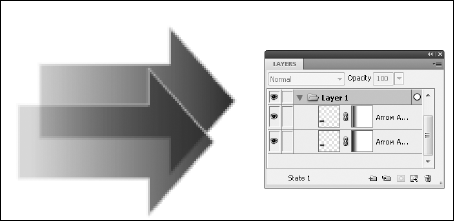
A mask lets you choose which part of a graphic is exposed and which part is covered (by the mask). See Figure 2-8 for an example of two vector graphics that have been masked with a gradient fill to fade the transparency from 100 percent to none.
To apply a gradient mask, follow these steps:
Create a vector shape (such as an arrow).
In the Layers panel, choose Add Mask from the panel menu.
A blank mask appears to the right of the vector shape's sublayer, as shown in Figure 2-9.
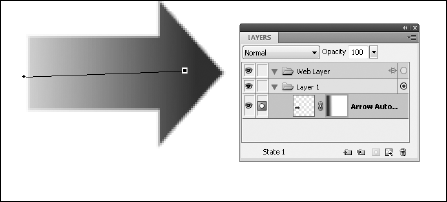
With the new mask active, click and hold the Paint Bucket tool to select the hidden Gradient tool.
With the Gradient tool, click and drag across the shape to make the gradient on the mask and create the transparency effect on the vector shape.
Notice that where the gradient is darker, the image is less visible, and where the gradient is lighter, the vector shape is more visible, as shown in Figure 2-10.

You can experiment with this effect on other shapes. Also, you can try clicking and dragging the gradient until you get the depth and direction you want.
Tip
A gradient tends to work better as a mask if you use its default colors: black and white.