 1. What's New in Illustrator CS4
by Fred Gerantabee, Christopher Smith, Jennifer Smith
Adobe® Creative Suite® 4 Design Premium All-in-One for Dummies®
1. What's New in Illustrator CS4
by Fred Gerantabee, Christopher Smith, Jennifer Smith
Adobe® Creative Suite® 4 Design Premium All-in-One for Dummies®
- Copyright
- About the Authors
- Authors' Acknowledgments
- Publisher's Acknowledgments
- Introduction
- I. Adobe Creative Suite 4 Basics
- 1. Introducing Adobe Creative Suite 4
- 2. Using Common Menus and Commands
- 3. Exploring Common Panels
- 4. Using Common Extensions
- 5. Importing and Exporting
- 6. Handling Graphics, Paths, Text, and Fonts
- 7. Using Color
- 8. Printing Documents
- II. InDesign CS4
- 1. What's New in InDesign CS4
- 2. Introducing InDesign CS4
- 3. Drawing in InDesign
- 4. Working with Text and Text Frames
- 4.1. Understanding Text, Font, and Frames
- 4.2. Creating and Using Text Frames
- 4.3. Adding Text to Your Publication
- 4.4. Looking at Text Frame Options
- 4.5. Modifying and Connecting Text Frames on a Page
- 4.6. Understanding Paragraph Settings
- 4.7. Editing Stories
- 4.8. Using Tables
- 4.9. Looking at Text on a Path
- 5. Understanding Page Layout
- 6. Clipping Paths, Transforming Objects, and Alignment
- 7. Understanding Color and Printing
- 8. Exporting Your Work
- 9. Integrating InDesign
- III. Illustrator CS4
- 1. What's New in Illustrator CS4
- 2. Discovering Illustrator CS4
- 3. Using the Selection Tools
- 4. Creating Basic Shapes
- 5. Using the Pen Tool and Placing Images
- 6. Using Type in Illustrator
- 6.1. Working with Type
- 6.1.1. Creating text areas
- 6.1.2. Creating a line of text
- 6.1.3. Flowing text into an area
- 6.1.4. Dealing with text overflow
- 6.1.5. Creating columns of text with the Area Type tool
- 6.1.6. Threading text into shapes
- 6.1.7. Wrapping text
- 6.1.8. Outlining text
- 6.1.9. Putting text on a path, in a closed shape, or on the path of a shape
- 6.2. Assigning Font Styles
- 6.3. Using the Character Panel
- 6.4. Using the Control Panel
- 6.5. Using the Paragraph Panel
- 6.6. Text Utilities: Your Key to Efficiency
- 6.1. Working with Type
- 7. Organizing Your Illustrations
- 8. Using Layers
- 9. Livening Up Illustrations with Color
- 9.1. Choosing a Color Mode
- 9.2. Using the Swatches Panel
- 9.3. Applying Color to the Fill and Stroke
- 9.4. Changing the Width and Type of a Stroke
- 9.5. Using the Color Panel
- 9.6. Saving Colors
- 9.7. Editing Colors
- 9.8. Building and Editing Patterns
- 9.9. Working with Gradients
- 9.10. Copying Color Attributes
- 9.11. The Live Trace Feature
- 9.12. The Live Paint Feature
- 10. Using the Transform and Distortions Tools
- 11. Working with Transparency and Special Effects Tools
- 12. Using Filters and Effects
- 13. Using Your Illustrator Images
- IV. Photoshop CS4
- 1. Exploring New Features in Photoshop CS4
- 2. Getting Into Photoshop CS4 Basics
- 3. Messing with Mode Matters
- 4. Creating a Selection
- 5. Using the Photoshop Pen Tool
- 6. Thinking about Resolution Basics
- 7. Creating a Good Image
- 8. Working with Painting and Retouching Tools
- 9. Using Layers
- 10. Saving Photoshop Images for Print and the Web
- V. Acrobat 9.0
- 1. Discovering Essential Acrobat Information
- 2. Creating PDF Files
- 3. Adding Interactivity to PDF Files
- 4. Editing and Extracting Text and Graphics
- 5. Using Commenting and Annotation Tools
- 6. Securing Your PDF Files
- VI. Dreamweaver CS4
- 1. Getting Familiar with New Features in Dreamweaver
- 2. Introducing Dreamweaver CS4
- 3. Creating a Web Site
- 4. Working with Images
- 5. Putting Text on the Page
- 6. Linking It Together
- 7. Creating Tables
- 8. Creating CSS Layouts
- 9. Publishing Your Web Site
- VII. Flash CS4
- 1. Getting Started in Flash CS4
- 2. Drawing in Flash CS4
- 3. Symbols and Animation
- 4. Applying More Advanced Animation
- 4.1. Creating Transformations
- 4.2. Joining Motion
- 4.3. Creating Fade Ins and Fade Outs
- 4.4. Copying and Pasting Motion
- 4.5. Animating along a Path with Motion Guides
- 4.6. Creating Inertia and Gravity with Easing
- 4.7. Fine-Tuning Shape Tweens with Shape Hinting
- 4.8. Creating Inverse Kinematics Poses and Animation
- 4.9. Using Mask Layers
- 4.10. Previewing Your Movie
- 5. Importing Graphics and Sounds
- 6. Lights, Camera, Movie Clips!
- 7. Controlling Your Movie with ActionScript
- 8. Getting Into the (Work)flow
- 9. Publishing and Final Delivery
- VIII. Fireworks CS4
- 1. Introducing Fireworks CS4
- 2. Free to Create
- 3. Livening Up Your Artwork with Color
- 4. Creating Text in Fireworks
- 5. Getting Images In and Out of Fireworks
- 6. Hotspots, Slices, and CSS Layouts
- 7. Using Buttons and Symbols
- 8. Don't Just Sit There — Animate!
Yes, Adobe has done it again — the developers have created an even better Adobe Illustrator, and you can discover the best new features in this chapter. This chapter breezes through the new features to open your eyes to exciting new work methods. Don't forget to look for references to where you can get more in-depth knowledge in other locations in this minibook.
For those of you who wished that you could produce multiple page documents in Illustrator, your wish has come true. Something should be said about the new multiple artboard feature because Illustrator isn't really the creation tool that you want to use to make multiple page documents, such as catalogs and books, but it's handy to be able to add artboards to spec sheets and technical drawings.
In the past, adding pages was done using a rather convoluted method of making a large artboard and then tiling the pages. Now you can create multiple artboards (up to 100!) as soon as the New Document dialog box appears.
To create a document with multiple artboards, follow these steps:
Launch Adobe Illustrator CS4 and choose File
New.
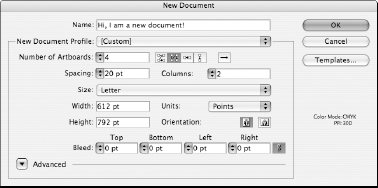
The New Document dialog box appears, as shown in Figure 1-1.
Choose how many artboards you want to start with by entering a number in the Number of Artboards text box.
Click a grid icon to the right of the Number of Artboards text box to determine how you want the artboards laid out.
With these grid boxes, you can set how many rows and columns you wish to use and you can also change the direction of the layout from left to right or right to left.
Enter an amount in the Spacing text box to determine how far apart the artboards will be.
Enter 0 (zero) if you want the artboards butting against each other or a higher value if you want some space between them.
Click OK to create your new document.
Note
Don't worry if you need to edit the artboards at a later time. You can edit them by choosing File
Pay close attention before you print a document with multiple artboards, or you may print needless pages. Here's how you can control the artboards that print:
Choose File
Print.The Print dialog box appears, as shown in Figure 1-3.
Below the Preview box in the lower-left corner, click the arrows to preview the artboards.
After you determine which artboards you want to print, enter them into the Range text box.
If you want to print all the artboards, make sure the All radio button is selected; otherwise enter a consecutive range, such as 1–3 in the Range text box. You can also print non-consecutive pages by separating them with a comma — enter 1, 5, 7 to print only artboards 1, 5 and 7.


A brush tool has been in Adobe Illustrator for quite some time, but now you can have the brush control that you have in other applications, such as Photoshop, right in Illustrator.
The Blob Brush is a new tool that's available, as shown in Figure 1-4. When you use this tool, notice that it has a radial annotator that shows the size and shape of the current brush. So what's so great about that? Press the right bracket (]) and watch the stroke width of the brush automatically increase; press the left bracket ([) to decrease the width of the stroke.
This new brush tool makes drawing with the brush much more intuitive ...no more searching for your stroke controls!
It's always good to improve your appearance, and Illustrator has done just that with the Appearance panel. The Appearance panel is a huge resource for beginner users as well as power users because it keeps you informed of the attributes that are applied to a selected object.
Notice in Figure 1-5 that you can now choose fills and strokes easily, right in the Appearance panel. You can even duplicate fills and strokes in the Appearance panel, which gives you the ability to create all sorts of interesting combinations. Read more about the Appearance panel in Chapter 12 of this minibook.

Note that when you have multiple strokes applied to one object, a warning appears in the Control panel notifying you if the topmost stroke isn't selected. This saves you the trouble of applying a new stroke to the wrong stroke.
If you read through the following chapters in this minibook, you discover lots of other incredible additions to Adobe Illustrator CS4. Many of the improvements increase the speed of production and quality of output. Have fun and read on!
-
No Comment