With motion and shape tweens, creative animation possibilities are limited only by your imagination. You'll no doubt want to explore what's possible, and in this chapter, you get started with some popular animation effects, such as fades and transformations. In addition, we show you how to use new features, such as Inverse Kinematics (IK), which give you new and unprecedented abilities to create sophisticated animation with less effort.
Some of the most common effects, such as zooms, flips, leans, and spins, are all different types of transformations, or changes to a symbol's dimensions, rotation, or skew. You can perform transformations on a symbol from the Tools panel, Transform panel, or Modify menu, and combine transformations for many animation possibilities.
Follow these steps to create a zoom-in effect:
On the first frame of a new layer, create an interesting shape on the stage with one of the Shape tools.
With the shape selected, choose Modify
Convert to Symbol.
The Convert to Symbol dialog box appears.
Enter a name for the symbol in the Name text box, (for example, type Zoom Shape), choose Graphic from the Type drop-down list, and click OK.
The symbol is added to your library and is ready to be used as part of a motion tween.
Select the first keyframe; right-click and choose Create Motion Tween from the contextual menu that appears.
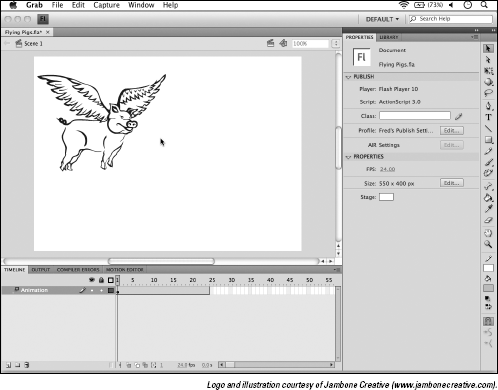
A new tween span is created on the layer. If you're working with the default frame rate of 24 fps, the tween span should be exactly 24 frames long, as shown in Figure 4-1.
Click the frame ruler above the Timeline at frame 24 to reposition the playhead at this point.
Choose Window
Transform to open the Transform panel. With the Transform panel, enter 300% in the Scale Width and Scale Height text boxes.A new keyframe is created automatically at frame 24 within the tween span — this marks the change in scaling you've just made.
Press Enter/Return to play your movie.
The smaller instance slowly tweens into the larger one, creating the illusion that you're zooming in closer to the object.
The zoom-out effect is identical to the animation you just created, but in reverse. Rather than starting with the smaller symbol instance, you start with the larger one and gradually pull away by tweening into the smaller one. Instead of creating a new animation, you can copy and reverse the existing one using a few handy shortcuts from the Timeline menu, which appears when you right-click (Windows) or Control-click (Mac) a frame.
To duplicate and reverse the existing tween, follow these steps:
Right-click your tween span directly on the Timeline and choose Copy Frames from the contextual menu that appears.
Select the next empty frame on the same layer.
If your tween span is 24 frames long, this will be frame 25.
Right-click and choose Paste Frames from the contextual menu that appears.
A copy of your tween span is pasted back-to-back with the existing one.
Right-click the new tween span, and choose Reverse Keyframes from the contextual menu that appears.
Click frame 1 and then press Enter/Return to play back your animation.
The zoom-in effect will play, followed immediately by the exact reverse (zoom-out).
The beauty of the new tween engine is that you no longer need to create several tweens or keyframes to have lots of different motion changes. You can create several different movements, transformations, and color effects sequentially within a single tween span.
On occasion, you may end up with two or more tween spans back-to-back. This is true if you copy and paste tween spans, as described in the previous section. You can, however, easily join tweens together into a single span for easier editing and tweaking.
Follow these steps to join multiple tween spans together:
While holding down the Shift key, click and select two or more consecutive tween spans on a single layer.
Right-click (Windows) or Control-click (Mac) any of the selected tweens and then choose Join Motions from the contextual menu that appears.
The tween spans are now joined together as one. You can now edit the tween span as a whole directly on the Timeline or with the Motion Editor.
Fade effects are very popular because they can add a cinematic feel to images, text, and graphics. You can see fades used in familiar media, such as photo slideshows or film, where images or scenes fade from one to another.
In Flash, fades are a type of basic color transformation that you can apply to any symbol by modifying its transparency, or alpha.
To create a fade in, follow these steps:
Click the New Layer icon at the bottom of the Timeline to create a new layer; select the Type tool and create some text on the new layer.
Use no more than two words with a font size of 24 points. You can set the type size and style from the Property inspector's Character options when the Type tool is active, so make sure that the panel is visible by choosing Window
Select the type with the Selection tool and convert it to a graphic symbol by choosing Modify
Convert to Symbol.This step adds the type to the library as a symbol and makes it available for tweening.
Right-click (Windows) or Control-click (Mac) the first keyframe of the current layer and choose Create Motion Tween from the contextual menu that appears.
A new tween span is created, and the playhead moves ahead to the end of the tween span.
Grab the playhead and drag it back to frame 1. With the Selection tool, click the new symbol once to select it.
In the Property inspector's Color Effects section, choose Alpha from the Style drop-down list.
Use the slider or text box to set the alpha of the symbol instance to 0 percent.
The symbol becomes fully transparent and seems to disappear. (Don't worry; it's still there!)
Click frame 24 in the Timeline; with the Selection tool, select the symbol.
In the Property inspector, choose Alpha from the Style drop-down list and then use the slider or text box to set the alpha to 100 percent.
Press Enter/Return to play the movie.
The text appears to fade in from nowhere onto the stage!
Very much like your zoom-out effect, the fade out is simply a reverse of a fade in. You can use the Timeline menu's Reverse Frames command to turn your fade in into a fade out as follows:
Select the tween span that contains your fade in.
Right-click (Windows) or Control-click (Mac) anywhere on the selected frames to open the contextual menu and choose Reverse Keyframes.
The action reverses the animation so that the symbol starts out fully opaque.
Press Enter/Return to play the movie.
The text you created now fades out on the stage.
Tip
Try duplicating and then reversing the fade-in tween to have the text fade in and then out.
A recent addition to Flash is the ability to copy the behavior of a motion tween and then paste it to a completely different symbol instance. This technique is handy if you need to have multiple objects follow the same exact animation behavior, such as birds of different colors and sizes all following the same flight pattern.
To copy and paste motion, you need an existing tween to copy from and then a symbol instance on a different layer to copy to. The following steps show you how to copy animation behavior from one tween that you can paste and apply to a different symbol afterwards:
Select an existing tween span on your Timeline, right-click (Windows) or Control-click (Mac), and then choose Copy Motion from the contextual menu that appears.
On a new layer, place an instance of a symbol from your library.
It can be the same symbol you've already tweened or a completely different symbol.
Right-click (Windows) or Control-click (Mac) the first keyframe of the new layer, and choose Paste Motion from the contextual menu that appears.
A new tween span is created.
Press Enter/Return to play your movie.
The new symbol instance animates in the same way as the original object from which its motion was copied.
Tip
You can work with two instances of the same symbol, but the beauty of this feature is that you can copy and paste animation between completely nonrelated symbol instances. You can also paste motion between symbol instances that have drastically different size, color, and rotation properties.
The motion tweens described earlier in the chapter have involved simple animation from one location to another. For some tweens, you'll want to have your symbol follow a more elaborate path of motion, such as a race car following a track. For these cases, you can give your tween a specific path to follow by creating a custom motion path.
Experienced Flash users may notice the absence of the Add Motion Guide button below the Timeline. Because the animation engine has been completely revised, the process of creating motion guides no longer requires a separate layer. You can now modify or replace the motion paths that are created automatically with each new tween span.
Motion guides are especially useful when you work with a shape that has an obvious orientation (or direction, such as the nose of a car or an airplane). For this reason, make sure you use a symbol with an obvious orientation as your tweened object in the following steps:
Create a new layer on the Timeline and place or create a new graphic symbol on the layer.
With the Selection tool, select the entire graphic and press the F8 shortcut key to convert it to a symbol.
When the Convert to Symbol dialog box appears, choose Graphic from the Type drop-down list and enter a name for the symbol in the Name text box.
Create another new layer on the Timeline, select the Pencil tool in the Tools panel, and select a stroke color from the Property inspector on the right.
Note: Make sure that Object Drawing mode is OFF. This button can be found on the bottom of the Tools panel when the Pencil tool is selected.
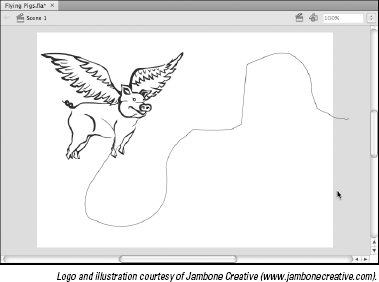
Draw a path on the stage with the Pencil tool, as shown in Figure 4-2.
Switch to the Selection tool and double-click the path you just created.
Choose Edit
Cut to remove it from the stage temporarily.Right-click (Windows) or Control-click (Mac) frame 1 of the layer which contains your symbol and choose Create Motion Tween from the contextual menu that appears.
A new tween span is created for your triangle symbol.
Choose Edit
Paste in Place to paste the path you created earlier.Flash automatically converts it to a motion path, and your symbol snaps to the path, as shown in Figure 4-3.
Press Enter/Return to play your movie.
The symbol follows the path you created. Next, you can tweak the tween so that the symbol follows the exact orientation of the path.
Select frame 1 of your tween span; on the Property inspector, locate and select the Orient to Path check box (it's located under the Rotation options).
Press Enter/Return again to play your movie and you'll see that the symbol now changes rotation to match the direction of the path.

Starting your symbol off on the right foot often helps get better results when using Orient to Path. If the symbol orientation isn't what you expect, try rotating the symbol in the right direction at both the beginning and ending frames of the tween span.
Warning
Be cautious of paths that overlap themselves; the results may not be what you expect!
Snap to it: The importance of snapping
Snapping is an essential part of your workflow and can very often make positioning items on the stage much easier and more accurate. Snapping is like turning on a magnet; when you drag an object, it jumps to the closest guide, path, or object that it finds on the stage, depending on what type of snapping you've enabled. Snapping is great for lining up objects with each other, for positioning artwork on a ruler guide, and especially for positioning a symbol on the beginning or end of a motion guide path.
By default, snapping is enabled for alignment, guides, and objects. Additionally, you can choose View
You can find snapping options by choosing View
When objects take motion in real life, several factors affect their speed as they move. Take the example of a ball bouncing up and down on a sidewalk: When the ball hits the ground and bounces, it loses speed as it moves upward because gravity pulls it back toward the ground. When the ball changes direction and moves back downward, increased gravity makes it pick up speed as it nears the ground again.
You can reproduce the two most recognizable forces, inertia and gravity, by using a special tween option — Ease. The new animation engine makes lots of easing behaviors available, including Bounce, Spring, Ease In (speed up), Ease Out (slow down), and more. You can assign easing to any tween span with the Motion Editor.
To create an easing behavior, follow these steps:
Select the Oval tool and on a new layer, create a perfect circle at the bottom of the stage.
Tip
Hold down the Shift key to constrain the circle while you draw it.
With the new circle selected, press the F8 keyboard shortcut; when the Convert to Symbol dialog box appears, choose Graphic from the Type drop-down list and enter a name for the symbol in the Name text box.
In this example, we named the circle Ball.
Right-click (Windows) or Control-click (Mac) the first frame of the layer and choose Create Motion Tween from the contextual menu that appears.
A new tween span is created, and the playhead advances to the last frame of the tween span.
With the Selection tool, select and move the symbol straight up to the top of the stage while leaving its horizontal position the same (see Figure 4-4).
Tip
Drag the symbol slowly toward the top of the stage to keep it from shifting left or right. The Snap to Objects behavior keeps the symbol aligned with its original horizontal position until you release it.
Press Enter/Return to preview the animation.
The Ball should now move from the bottom to the top of the stage.
Click directly on the tween span on the Timeline to select it and then click the Motion Editor's panel tab to bring it forward.
You see the various properties of your tween represented on the Motion Editor panel.
Scroll to the bottom of the Motion Editor, locate the Eases row, and change the Simple (slow) value from 0 to 100.
You can click and drag over the value to change it, or double-click and enter the value by hand.
You see the default Simple (slow) ease is already listed. You can add other types of eases to use later on, but for now, the default will do fine.
Changing the value creates an Ease Out, which slows the animation as it comes to completion.
Scroll up to the top of your Motion Editor and locate the Basic Motion row; directly to the right, choose Simple (slow) from the drop-down list.
This applies the ease to the motion properties of your tween.
Press Enter/Return to play back and preview your animation.
The animation slows down gradually as it reaches completion.

You can see how easing affects the speed of the tween as it progresses, and now a simple animation becomes much more lifelike. However, what goes up must come down, so the following steps walk you through making the Ball return to the ground:
Click the Timeline tab and then click directly on the layer anywhere within the tween span to select the entire motion tween.
Right-click (Windows) or Control-click (Mac) the selected frames to open the contextual menu and choose Copy Frames.
On the same layer, select the next empty frame right after the tween span ends.
With the frame selected, right-click (Windows) or Control-click (Mac) and choose Paste Frames from the contextual menu that appears to paste the tween you copied in Step 2.
Click the newly pasted tween span to select it.
Right click (Windows) or Control-click (Mac) the selected frames and choose Reverse Keyframes from the contextual menu that appears to flip the tween backward.
Press Enter/Return to preview your animation.
The Ball now goes up and then down, and conveniently the animation is not only reversed, but so is easing.
Chapter 3 of this minibook explores the possibilities of morphing shape and color with shape tweens. Flash does a great job of recalculating shapes during a tween, but sometimes you need to give it a little help, especially when you have two shapes that have common features. Flash may overthink things and perform more shape morphing than it has to. For these cases, you can use shape hints — sets of matched markers that can tell Flash that two points on two different shapes are related. You can attach shape hints to the outlines of shapes on the starting and ending frames of a shape tween to let Flash know what common points exist between the two.
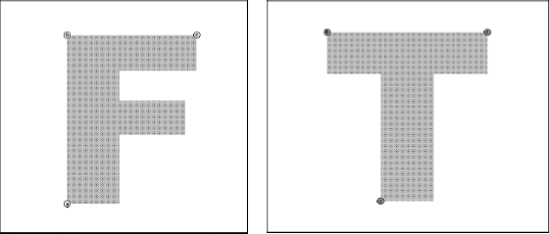
A good example of related shapes are the letters F and T. The two letters have many common angles. A shape tween between the two is a great way to make use of shape hints.
Before you get started, create a new document. Select the Type tool and, with the Property inspector, set the font style to Arial Black (or equivalent) and set the font size to 200. Then follow these steps:
On the first frame of a new layer, type F in the middle of the stage.
Select the letter with the Selection tool and choose Modify
Break Apart to break the type down to its raw outlines.On frame 20 of the same layer, create a new blank keyframe with the F7 keyboard shortcut.
Type T on the new keyframe and position it in the same place as the F on the first frame.
You can use the Property inspector to match the X and Y positions, if necessary.
Break the T apart by choosing Modify
Break Apart.Create a shape tween by right-clicking (Windows) or Control-clicking (Mac) the first frame and choosing Create Shape Tween from the contextual menu that appears.
An arrow and green shaded area appear, indicating that the tween was created successfully.
Press Enter/Return to preview your movie.
The F morphs into the T.
Even though the shape tween was successful, the outcome may not have been what you expected. Chances are the F seems to get mashed up (instead of a smooth transition) before being completely reconstructed into the T because Flash can't see the common angles between the two shapes (even though you can). That's where shape hints come in. You can add shape hints to suggest common points to Flash and smooth out the tween.
Before you get started, make sure that Snap to Objects is enabled by choosing View
Select frame 1 of your shape tween and choose View
Show Shape Hints to turn on shape hinting.Choose Modify
ShapeAdd Shape Hint to create a new shape hint on the stage.A red button, labeled with the letter a, appears.
Repeat Step 2 to add another shape hint.
This time, the shape hint appears labeled with the letter b.
Tip
Sometimes shape hints stack on top of each other; move one to reveal the others underneath if only one is visible.
Position the two shape hints on the outline of the F.
To do so, move shape hint (b) over just a bit so that you can see shape hint (a). Then move (a) and snap it to the lower-left corner of the F. Position the second shape hint (b) in the upper-left corner of the F.
Select frame 20.
You see the companions to the shape hints you created, waiting to be positioned.
Position shape hints (a) and (b).
This step matches the bottom-left and top-left corners of the T to the ones in F, and the buttons turn green to indicate a successful match.
Press Enter/Return to preview your animation.
If you watch carefully, you see that the shape hints are keeping those two corners anchored while the rest of the shape transforms, creating a smoother transition.
Note: Like motion guides, shape hints don't appear in your final, published movie.
Tip
Add Shape Hints with the shortcut key combination: Shift+Ctrl+H (Windows) or Shift+
You can also add some remaining hints to finalize your tween by following these steps:
Select frame 1 of your shape tween and make sure that shape hints are still visible by choosing View
Show Shape Hints.If they're already enabled, you see a check mark.
Create one new shape hint with the keyboard shortcut Shift+Ctrl+H (Windows) or Shift+
+H (Mac).
The shape hint is automatically labeled with the letter c.
Position the (c) shape hint on the F (see Figure 4-5) on the top-right corner.
Select frame 20 and you see the companion to the new shape hint waiting to be placed.
Position the shape hint on the T to match the angle you marked on the F.
Press Enter/Return to play your animation.
You see that the shape hints have provided a much smoother transition from what you initially started with.
Shape hints have their own contextual menu that appears when you right-click (Windows) or Control-click (Mac) on any shape hint on the first frame of a shape tween. To clear a selected shape hint, choose Remove Shape Hint or choose Remove All Hints to clear all hints on the stage and start over.
Tip
While it's often not necessary to add more than a handful of shape hints, you may be wondering: What is the maximum number of shape hints allowed? The answer is 26 — the exact amount of letters in the alphabet. Once Flash runs out of letters to label shape hints, it won't allow you to create any additional ones.
A significant new addition for designers and animators is Flash's support for Inverse Kinematics (IK), a principle relied upon in 3D and computer animation and modeling. Inverse Kinematics determines how jointed or connected objects position themselves relative to one another when moved.
For example, when animating a human arm, if the forearm changes position, it ultimately affects the position of the connected hand and upper arm. It's these principles that help create life-like animation and interaction.

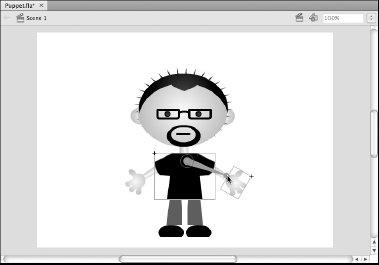
To create and connect IK container objects, follow these steps:
Create a new Flash document, and place two symbol instances on a new layer.
These can be instances of the same symbol or of two different symbols.
Select the Bone tool from the Tools panel, move your pointer over the first object until a plus sign appears, drag until the cursor is over the second object, and release the mouse button, as shown in Figure 4-6.
This draws a virtual bone between the two shapes, connecting them together.
You've now converted the two symbol instances to IK container objects, and the layer's been converted to an Armature layer.
Choose the Selection tool and drag either of the connected symbols to see how the connected objects will behave.
The second symbol changes its position based on the position of the first.
You can add more objects to the chain. Although you can't add objects randomly to an Armature layer, you can connect existing IK container objects to artwork on other layers to add them to the chain.
Follow these steps to add objects to an existing Armature layer:
Create a new layer on the Timeline and drag a symbol instance to it from the Library panel.
Position the symbol where you want it relative to the existing IK container objects on the stage.
Choose the Selection tool and select the object in the existing Armature layer that you want to connect the new symbol to.
Choose the Bone tool, locate the joint (or connection point) on the selected IK container object, and click and drag from that point to the new symbol.
A new bone is drawn to connect the two objects together, and the symbol is removed from its original layer and added to the Armature layer.
Choose the Selection tool and drag the new symbol around to see how its motion affects the other objects in the chain.
After you create a series of connected IK objects, you can put them into motion with poses. Poses capture different positions of your IK objects, and Flash can animate from pose-to-pose to create sophisticated animation sequences.
After an Armature layer is created, poses can be inserted (much like keyframes) to note different points along the Timeline where a new pose will be created.
To create and animate poses, follow these steps:
Click and select an empty frame on an existing Armature layer (for example, frame 15).
Right-click (Windows) or Control-click (Mac) the selected frame and choose Insert Pose from the contextual menu that appears, as shown in Figure 4-7.
A new keyframe is created here, where you can re-pose the IK objects.
Very much like a keyframe, a pose lets you change the position of IK objects at a specific point on the Timeline.
Choose the Selection tool and reposition the connected objects on your Armature layer to create a unique pose, as shown in Figure 4-8.
Press Enter/Return to play back the Timeline.
Flash creates an animation to transition from one pose to the next!


Just as with motion tweens, you can mimic the forces of gravity and inertia using easing with IK animations. Although the Motion Editor isn't available for posed animation, you can easily add easing behavior from the Property inspector to give your IK animation a more realistic look and feel.
Follow these steps to add easing to an Armature layer:
Click and select the first frame of an existing IK Armature layer on the Timeline.
Locate the Ease options on the Property inspector on the right — the default value is set to zero (no ease) — and then click and drag to change the value to 100 (Ease Out).
(Optional) Select another type of ease from the Type drop-down list.
Press Enter/Return to view the animation.
You see the easing change the behavior of your animation.
The concept of masking involves using a shape (or shapes) to hide or reveal portions of a piece of artwork — working very much like a small window in your house. You can see only what the window allows you to see when you're inside. Flash features a special type of layer, known as a mask, and its contents are used to selectively reveal (or hide) artwork or animation on another layer.
You can convert any layer into a mask by using the Layer contextual menu, which is launched by right-clicking (Windows) or Control-clicking (Mac) the layer's name area. Artwork on a mask layer isn't visible; the content of a mask layer always represents the visible area of the layer underneath.
Animated text is a great candidate for masking. The following steps take you through creating a tween to which you add a mask layer for added effect. Before you get started, create a new document and select the Type tool. Choose a stroke and fill color and then use your Property inspector to set the type face to Arial Black (or something similar) and the font size to 40. Then follow these steps:
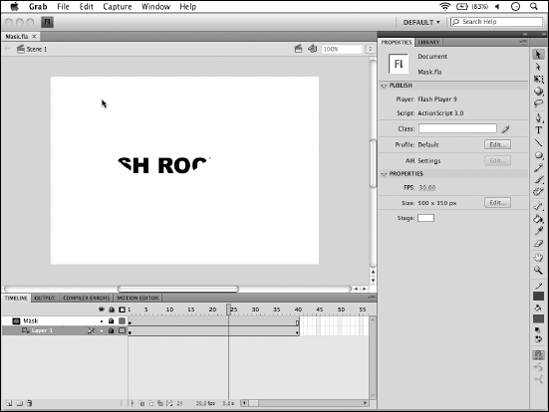
On a new layer, select the Text tool and type a few words on the layer.
For this example, we typed FLASH ROCKS in capital letters.
Switch to the Selection tool, and select the text. Choose Modify
Convert to Symbol or press the F8 keyboard shortcut to convert the text to a new graphic symbol.In the Convert to Symbol dialog box, choose Graphic from the Type drop-down list and enter a name for the symbol in the Name text box.
Place the text off the stage to the left so that it's sitting in the pasteboard area.
You animate the text to bring it across the stage, entering from one side and exiting on the other.
Right-click (Windows) or Control-click (Mac) the layer that contains your text, and choose Create Motion Tween from the contextual menu that appears to create a new tween span.
An instance of the text is created there as well.
Move your pointer over the last frame of the new tween span until you see the double arrows. Click and drag to extend the tween span to frame 40.
On frame 40, select the text and drag it all the way to the right side of the stage.
A keyframe is created at frame 40, and this creates a tween that moves the text from left to right across the stage.
Insert a new layer above the tween layer and name it Mask; create a shape to use as your mask on this layer. Make sure that the shape is at least as tall as the text symbol you created.
For example, we used the Polystar tool to create a star in the center of the stage. The Star option for the Polystar tool is available on the Property inspector under Options.
Right-click (Windows) or Control-click (Mac) the new layer name and choose Mask from the contextual menu that appears.
The new layer is converted to a mask layer, and the tween layer appears indented underneath, as shown in Figure 4-9. Both layers are locked automatically.
Press Enter/Return to play your movie.
The text animates, appearing through the shape (a star, in this example), much like you're viewing the animation through a window.
Tip
For the masking layer to take effect, both the mask layer and the layer being masked must be locked. To edit the contents of either layer, unlock the layers by clicking and removing the padlock icons on each layer.
Tip
Mask layers can contain just about anything a standard layer can, including tweens. Try creating a motion tween on your mask layer and see what happens!
Previewing your movie in the Flash Player to check its speed and size is a good idea. To view your movie in Preview mode, choose File
This step creates an .swf file from your current authoring file and displays it immediately in the Flash Player. Previewing is a great way to see how your movie will actually appear to your users and can highlight any potential snags.
Note
Ultimately, the final viewing environment for most Flash movies is on the Web in a browser, such as Internet Explorer, Safari, or Firefox. Part of what Flash creates for you at publish time isn't only a finished .swf but also an HTML (HyperText Markup Language) page to contain your movie. To see how your movie looks as viewed in a browser, choose File