In This Chapter
This chapter shows you how to use the painting and retouching tools in Photoshop. If you're unsure about how good the painting you're about to do will look, create a new layer and paint on that. (See Chapter 9 of this minibook to find out how to create and use layers.) That way, you can delete the layer by dragging it to the Trash Can (at the bottom of the Layers panel) if you decide that you don't like what you've done. Don't forget to make the Eraser tool your friend! You can also repair painting or retouching mistakes by Alt+dragging (Windows) or Option+dragging (Mac) with the Eraser tool selected to erase the last version saved or present history state.
Have fun and be creative! Because Photoshop is pixel-based, you can create incredible imagery with the painting tools. Smooth gradations from one color to the next, integrated with blending modes and transparency, can lead from super-artsy to super-realistic effects. In this chapter, you discover painting fundamentals, and we show you how to use retouching tools to eliminate wrinkles, blemishes, and scratches. Don't you wish you could do that in real life?
Use the Swatches panel to store and retrieve frequently used colors. The Swatches panel allows you to quickly select colors. The Swatches panel also gives you access to many other color options. By using the panel menu, you can select from a multitude of different color schemes, such as Pantone or Web-safe color sets. These color systems are converted to whatever color mode in which you're working.
To sample and store a color for later use, follow these steps:
To sample a color from an image, select the Eyedropper tool in the Tools panel and click a color in the image.
Alternatively, you can use any of the paint tools (the Brush tool, for example) and Alt-click (Windows) or Option-click (Mac).
If the Swatches panel isn't already open, choose Window
Swatches.
Store the color in the Swatches panel by clicking the New Swatch button at the bottom of the Swatches panel.
Anytime you want to use that color again, simply click it in the Swatches panel to make it the foreground color.
At the bottom of the Tools panel reside the foreground and background color swatches. The foreground color is the color that you apply when using any of the painting tools. The background color is the color that you see if you erase or delete pixels from the image.
Choose a foreground or background color by clicking the swatch, which opens the Color Picker dialog box. To use the Color Picker, you can either enter values in the text fields on the right, or you can slide the hue slider.
Pick the hue (color) that you want to start with and then click in the color panel to the left to choose the amount of light and saturation (grayness or brightness) you want in the color. Select the Only Web Colors check box to choose one of the 216 colors in the Web-safe color palette. The hexadecimal value used in HTML documents appears in the text field in the lower right of the Color Picker.
If you want to quickly save a color, click the Add to Swatches button right in the Color Picker.
Grouped together in the Tools panel are the tools used for painting and retouching. The arrow in the lower right of a tool icon indicates that the tool has more related hidden tools; simply click and hold on the tool icon to see additional painting and retouching tools. In this chapter, we show you how to use the Spot Healing Brush, Healing Brush, Patch, Red Eye, Brush, Clone Stamp, History Brush, Eraser, and Gradient tools. You also discover ways to fill shapes with colors and patterns.
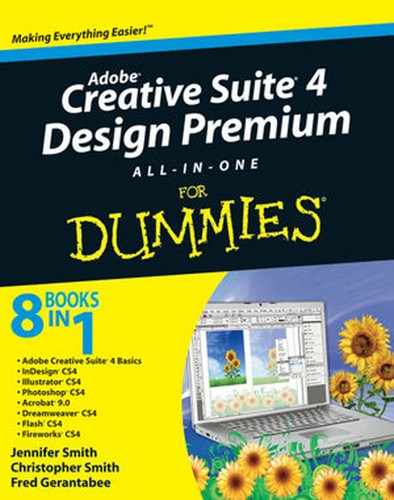
As you click to select different painting tools, note the Brush menu (second from the left) on the Options bar, as shown in Figure 8-1. Click the arrow to open the Brushes Preset picker. You can use the Master Diameter slider to make the brush size larger or smaller, as well as change the hardness of the brush.
Tip
The hardness refers to how "fuzzy" the edges are; a softer brush is more feathered and soft around the edges, whereas a harder edge is more definite (see Figure 8-2).
Tip
Don't feel like accessing the Brushes Preset picker every time you want to make a change? Press the right bracket ] several times to make your brush diameter larger or press the left bracket [ to make the brush diameter smaller. Press Shift+] to make the brush harder or Shift+[ to make the brush softer.
Choose Window

The Spot Healing Brush tool quickly removes blemishes and other imperfections in your images. Click a blemish and watch it paint matching texture, lighting, transparency, and shading to the pixels being healed. The Spot Healing Brush tool doesn't require you to specify a sample spot. The Spot Healing Brush automatically samples from around the retouched area.
Select the Healing Brush tool in the Tools panel (it's a hidden tool of the Spot Healing Brush tool).
Find an area in the image that looks good and then Alt-click (Windows) or Option-click (Mac) to sample that area.
For example, if you'll eliminate wrinkles on a face, choose a wrinkle-free area of skin near the wrinkle. (Try to keep it relatively close in skin tone.)
Position the mouse cursor over the area to be repaired and start painting.
The Healing Brush tool goes into action, blending and softening to create a realistic repair of the area.
Repeat Steps 2 and 3 as necessary to repair the blemish, wrinkles, or scratches.
Click and hold the Healing Brush tool to select the Patch tool; on the Options bar, select the Destination radio button.
You can either patch the source area or the destination. The preference is really up to you. We recommend taking a good source and dragging it over the area that needs repaired.
With the Patch tool still selected, drag to create a marquee around the source that you want to use as the patch.
The source is an unscratched or wrinkle-free area.
After you create the marquee, drag the selected source area to the destination that's to be repaired.
The Patch tool clones the selected source area while you drag it to the destination (the scratched area); when you release the mouse button, the tool blends in the source selection and repairs the scratched area!
Tip
Make the patch look better by choosing Edit
You'll love the fact that red eye is extremely easy to fix in Photoshop. Just follow these steps:
Table 8-1. Brush Keyboard Shortcuts
Function | Windows | Mac |
|---|---|---|
Choose the Brush tool | B | B |
Increase brush size | ] | ] |
Decrease brush size | [ | [ |
Harden brush | Shift+] | Shift+] |
Soften brush | Shift+[ | Shift+[ |
Sample color | Alt-click | Option-click |
Switch foreground and background color | X | X |
Change opacity by a given percentage | Type a number between 1 and 100 | Type a number between1 and 100 |
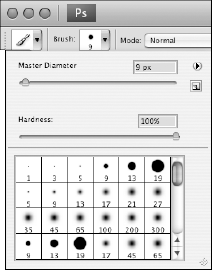
If you're really into the brushes, you have lots of great options available in the Brushes panel (choose Window
You have several choices of attributes, most of which have dynamic controls in the menu options that allow you to vary brush characteristics by tilting or applying more pressure to a stylus pen (if you're using a pressure-sensitive drawing tablet), among other things.
Note
A warning sign indicates that you don't have the appropriate device attached to use the selected feature, such as a pressure-sensitive drawing tablet.
The following options are available in the Brushes panel:
Brush Tip Shape: Select from these standard controls for determining brush dimensions and spacing.
Shape Dynamics: Change the size of the brush as you paint.
Scattering: Scatter the brush strokes and control brush tip count.
Texture: Choose from pre-existing patterns or your own.
Tip
Create a pattern by selecting an image area with the Rectangular Marquee tool. Choose Edit
Dual Brush: Use two brushes at the same time.
Color Dynamics: Change the color as you paint.
Other Dynamics: Change the opacity and flow.
Here's what these attributes available in the Options bar do:
Noise: Adds a grainy texture to the brush stroke.
Wet Edges: Makes the brush stroke appear to be wet by creating a heavier amount of color on the edges of the brush strokes.
Airbrush: Gives airbrush features to the Brush tools. Enable the Airbrush feature by clicking the Airbrush button and adjusting the pressure and flow on the Options bar.
Tip
If you click and hold with the Brush tool on the image area, the paint stops spreading. Turn on the Airbrush feature and notice that when you click and hold, the paint keeps spreading, just like with a can of spray paint. You can use the Flow slider on the Options bar to control the pressure.
Protect Texture: Preserves the texture pattern when applying brush presets.
In addition to the preceding options, you can also adjust the jitter of the brush. The jitter specifies the randomness of the brush attribute. At 0 percent, an element doesn't change over the course of a stroke; at 100 percent, a stroke will totally vary from one attribute to another. For example, if you select Other Dynamics in the Brushes panel and then change the Opacity Jitter to 100 percent, the opacity will vary from 0 to 100 percent while you're painting.
After going through all the available brush options, you may want to start thinking about how you'll apply the same attributes later. Saving the Brush tool attributes is important as you increase in skill level.
Here's how you use the Clone Stamp tool:
With the Clone Stamp tool selected, position the cursor over the area that you want to clone and then Alt-click (Windows) or Option-click (Mac) to define the clone source.
Position the cursor over the area where you want to paint the cloned pixels and start painting.
Note the cross hair at the original sampled area, as shown in Figure 8-4. While you're painting, the cross hair follows the pixels that you're cloning.

Tip
When using the Clone Stamp tool for touching up images, it's best to resample many times so as to not leave a seam where you replaced pixels. A good clone stamper Alt-clicks (Windows) or Option-clicks (Mac) and paints many times over until the retouching is complete.
Choose Window
Tip
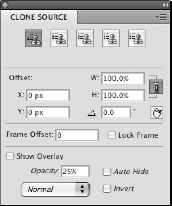
The Clone Source panel can be extremely helpful with difficult retouching projects that involve a little more precision.
Follow these steps to experiment with this fun and interactive panel:
If the Clone Source panel isn't visible, choose Window
Clone Source.
Alt-click (Windows) or Option-click (Mac) in the image area to record the first clone source.
Click the second Clone Source icon at the top of the Clone Source panel and then Alt-click (Windows) or Option-click (Mac) somewhere else on the page to define a second clone source.
Repeat as needed to define more clone sources. You can click the Clone Source icons at any time to retrieve the clone source and start cloning.
Enter any numbers you want in the Offset X and Y, W and H, and Angle text boxes in the center section of the Clone Source panel to set up transformations before you clone.
Select the Show Overlay check box to see a preview of your clone source.
Whatever you plan on doing, it's much easier to see a preview before you start cloning. If you don't use the Clone Source panel for anything else, use it to see a preview of your clone source before you start painting. If it helps to see the clone source better, select the Invert check box.
You see an overlay (or preview) prior to cloning. This helps you to align your image better, which is great for precision work. If you want the preview to go away after you start cloning, select the Auto Hide check box.
Choose Window
At the top of the History panel is a snapshot of the last saved version of the image. Beside the snapshot is an icon noting that it's the present History state.
The Eraser tool uses all the same commands as the Brush tools. You can make an eraser larger, softer, and more or less opaque. But even better, follow these steps to use the Eraser tool creatively:
Open any color image and apply a filter.
For example, we chose Filter
Select the Eraser tool and press 5 to change it to 50 percent opacity.
You can also use the Opacity slider on the Options bar.
Hold down the Alt (Windows) or Option (Mac) key to paint back 50 percent of the original image's state before applying the filter.
Continue painting in the same area to bring the image back to its original state!
The original sharpness of the image returns where you painted.
Note
Holding down the Alt (Windows) or Option (Mac) key is the key command to erase to the last saved version (or history state). This tool is incredible for fixing mistakes or removing applied filters.
With the Options bar, you also can choose the type of gradient that you want: Linear, Radial, Angle, Reflected, or Diamond.
As a default, gradients are created using the current foreground and background colors. Click the arrow on the Gradient button on the Options bar to assign a different preset gradient.
To create a gradient, follow these steps:
Choose the Gradient tool and click the Gradient Editor button on the Options bar.
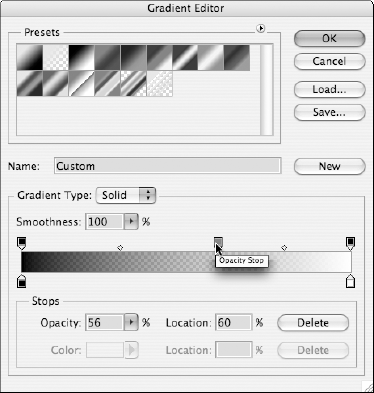
The Gradient Editor dialog box appears. At the bottom of the gradient preview, you see two or more stops. The stops are where new colors are inserted into the gradient. They look like little house icons. Use the stops on the top of the gradient slider to determine the opacity.
Click a stop and click the color swatch to the right of the word Color to open the Color Picker and assign a different color to the stop.
Click anywhere below the gradient preview to add more color stops.
Drag a color stop off the Gradient Editor dialog box to delete it.
Click the top of the gradient preview to assign different stops with varying opacity, as shown in Figure 8-6.
When you're finished editing the gradient, name it and then click the New button.
The new gradient is added to the preset gradient choices.
To apply your gradient, drag across a selection or image with the Gradient tool.
You can use blending modes to add flair to the traditional opaque paint. Use blending modes to paint highlights or shadows that allow details to show through from the underlying image or to colorize a desaturated image. You access the blending modes for paint tools from the Options bar.
You really can't get a good idea of how the blending mode works with the paint color and the underlying color until you experiment. (That's what multiple undos are for!) Alternatively, you can copy the image you want to experiment with onto a new layer and hide the original layer; see Chapter 9 of this minibook for more about layers.
The following list describes the available blending modes:
Normal: Paints normally, with no interaction with underlying colors.
Dissolve: Gives a random replacement of the pixels, depending on the opacity at any pixel location.
Behind: Edits or paints only on the transparent part of a layer.
Darken: Replaces only the areas that are lighter than the blend color. Areas darker than the blend color don't change.
Multiply: Creates an effect similar to drawing on the page with magic markers. Also looks like colored film that you see on theater lights.
Color Burn: Darkens the base color to reflect the blend color. If you're using white, no change occurs.
Linear Burn: Looks at the color information in each channel and darkens the base color to reflect the blending color by decreasing the brightness.
Darker Color: Compares the total of all channel values for the blend and base color and displays the lower value color.
Lighten: Replaces only the areas darker than the blend color. Areas lighter than the blend color don't change.
Screen: Multiplies the inverse of the underlying colors. The resulting color is always a lighter color.
Color Dodge: Brightens the underlying color to reflect the blend color. If you're using black, there's no change.
Linear Dodge: Looks at the color information in each channel and brightens the base color to reflect the blending color by increasing the brightness.
Lighter Color: Compares the total of all channel values for the blend and base color and displays the higher value color.
Overlay: Multiplies or screens the colors, depending on the base color.
Soft Light: Darkens or lightens the colors, depending on the blend color. The effect is similar to shining a diffused spotlight on the artwork.
Hard Light: Multiplies or screens the colors, depending on the blend color. The effect is similar to shining a harsh spotlight on the artwork.
Vivid Light: Burns or dodges the colors by increasing or decreasing the contrast.
Linear Light: Burns or dodges the colors by decreasing or increasing the brightness.
Pin Light: Replaces the colors, depending on the blend color.
Hard Mix: Paints strokes that have no effect with other Hard Mix paint strokes. Use this mode when you want no interaction between the colors.
Difference: Subtracts either the blend color from the base color or the base color from the blend color, depending on which has the greater brightness value. The effect is similar to a color negative.
Exclusion: Creates an effect similar to, but with less contrast than, the Difference mode.
Hue: Applies the hue (color) of the blend object onto the underlying objects but keeps the underlying shading or luminosity intact.
Saturation: Applies the saturation of the blend color but uses the luminance and hue of the base color.
Color: Applies the blend object's color to the underlying objects but preserves the gray levels in the artwork. This mode is great for tinting objects or changing their colors.
Luminosity: Creates a resulting color with the hue and saturation of the base color and the luminance of the blend color. This mode is the opposite of the Color mode.
This section provides an example of using the blending modes to change and add color to an image. A great example of using a blending mode is tinting a black-and-white (grayscale) image with color. You can't paint color in Grayscale mode, so follow these steps to add color to a black-and-white image:
Open an image in any color mode and choose Image
ModeRGB.If the image isn't already a grayscale image, choose Image
AdjustmentsDesaturate.This feature makes it appear as though the image is black and white, but you're still in a color mode with which you can apply color.
Choose a painting tool (the Brush tool, for example) and, with the Swatches panel, choose the first color that you want to paint with.
On the Options bar, select Color from the Mode drop-down list and then use the Opacity slider to change the opacity to 50 percent.
You could also just type 5.
Start painting!
The Color Blending mode is used to change the color of the pixels, while keeping the underlying grayscale (shading) intact.
Tip
Another way to bring attention to a certain item in an RGB image (like those cute greeting cards that have the single rose in color and everything else in black and white) is to select the item you want to bring attention to. Choose Select
If you have a definite shape that doesn't lend itself to being painted, you can fill it with color instead. Make a selection and choose Edit
If you want to use an existing or saved pattern from the Brushes panel, you can retrieve a pattern by selecting Pattern in the Fill dialog box as well. Select History from the Use drop-down list to fill with the last version saved or the history state.
All the Photoshop tools allow you to save presets so that you can retrieve them from a list of presets. The following steps show you an example of saving a Brush tool preset, but the same method can be used for all other tools as well:
Choose a brush size, color, softness, or anything!
Click the Tool Preset Picker button on the left side of the Options bar.
Click the triangle in the upper-right corner to access the fly-out menu and then choose New Tool Preset.
The New Tool Preset dialog box appears.
Type a descriptive name in the Name text field (leave the Include Color check box selected if you want the preset to also remember the present color) and then click OK.
Access the preset by clicking the tool's Preset Picker button and choosing it from the tool's Preset Picker list.
Each preset that you create is specific to the tool that it was created in, so you can have a crop preset, an eraser preset, and so on. After you get in the habit of saving presets, you'll wonder how you ever got along without them!