In This Chapter
Animations, used in moderation, can liven up a page. You can make simple animations to create effects of light and movement — or go to the max with dancing babies. The subtle approach probably is better, as most folks are more intrigued by interesting content than by distracting animations. Still, you find animations being used every day, especially in rotating banner ads.
The animations that you produce in Fireworks aren't quite the same those in Flash. Fireworks animations typically are smaller and are saved in the GIF format, which doesn't require a plug-in to view. You create them by using the States panel, which we cover in detail in Chapter 7 of this book.
In this chapter, you use the States panel to create multiple versions of your artwork that play one after another to create an animation
Note
The terms states and frames can be used interchangeably (though we generally prefer the term states).
Tip
As you create images for animation, experiment to find out how many colors you can include without increasing the file size dramatically. If you're working with size restrictions (as many advertising sites require), you may have to make the image files smaller by deleting states or adjusting color. Creating animations is a give-and-take process, in which you're trying to get the best effects from the smallest files.
Creating images is a simple process in Fireworks. Creating images for animations is also simple but slightly different, in that the images are created from several states that play one after another to create the illusion of movement. In the first two sections of this chapter, you create a simple manual animation of a bouncing ball. Later in the chapter, you find out how to automate the process.
To create an image for animation, follow these steps:
Create or open the object that you want to animate.
For this example, create a circle with the Ellipse tool.
With the Pointer tool, select the circle.
Choose Window
States.
The States panel appears, listing one state (see Figure 8-1).
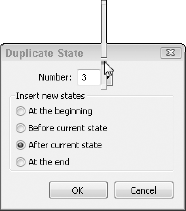
From the panel menu in the top-right corner, choose Duplicate State.
The Duplicate State dialog box appears (see Figure 8-2).
Use the Number slider to add three new states.
In the Insert New States section, select the After Current State radio button and then click OK.
Because all the states are identical, you see no change. The objects are positioned on top of one another.

Onion skinning can be a huge help when you're trying to create a good flow for an animation. Onion skinning gives you the opportunity to edit the selected state but view (in a dimmed view) the states that come before and after the selected state, as shown in Figure 8-3.

Adding an object to multiple states
Perhaps you created the perfect animation but then discovered that you forgot to include an element. You can copy or create the missing object in one state and then add it to all the other states. Follow these steps:
Select the state in which you want the new object to appear.
Copy and paste the artwork for the new object to the selected state, or create the new object in that state.
Make sure that the new artwork is selected, right-click (Windows) or Control-click (Mac) the selected state in the States panel, and choose Copy to States from the contextual menu.
The Copy to States dialog box appears.
Select the All States radio button (see the following figure), and click OK.
The selected object is included in all the states.

To use onion skinning in your animation, follow these steps:
Select the State 2 row in the States panel.
Click the Onion Skinning button in the bottom-left corner of the panel (refer to Figure 8-1).
A drop-down list appears.
Select Show All States to show one state before and one after the selected state.
Creating the actual animation certainly isn't rocket science, but you need to pay attention to the state you select before making your move.
To put your animation in motion, follow these steps:
Select State 2 in the States panel to view the state 2 circle.
With the Pointer tool, drag the circle slightly up and to the right.
Drag the circle below and to the right of the state 2 circle.
Select State 4 to view the state 4 circle.
Drag the circle above and to the right of the state 3 circle.
You should see a flow that — in a very primitive way — represents a bouncing ball (see Figure 8-4).

You can test an animation right in the Fireworks artboard or on the Web.
Fireworks provides several playback controls on the right side of the artboard window, as shown in Figure 8-5.
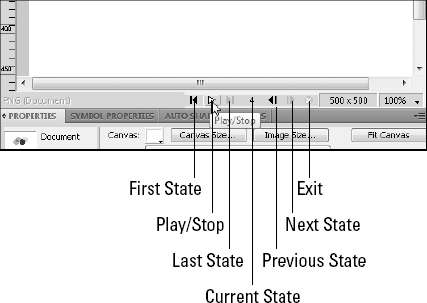
To use these controls to test an animation in Fireworks, follow these steps:
Click the Play button to start the animation.
Notice that the Play button changes to the Stop button.
After playing the animation, click the Stop button to stop the animation.
In the "Adjusting Playback" section, later in this chapter, you find out how to control the speed of each state (or frame) and discover where to turn looping (repeat) off and on.
You can speed or slow an entire animation, or control the speed of each slide individually. Controlling the timing of individual states can be helpful in an advertising animation, for example, if you want to keep one state visible longer than the others. You can also loop an animation. This section describes both types of changes.
The frame rate is the speed at which your animation will play. To change the frame rate, follow these steps:
Select the states(s) for which you want to set the frame rate.
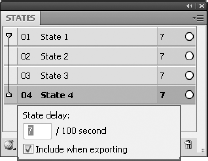
Choose Properties from the panel menu in the top-right corner of the States panel.
The State Delay pop-up appears, as shown in Figure 8-6.
In the text box, enter a value (in 100ths of a second) to make the animation go faster or slower.
The lower the value you enter, the faster the animation plays. Make sure the Include when Exporting check box is selected. Click anywhere on the artboard to close the window.
(Optional) To test the results of you frame rate change, press the Play button in the lower-right side of the artboard window.
Tip
Want to display one state longer than the others? Select only that particular state and then change its frame rate to be slower than the other states' frame rates.
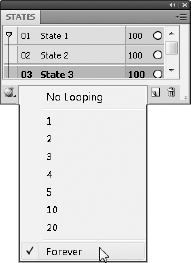
You can choose to loop an animation into eternity or just a certain number of times. To do this, follow these steps:
Click the GIF Animation Looping button in the bottom-left corner of the States panel (refer to Figure 8-1).
A menu drops down.
Choose the number of times you want the animation to loop (see Figure 8-7).
Save and close the animation.
You've completed a manual animation. In the next section, you find out how to create an animation in which Fireworks creates the states for you automatically.
Tweening is the process of creating a state between two others, usually as a start or stop point for the animation. Use tweening to simulate an object moving, like a ball bouncing, or fading an image in or out of an animation.
To use the tweening feature in Fireworks, you must have a symbol — for this example, an arrow. To create this symbol, follow these steps:
Choose File
New and create a new document large enough to contain your animation.For this exercise, create a document 500 pixels by 500 pixels.
Click and hold the Rectangle tool, and select the Arrow tool from the Vector section of the Tools panel.
In the top-left corner of the canvas, click and drag to create a small arrow.
Choose Modify
SymbolConvert to Symbol.Type an appropriate name for the symbol in the Name text box (such as Arrow), select the Graphic radio button, and click OK.
Fireworks converts your arrow graphic to a symbol.
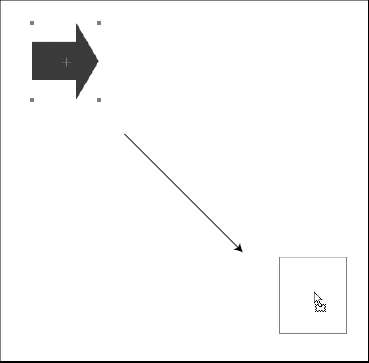
After you create a symbol, you need to clone the symbol to create start and end points for the animation. Follow these steps:
Select the arrow symbol on the canvas.
Holding down the Alt (Windows) or Option (Mac) key, drag the arrow to the bottom-right corner of the canvas.
As shown in Figure 8-8, by holding down the Alt/Option key while you drag, you're cloning the arrow.
Choose the Scale tool in the Select section of the Tools panel, and make the cloned arrow (in the bottom-right corner) larger than the original.
With the Pointer tool, position both arrow symbols on the canvas the way you want them.
These symbols are the start and end points for your animation, so place them where you want the animation to begin and end.
When you have two instances of the symbol on the artboard, you're ready to tween the symbols to create an animation. Follow these steps:
With the Pointer tool, select one of the arrow symbols and then Shift-click the other to select both at the same time.
Choose Modify
SymbolTween Instances.The Tween Instances dialog box appears.
Enter a value in the Steps text box.
For this example, enter 5 (see Figure 8-9) to create 5 new states (or frames) for transforming the small arrow into the large arrow.
(Optional) If you want the symbols to appear one at a time, you want those states to be distributed to separate states in the States panel, so check the Distribute to States check box.
Click OK.
Test your animation by clicking the Play button in the bottom-right section of the Fireworks workspace and then save the file.

If you're a Photoshop user, you're probably familiar with masks. Masks let you choose the viewable area of an image. The process is much like cutting a hole in a piece of paper and then placing an image under it. The hole in the paper shows only the area of the image below that you want to expose; the rest of the paper masks (covers) the parts of the image that you don't want to expose.
You can take this masking feature a step further in Fireworks by animating a mask. In this section, you create a simple object and mask, and then animate the mask.
To create the image and mask for your animation, follow these steps:
Create a new document that's 500 pixels by 500 pixels in size.
With the Star tool (hidden in the Rectangle tool), create lots of stars close together.
Use any colors and sizes you want for the stars. This step creates multiple layers.
Choose Window
Layers to open the Layers panel.Click the top layer listed in the Layers panel and then Shift-click the bottom layer to select all the layers that you created.
From the panel menu in the Layers panel, choose Flatten Selection.
The layers are flattened into one bitmap layer.
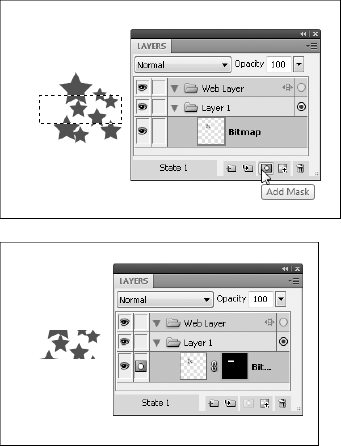
Select the Marquee tool in the Bitmap section of the Tools panel, make a narrow rectangular selection through the middle of the stars, and then click the Add Mask button at the bottom of the Layers panel (see Figure 8-10).
Fireworks creates a mask based on the image area you selected.
In this section, you animate the mask but not the stars. Follow these steps:
In the Layers panel, click the chain that appears between the stars layer and the mask.
This chain lets you move the layer and mask independently.
In the Layers panel, click the mask to select it.
From the panel menu in the States panel, choose Duplicate State.
The Duplicate State dialog box appears.
Select the After Current State radio button, and click OK.
State 2 appears.
With the Pointer tool, drag the mask down slightly on the canvas.
The stars stay in place; only the mask moves.
Repeat Step 5 at least once.
Test your animation by clicking the Play button in the bottom-right section of the Fireworks workspace.
You can come up with some creative animations by using this technique, perhaps using a logo or other text as a mask.
You created it, you tested it, you previewed it, and now you want to use it. To make an animation work, all you have to do is choose the GIF format in the Optimize panel. (GIF is the Web format that supports animation.) No HTML is needed.
To export an animation, follow these steps:
Choose File
Export.The Export dialog box appears.
Choose Images Only from the Export drop-down list.
Name the file.
Put the file in your site location by navigating to the correct folder and clicking Export.