This chapter shows you how to put graphics and text together so that you can start creating page layouts. Interesting and creative page layouts help draw interest to the pictures and words contained within the publication. An interesting layout motivates more of the audience to read the text you place on a page.
You can add several kinds of image files to an InDesign document. Some of the most common kinds are JPEG, TIF, GIF, and PSD. Images are imported into graphic frames, which are instantly created when you add the image to the page.
InDesign allows you to make specific settings, such as those for quality, linkage, and color management, when importing an image. You can adjust additional settings when you import an image with the Image Import Options dialog box. In the "Importing other InDesign documents" section, you see how to change various import options, but for now, to import an image into InDesign (without changing the import settings), follow these steps:
Make sure that nothing on the page is selected.
If an object on the page is selected, click an empty area so that the element is deselected before you proceed.
Choose File
Place.
The Place dialog box opens, where you can browse through your hard drive for image files to import. This dialog box allows you to import various kinds of files into InDesign, not just images.
Select the image that you want to import and click Open.
The Place dialog box closes, and your cursor displays a thumbnail of the image you selected.
Tip
In InDesign, you can import multiple images at one time. Simply hold down the Ctrl (Windows) or

Move the cursor to where you want the upper-left corner of the first image to be placed on the page and then click the mouse.
If you've selected multiple images, you can use the left and right arrow keys to navigate through the thumbnail images in your loaded cursor. Every time you click, the next image is placed, until there are no more images to place.
The image(s) is imported and placed into the publication as a graphic frame. You can now resize, move, and modify the image.
Don't worry if the image imports and is too large for the layout or needs to be cropped — for more information about selecting graphic frames and modifying them, check out Chapter 6 of this minibook. To find out about importing and working with text and stories, see Chapter 4 of this minibook.
Tip
It's sometimes easier to create a graphic frame and then add an image to it. Now in CS4, you can set fitting properties before you import an image. To set the fitting properties in a blank frame, choose Object
When you import PDF files, you can preview and crop the pages by using the Place PDF dialog box (choose File
The Place PDF dialog box offers the following options:
Crop: You can crop the page you're importing using this drop-down list. Some options are unavailable because they depend on what's in the PDF you're importing. The hatched outline in the preview shows you the crop marks.
Transparent Background: If you select this check box, the PDF background is made transparent so that elements on the InDesign page show through. The PDF background is imported as solid white if this option isn't selected.
Starting in InDesign CS3, you had the opportunity to place an InDesign document inside another. This feature, though really neat, could possibly cause a series of issues related to nesting images and fonts inside another document, inside yet another document. Yet, Adobe has done a pretty good job making this as error-free as possible.
Here's how you can take advantage of this feature:
With a document open, choose File
Place, or use the keyboard shortcut Ctrl+D (Windows) or +D (Mac).
The Place dialog box appears.
Check the Show Import Options check box at the bottom of the Place dialog box.
Navigate to an InDesign file and double-click to open it.
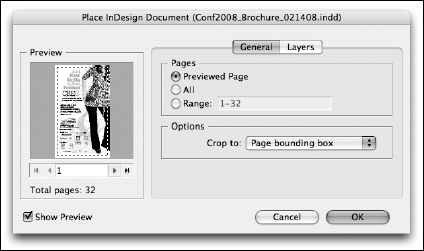
The Place InDesign Document dialog box appears, as shown in Figure 5-1, offering you the opportunity to choose which page(s) you want to place.
Click OK.
Click the page to place the document.
If you're placing a document with multiple pages, click again to place each additional page.
You can either have your images linked to a publication or embedded within it. Instead of importing images or files directly into InDesign and embedding them, you can link the content to the file instead. Here's the difference between linking and embedding:
Linking: The image that appears in the InDesign document is basically a preview of the actual image file stored on your hard drive. If the file you linked to your InDesign document is changed (the name and location must remain the same), the link breaks and the image no longer appears in your layout.
Embedding: The image is copied into and saved within the publication itself. It doesn't matter where the file you imported is or if you alter that file because an embedded image is stored within the InDesign document itself.
When you print or export the publication you're working on, the information is added to the document from linked files (if you have any). This means you have to be careful to keep all your linked files together with the InDesign document, particularly if you send or save it to a different location. You can update the links for an image by selecting it in the Links panel and choosing Relink from the Links panel menu. You're prompted to find that file on your hard drive so that the file can be linked to the new location.
Note
If you choose to use embedded images instead of linked images, be aware that your publication's file size increases because of the extra data that's being stored within it.
Images 48K or smaller are automatically embedded within the publication. If an imported image is larger than that, the file is linked. To find out what files are embedded or linked, look at the Links panel. Choose Window
You can choose to embed a file using the Links panel menu. Click the triangle in the upper-right corner to access the panel menu and select Embed Link if you want a linked file to be embedded within the document. Alternatively, choose Unembed Link from the Link panel menu to link a file instead of having it embedded in the document.
You can set different quality settings for how your images import and display in the workspace. These settings may help speed up your work (set at a lower quality) or give you a better idea of the finished print project (set at a higher quality). These settings are applicable only to how you see the images while using InDesign: They have no bearing over the final printed or exported product.
To change image display quality, choose Edit
Fast Display: In order to optimize performance, the entire image or graphic is grayed out.
Typical Display (Default): This setting tends to make bitmaps look a little blocky, particularly if you zoom in. The speed of zooming in and out is increased if you select this option. InDesign uses a preview that it's created (or was already imported with the file) to display the image on the screen.
High Quality Display: The original image is used to display on-screen. This allows you to preview a very accurate depiction of what the final layout will look like, but you may find that InDesign runs slowly when you use the High Quality option.
Notice the difference among these settings in Figure 5-2.
Tip
To change the display for individual images, select the graphic frame and choose View
After you import an image into your document, you can select images in several different ways with the Selection or Direct Selection tools. This is useful when you want to select and edit just the graphic frame, or just the image inside it.
To select and then edit an image on the page, follow these steps:
Place an image on a page by importing it or pasting it into InDesign.
The image is placed within a graphic frame.
With the Selection tool, drag one of the corner handles on the graphic frame.
The graphic frame is resized but not the image. The image appears to be cropped because you resized the graphic frame — but the image remains the same size within the frame, as shown in the center of Figure 5-3.
Choose Edit
Undo or press Ctrl+Z (Windows) or +Z (Mac) to undo the changes to the image.
The image returns to its original appearance on the page.
With the Direct Selection tool, click the picture and then drag one of the corner handles.
The image inside the graphic frame resizes, but the graphic frame remains the same size.
Click within the image and drag to move the image within the graphic frame-bounding box.
A hand appears when you move the cursor over the graphic; when you move the image just past the edge of the graphic frame boundaries, that part of the image isn't visible anymore, as shown on the right of Figure 5-3.
Tip
When repositioning a graphic within a frame, click and hold. When you do so, the entire image appears (screened outside the frame area), as shown in the image on the right in Figure 5-3. Seeing the dimmed image allows you to crop more effectively.
Tip
You can set the frame or image to resize by choosing Object
Tip
Talk about an incredible new feature! The new Links panel is introduced in Chapter 1 of this minibook, but you don't realize the importance of this handy, improved feature until you start placing a lot of images in multiple page documents. The Links panel can help you find images within your document, open images so that you can edit them, and view important information about the selected image. See Figure 5-4 to help you to navigate this improved panel.
InDesign offers many tools that help you work with text and graphics together in a layout. From the tools in the toolbox to commands to panel options, InDesign offers you an immense amount of control over how you can manipulate graphics and text in a spread.
When you create a new document, you can set the page orientation and size. If you ever need to change your settings after you've created a document, choose File
Page Orientation: Select either Landscape or Portrait. One of the first things you decide upon when you create a new document is how your pages will be oriented. A landscape page is wider than it is tall; a portrait orientation is taller than it is wide.
Page Size: Choose from many standardized preset sizes, such as Letter, Legal, and Tabloid. Alternatively, you can set a custom page size for the document. Make sure that you properly set the page size so that it fits the kind of paper you need to print on.
Margins, columns, and gutters help divide a page for layout and confine its dimensions:
Margin: The area between the edge of the page and the main printed area. Together, the four margins (top, bottom, left, and right) look like a rectangle around the page's perimeter. Margins don't print when you print or export the publication.
Column: Columns divide a page into sections used for laying out text and graphics on a page. A page has at least one column when you start, which is between the margins. You can add additional column guides to this, which are represented by a pair of lines separated by a gutter area. Column guides aren't printed when you print or export the publication.
Gutter: The space between two columns on the page. A gutter prevents columns from running together. You can define the gutter's width in Object

You can set margins and columns when you create a new document, which we discuss in Chapter 2 of this minibook. However, you can also modify margins and columns after the document's been created and specify different values for each page. You can modify the gutter, which is the width of the space between each column.
You can change margins and columns by setting new values in the Margins and Columns dialog box. Choose Layout
Using guides when you're creating your page layouts is a good idea because guides help you more precisely align elements on a page and position objects in the layout. Aligning objects by eyeballing them is difficult because you often can't tell if an object is out of alignment by a small amount unless you're zoomed in to a large percentage.
Note
Make sure that snapping is enabled by choosing View
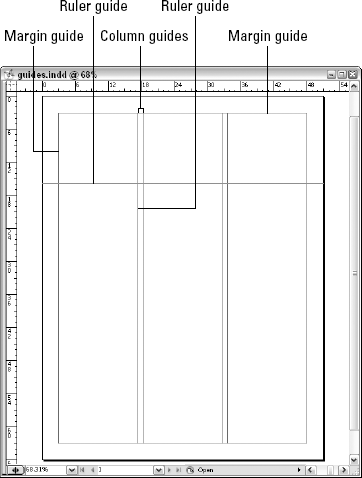
Because guides are very useful in creating a layout, check out the following kinds available in InDesign (see to Figure 5-5):
Column guides: These guides are set when you open a new document in InDesign. Column guides evenly distribute the page into columns and can be used to align text frames in a document. They don't always have to be equally spaced the way they're originally placed on a page. You can drag columns to a new location manually. Simply click a column guide directly on a line and drag the line to a new location. The cursor changes to a double-ended arrow while you drag the column guide to a new location.
Margin guides: Margin guides are the guidelines discussed in the previous section that define the area between the edge of the page and the main printable area.
Ruler guides: Ruler guides are ones you manually define; they can be used to align graphics, measure an object, or specify the location of a particular asset you want to lay out. See Chapter 2 of this minibook for details about adding ruler guides to the workspace.
Smart guides: As previously mentioned, smart guides offer the ability to align objects on your InDesign page to other objects or even to the page. Smart object alignment allows for easy snapping to page item centers or edges or page centers. In addition to snapping, smart guides give feedback to the user indicating which object you're snapping.
To find out how to show and hide grids and guides, see Chapter 2 of this minibook.
Note
Don't forget that in InDesign CS4, you delete all guides at once by right-clicking the ruler (Windows) or Control-clicking the ruler (Mac) and selecting Delete All Guides from the contextual menu.
You can lock elements, such as objects and guides, in place. This feature is particularly useful after you've carefully aligned elements on a page. Locking objects or guides prevents you from accidentally moving them from that position.
To lock an element, follow these steps:
Use a drawing tool to create an object on a page and then select it with the Selection tool.
A bounding box with handles appears when the object is selected.
Choose Object
Lock Position.
The object is locked in position. Now when you try to use the Selection or Direct Selection tools to move the object, the object doesn't move from its current position.
To lock guides in place, follow these steps:
Drag a couple ruler guides onto the page by clicking within a ruler and dragging toward the page.
A line appears on the page. (If rulers aren't visible around the pasteboard, choose View

Drag a ruler guide to a new location if needed; when you're happy with the ruler guides' placements, choose View
Grids and Guides Lock Guides.
All guides in the workspace are locked. If you try selecting a guide and moving it, the guide remains in its present position. If you have any column guides on the page, they're locked as well.
Tip
Use layers in your publications for organization. Layers are a lot like transparencies that lay on top of each other, so they can be used for stacking elements on a page. For example, you may want to stack graphics or arrange similar items (such as images or text) onto the same layer. Each layer has its own color of bounding box, which helps you tell which item is on which corresponding layer. For more information on layers in general, see Book III, Chapter 8.
When you have text and graphics together on a page, they should flow and work with each other in order to create an aesthetic layout. Luckily, you can work with text wrap to achieve a visual flow between text and graphics. In this section, you discover how to wrap text around images and graphics in your publications.
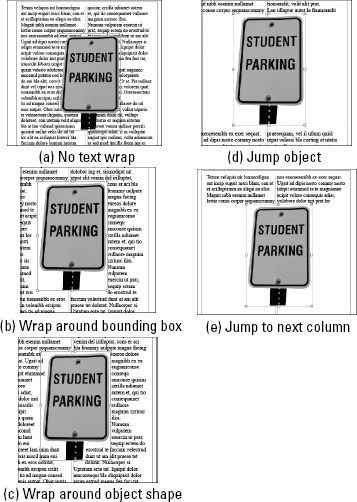
Images can have text wrapped around them, as shown in Figure 5-6. Wrapping is a typical feature of page layout in print and on the Web. You can choose different text wrap options by using the Text Wrap panel, which you open by choosing Window
The drop-down list at the bottom of the Text Wrap panel is used to choose from various contour options. Choose from the following options to wrap text around an object's shape:
No Text Wrap: Click this button to use the default setting or to remove any text wrapping from the selected object.
Wrap around Bounding Box: Click this button to wrap text around all sides of the bounding box of the object.
Offset: Enter an amount to offset the text from wrapping around the object.
Wrap around Object Shape: Click this button to wrap text around the edges of an object.
Contour Options: Select a contour from this drop-down list, which tells InDesign how the edges of the image are determined. You can choose from various vector paths or the edges to be detected around an object or image with transparency.
Top Offset: Enter a value for the top offset modifier to offset the text wrapping around the object.
Jump Object: Click this button to have the text wrapping around the image jump from above the image to below it, with no text wrapping to the left or right of the object in the column.
Jump to Next Column: Click this button to cause text to end above the image and then jump to the next column. No text is wrapped to the left or right of the image.
Offset: Enter offset values for text wrapping on all sides of the object.
To add text wrapping to an object (a drawing or image), follow these steps:
Create a text frame on the page.
Add text to the text frame by typing, pasting text from elsewhere, or filling it with placeholder text. This text will wrap around the image, so make sure that the text frame is slightly larger than the graphic frame you'll use.
With the Selection tool, select a graphic frame on the page and move it over the text frame.
Bounding box handles appear around the edges of the image or graphic.
Choose Window
Text Wrap to open the Text Wrap panel.
The Text Wrap panel opens.
With the graphic frame still selected, click the Wrap around Object Shape button.
The text wraps around the image instead of hiding behind it.
If you're working with an image that has a transparent background, choose Detect Edges or Alpha Channel from the Contour Options drop-down list.
The text wraps around the edges of the image, as shown in the (c) Wrap around Object Shape example in Figure 5-6.
If you've applied a text wrap around an object (as we show you how to do in the preceding section), you can then modify that text wrap. If you have an image with a transparent background around which you've wrapped text, InDesign created a path around the edge of the image; if you have a shape you created with the drawing tools, InDesign automatically uses those paths to wrap text around.
Warning
Before proceeding with the following steps, be sure that the object uses the Wrap around Object Shape text wrap. (If not, open the Text Wrap panel and click the Wrap around Object Shape button to apply the text wrapping.) Remember to choose Detect Edges if you're using an image with a transparent background.
To modify the path around an image with text wrapping by using the Direct Selection tool, follow these steps:
Select the object using the Direct Selection tool.
The image is selected, and you can see the path around the object.
Drag one of the anchor points on the path using the Direct Selection tool.
The path is modified according to how you move the point. (For more about manipulating paths, take a look at Chapter 3 of this minibook.) The text wrapping immediately changes, based on the modifications you make to the path around the object.
Select the Delete Anchor Point tool from the toolbox and delete one of the anchor points.
The path changes again, and the text wrapping modifies around the object accordingly.
Note
You can also use the Offset values in the Text Wrap panel to determine the distance between the wrapping text and the edge of the object. Just increase the point values to move the text farther away from the object's edge.
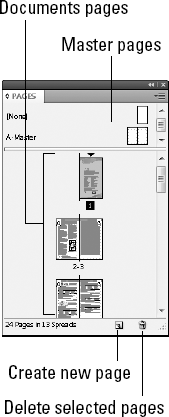
Pages are the central part of any publication. The page is where the visible part of your publication is actually created. Navigating and controlling pages is a large part of what you do in InDesign. The Pages panel allows you to select, move, and navigate through pages in a publication. When you use default settings, pages are created as facing pages, which means they're laid out as two-page spreads. Otherwise, pages are laid out individually. This is reflected, and can also be changed, in the Pages panel.
The Pages panel, which you open by choosing Window
To discover more about master pages and how they differ from regular pages in your document, see the "Using Master Spreads in Page Layout" section, later in this chapter.
Use the Pages panel to select a page or spread in your publication. Select a page by clicking the page. If you Ctrl-click (Windows) or
You can also add new pages to the publication by using the Pages panel. To add a new page, follow these steps:
Choose Window
Pages to open the Pages panel.
The Pages panel opens.
Click the Create New Page button.
A new page is added to the document.
Select one of the pages in the Pages panel.
The selected page is highlighted in the Pages panel.
Click the Create New Page button again.
A new page is added following the selected page.
Tip
To delete a page, select the page in the Pages panel and click the Delete Selected Pages button. The selected page is removed from the document.
Tip
Now in InDesign CS4, you can add, delete, move pages, and more by choosing Layout
When you're working with longer documents, adding page numbers before you print or export the publication is a good idea. You don't have to add them manually: InDesign has a special tool that allows you to number pages automatically. This tool is particularly useful when you move pages around the document. You don't have to keep track of updating the numbering when you make these kinds of edits.
To number pages, follow these steps:
Create a text frame on the page where you want the page number to be added.
Double-click the text frame so that the insertion point is blinking in the frame.
Choose Type
Insert Special Character Markers
 Current Page Number.
The current page number appears in the text frame you selected. If you added the page number to a master page, the master pages' letter appears in the field instead.
If you want page numbers to appear on all pages in the document, add the text frame to a master page. Remember that page numbers are added only to the pages in your document associated with that master page. If you add the page number on a regular page in the document, it adds the page number only to that single page.
Tip
To modify automatic numbering settings, choose Layout
Master pages are a lot like templates that you use to format your page layouts. The settings, such as margins and columns, are applied to each layout that the master page is applied to. If you put a page number on a master page, it also appears on each page that uses the layout. You can have more than one master page in a single publication, and you can choose which pages use a particular master page.
A master page or spread typically contains parts of a layout that are applied to many pages. It has elements that are used on many pages, such as page numbering, text frames to enter text into, background images, or a heading that's used on every page. You can't edit the items you have on a master page on the pages assigned to it — you can edit those items on the master page only.
Note
Master pages are lettered. The first master page is the A-Master by default. If you create a second master page, it's the B-Master by default. When you create a new publication, the A-Master is applied to all the pages you initially open in the document. You can add pages at the end that don't have a master applied to them.
Creating master pages and applying them to your publication enables you to create a reusable format for your publication, which can dramatically speed up your workflow when you put together documents with InDesign.
You may need more than one master page or master spread for your document. You may have another series of pages that need a unique format. In this situation, you'd need to create a second master page. You can create a master page or a master spread from any other page in the publication, or you can create a new one with the Pages panel.
To create a master page using a page in the publication, do one of the following:
Choose New Master from the Page panel's menu and then click OK. A blank master page is created.
Drag a page from the pages section of the panel into the master page section of the Pages panel. The document page turns into a master page.
Warning
If the page you're trying to drag into the master pages section is part of a spread, select both pages in the spread before you drag it into the master pages section. You can drag individual pages into the master page section only if they're not part of a spread.
After you create a master page, you can apply it to a page. You can also remove a page from a master page layout as well as delete a master page altogether:
To add master page formatting to a page or spread in a publication: In the Pages panel, drag the master page you want to use from the master page section on top of the page you want to format in the document pages section. When you drag the master page on top of the page, it has a thick outline around it. Release the mouse button when you see this outline, and the formatting is applied to the page.
To remove any master page applied to a document page: In the Pages panel, drag the None page from the master area in the Pages panel onto that document page. You may need to use the scroll bar in the master pages area of the Pages panel to find the None page.
To delete a master page: In the Pages panel, select the unwanted master page and then choose Delete Master Spread from the panel menu.
