Understanding symbols and the library
Creating and editing symbols
Using the new Spray Brush and Deco tools
Working with frames and keyframes in the Timeline
Creating animations with tweens
Understanding frame-by-frame animation
Working with frame rate
After you're familiar with Flash's drawing tools, explore what Flash is best known for: animation. In this chapter, you bring your creations to life with movement, interactivity, and sounds. Flash CS4 introduces some significant new changes to the way animation is created on the Timeline, which will be exciting for new and experienced users alike.
First, you'll explore some central concepts in Flash: symbols and the library. Because symbols are an essential part of creating animation in Flash, you'll discover how to create and modify symbols before diving into your first animation tasks.
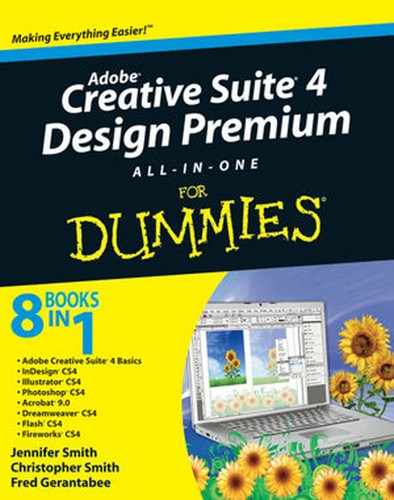
Each Flash document contains a library, a repository of reusable graphics, animations, buttons, sounds, video, and even fonts. As you build your Flash movie, you can add any piece of artwork you've created on the stage to your library, where the artwork's stored as a symbol (as shown in Figure 3-1).
What makes symbols so powerful is that you can reuse them as many times as necessary. Simply drag and drop a copy (referred to as an instance) from the Library panel onto the stage anywhere in your movie. Most importantly, each instance remains linked to the original in your library. Any changes made to the original (or master) automatically update any instances of that same symbol used throughout the movie.
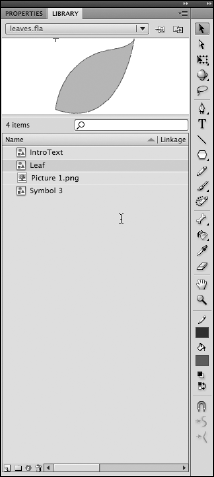
Figure 3-1. The Library panel stores symbols that you create from graphics and animations, as well as sounds, images, and fonts.
Symbols are broken down into three main categories: graphics, buttons, and movie clips. You can find out more about button and movie clip symbols in Chapters 6 and 7 of this minibook.
Certain types of animation in Flash require the use of symbols, so it's a good time to become familiar with the most basic of symbol types: graphics. You can convert any object on the stage into a graphic symbol, allowing you to take advantage of additional features unique to symbols. You can also create empty graphic symbols from the Library panel or by choosing Insert
Follow these steps to create a graphic symbol:
Choose Insert
New Symbol or choose New Symbol from the panel menu located in the top-right corner of the Library panel.
The Create New Symbol dialog box appears.
Assign a name to the symbol, choose Graphic from the Type drop-down list, and click OK.
You see a blank slate on the stage where you can add to your symbol.
Choose Scene 1 from the navigation bar above the stage to exit the symbol and return to the main Timeline.
You now see your new symbol listed in the Library panel.
Follow these steps to create a graphic symbol from existing artwork on the stage:
With the Selection tool, select the object(s) on the stage that you want to convert to a symbol.
Choose Modify
Convert to Symbol.The Convert to Symbol dialog box appears.
Enter a name for the symbol, choose Graphic from the Type drop-down list, and click OK.
Your new symbol now appears listed in the Library panel.

Figure 3-2. A symbol is enclosed in a bounding box, and the Property inspector shows the symbol's name.
Warning
Don't confuse symbols with Drawing Objects — both display artwork inside a bounding box, but Drawing Objects don't have the same abilities that symbols have, nor are they stored automatically in your library. Use the Property inspector to determine whether an object is a symbol or a Drawing Object if you're unsure — a distinctive icon and description appear for each one at the top of the Property inspector.
After you add graphic symbols to your library, if you need to reuse one, you can simply drag a copy from the Library panel and drop it on to the stage (see Figure 3-3). Each copy of a symbol is referred to as an instance in Flash. Although all these instances remain linked to the original, you have the flexibility to scale, transform, and rotate each instance individually.
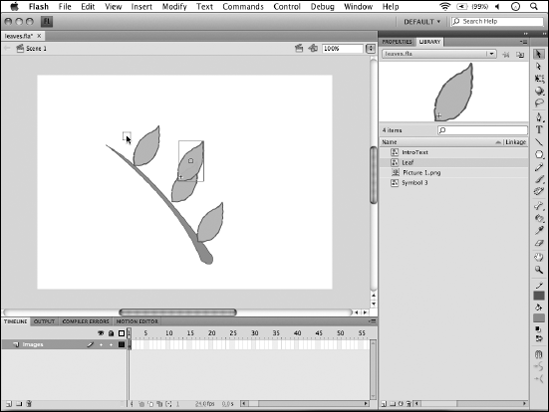
Figure 3-3. Drag and drop a symbol from your library onto the stage to add as many instances as you want.
Follow these steps to add symbols to the stage:
Locate a symbol in your library that you want to add to the stage.
Drag a copy from the Library panel to the stage; repeat this a few times so that you have several instances on the stage.
Select each instance individually and experiment with different scaling, transforming, and rotating for each one.
After you create symbols, you can modify them from within the library or directly on the stage. Changes made to a symbol are applied to all instances of that symbol throughout the movie.
To edit a symbol from within the library, follow these steps:
Select a symbol in your Library panel and choose Edit from the panel menu, or double-click any symbol in the Library panel.
To really see the effect of editing the master symbol, use a symbol you dragged previously to the stage.
The symbol appears on the stage in edit mode.
Make some changes in color, shape, or size.
Exit the symbol by selecting Scene 1 from the navigation bar above the stage to return to the main Timeline.
Instances of this symbol on the stage reflect the changes you've made to the symbol in the library.
Editing a symbol in place on the stage can be more intuitive, as you may want to modify it to work better with other artwork on the stage. You can directly edit a symbol from any of its instances on the stage (as shown in Figure 3-4), but keep in mind that regardless of which instance you edit, all instances will be affected.
To edit a symbol in place, follow these steps:
Select and double-click any symbol instance on the stage.
You're now in the symbol's edit mode, but you can still see the other objects on the stage in the background. Flash dims objects in the background so that you can see your changes in context.
Make your changes and exit the symbol's edit mode by selecting Scene 1 on the navigation bar above the stage.

Symbols in your library can be sorted using any of the column headers at the top of the symbol list. You may only be able to see Name and Linkage at first glance, but if you use the horizontal scroll bar at the bottom of the panel, you can see additional columns for Use Count, Date Modified, and Type.
To sort by any column, click the column name. If the arrow next to the column name is pointing up, the sort is descending, with the highest value up; if the arrow is pointing down, the sort is ascending, with the lowest value up top.
You may want to create a variation of one of your symbols that goes beyond what you can do on an instance-by-instance basis. A good example is two birds that are similar in appearance, but one has different shaped wings or a different base color. This instance would be a good case for duplicating an existing symbol so that any changes can be made to the copy and treated as a new symbol.
To duplicate a symbol, select the symbol in the library you want to copy and choose Duplicate from the panel menu in the top-right corner of the panel. You're given a chance to name the new version of the symbol when the Duplicate Symbol dialog box appears.
Tip
You can rename any symbol directly from the Library panel. Select the symbol and choose Rename from the panel menu.
A closer look at the Library panel
Your Library panel is the main storage location for all your symbols, and very much like any library, it has essential organizational tools that make managing your symbols easy.
The most basic and common functions are made easy through several icons found along the bottom of the panel (see figure):

Panel menu: All panels have panel menus, which offer additional options or modify the view of the panel itself. The Library panel's panel menu carries out additional symbol and library-related tasks.
Pin Library: Clicking this icon makes sure that the current library stays active even when you switch between other open documents. Normal behavior (unpinned) is for library views to switch automatically when moving between open documents.
New Library: Creates a duplicate Library panel in case you want multiple, distinctive views of your current library. You can also open a new Library panel to view libraries from other currently open documents.
Search: The text box and magnifying glass under the preview panel allow you to search for symbols by name in the library, which is especially helpful for large libraries. Simply type a full or partial name and the panel will display matches (if any exist).
New Symbol: Create a new symbol, identical to the command found by choosing Insert
New Folder: Create folders that you can sort your symbols into for easy categorization. You can create folders within folders for even finer sorting capabilities.
Properties: If a symbol is highlighted in your library, clicking the Properties icon opens the Symbol Properties window. From here, you can redefine the symbol's name, type, or registration point.
Trash Can: Yes, you guessed it — this symbol deletes (trashes) the currently highlighted symbol in the library. Be careful with this: No warning is given before the deed is done. However, you can choose Edit
Flash CS4 introduces two new tools that enable you to get truly creative with symbols: the Spray Brush and Deco tools. These tools rely on symbols from your library, allowing you to paint random textures or fill areas with complex patterns. You can even easily draw symmetrical artwork with the Deco tool's included Symmetry Brush mode.
The Spray Brush tool paints with instances of a single symbol from your library. You can use the Property inspector to dial in settings for scaling, randomness, and brush size.
Follow these steps to paint with the Spray Brush tool:
Click the New Layer button (found below the Timeline) to create a new, empty layer to paint on.
Select the Spray Brush tool from the Tools panel (click and hold down on the Brush tool to find the Spray Brush tool).
The Property inspector displays options for the Spray Brush tool.
In the Property inspector, click the Edit button in the Symbol options area.
The Swap Symbol dialog box appears, prompting you to select a symbol from your library.
Choose a symbol and click OK to exit the dialog box.
In the Symbol options area, use the Scale Width and Scale Height sliders to reduce or increase the scaling for each instance painted on the stage.
In the Brush options area, enter values for the Width and Height of the brush, and if desired, Brush Angle.
Click and drag on the stage to begin painting.
The Spray Brush paints with the symbol you selected using the settings you chose in the Property inspector, as shown in Figure 3-5.
Tip
The Spray Brush tool creates groups from all the paint droplets it leaves behind. You can break apart these groups by choosing Modify
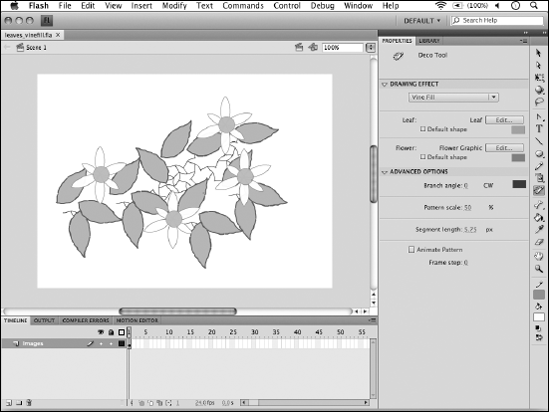
In the following steps, we show you how to experiment with the Deco tool's three different drawing effects using symbols from your library. First, we show you how to use the Vine Fill:
Open or create a new Flash document, and add at least two graphic symbols to your library with the methods described earlier in this chapter.
Select the Deco tool from the Tools panel.
The Property inspector changes to reflect that the current drawing effect is set to Vine Fill.
Vine Fill mode creates a vine-style pattern between two symbols, using one as the leaf (that decorates the vine path) and one as the flower (that appears at the end of each vine).
In the Leaf section of the Property inspector, click the Edit button to select a symbol from your library to serve as the leaf.
From the dialog box that appears, choose a symbol from your library and click OK to set that symbol.
In the Flower section of the Property inspector, click the Edit button to select a symbol from your library to serve as the flower.
From the dialog box that appears, select a symbol from your library and click OK to set that symbol.
In the Advanced Options section of the Property inspector, click the color swatch and choose a color for the vine that will interconnect the two symbols you've chosen when the pattern is created.
Click the New Layer button below the Timeline to create a new, empty layer to paint on.
Click the stage, and the Deco tool begins to draw a new vine pattern using the symbols you've chosen.
The Deco tool draws a vine and caps the vine with the flower symbol you chose. Continue to click and release to draw new vines.
To give the Grid Fill drawing effect a try, follow these steps:
Click the New Layer button below the Timeline to create a new empty layer to use with the Grid Fill.
If the Deco tool isn't active, select Deco tool from the Tools panel.
Change the drawing effect from Vine Fill to Grid Fill with the drop-down list at the top of the Property inspector.
Grid Fill creates a uniform grid-style pattern within a selected area. You can use Grid Fill to fill a specific shape on the stage, or the entire stage itself.
Click the Edit button to select the fill symbol.
When the Swap Symbol dialog box appears, choose a symbol from your library to use as a pattern and click OK.
In the Property inspector, click and drag over the Horizontal Spacing and Vertical Spacing values to set the desired distance (in pixels) between each row and column.
(Optional) Use the Pattern Scale slider to reduce or increase the size of the symbol used to create the pattern.
Click the stage with the Deco tool, and the stage fills up with a grid pattern using the symbol and settings you chose, as shown in Figure 3-6.
The last drawing effect we show you how to use is the Symmetry Brush, which lets you draw cool symmetrical artwork with symbols. Follow these steps to use the Symmetry Brush:
Click the New Layer button to insert a new layer on the Timeline.
If the Deco tool isn't active, select the Deco tool from the Tools panel.
On the Property inspector, select Symmetry Brush from the Drawing Effect drop-down list.
To the right of Module, click the Edit button.
From the Swap Symbol dialog box that appears, select a symbol from your library to use with the Symmetry Brush and then click OK.
On the stage, click and drag to begin drawing with the Symmetry Brush.
The symbol you chose is duplicated in a rotating pattern around your brush point. Release the mouse button to stop drawing.
The new pattern displays two handles — one to adjust pattern size, and one to adjust the distance between each symbol.
Move your cursor over the top of the vertical handle until you see a black arrow; click and drag to readjust the size of the pattern.
Move your cursor over the end of the horizontal handle until you see a black arrow; click and drag clockwise or counter-clockwise to reduce or increase the distance between symbol instances, respectively.
If you look at the Advanced Options for the Symmetry Brush (on the bottom of the Property inspector), you'll see quite a few other interesting modes that let you reflect symbols or reconfigure them into a grid. Experiment with these and try different symbols from your library for contrast.
The Timeline, located above the stage, is where your animation is created. It's important to take a detailed look at the components that make the Timeline tick: frames, keyframes, and the playhead.
The Timeline is composed of a series of consecutive frames (see Figure 3-7), each of which represents a point in time (much like a historical timeline). When the Flash Player plays your movie, the playhead moves from left to right across the Timeline. The playhead is represented by a red vertical line in your Timeline window. The numbers above the Timeline represent specific frame numbers.

Think of historical milestones represented at specific points on a Timeline with prominent markers. On a Flash Timeline, significant events (such as the beginning and end of an animation sequence) are represented as keyframes.
Every time you want to place a graphic, animation, or sound, first create a keyframe at the specific point on the Timeline where you want it to occur. When you create a new document, a single keyframe is automatically created on frame 1. Keyframes look like standard frames, except with a hollow or black circle inside.
Add more keyframes as necessary to create animations or have graphics appear and disappear at specific points along the Timeline.
When you understand the basics of the Timeline (see preceding section), you're ready to create your first animation. The good news is that Flash does a lot of the hard work for you!
Flash can automatically create animation sequences from nothing more than a starting point and an ending point, figuring out everything in between. This type of animation is a tween. Motion and shape are the two types of tweens.
A motion tween is a type of Flash-generated animation that requires the use of symbols and is best for creating movement, size, and rotation changes, fades, and color effects. All you need to do is tell Flash where to change the appearance of a symbol instance, and it fills in the blanks in between to create an animation sequence.
Tip
Only one object can be tweened on one layer at a time. If you want to tween several objects simultaneously, each object needs to occupy its own layer and have its own tween applied.
To create a motion tween, follow these steps:
Drag a symbol from your library to the stage to a new layer.
The symbol is added to frame 1. For example, we positioned the symbol on the left edge of the stage, which is where the motion will begin.
Right-click the first frame of the layer that your symbol is on and choose Create Motion Tween from the contextual menu that appears.
A shaded span of frames appears on the Timeline, called a tween span, and the layer is converted to a tween layer.
To create animation, you can now move the playhead to different points along the tween span and make changes to your object's appearance or position.
Drag the playhead to a new frame and then reposition your symbol.
For this example, we dragged to frame 15 and repositioned the symbol in the middle of the stage.
A new keyframe (which appears as a bullet point) has been created automatically at this frame to mark the change.
Drag the playhead to another frame and move the symbol instance to another location on the stage, as shown in Figure 3-8.
For this example, we dragged to frame 24 and repositioned the symbol on the left side of the stage.
In addition to another keyframe, a motion path is created on the stage to show the path of animation that the symbol will take.
Press Enter/Return to play the Timeline and preview your animation.
For the motion tween we created, the symbol moves from left to right.

You're just scratching the surface of what Flash can do; feel free to experiment further with different symbols and positions, and alter the length of your animations by placing starting and ending keyframes closer together or farther apart.
If you want a tween to play out longer or shorter, or have more time for additional keyframes and motion, you can expand the number of frames in a tween span. By default, the length of each new tween span is based on your frame rate. A frame rate of 24 fps (frames per second) creates a 24-frame tween span each time, a frame rate of 30 fps creates a 30-frame tween span, and so on.
To expand or trim a tween span, follow these steps:
Locate and select a tween span on the Timeline and select the last frame in the span.
Move your cursor over the last frame of the span until a double-arrow icon appears.
Click and drag left or right to trim or lengthen the span, respectively.
Warning
If you resize a tween span after animation already has been created, existing keyframes will shift from their original positions on the Timeline. This will cause certain animations to begin or end at different times than you originally intended.
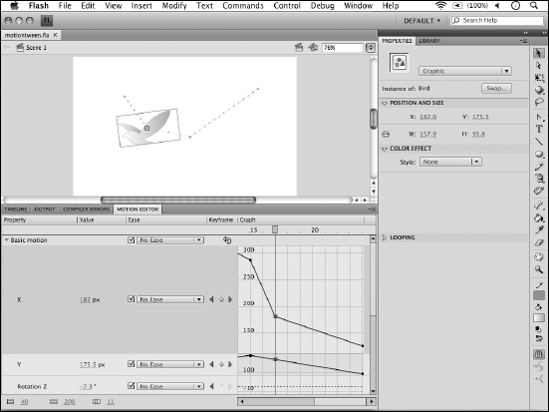
Flash CS4 features a brand new Motion Editor panel, which gives you precise control over each aspect of a motion tween. The Motion Editor displays the various properties of a motion tween (such as motion, scale, and transparency) in a graph-style format that you can use to edit or add to your animations. You can use the Motion Editor only on motion tween spans; it can't be used to modify shape tweens or classic tweens (motion tweens created in Flash CS3 or earlier).
The Motion Editor can be found behind the Timeline panel at the bottom of your default workspace.
Follow these steps to modify a motion tween with the Motion Editor:
Clicking the Motion Editor tab (you can find it behind the Timeline panel) to bring the Motion Editor panel forward.
Select a tweened object on the stage; you can click either the object or the motion path to select the tween.
The Motion Editor displays each property as a row with a graph line running through it, as shown in Figure 3-9. The graph line represents the changes in a property value (such as scaling percentage) throughout the course of a tween span.
Locate a property that your tween is using, such as Alpha, X, or Y, and click the row's title to expand it.
Along each line you'll find points, or keyframes, that mark changes in the value of that property at different points in time.
Select a keyframe and drag it up or down to change the value of the current property.
Move your pointer over a different portion of the line. While holding down the Ctrl key (Windows) or the
key (Mac), click directly on the line to create a new point (or keyframe).
Drag this point up or down to change the property's value at this position.
Press the Enter/Return key to play back your Timeline and see how your modifications have affected the current tween.
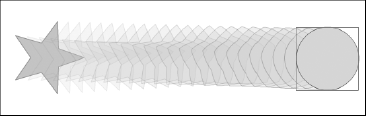
It's easy to see how Flash can open up new worlds for creating quick, sleek animation without too much effort. After experimenting with motion tweens (see the preceding sections), you may find working with symbols a bit limiting, especially if your goal is to modify the shape of an object from start to finish, such as morphing a star into a circle. In this case, you'd want to take advantage of shape tweens.
For the most part, shape tweens are created in a very similar manner to motion tweens. However, unlike motion tweens, shape tweens must use raw shapes instead of symbols.
In addition to morphing between distinctively different shapes, shape tweens can morph color. Like motion tweens, you can tween only one shape at a time on a single layer. If you want to create multiple shape tweens simultaneously, isolate each one on its own layer.
Follow these steps to create a shape tween:
Create a new Flash document. At the bottom of the workspace, click the Timeline panel's tab to bring it forward.
On an empty layer, draw a shape (for example, a star or polygon with the Polystar tool) on frame 1.
You can include a stroke and a fill, as the shape tween can handle both.
Create a blank keyframe on frame 30 by choosing Insert
TimelineBlank Keyframe.As opposed to the motion tween, we choose a blank keyframe here because we don't want a copy of the shape drawn on frame 1 to be carried over to the new keyframe.
Draw a distinctively different shape on the new blank keyframe on frame 30.
Select frame 1 and choose Insert
Shape Tween.You see an arrow and green shaded area appear between the starting and ending keyframes, indicating that you've successfully created a shape tween.
Turn on the Onion Skin Outlines option below the Timeline (see Figure 3-10) to see the frames that Flash has created for you.
Press Enter/Return to play back your animation.
You now see the original shape transform into the final shape.
Try creating a tween between two type characters with the preceding steps. Create the letters using the Text tool. Break the characters into their raw forms before creating a shape tween by choosing Modify
If you come from a traditional animation background, you may want to create animation the old-fashioned way: frame-by-frame. Flash easily supports this method, but it's best to decide which method you want to use based on what type of animation you want to create.
There are advantages to both methods: Although motion and shape tweens give you the power to create sleek animations quickly and easily, you may find they're limited. Frame-by-frame animation is significantly more time-consuming and complex to create but can afford some detail and flexibility that you can't otherwise achieve.
To create a frame-by-frame animation, follow these steps:
Create a blank keyframe for each frame you want to include in your animation.
Frames don't have to be consecutive; you can leave space between keyframes to control the time that elapses between each.
Draw (or insert) a graphic for each state of your animation on the appropriate keyframes.
Play back your animation by pressing the Enter/Return key.
In Chapter 4 of this minibook, you explore advanced animation techniques using Flash's new IK and Armature features, which allow you to create sophisticated animation with the ease of tweens, but the complexity of frame-by-frame animation.
Tip
If your goal is to simply move an object from one location to another, create fades, or transform size and rotation, it makes sense to use motion tweens and let Flash do the thinking for you. If you're trying to create highly complex animations that tweens can't handle (for example, a person running), you may want to try the more traditional frame-by-frame approach.
In some cases, you can break your artwork into individual moving parts (like wheels on a bicycle) across several layers to achieve similar affects to frame-by-frame by using motion tweens. You can explore these further in the next chapter.
Frame rate plays an important part in the performance and appearance of your Flash movie. It dictates how many frames are played back per second by the Flash Player, in turn affecting the speed and smoothness of your animations.
You can modify frame rate in three ways:
Choose Modify
Document.With nothing on the stage selected, use the Property inspector. You'll see your document properties.
Click and drag over the frame rate value displayed at the bottom of the Timeline panel.
Tip
Frame rate is completely based upon the result you're trying to achieve. Although the default frame rate in Flash is 24 fps (frames per second), you may also want to consider something around 30 fps, which is consistent with broadcast/digital video frame rates and should provide a good starting point for smooth, consistent animation. To keep things in perspective, keep in mind that a film projector (like the one at your local movie theater) runs at 24 fps.
If you want to increase the overall speed and smoothness of your animation, you can try increasing the frame rate gradually until you find the one that's right for you. Flash can support frame rates of up to 120 fps.
Note
Changing frame rate affects the playback of your entire movie. If you're trying to adjust the speed of one specific animation, consider modifying the tween itself.