In This Chapter
Transforming objects with the Transform panel
Transforming objects with the Free Transform tool
Rotating and scaling objects
Shearing and reflecting objects
Adding a clipping path
Aligning and distributing objects in a layout
In this chapter, you discover several different ways to manipulate and arrange objects on a page. You find out how to use the Transform panel and other tools in the toolbox to transform objects on page layouts. You can make the same transformation in many different ways in InDesign, so for each way you can transform an object, we show you a couple different ways to do the same job.
Aligning and/or distributing objects and images helps you organize elements logically on a page. In this chapter, you find out how to align objects with the Align panel. In Chapter 5 of this minibook, we touch on vector paths. This chapter provides more information about clipping paths. We show you how to create a new path to use as a clipping path for an image in your document.
Chapter 3 of this minibook shows you how to transform graphic objects by skewing them. You can manipulate objects in InDesign in many other ways. You can transform an object by choosing Object
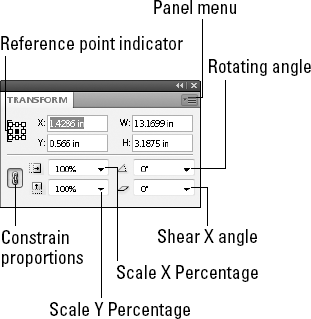
The Transform panel (as shown in Figure 6-1) is extremely useful for changing the way an image or graphic looks and also for changing the scale, rotation, or skew of the selected object. You can choose from a range of values for some of these modifiers or manually set your own by typing them.
The Transform panel offers the following information and functionality:
Reference point: Indicates which handle is the reference for any transformations you make. For example, if you reset the X and Y coordinates, the reference point is set to this position. In Figure 6-1, the reference point is in the center, as indicated by the solid square.
Position: Change these values to reset the X and Y coordinate position of the selected object.
Size: The W and H text fields are used to change the current dimensions of the object.
Scale: Enter or choose a percentage from the Scale X Percentage and Scale Y Percentage drop-down lists to scale (resize) the object on either of these axes.
Constraining proportions: Click the Constrain Proportions button to maintain the current proportions of the object that's being scaled.
Shearing: Enter or choose a negative or positive number to modify the shearing angle (skew) of the selected object.
Rotation angle: Set a negative value to rotate the object clockwise; a positive value rotates the object counterclockwise.
When you're scaling, shearing, or rotating an object in your layout, it transforms based on the reference point in the Transform panel. For example, when you rotate an object, InDesign considers the reference point to be the center point of the rotation.
Click a new reference point square in the Transform panel to change the reference point of the graphic to the equivalent bounding box handle of the currently selected object.
Note
You can access dialog boxes for each kind of transformation by choosing Object
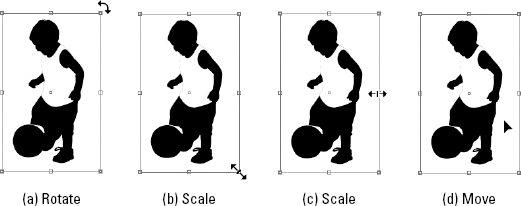
The different functions of the Free Transform Tool are represented in InDesign by different cursors, as shown in Figure 6-2.
To move an object using the Free Transform tool, follow these steps:
Use the Selection tool to select an object on the page.
You can use an object that's already on the page or create a new shape using the drawing tools. When the object is selected, you'll see handles around the edges.
Select the Free Transform tool from the toolbox.
The cursor changes to the Free Transform tool.
Move the cursor over the middle of the selected object.
The cursor changes its appearance to indicate that you can drag to move the object (refer to Figure 6-2). If you move the cursor outside the edges of the object, the cursor changes when the other tools, such as rotate, scale, and shear, become active.
Drag the object to a different location.
The object is moved to a new location on the page.
You can rotate an object by using the Free Transform tool or the Transform panel. Using the panel allows you to enter a specific degree that you want the object to rotate. The Free Transform tool lets you visually manipulate the object on the page.
To rotate an image by using the Free Transform tool, follow these steps:
Select an object on the page with the Selection tool.
Handles appear around the edges of the object. You can rotate any object on the page.
Select the Free Transform tool in the toolbox and move it near the handle of an object outside the bounding box.
The cursor changes when you move it close to the handle of an object. For rotation, you must keep the cursor just outside the object.
When the cursor changes to the rotate cursor, drag to rotate the object.
Drag the cursor until the object is rotated the correct amount.
Alternatively, you can use the Rotate tool to spin an object by following these steps:
With the object selected, select the Rotate tool in the toolbox and move the cursor near the object.
The cursor looks similar to a cross hair.
Click the cursor anywhere on the page near the object.
The point the object rotates around is set on the page.
Drag the cursor outside the object.
The object rotates around the reference point you set on the page. Hold the Shift key if you want to rotate in 45-degree increments.
You can also rotate objects by using the Transform panel. Here's how:
Select an object on the page with the Selection tool.
The bounding box with handles appears around the selected object.
If the Transform panel isn't open, choose Window
Object & Layout Transform.
The Transform panel appears.
Select a value from the Rotation Angle drop-down list or click the text field and enter a percentage.
The object rotates to the degree that you set in the Transform panel. Negative angles (in degrees) rotate the image clockwise, and positive angles (in degrees) rotate the image counterclockwise.

To scale an object by using the Free Transform tool or the Scale tool, follow these steps:
Select an object on the page.
A bounding box appears around the object.
Select the Free Transform tool or the Scale tool from the toolbox.
Move the cursor directly over a corner handle.
The cursor changes into a double-ended arrow (refer to Figure 6-2).
Drag outward to increase the size of the object; drag inward to decrease the size of the object.
Tip
If you want to scale the image proportionally, hold down the Shift key while you drag.
Release the mouse button when the object is scaled to the correct size.
To resize an object using the Transform panel, select the object and enter new values into the W and H text fields in the panel. The object then resizes to those exact dimensions.
Shearing an object means that you're skewing it horizontally, slanting it to the left or right. A sheared object may appear to have perspective or depth because of this modification. You use the Shear tool to create a shearing effect, as shown in Figure 6-3.

Follow these steps to shear an object:
Select an object on the page.
The bounding box appears around the object that is selected.

The cursor changes so it looks similar to a cross hair. Click once on the corner of the object that you want to shear from, and a cross hair appears as you see in Figure 6-3.
Click anywhere above or below the object and drag.
The selected object shears depending on the direction that you drag. Press the Shift key while you drag to shear an object in 45-degree increments.
Tip
To shear objects with the Free Transform tool, begin dragging a handle and then hold down Ctrl+Alt (Windows) or
You can also enter an exact value into the Transform panel to shear an object. Select the object and then enter a positive or negative value into the panel representing the amount of slant you want to apply to the object.
Tip
You can apply shear by choosing Object
You can reflect objects to create mirror images by using the Transform panel menu. The menu provides several additional options for manipulating objects.
Follow these steps to reflect an object:
Select an object on the page and then press F9 to open the Transform panel.
The object's bounding box and handles appear. The Transform panel shows the current values of the selected object.
Click the panel menu in the Transform panel.
The menu opens, revealing many options available for manipulating the object.
Select Flip Horizontal from the Transform panel menu.
The object on the page flips on its horizontal axis. You can repeat this step with other reflection options in the menu, such as Flip Vertical.
Tip
You can also reflect objects with the Free Transform tool by dragging a corner handle past the opposite end of the object. The object reflects on its axis.
Clipping paths allow you to create a path that crops a part of an image based upon the path, such as removing the background area of an image. This shape can be one that you create using InDesign, or you can import an image that already has a clipping path. InDesign can also use an existing alpha or mask layer, such as one created using Photoshop or Fireworks, and treat it like a clipping path. Clipping paths are useful when you want to block out areas of an image and have text wrap around the leftover image.
You can create a clipping path right in InDesign by using a drawing tool, such as the Pen tool. You use the tool to create a shape and then paste an image into this shape on the page. Here's how:
Choose File
Place and browse to locate an image.
The path should be created so that it can contain the image.
With the Selection tool, click to select the image and then choose File
Cut.Select the shape you created in Step 1 and choose Edit
Paste Into.The image is pasted into the selected shape that you drew with the Pen tool.
In other chapters of this minibook, we show you how to arrange objects on the page. However, you can arrange text or objects in a few other ways. This section covers the additional ways you can arrange objects, which gives you more control over the placement of elements in your document.
New in CS4, you have the ability to align visually without the need of any extra tools or panels. If you keep smart guides activated (they're on by default), when you use the Selection tool to select and move objects around your page, guides appear automatically. These guides appear when the selected object is aligned with other objects on the page or with the page itself. If these pesky guides start to bother you, choose Edit
You can also align objects on a page with the Align panel (choose Window
Tip
If you're not sure what each button does after reading the associated ToolTip, look at the icon on the button. It's sometimes helpful in depicting what the Align button does to the selected objects.
Here's how you align elements on the page:
Select several objects on the page with the Selection tool.
Hold the Shift key while clicking each object to select several objects.
Each of the objects is selected when you click them on the page. If you don't have a few objects on a page, quickly create a couple new objects by using the drawing tools.
Choose Window
Object & LayoutAlign.The Align panel opens.
Select the kind of alignment you want to apply to the selected objects.
Try clicking the Align Vertical Centers button. Each of your selected objects aligns to the vertical center point on the page.
In the preceding step list, we show you how to align a few objects on a page, which is easy enough. However, what if the objects that you're aligning aren't distributed evenly? Maybe their centers are lined up, but there's a large gap between two of the images and a narrow gap between the other ones. In that case, you need to distribute objects as well as align them. Distribute objects on the page to space them relative to the page or each other in different ways. Here's how:
Select objects on a page that are neither aligned nor evenly distributed by using the Selection tool while holding the Shift key.
The objects are selected when you click each one. All the objects you select will be aligned to each other on the page.
If the Align panel isn't open, choose Window
Object & LayoutAlign.The Align panel opens.
Click the Distribute Horizontal Centers button and then click the Align Vertical Centers button directly above it on the Align panel.
The selected objects are distributed evenly and aligned horizontally on the page.
Don't forget about the cool new Multiple Place feature in InDesign CS4 that allows you to distribute and align on the fly! Try this handy new feature:
Choose File
Place.Press Ctrl (Windows) or
(Mac), select multiple images, and then click the Open button.
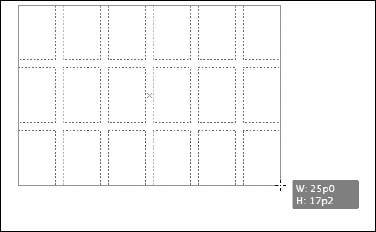
Before clicking to place the images, hold down Ctrl+Shift (Windows) or
+Shift (Mac).The cursor appears as a grid, as shown in Figure 6-4.
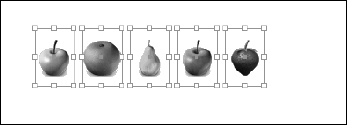
Click and drag to create the rectangle that you want your images aligned and distributed within.
The images are aligned and distributed automatically, as shown in Figure 6-5.