You can export publications into several different kinds of file formats from InDesign, just as you can import various kinds of file formats. In this chapter, we take a closer look at the different kinds of files you can create electronically from an InDesign document.
What kind of file format you decide to export to depends on what you'll use the file for. The first thing you want to do is figure out what you need your content to do. Does the content need to be on a Web page, or do you need to send the file by e-mail? Do you need to import the content into a different program, such as Macromedia Flash or Adobe Illustrator? Do you need to take a particular kind of file somewhere else to print it?
Exporting your files to a particular format is how you can take your content from InDesign and make it "portable" for integration or display purposes. You can choose from a range of formats, and you can control many settings to customize how the file is exported.
You can export a file in several different file formats from InDesign. You can export to image files in the following formats:
JPEG (Joint Photographic Experts Group): A commonly used method of compression for photographic images.
EPS (Encapsulated PostScript): A self-contained PostScript document, which describes an image or drawing that can be placed within another PostScript document.
XML (Extensible Markup Language): A general-purpose specification for creating custom markup languages, used in InDesign to export InCopy files.
SVG (Scalable Vector Graphics): An XML specification and file format for describing two-dimensional vector graphics, both static and animated.
PDF (Portable Document Format): Used for document exchange, see more in next section.
Rich or Plain text (text files): Rich formatting can include formatting, whereas plain includes text only.
Different file formats are used for different purposes. Here are some of the things you can do with files exported from InDesign:
Image files: Image files, such as JPEG and EPS, can be exported from InDesign and then imported into other software programs. You can export these images for use in print after being imported into a different graphics program or you can use the images on the Web. It all depends on how you set up the document for export and the settings you use.
PDFs: PDF (Portable Document Format) is a common format used extensively for distributing files, such as e-books, brochures, and so on. You may need to distribute the file to a wide audience or to a service provider for printing. Anyone who's installed the Adobe Reader (also known as Acrobat Reader) on his or her computer can view your document. PDF is also used for importing as an image or text into other programs, such as Flash.
InCopy stories: InCopy is tightly integrated with InDesign and is used to create and edit text documents. Therefore, if you have InCopy, you can export to it when you want to extensively edit the text in your file. InCopy is used for word processing and is designed to integrate with InDesign for associated page layout. You can read more about this application at
www.adobe.com/products/incopy.SVG files: You can export as SVG (Scalable Vector Graphics), which is a file format that combines XML and CSS to display your files. SVG is a vector-based format that's also used for displaying content online through use of an oversized plug-in called SVG Viewer. You can download it for Mac or Windows platforms from
www.adobe.com/svg/viewer/install/main.html.Text files: Text files are a simple way to export your content. If you need the text from your document only to incorporate or send elsewhere, you can export as plain (Text Only), tagged, or rich text. If you need to send your document to someone who doesn't have InDesign, exporting as text may be a good option.
After determining which file format you want to export your file as, take a look at how to export these files and the different kinds of settings you can control when doing so. The rest of this chapter shows you how to export different file types from InDesign.
You can export publications from the Export dialog box. Access the Export dialog box by choosing File
InDesign allows you to export a PDF file of your document or book. If you choose to export a PDF document, you have many options available to customize the document you're exporting. You can control the amount of compression for the document, the marks and bleeds you have in InDesign, and security settings. Here's how you export to PDF:
Choose File
Export.
The Export dialog box opens.
Choose a location in which to save the files and enter a new filename.
Browse to a location on your hard drive with the Save In drop-down list if you're using Windows and name the file in the File Name text field. Name the file in the Save As text field on the Mac and choose a location with the Where drop-down list.
Select Adobe PDF from the Save as Type (Windows) or Format (Mac) drop-down list.
Click Save.
The Export PDF dialog box appears with the General options screen open.
Choose a preset from the Preset drop-down list.
These presets are very good and easy to use. If you're familiar with Adobe Acrobat and the Adobe Distiller functions, they're the same. (For more detailed information about what each setting does, see Book V.)
Tip
These presets automatically change the export settings for your document. For example, you can select Smallest File Size from the Preset drop-down list if you're displaying your work online or select High Quality Print if you plan for the PDF to be printed on home printers. Select Press Quality if you intend to have the PDF professionally printed.
Leave the Standard drop-down list at None.
Unless, of course, you know about PDF/X and know which form of it to select. The details of PDF/X are explained in Book V.
Select a range of pages to export by typing the start (then a hyphen) and end page in the Range text box.
You can also print non-consecutive pages by separating the page numbers with a comma.
You can choose to export all pages or a range of pages.
Choose a compatibility setting for the PDF from the Compatibility drop-down list.
Compatibility settings determine what kind of reader is required to view the document. Setting compatibility to Acrobat 5 (PDF 1.4) ensures a wide audience can view your PDF. Some older PDF readers may not be able to interpret certain features in your document if you choose compatibility for a higher version.
Choose whether to embed thumbnails, whether to optimize the document, and what kinds of elements to include in the file by checking the check box to the left of the options in the Include section.
Other settings allow you to include bookmarks, links, and other elements in the file. Unless you've added any of these elements, you don't need to worry about selecting these options. You may want to embed thumbnail previews, but an Acrobat user can create thumbnails when the file is open as well.
Note
Click Security in the list on the left of the Export PDF dialog box to open the Security screen, where you can specify passwords to open the document. You can also choose a password that's required to print or modify the PDF file.
Click the Export button to export the file.
The file is saved to the location you specified in Step 2.
From InDesign, you can export EPS files, which are useful for importing into other programs. EPS files are single-page graphics files, which means each exported InDesign page is saved as a separate EPS file. Here's how to export EPS files:
Choose File
Export.The Export dialog box opens.
Select a location on your hard drive to save the EPS files, enter a new filename, and select EPS from the Save as Type (Windows) or Format (Mac) drop-down list; click Save.
The Export EPS dialog box opens.
Choose a page or range of pages to export.
Select the All Pages option to export all pages or select the Ranges option and enter a range of pages. If you want spreads to export as one file, select the Spreads check box.
If you're creating more than one EPS file (for example, exporting more than one page of your InDesign document), the file is saved with the filename, an underscore, and then the page number. For example, page 7 of a
cats.inddfile would be saved ascats_7.epsin the designated location.Tip
No need to export an EPS to place an InDesign file into another InDesign file! If you're creating classified pages or any page that contains other InDesign pages, you can save yourself a few steps by simply choosing File
From the Color drop-down list, select a color mode; from the Embed Fonts drop-down list, select how you want fonts to be embedded.
From the Color drop-down list, select Leave Unchanged to retain the color mode you're using for the InDesign document. You can also change the color mode to CMYK (Cyan, Magenta, Yellow, Black), Gray (grayscale), or RGB (Red, Green, Blue). For more information on color modes, flip to Chapter 7 of this minibook.
From the Embed Fonts drop-down list, select Subset to embed only the characters that are used in the file. If you select Complete, all the fonts in the file are loaded when you print the file. Selecting None means that a reference to where the font is located is written into the file.
Choose whether you want a preview to be generated for the file by choosing from the Preview drop-down list.
A preview (a small thumbnail image) is useful if an EPS file can't be displayed. For example, if you're browsing through a library of images, you'll see a small thumbnail image of the EPS file; so whether or not you use the image or can open it on your computer, you can see what the file looks like. From the Preview drop-down list, you can select TIFF to generate a preview; select None if you don't want a preview to be created.
Click the Export button to export the files.
The files are saved to the location you designated in Step 2.
You can export JPEG files from an InDesign document. You can export a single object on the selected page, or you can export entire pages and spreads as a JPEG image. JPEG files allow you to effectively compress full color or black-and-white images.
To export a JPEG image, follow these steps:
Select an object on a page or make sure that no object is selected if you want to export a page or spread.
Choose File
Export.The Export dialog box opens.
Type a filename, locate where you want to save the file on your hard drive, and select JPEG from the Save as Type (Windows) or Format (Mac) drop-down list; click Save.
The Export JPEG dialog box opens.
If you want to export a page, select the Page option and enter the page number; if you want to export the currently selected object, make sure that the Selection option is selected.
The Selection option is available only if a selection was made in Step 1.
Choose an image quality and format to export by choosing from the Image Quality and the Format Method drop-down lists.
The Image Quality drop-down list controls the amount of compression used when you export the JPEG. The Maximum option creates an image with the highest file size and best quality, whereas the Low option creates a smaller file of lesser quality because it includes less image information.
If you choose the Baseline format from the Format Method drop-down list, the entire image has to be downloaded before it displays in a Web browser. Select Progressive to show the image in a progressively complete display as it downloads in a Web browser.
Click the Export button.
The file exports and saves to the location that you specified in Step 3.
In InDesign CS4, you can export your InDesign document as a Flash SWF (Shockwave Flash file). To do so, follow these steps:
Choose File
Export.The Export dialog box appears.
Choose a location to save the files, enter a new filename, and choose Adobe Flash (SWF) from the Save as Type (Windows) or Format (Mac) drop-down list.
Tip
If you need to include video, audio, animation, and complex interactivity, export your file as Adobe Flash CS4 XFL (a
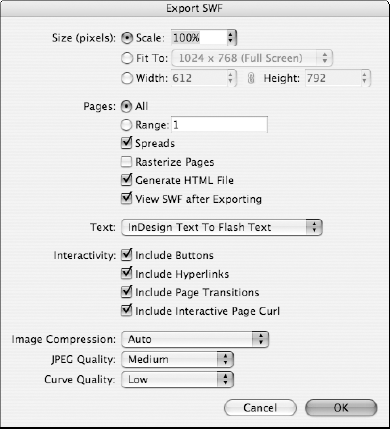
.zipfile that contains the source material for a Flash document) because this file format supports those features.The Export SWF dialog box, as shown in Figure 8-1, allows you to set the output size, specify the pages to include, and make various conversion and compression choices.
Choose the size you want for the exported file.
Select the Scale option and leave the drop-down list at 100% if you don't want to change the size of the exported file. Otherwise, select the Fit To option and choose from the drop-down list, or select the Width option and enter your own dimensions in the Width and Height drop-down lists.
Select which page(s) you want to export.
Select the All option to export the entire document; select Range and enter a page number if you want to export only a specific page or pages. Select the Spreads check box if you want to export page spreads.
Select how you want the text to export from the Text drop-down list.
What's really great about exporting as Adobe Flash CS4 (XFL) is that your InDesign objects remain vector (unless transparency is applied), and you have the option to export InDesign text as editable Flash text, vectors, or pixels.
Note
If you choose InDesign Text to Flash Text, please note that the text is laid out in Flash with each line becoming a separate text object.
Select the Interactivity options you want by choosing one or more check boxes.
You can choose to include buttons, hyperlinks, page transitions, and interactive page curls by selecting the appropriate check boxes.
Choose the image compression, JPEG quality, and curve quality you want from the Image Compression, JPEG Quality, and Curve Quality drop-down lists.
Click OK to export your InDesign document as a Flash file.
You can export plain or rich text from an InDesign document or as an InDesign tagged text format. These formats can be slightly different, depending on the text in your document.
To export text, follow these steps:
Select the Text tool from the toolbox and select some text within a text frame in your document.
You must have text selected in order to see text export options in the Export dialog box.
Choose File
Export.The Export dialog box opens.
Enter a filename, select a location to save the file in, and select Text Only from the Save as Type (Windows) or Format (Mac) drop-down list; click Save.
The Text Export Options dialog box opens.
Choose a platform and encoding for the export.
Select either Windows or Macintosh from the Platform drop-down list to set the PC or Mac operating system compatibility. Select an encoding method for the platform you choose from the Encoding drop-down list; you can choose either Default Platform or Unicode.
Unicode is a universal character-encoding standard that's compatible with major operating systems. Encoding refers to how characters are represented in a digital format, and it's essentially a set of rules that determines how the character set is represented by associating each character with a particular code sequence.
Click the Export button.
The file exports and saves to the location that you specified in Step 3.