In This Chapter
Discovering the selection tools
Painting selections the easy way
Giving transformed selections a try
Feathering away
Keeping selections for later use
Using the Vanishing Point feature
Using Photoshop to create compositions that may not actually exist and retouching images to improve them is common. What you don't want is obvious retouching or a composition that looks contrived. (The exception is if you intend an image to be humorous, such as putting baby Joey's head on Daddy's body.)
That's where the selection tools come in. In this chapter, you discover several selection methods and how to use the selection tools to make your images look as though you haven't retouched or edited them. Even if you're an experienced Photoshop user, this chapter provides a plethora of tips and tricks that can save you time and help make your images look absolutely convincing.
You create selections with the selection tools. Think of selections as windows in which you can make changes to the pixels. Areas that aren't selected are masked, which means that these unselected areas are unaffected by changes, much like when you tape around windows and doors before you paint the walls. In this section, we briefly describe the selection tools and show you how to use them. You must be familiar with these tools in order to do anything in Photoshop.
Note
As with all the Photoshop tools, the Options bar (viewed across the top of the Photoshop window) change when you choose different selection tools. The keyboard commands you read about in this section exist on the tool Options bar and appear as buttons across the top.
The Marquee tool includes the Rectangular Marquee (for creating rectangular selections), Elliptical Marquee (for creating round or elliptical selections), and Single Row Marquee or Single Column Marquee tools (for creating a selection of a single row or column of pixels). You can access these other Marquee tools by holding down on the default, Rectangle Marquee tool in the Tools panel.
To create a selection, select one of the Marquee tools (remember you can press M) and then drag anywhere on your image. When you release the mouse button, you create an active selection area. When you're working on an active selection area, whatever effects you choose are applied to the whole selection. To deselect an area, you have three choices:
Choose Select

Press Ctrl+D (Windows) or

While using a selection tool, click outside the selection area.
How you make a selection is important because it determines how realistic your edits appear on the image. You can use the following tips and tricks when creating both rectangular and elliptical selections:
Add to a selection by holding down the Shift key; drag to create a second selection that intersects the original selection (see the left image in Figure 4-1). The two selections become one big selection.
Delete from an existing selection by holding the Alt (Windows) or Option (Mac) key and then drag to create a second selection that intersects the original selection where you want to take away from the original selection (on the right in Figure 4-1).
Constrain a rectangle or ellipse to a square or circle by Shift+dragging; make sure that you release the mouse button before you release the Shift key. Holding down the Shift key makes a square or circle only when there are no other selections. (Otherwise, it adds to the selection.)
Make the selection from the center by Alt+dragging (Windows) or Option+dragging (Mac); make sure that you release the mouse button before the Alt (Windows) or Option (Mac) key.
Create a square or circle from the center out by Alt+Shift+dragging (Windows) or Option+Shift+dragging (Mac). Again, make sure that you always release the mouse button before the modifier keys.
When making a selection, hold down the spacebar before releasing the mouse button to drag the selection to another location.
If you've created an effect that you particularly like — say, changing a block of color in your image — and you want to apply it multiple times throughout an image, you can do so. To make the exact same selection multiple times, follow these steps:
With the Marquee tool selected, select Fixed Size from the Style drop-down list on the Options bar.
You can also select Fixed Ratio from the Style drop-down list to create a proportionally correct selection, but not fixed to an exact size.
On the Options bar, type the Width and Height values into the appropriate text fields.
You can change ruler increments by choosing Edit
Click the image.
A selection sized to your values appears.
With the selection tool, drag the selection to the location that you want selected.
Tip
Shift+drag a selection to keep it aligned to a straight, 45-degree, or 90-degree angle.
As a default, when you're using a selection tool, such as the Marquee tool, your selections are floating, which means that you can drag them to another location without affecting the underlying pixels. You know that your selection is floating by the little rectangle that appears on your cursor (see the left image in Figure 4-2).

If you want to, however, you can move the underlying pixels. With the selection tool of your choice, just hold down the Ctrl (Windows) or
Tip
Hold down Alt+Ctrl (Windows) or Option+
Tip
Just like with the Marquee tool, you can press the Shift key to add to a lasso selection and press the Alt (Windows) or Option (Mac) to delete from a lasso selection.
Hold down on the Lasso tool to show the hidden Lasso tools, the Polygonal Lasso and the Magnetic Lasso tool. Use the Polygonal Lasso tool by clicking a start point and then clicking and releasing from point to point until you come back to close the selection. Use the Magnetic Lasso tool by clicking to create a starting point and then hovering the cursor near an edge in your image. The Magnetic Lasso tool is magnetically attracted to edges; as you move your cursor near an edge, the Magnetic Lasso tool creates a selection along that edge. Click to manually set points in the selection; when you get back to the starting point, click to close the selection.
You may find that the Polygonal Lasso and the Magnetic Lasso tools don't make as nice of a selection as you want. Take a look at the upcoming section, "Painting with the Quick Mask tool", for tips on making finer selections.
Follow these steps to find out how you can take advantage of this new tool:
Open a file that requires a selection.
You can find sample images in Windows at
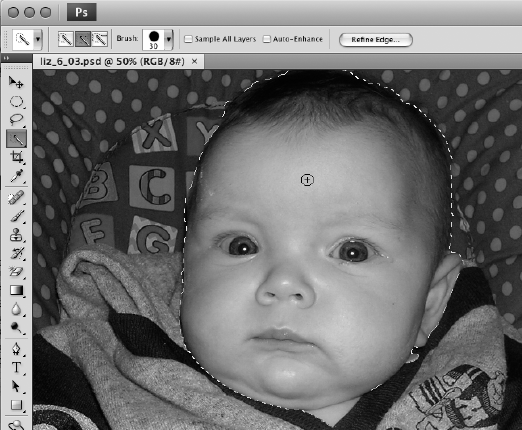
C:Program FilesAdobeAdobe Photoshop CS4ExtrasSamplesand on the Mac atApplicationsAdobeAdobe Photoshop CS3ExtrasSamples.Select the Quick Selection tool.
Position the cursor over the area that you wish to select. Notice the brush size displayed with the cursor; click and drag to start painting the selection.
Tip
You can adjust the size of the painting selection by pressing [ to make the brush size smaller or ] to make the brush size larger.
With the Add to Selection or Subtract from Selection buttons in the Options bar, you can paint more of the selection or deselect active areas (see Figure 4-3).
When you have the Magic Wand tool selected, a Tolerance text field appears on the Options bar. As a default, the tolerance is set to 32. When you click with a setting of 32, the Magic Wand tool selects all pixels within 32 shades (steps) of the color that you clicked. If it didn't select as much as you want, increase the value in the Tolerance text field (all the way up to 255). The amount that you enter really varies with each individual selection. If you're selecting white napkins on an off-white tablecloth, you can set as low as 5 so that the selection doesn't leak into other areas. For colored fabric with lots of tonal values, you might increase the tolerance to 150.
Tip
Don't fret if you miss the entire selection when using the Magic Wand tool. Hold down the Shift key and click in the missed areas. If the tool selects too much, choose Edit
If you have fuzzy selections (fur, hair, or leaves, for example) or you're having difficulty using the selection tools, the Quick Mask tool can be a huge help because it allows you to paint your selection uniformly in one fell swoop.
To enter into Quick Mask mode, create a selection and then press Q. (Pressing Q again exits you from Quick Mask mode.) You can also click the Quick Mask button at the bottom of the Tools panel. If you have a printing background, you'll notice that the Quick Mask mode, set at its default color (red), resembles something that you may want to forget: rubylith and amberlith. (Remember slicing up those lovely films with Exacto blades before computer masking came along?) In Quick Mask mode, Photoshop shows your image as it appears through the mask. The clear part is selected; what's covered in the mask isn't selected.
To create and implement a quick mask, follow these steps:
Press Q to enter Quick Mask mode.
Press D to change the foreground and background color boxes the default colors of black and white.
Select the Brush tool and start painting with black in the clear area of the image in Quick Mask mode.
It doesn't have to be pretty; just get a stroke or two in there.
Press Q to return to the Selection mode.
You're now out of Quick Mask mode. Notice that where you painted with black (it turned red in the Quick Mask mode), the pixels are no longer selected.
Press Q again to re-enter the Quick Mask mode and then press X.
This step switches the foreground and background colors (giving you white in the foreground, black in the background).

The white strokes turn clear in the Quick Mask mode.
Press Q to return to the Selection mode.
Where you painted white in the Quick Mask mode is now selected.
When in Quick Mask mode, you can paint white over areas you want selected and black over areas that you don't want selected. When painting in the Quick Mask mode, increase the brush size by pressing the ] key. Decrease the brush size by pressing the [ key.
In the Selection mode, your selection seems to have a hard edge; you can soften those hard edges by using a softer brush in the Quick Mask mode. To make a brush softer, press Shift+[; to make a brush harder, press Shift+].
Because the Quick Mask mode makes selections based on the mask's values, you can create a mask by selecting the Gradient tool and dragging it across the image in Quick Mask mode. When you exit Quick Mask mode, it looks as though there's a straight-line selection, but actually the selection transitions as your gradient did. Choose any filter from the Filters menu and notice how the filter transitions into the untouched part of the image to which you applied the gradient.
If you're working in Quick Mask mode, choose Window
After you master creating selections, you'll find that working with the selections — painting, transforming, and feathering them — can be easy and fun.
Don't deselect and start over again if you can just nudge or resize your selection a bit. You can scale, rotate, and even distort an existing selection. Follow these steps to transform a selection:
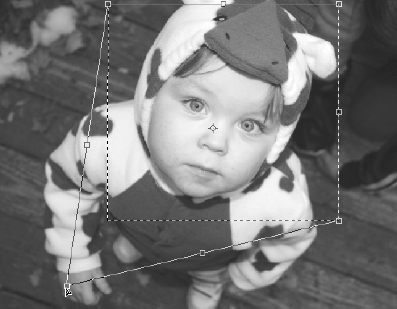
Create a selection and then choose Select
Transform Selection.You can use the bounding box to resize and rotate your selection.
Drag the handles to make the selection larger or smaller. Drag a corner handle to adjust width and height simultaneously. Shift+drag a corner handle to size proportionally.
Position the cursor outside the bounding box to see the Rotate icon; drag when it appears to rotate the selection. Shift+drag to constrain to straight, 45-degree, or 90-degree angles.
Ctrl+drag (Windows) or
Press Enter or Return or double-click in the center of the selection area to confirm the transformation; press Esc to release the transformation and return to the original selection.
Knowing how to retouch an image means little if you don't know how to make the retouching discreet. If you boost up the color using curves to the CEO's face, do you want it to appear like a pancake has been attached to his cheek? Of course not — that isn't discreet at all (or very wise). That's where feathering comes in. Feathering a selection blurs its edges, so as to create a natural-looking transition between the selection and the background of the image.
To feather an image, follow these steps:
Create a selection.
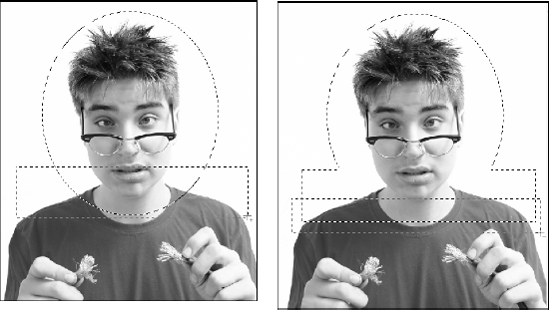
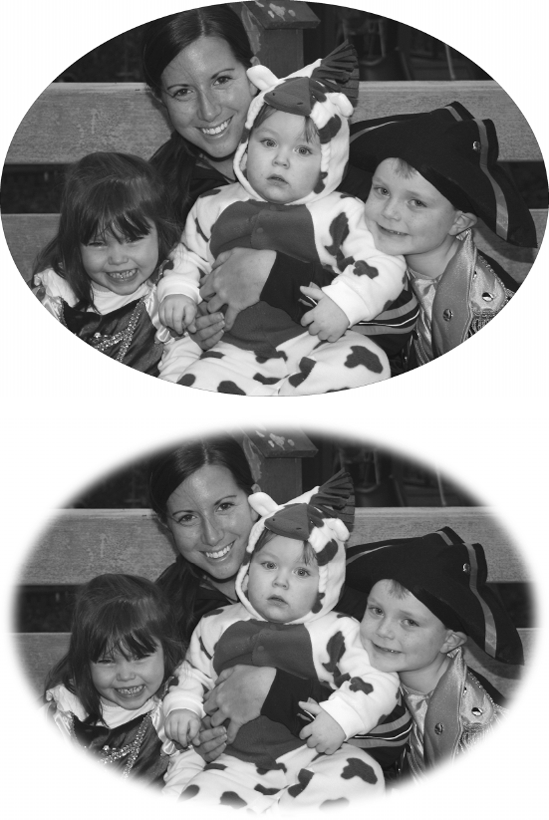
For the nonfeathered image shown on top in Figure 4-5, we used the Elliptical Marquee tool to make a selection. We then copied the selection, created a new, blank image, and pasted the selection into the new image.
To create the feathered image on the bottom in Figure 4-5, we used the Elliptical Marquee tool to select the same area on the original image and went on to Step 2.
Choose Select
ModifyFeather.In the Feather dialog box that appears, type a value in the Feather Radius text field and then click OK.
For example, we entered 20 in the Feather Radius text field. (We then copied the selection, created a new image, and pasted the feathered selection into the new image to create the image on the bottom of Figure 4-5.) Voilà! The edges of the image are softened over a 20-pixel area, as shown on the bottom of Figure 4-5. This technique is also referred to as a vignette in the printing industry.
Note
The results of the feathering depend upon the resolution of the image. A feather of 20 pixels in a 72-ppi (pixels per inch) image will be a much larger area than a feather of 20 pixels in a 300-ppi image. Typical amounts for a nice vignette on an edge of an image would be 20 to 50 pixels. Experiment with your images to find what works best for you.
This feathering effect created a nice soft edge to your image, but it's also useful when retouching images:
Using any selection method, create a selection around a part of an image that you want to lighten.
Choose Select
ModifyFeather; in the Feather dialog box that appears, enter 25 in the Feather Radius text field and click OK.If you get an error message stating, "No pixels are more than 50% selected," click OK and create a larger selection.
Choose Image
AdjustmentsCurves.Click in the center of the curve to add an anchor point and drag up to lighten the image.
This step lightens the midtones of the image.
Notice how the lightening fades out so that there's no definite edge to the correction. You can have more fun like this in Chapter 7 of this minibook, where we cover color correction.
Like to experiment, but also want a preview of exactly what your changes to the selection are actually doing? Then you'll love the Refine Edge feature. The Refine Edge feature was introduced in Photoshop CS3 and is available in the Options bar across the top of the Photoshop window whenever you have any selection tool active.
To use the Refine Edge feature, follow these steps:
Make a selection.
With any selection tool active, click the Refine Edge button in the Options bar at the top of the Photoshop window.
The Refine Edge dialog box appears, as shown in Figure 4-6.
Choose a preview method by clicking the icons across the bottom of the Refine Edge dialog box.
On White is the default setting, and it shows your selection as it would appear on a white background.
Don't worry! The rest of your image hasn't been removed; this preview helps you to better see the effects of this feature.
Here are the selections that you can choose from in the Refine Edge dialog box:
Radius: Radius determines the size of the region around the selection boundary in which edge refinement occurs.
Contrast: Contrast sharpens selection edges and removes fuzzy artifacts.
Smooth: Smooth reduces irregular areas in the selection boundary.
Feather: Feather creates a soft-edged transition between the selection and its surrounding pixels.
Contract/Expand: Use Contract/Expand to shrink or enlarge the selection boundary.
When you're happy with the results, click OK.

The term alpha channel sounds pretty complicated, but it's simply a saved selection. Depending upon the mode you're in, you already have several channels to contend with. A selection is just an extra channel that you can call on at any time.
To create an alpha channel, follow these steps:
Create a selection that you want to save.
Choose Select
Save Selection.Name the Selection and click OK.
An additional named channel that contains your selection appears in the Channels panel.
To load a saved selection, follow these steps:
Choose Select
Load Selection.The Load Selection dialog box appears.
Select your named channel from the Channel drop-down list.
If you have an active selection and then choose to load a selection, you have additional options. You can do the following with an active selection when loading a channel by selecting one of the following options:
New Selection: Eliminate the existing selection and create a new selection based upon the channel you select.
Add to Selection: Add the channel to the existing selection.
Subtract from Selection: Subtract the channel from the existing selection.
Intersect with Selection: Intersect the channel with the existing selection.
Click OK.
Note
Other Adobe applications, such as InDesign, Illustrator, Premiere, and After Effects, can also recognize alpha channels.
This incredible new feature lets you preserve correct perspective in edits of images that contain perspective planes, such as the sides of a building. You can do so much with this feature, and we provide you with a simple introduction. Try experimenting with multiple planes and copying and pasting items into the Vanishing Point window for even more effects. Follow these steps:
Open a file that you want to apply a perspective filter to.
If you don't have an appropriate image handy, try using a
Vanishing Point.psdfile. You can find the file in Windows atC:Program FilesAdobeAdobe Photoshop CS3ExtrasSamplesand on the Mac atApplicationsAdobeAdobe Photoshop CS3ExtraSamples.Create a new blank layer by clicking the Create a New Layer button at the bottom of the Layers panel.
If you create a new layer each time you use Vanishing Point, the results appear on a separate layer. Putting the Vanishing Point results in a separate layer and also preserves your original image, as you can delete the result of the vanishing point filter and still retain your original layer.
Choose Filter
Vanishing Point.A separate Vanishing Point window appears. If you receive an error message about an existing plane, click OK.
If you're using a sample file from Photoshop, it will have a perspective plane already created for you. To help you understand this feature better, delete the existing plane by pressing the Delete or Backspace key.
Select the Create Plane tool and define the four corner nodes of the plane surface.
Tip
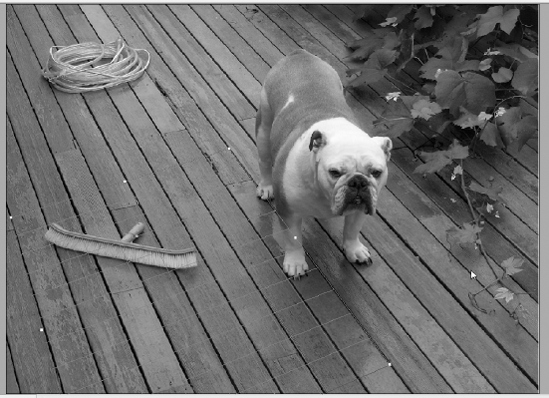
Try to use objects in the image to help create the plane. In Figure 4-7, the planks of wood were used to make the perspective plane.
After the four corner nodes of the plane are created, the tool automatically is switched to the Edit Plane tool.
Select and drag the corner nodes to make an accurate plane.
The plane grid should appear blue, not yellow or red, if it's accurate.
After creating the plane, you can move, scale, or reshape the plane. Keep in mind that your results depend on how accurately the plane lines up with perspective of the image.
Tip
You can use your first Vanishing Point session to simply create perspective planes and then click OK. The planes appear in subsequent Vanishing Point sessions when you choose Filter
Choose the Stamp tool in the Vanishing Point window and then choose On from the Heal drop-down list in the Options bar.
You'll love where this is going. In the example image,
Vanishing Point.psd, we simply clone the blue broom, but it should get your brain working about all the ways that you can apply this greatly improved feature.With the Stamp tool still selected, cross over part of the area or part of the image you want to clone and Alt-click (Windows) or Option-click (Mac) to define it as the source that's to be cloned.
In the image
Vanishing Point.psd, we clicked the middle part of the blue broom.Without clicking, move toward the back of the perspective plane (you can even clone outside the plane) and then click and drag to reproduce the cloned part of the image.
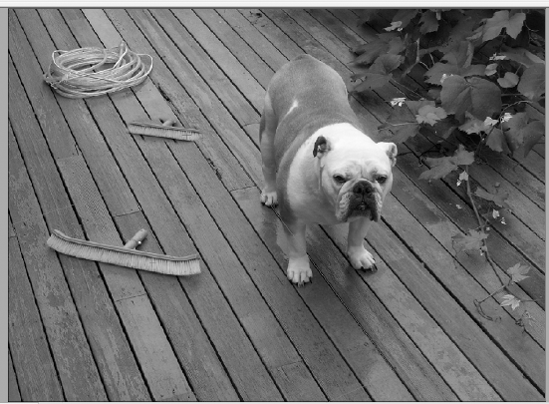
Notice in Figure 4-8, it's cloned as a smaller version, in the correct perspective for its new location.
Start from Step 7 and clone any region of an image up closer to the front of the perspective pane.
The cloned region is now cloned as a larger version of itself.
You can use the Marquee tool options (Feather, Opacity, Heal, and Move Mode) at any time, either before or after making the selection. When you move the Marquee tool, the Stamp tool, or the Brush tool into a plane, the bounding box is highlighted, indicating that the plane is active.
Click OK.
To preserve the perspective plane information in an image, save your document in PSD, TIFF, or JPEG format.