Creating shapes and lines
Editing and selecting shapes
Tweaking and splicing shapes and lines
Transforming shapes and artwork
Creating and modifying text
Working with colors and gradients
Using the Paintbrush tool
Many great creations start with the most basic of shapes and build from there. In this chapter, you discover the secrets of drawing shapes and lines and working with colors in Flash.
To get your creation started, become familiar with the Shape and Line tools on the Tools panel and use them as the starting point for everything from basic buttons to complex illustrations.
When you're ready to create more complex artwork beyond what the Shape and Line tools offer, the Pen and Pencil tools are standing by. These tools work very differently, and for that reason, should be chosen based on the kind of artwork you want to create.
The following sections show you how to get started creating basic shapes and lines.
Before you draw the shape, set some colors for your shape with the two swatches located at the bottom of the Tools panel. The Fill color swatch (indicated by the paint bucket icon) lets you set what color your shape will be filled with. The Stroke Color swatch (indicated by the ink bottle icon) controls the outline color.
Flash lets you choose colors from the Swatches panel. You can add your own colors to this panel, but for now, choose one of the available colors for your shape's fill and stroke.
Tip
Click and drag on the stage to create a shape. Notice that by default, shapes are drawn from the left corner outward. You can draw shapes from the center (which is sometimes easier) by holding down the Option (Mac) or Alt (Windows) key while drawing the shape.
To constrain a shape proportionally, hold down the Shift key while drawing or resizing.
If you overlap two or more shapes in Flash, they automatically merge, or become one complete shape. You can take advantage of this behavior by using an overlapping shape to knock out another, or you can make more complex shapes by combining simpler ones.
You may also find that overlapping strokes results in divided fill areas, which can be a desirable effect. Experiment by drawing and overlapping shapes and using the Selection tool to select parts of the resulting object.
To modify your line's color or appearance, select it with the Selection tool and use the Property inspector to change the stroke color and size. You also find a Style drop-down list, which lets you choose among straight, dotted, dashed, and artistic stroke styles.
Tip
To create perfectly vertical or horizontal lines, hold down the Shift key while using the Line tool. You can also create diagonal lines in 45-degree increments with this same method.
Using the Pen tool may be a bit different than you're used to, unless of course, you've used the Pen tool in applications like Illustrator or Photoshop. The Pen tool isn't a freehand drawing tool; rather, it allows you to create paths, or outlines, composed by connecting anchor points. When you click and create new points, lines are automatically drawn connecting those points together. You can then either bend those lines into precise curves or leave them straight.
The best way to understand the Pen tool is to practice working with it. Visualize a shape you want to draw (for example, a leaf), and try to create it with the Pen tool.
To get started, follow these steps:
Select the Pen tool from the Tools panel.
Use the Color swatch on the bottom of the Tools panel to set a stroke color.
Click to set the first point on the stage and then construct a line by clicking again to set a second point where you want the line to end.
Click to set a new point and before releasing the mouse button, drag to the left or right to bend the new line into a curve.
The more you drag in a particular direction, the more extreme the curve will be.
Continue creating new points and experimenting with different curves.
Move your mouse pointer over the first point you created (a loop appears above the icon) and click to close the path and complete the shape.
Tip
The Pen tool attempts to continue a curve in the same direction even after a new point is set. To reset the last point drawn back to a straight line, hold down the Option (Mac) or Alt (Windows) key and click the last point created before setting a new one.
The precise nature of the Pen tool is great for certain situations, but if you prefer the intuitive feel of freehand drawing or want to create more natural or rough artwork, consider using the Pencil tool.
An attractive feature of the Pencil tool is that it has three different modes to choose from. Each mode provides a different level of smoothing, so even if your hand isn't the steadiest, the Pencil tool compensates by automatically smoothing out lines or curves while you create them.
To select and move the stroke or fill only, follow these steps:
Select the Selection tool from the Tools panel.
Click once on either your shape's stroke or fill to activate it.
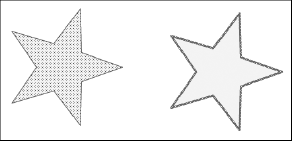
To select the entire shape, double-click the fill of your shape or use the Selection tool to drag around it on the stage (see Figure 2-1).
Click and drag the selected stroke or fill or use the arrow keys to separate it from the rest of the shape.
You can choose your fill and stroke colors ahead of time before you start drawing, but if you change your mind, modifying colors is easy to do.
You can modify either the fill or stroke colors of a pre-existing shape in the three ways:
Select the entire shape and change its fill and/or stroke colors from the swatches on the Property inspector (see Figure 2-2).
Select the entire shape and change your fill and/or stroke colors with the Fill and Stroke swatches on the Tools panel.
Set your colors on the Tools panel and use the Ink Bottle tool by clicking the stroke or use the Paint Bucket tool by clicking the fill.

To apply a fill color to your shape, select it on the stage and choose a color from the Fill swatch at the bottom of the Tools panel. Grab the Paint Bucket tool and click inside of your shape. To apply a stroke color, select a color from the Stroke swatch at the bottom of the Tools panel, and select the Ink Bottle tool. Click once on the edge of your shape to set a stroke with the selected color.
Tip
You can also set Fill or Stroke colors from the Fill and Stroke section of the Property inspector when the Ink Bottle or Paint Bucket tools are selected.
The ability to freely tear apart shapes can be very flexible and useful, but some prefer to work with shapes as single objects (similar to how Illustrator CS4 does). For this reason, Object Drawing mode was created; this optional mode automatically combines the stroke and fill of a shape into a single object, which you can move and resize as a whole. Shapes drawn in Object Drawing mode have a bounding box around them; the stroke and fill are moved together as one object.
To convert a shape drawn with Object Drawing mode to its raw form, select the shape and choose Modify
Warning
Unlike shapes drawn in standard mode, Drawing Objects can't be merged together; break any Drawing Objects apart first, or choose Modify
You can easily dissect mergeable shapes (not Drawing Objects) by selecting only certain portions with the Selection or Lasso tools, as shown in Figure 2-4. Try drawing a marquee around only half the shape with the Selection or Subselection arrow; notice that only half the shape or line becomes selected, and you can then separate it.
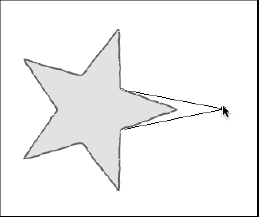
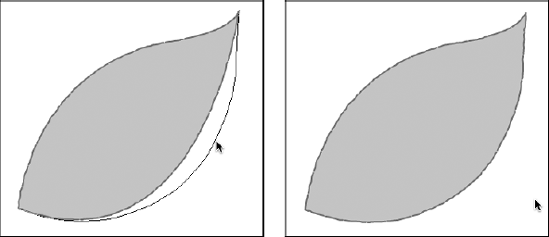
If you need to tweak the shape beyond its original form, you can use Selection or Subselection tools to tweak, distort, and reshape. To tweak or reshape with the Selection tool, move it outside and close to an edge or corner of your shape; notice a small curved or angled line icon appears next to your pointer. Click and drag to bend, reshape, and distort the outline of your shape, as shown in Figure 2-5.
Tip
You can use the Selection tool to bend straight edges into curves. Try it on a line or straight edge from a rectangle, and you'll see that you can easily pull the line into a curve!
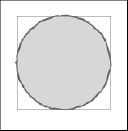
To tweak or reshape with the Subselection tool, click the outside edge or stroke of a shape to activate its path. Each point is represented by a hollow box. Click any point to activate it; click and drag it or move it using the arrow keys to reshape (see Figure 2-6).
When you need to create a selection with more precision than the Selection tool allows (for example, around an odd shape or a tricky area), use the Lasso tool. The Lasso tool draws freehand selections around specific areas of your artwork. To draw a selection with the Lasso tool, select it from the Tools panel and click and drag to draw a selection around the target area, as shown in Figure 2-7. Make sure to close the selection by overlapping the starting and ending points.

You can perform partial selections only with raw (broken apart) shapes and lines. Artwork drawn in Object Drawing mode needs to be broken apart first (choose Modify
Interestingly enough, although the Pen and Pencil tools behave in completely different ways, both ultimately create the same thing: paths. These paths can be filled (if closed) or modified on a point-by-point basis, or you can apply a stroke to them.
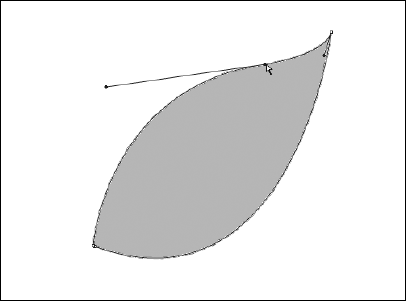
To fine-tune a path, choose the Subselection tool (white arrow) from the Tools panel. Click the path; it becomes highlighted, and the points show up as hollow boxes. You can now select any individual point and selectively drag it or move it with the arrow keys to reshape the path.
To adjust a curve with the Subselection tool, highlight the point adjacent to the curve you want to modify. A handle appears; you can grab and move this handle to adjust the curve.
To add or subtract points, click and hold down on the Pen tool to select the Add Anchor Point or Subtract Anchor Point tools. Click exactly on the path where you want to add an anchor point or click directly on a point to remove it.
After you have some drawing done, you may want to adjust the width, height, or rotation of your artwork. Depending on the level of precision you're looking for, you can do this in two ways: manually with the Transform tool or by dialing in exact values on the Transform panel.
To rotate your artwork, hover over any corner handle until you see the rotation icon (a circular arrow) and then click and drag to rotate your artwork freely.
To resize your art proportionally, hold down the Shift key while dragging a handle. If you hold down the Shift key while in rotation mode, it limits your movements to precise 45-degree increments.
For those times when you need to dial in exact transformation values, you can use the Transform panel, which you can open by choosing Window

Follow these steps to transform artwork with the Transform panel:
Select the object you want to transform on the stage and open the Transform panel by choosing Window
Transform.
To increase the size of the artwork, enter width and height percentage values above 100 percent; to decrease the size, enter values below 100 percent. To keep the sizes proportional, select the Constrain Values check box.
To rotate your artwork, select the Rotate radio button, click the number to activate the text box, type a value above 0 degrees, and press Enter.
Rotation is performed clockwise; to rotate counter-clockwise, enter a negative number.
Skewing transforms your artwork on a 3D plane and can add interesting perspective to your shape. You can perform skewing with the Transform panel by selecting the Skew option button and entering values for horizontal and vertical skew amounts.
Give it a try: Select your shape, type in some Skew values, and press Enter to see the transformation applied. If you're not happy, don't fret; simply click the Remove Transform button in the lower-right corner of the Transform panel to set everything back to normal.
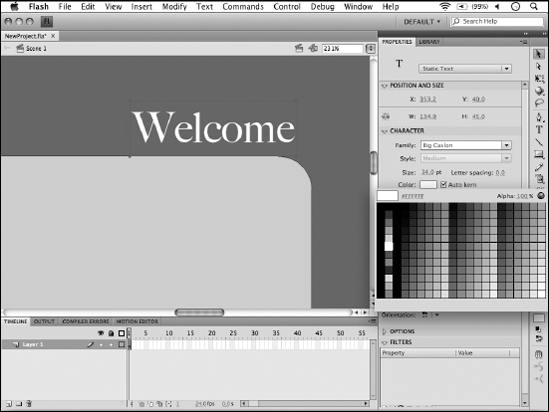
To create a line of type, select the Text tool from the Tools panel, click a location on the stage, and begin typing. With the Property inspector, fine-tune your text's size, typeface, alignment, and color, as shown in Figure 2-10. Additional options in the Property inspector, such as paragraph formatting and alignment, can help with larger blocks of text.
To edit type, choose the Text tool and click the text you want to edit. When the blinking cursor appears, you can select, add, or modify the text. While the text is selected, you can also change colors, typeface, and size with the Property inspector.
You can transform type just like shapes and artwork by using either the Transform tool or the Transform panel. Regardless of any transformations you put your type through, it remains editable.
To transform a line of type, make sure that it's active by first selecting it with the Selection or Text tools. To transform, choose the Transform tool or open the Transform panel.
You can distort and modify type outlines just like any other shape or path. However, type is created on a special type path so that it can be edited at any point. You'll need to break your type characters off a path first in order to tweak any of their outlines.
To modify or distort type outlines, follow these steps:
Select the type you want to modify and choose Modify
Break Apart.If your type is longer than a single character, repeat Step 1.
Use the Selection or Subselection tool to modify the outlines (as demonstrated with shapes earlier in the chapter).
(Optional) Use the Ink Bottle tool to apply a stroke to your type.
You've undoubtedly seen and made use of the built-in color swatches in Flash, but suppose that you want to use colors that are not included in the Swatches panel. Here's where the Color panel comes into play. From this panel, you can mix and create your own color swatches, make gradients, and even apply transparency effects to existing colors on the stage.
You've already seen the Swatches panel in action — you used it to select fill and stroke colors from the Tools panel and Property inspector. The Swatches panel exists on its own free-floating panel as well, which you can open by choosing Window
The 256 colors on this panel represent the Web-safe color spectrum, which is optimized to make sure that any user, even those with monitors using lower color depth settings, can enjoy your creations.
You can add colors to the Swatches panel from the Color panel, which means that you have access to your own custom colors from anywhere the Swatches panel appears.
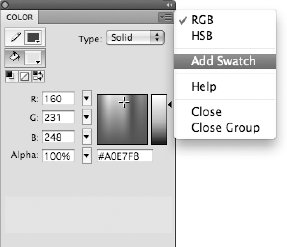
The Color panel features two ways to select a precise color: the color wheel on the right or the sliders on the left. You can combine the two methods to hone in on just the right shade. After you choose the color you want, you can easily add it as a swatch to the Swatches panel by choosing Add Swatch from the panel menu, as shown in Figure 2-11.
To apply a color choice automatically to the stroke or fill swatches, click either the Fill or Stroke color swatch on the top-left corner of the Color panel. Any changes made using the color wheel or sliders are applied automatically to the selected swatch.
To select a color on the color wheel, click and drag the cross hair inside the color wheel until you find the right hue (for example, greens). Use the slider to the right to select the exact shade of that color.
To select a color with the sliders, first select either the RGB (Red, Green, Blue) or HSB (Hue, Saturation, Brightness) sliders from the Color panel's panel menu. Move the sliders to find the exact color you want. You can fine-tune this color further with the color wheel and slider.
To save your new color as a swatch, find your desired color and choose Add Swatch from the panel menu. Your new color appears as a new swatch on the Swatches panel, and you can select it anywhere the Swatches panel appears.
Gradients are blends between two or more colors that you can use to fill any area or shape, just like a solid color. If you look at the Swatches panel, you see some gradient presets that you can use right away. You can also use the Color panel to create your own gradients and add them to the Swatches panel.
Follow these steps to create a gradient:
Open the Color panel by choosing Window
Color and choose Linear from the Type drop-down list.Linear is one of two gradient types that you can create.
Double-click one of the horizontal sliders that appears above the gradient ramp at the bottom to see the Swatches panel; pick a color to apply to that slider.
To add more colors to your gradient, click anywhere on the gradient ramp to add a slider. You can then double-click this slider to set the color.
Adjust the color blends of the gradient by moving the sliders closer together or farther apart.
To remove colors or sliders, click the slider you want to remove and drag it off the panel to the left or right.
Choose Add Swatch from the panel menu to save your new gradient.
The gradient swatch is added to your Swatches panel alongside the existing gradients.
In addition to linear gradients, which blend colors evenly in a straight line, you can create radial gradients. Radial gradients are a special type of gradient shape where colors blend from the center outward in a circular motion. To set a gradient as a radial gradient, choose Radial from the Type drop-down list on the Color panel. To set a gradient as a linear gradient, choose Linear from the Type drop-down list.
Both gradient types are created and added to the Swatches panel in the exact same manner, as described in the preceding step list.
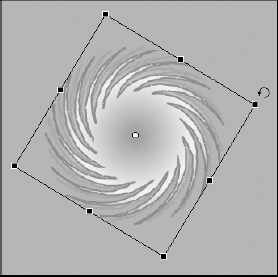
After you create a gradient, you can use it to fill a shape the same way you'd set a solid fill color. After you apply a gradient to a shape on the stage, you can use the Gradient tool to modify the gradient's direction, size, and intensity.
To modify a gradient fill, follow these steps:

A bounding box appears.
Use the bounding box's center point to move the transition point of the gradient.
Use the handle on the right side to modify the intensity of the gradient.
Change the direction of the gradient by using the rotating arrow icon at the upper-right corner of the selection area.
If you're working with a radial gradient, you'll notice the Gradient Transform tool behaves slightly differently. An extra round handle appears to let you scale the gradient, and the rotating arrow icon (which rotates the gradient area) is located on the bottom right. Experiment with both linear and radial gradients to see the differences.
The Paintbrush tool features several different brush sizes and tips, as well as five modes for controlling how (and where) the Paintbrush tool does its magic.
Follow these steps to use the Paintbrush tool:
With the Paintbrush tool selected, choose a brush size and tip shape from the very bottom of the Tools panel.
Choose a fill color from the Fill color swatch on the Tools panel, Property inspector, or Color panel.
Freely paint on the stage to see the Paintbrush tool in action.
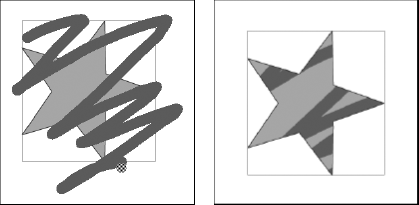
The different Paintbrush modes change where and how the tool works against different objects on the stage. A good way to see these modes in action is to draw a shape on the stage and make sure that the shape has both a stroke and fill set. Experiment by changing between the different modes and trying to paint over the shape. In Figure 2-12, the selected object was painted over with the Paintbrush tool in Paint Selection mode. This mode affects only the area of the selected shape.
Because the strokes left behind by the Paintbrush tool are simply filled shapes, you can apply a stroke to it, change its fill color, or use it to create interesting shapes that you can tweak by using the same methods demonstrated in the "Transforming Artwork and Shapes" section, earlier in this chapter.
To apply an outline to a painted area, set a color by using the Stroke color swatch on the Tools panel, select the Ink Bottle tool, and click the outer edge of the fill. You can now use the Property inspector to change the width, color, and style of the stroke as well.