Getting Started with SAS 9 or SAS Studio
Setting up SAS 9
SAS 9 Installation
If you are intending to approach this book using SAS 9, I assume you have successfully
installed it (probably SAS 9.4 or 9.3 at the time of writing) or have access to it
through some other means such as an enterprise cloud system.
Open SAS 9
To open SAS 9 find and open the “SAS 9.4 (English)” or similar icon on your desktop
or start menu, depending on your computer’s set-up. Figure 5.1 Starting SAS 9 from a start menu shows the start menu item on a representative computer, although yours may look different.
Figure 5.1 Starting SAS 9 from a start menu

When you initially open SAS 9 you get a screen similar to Figure 5.2 Screenshot of initial SAS 9 screen. As can be seen there, the initial SAS environment has various parts, including:
-
The Explorer window enables you to navigate between files associated with SAS, notably datasets.
-
The Log window is where SAS communicates with you. You should view the log whenever you do something to check for issues or errors.
-
The Editor window is where you type programming commands (code) to tell SAS what to do.
-
The Results windows and Viewers. When you run statistical procedures, SAS 9 will open Results sections that contain the results of the analyses. When you first open SAS 9, there are no results windows since you have not yet analyzed anything.
Figure 5.2 Screenshot of initial SAS 9 screen

The first step is to get our datasets into SAS.
Create a SAS Library in SAS 9 and Link It to a Windows Folder
SAS uses a concept called ”libraries,” which are basically virtual tags that associate
a keyword with a certain location on your hard drive or server. Think of a library
as a shortcut method for telling SAS what physical folder to look at for the datasets
associated with your current project. In other words, in programming, you do not want
to have to tell SAS that the location of your dataset is something like “C:UsersGregoryDocumentsMBA”,
as this is overly complex. Rather, you might associate a library called “MBA” with
this location. Then, when you use the library name “MBA” in the future, SAS will know
to look in this location for the dataset you name.
To use the programming code and datasets associated with this course, we will create
a new library called “Textbook,” which will be associated with all the course datasets.
To create the “Textbook” library, do the following:
-
Store the “Textbook Materials SAS 9” folder on your computer: The textbook uses pre-created datasets and programming code to help you learn, which you should find in a Windows folder called “Textbook Materials SAS 9” on the book website or storage materials. First, copy this folder onto your computer’s hard drive (do not keep the folder on a separate flash drive).
-
Create a SAS library and link it to the textbook materials: Follow these steps:
-
In the SAS Explorer window (see Figure 5.2 Screenshot of initial SAS 9 screen above) double click Libraries.
-
Right click in the Libraries section.
-
Click New.
-
The New Library window will open as seen in Figure 5.3 The New Library window in SAS 9
-
Figure 5.3 The New Library window in SAS 9

-
Give the library a name. For this book, put the word “Textbook” in the name section as I have done in Figure 5.3 The New Library window in SAS 9. If you were creating a library for something else, you could give your own name; it should be something easy to remember and type later in the programming code (e.g. “PhD”).
-
Click Enable at startup as shown in Figure 5.3 The New Library window in SAS 9.
-
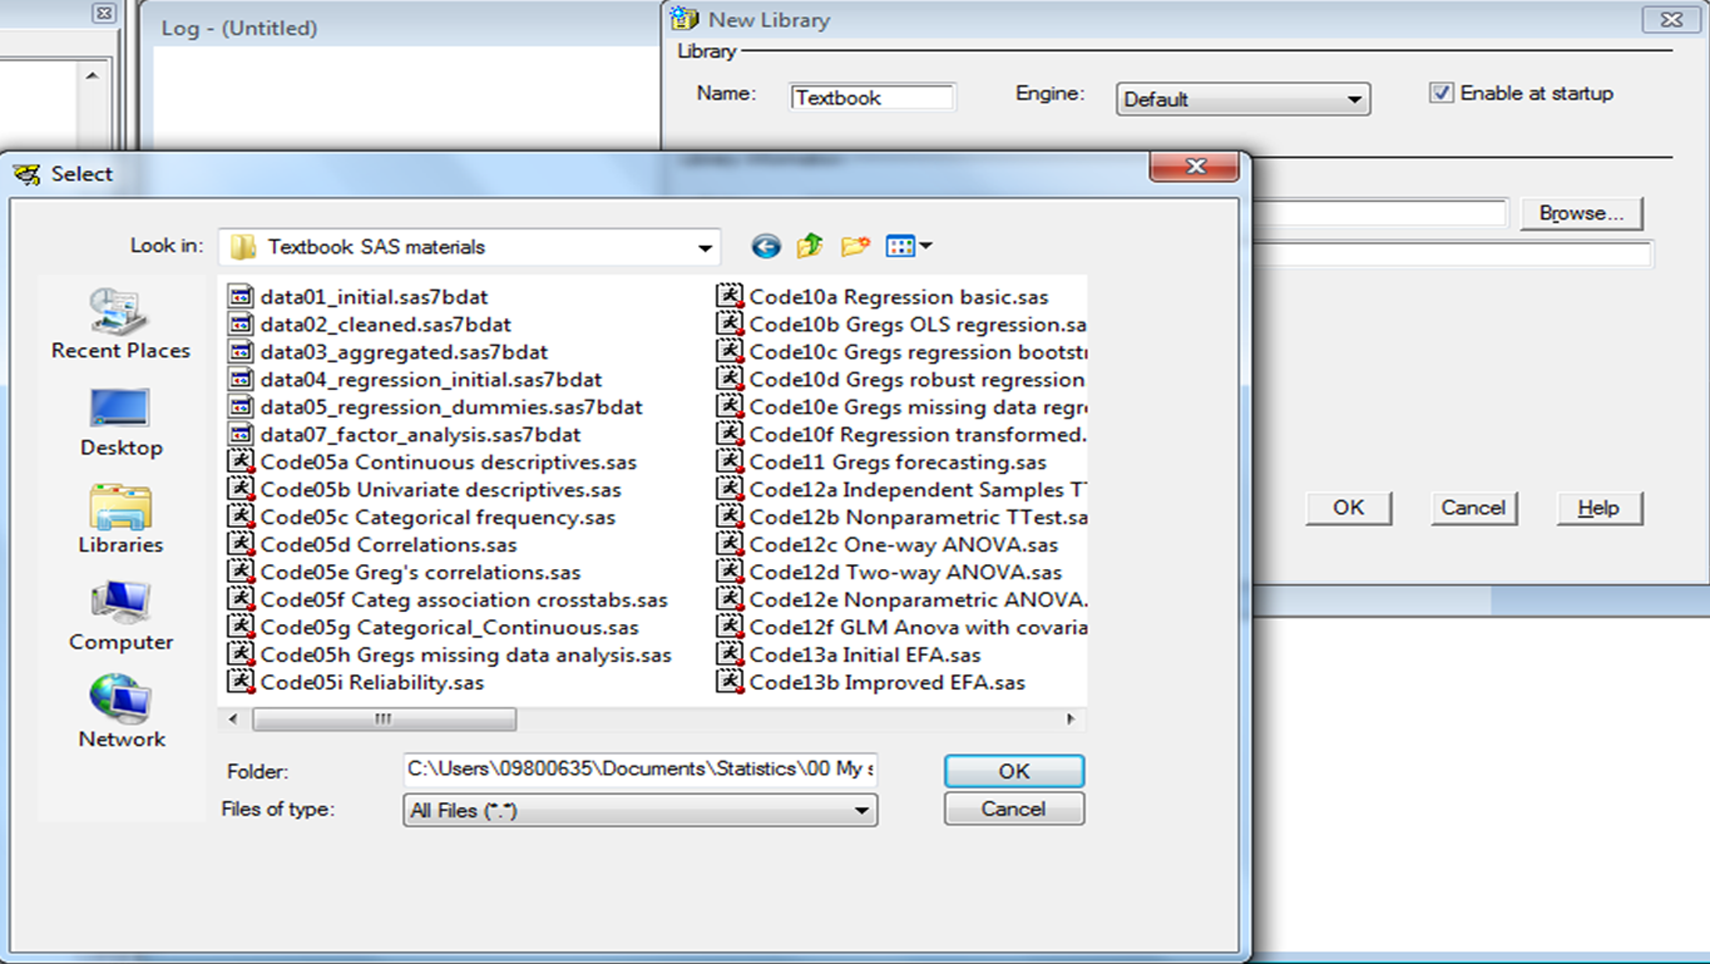
Click Browse’. Browse to the “Textbook SAS Materials” folder that you stored on your computer. Note that in this step you must open and go into the “Textbook Materials SAS 9” folder as shown in Figure 5.4 Browsing into the Textbook Materials SAS 9 folder.
Figure 5.4 Browsing into the Textbook Materials SAS 9 folder
-
Click OK. You will go back to the New Library window. Click OK again. You should now see and be able to access the “Textbook” library, as shown in Figure 5.5 Example of the new Textbook library in SAS 9.
Figure 5.5 Example of the new Textbook library in SAS 9
(Optional for this Book): Import New Data into SAS 9
Once your “Textbook” library has been created and linked to the “Textbook Materials”
folder, you will not need any new datasets because all the data we use for the book
has been pre-created for you.
However, you can also import new datasets into SAS. For example, say that you have
a Microsoft Excel dataset that you want to use in SAS. In SAS, use the File > Import Data command. To import data into SAS simply do the following:
-
Access the File > Import Data window.
-
Select the format of the current data file: Choose the data format of the dataset that you want to import (e.g. if the data is in an Excel file choose “Microsoft Excel Workbook (*.xls *.xlsb *.xlsm *.xlsx)”. Click Next.
-
Open the file: Browse to the location of the data file in the main window. Under Files of Type specify your type of file (e.g. Microsoft Excel 2010 is “.xlsx”). Choose the data file by selecting the file and clicking Open.
-
Choose the table (worksheet): Since programs like Excel can have multiple worksheets, choose the name of the worksheet in which your data resides. Click Next.
-
Associate the file with a library and name it: Choose the library with which you want to associate your data (if you don’t have a library yet, create one using the guidelines in the previous section). Under Member give the name of the new SAS dataset that will be created. (SAS names cannot have spaces, but they can use underscores, such as the name “Data01_Initial”).
-
Click Next and Finish to import.
See the SAS help files for more on opening and importing data.
Once you associate your library with raw data, you are ready to begin initial data
assessment. Before going on, I suggest making changes to overall SAS options.
(Optional): Setting SAS 9 Options
When you first open SAS, I strongly suggest making one change to the native settings.
It is always desirable to get your final statistical results in a good, HTML format.
To enable this, I suggest doing the following (you only have to do this the first
time you open SAS):
-
In the SAS toolbar, click Tools > Options > Preferences.
-
In the Preferences window, as shown in Figure 5.6 Setting the HTML options in SAS 9, click Results.
Figure 5.6 Setting the HTML options in SAS 9

-
As shown in Figure 5.6 Setting the HTML options in SAS 9, click Create HTML and under Style I suggest choosing one of the “Journal” styles. I have chosen Journal3a above. (Journal is a simple, clean black-and-white tabular format for HTML output, which is good for printing and looks like the results in this book).
As an alternative to SAS 9, SAS Studio is a wonderful new innovation by SAS, especially
as it is free for non-commercial use, runs on most Macintosh computers, and uses many
programming innovations. I describe setting it up next.
Setting up SAS Studio
SAS Studio Installation
SAS Studio is available through various channels, including a free version for non-commercial
use as part of SAS University Edition which you can obtain from www.sas.com. SAS Studio is also available as part of other commercial SAS packages. You will
either install a virtualization program that will allow SAS Studio to run through
your internet browser[1] or you can access it in a cloud environment through Amazon Web Services (AWS Marketplace).
In ether case, it is important to follow the installation instructions carefully.
Note that SAS Studio will only run on computers with sufficient hardware and software.
You can access the system requirements on the installation website.
This book will proceed using SAS Studio 3.4 installed on a local computer.
Opening SAS Studio
Once you have set up SAS Studio, if you installed it on your computer using the virtualization
program, follow the steps detailed in Figure 5.7 Opening SAS Studio, which are:
-
Open your virtualization program (either Oracle VirtualBox or VMWare Player), and double click on the “SAS University Edition” link. Note that you would have needed to link the virtualization program to SAS Studio files and set up a “myfolders” folder on your machine. If you did not do these steps, return to the installation instructions from the www.SAS.com website and follow them.
-
Wait for the black screen containing the URL web link to open. Leave this window open in the background.
-
Open your web browser (such as Mozilla Firefox, Google Chrome, or Internet Explorer). Enter the URL web link (e.g. http://localhost:10080) from the black screen in Step 2. This should open the initial SAS Studio screen (as you can see in the third panel of Figure 5.7 Opening SAS Studio). From here you can access SAS Studio[2]. It is easier to create a bookmark of the URL link for future use.
Figure 5.7 Opening SAS Studio

Once SAS Studio opens, you should see the main initial window as shown in Figure 5.8 The initial SAS Studio window.
Getting Acquainted with SAS Studio
As can be seen in Figure 5.8 The initial SAS Studio window, the initial SAS environment has various parts, including:
-
The Server Files and Folders section enables you to navigate between and choose files (notably datasets and code files) in folders that have been associated with SAS.
-
The Code window is where you type programming commands (code) to tell SAS Studio what to do.
-
The Log window is where SAS communicates with you. You should check the log whenever you do something to check for issues or errors.
-
The Results window: When you run statistical procedures, SAS Studio will open a file that contains the results of the analyses.
Figure 5.8 The initial SAS Studio window

Linking SAS Studio with Folders & Files on your Computer
Usually, when you undertake a statistics project, you want to link SAS Studio to a
folder on your hard drive or server that will contain your important files (especially
datasets and files containing programming code).
You can link SAS Studio to any folder on your computer or server; however, as part
of your installation you would have created a default “myfolders” folder that you
shared permanently with SAS Studio. Anything – be it a file or folder – that you place
into the “myfolders” folder on your hard drive will automatically show in the Server Files and Folders‘ section in SAS Studio.
As an example, you should now download the “Textbook Materials SAS Studio” folder
from the book website at http://support.sas.com/publishing/authors/lee.html into the “myfolders” folder on your hard drive. The folder should appear in SAS Studio
as shown in Figure 5.9 Example of a shared folder in SAS Studio below. Note that you may have to click the refresh button before you will see the
new content appear in SAS Studio.
Figure 5.9 Example of a shared folder in SAS Studio

Once you have placed the “Textbook Materials SAS Studio” folder into the “myfolders”
folder, you will be able to see all of its contents in SAS Studio. In the future,
if you add new folders to this location for different projects, they will also appear
in My Folders. As stated above, you can link SAS Studio to locations other than “myfolders” on
your hard drive or server. To learn how to achieve this, see the helpfiles.
Creating a SAS Studio Library & Linking It with a Folder
SAS uses a concept called ”libraries,” which are basically virtual tags that associate
a keyword with a certain location on your hard drive or server. Think of a library
as a shortcut method for telling SAS what physical folder to look at for the datasets
associated with your current project. In other words, in programming you do not want
to have to tell SAS that the location of your dataset is something like “C:UsersGregoryDocumentsMBA”,
as this is overly complex. Rather, you might associate a library called “MBA” with
this location. Then, when you use the library name “MBA” in the future SAS will know
to look in this location for the dataset you name.
To use the programming code and datasets associated with this course, we will create
a new library called “Textbook”, which will be associated with all the course datasets.
To create the “Textbook” library, do the following:
-
Store the textbook SAS materials on your computer: This step was described in the previous section.
-
Create a SAS library and link it to the textbook materials: Follow these steps:
-
In the SAS Studio Server Files and Folders section (see Figure 5.9 Example of a shared folder in SAS Studio above) choose the folder you wish to create a library for, and right click on it.
-
Choose Create > Library from the menu.
-
The New Library’ window will open as seen in Figure 5.10 The New Library window in SAS Studio.
-
Figure 5.10 The New Library window in SAS Studio

-
Give the library a name. For this book, put the word “Textbook” in the name section as I have done in Figure 5.10 The New Library window in SAS Studio. If you were creating a library for something else, you could give your own name;, it should be something easy to remember and type later in the programming code (e.g. “PhD”).
-
Click Re-create the library at start-upFigure 5.10 The New Library window in SAS Studio as I have done in Figure 5.10 The New Library window in SAS Studio.
-
Click OK.
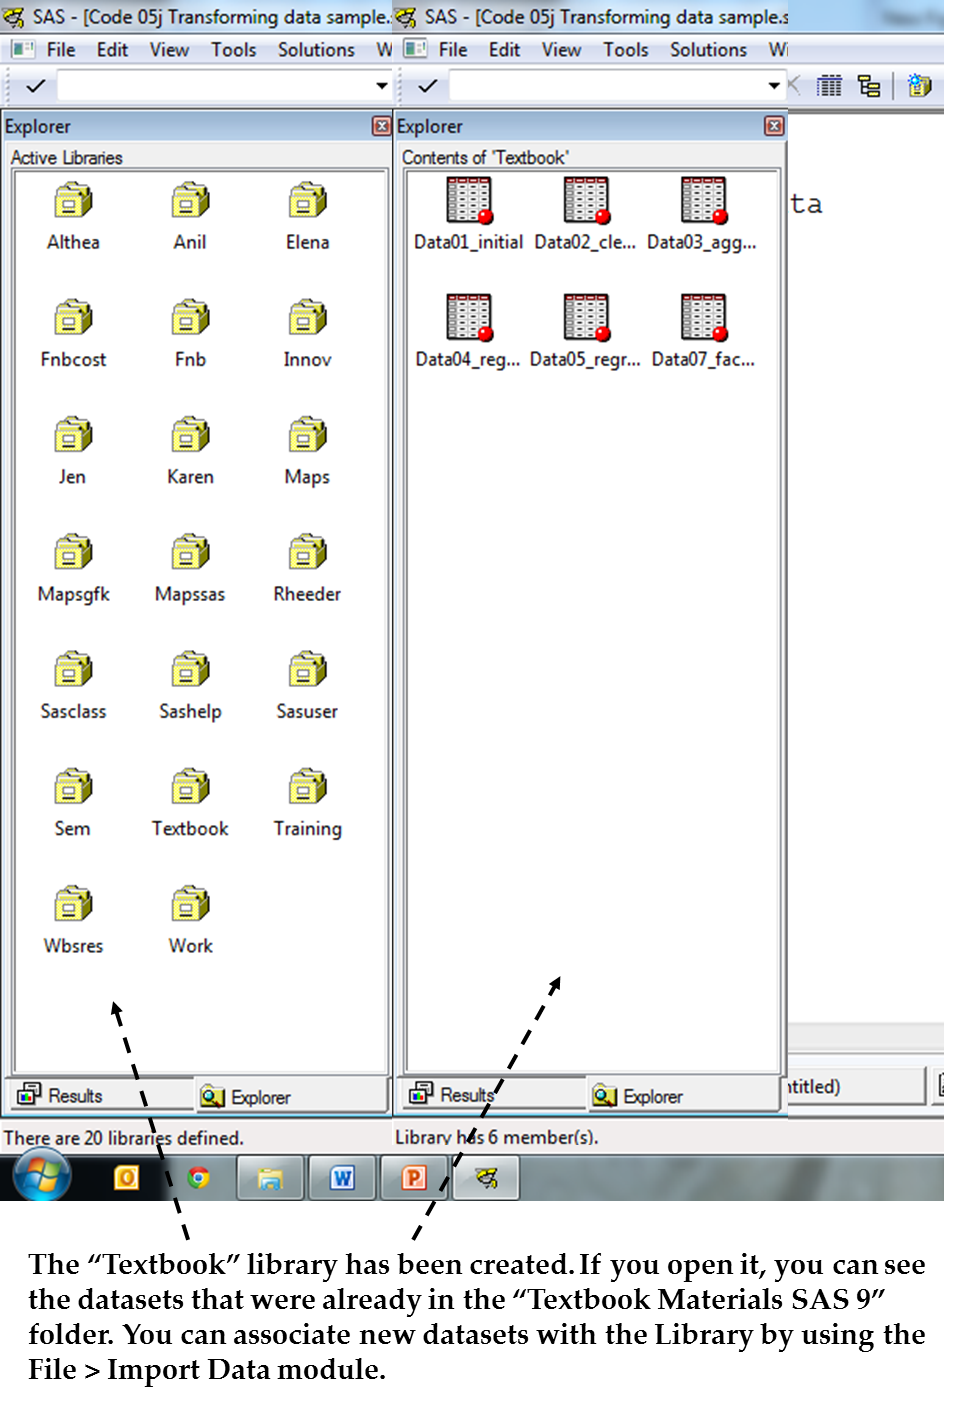
You should now see and be able to access the Textbook library in the SAS Studio Libraries section, as in Figure 5.11 Browsing into the Textbook SAS Studio Materials Folder.
Figure 5.11 Browsing into the Textbook SAS Studio Materials Folder
(Optional for this Book): Import New Data into SAS Studio
Once the “Textbook Materials” folder has been linked to SAS Studio and a “Textbook”
library linked to it, you will not need any new datasets for the book because all
the data we use for the book has been pre-created for you.
However, you can also import new datasets into SAS Studio from other database sources.
For example, say that you have a Microsoft Excel dataset that you want to use in SAS
Studio. Use the New Import Data wizard, as shown in Figure 5.12 The New Import Data wizard in SAS Studio.
Figure 5.12 The New Import Data wizard in SAS Studio
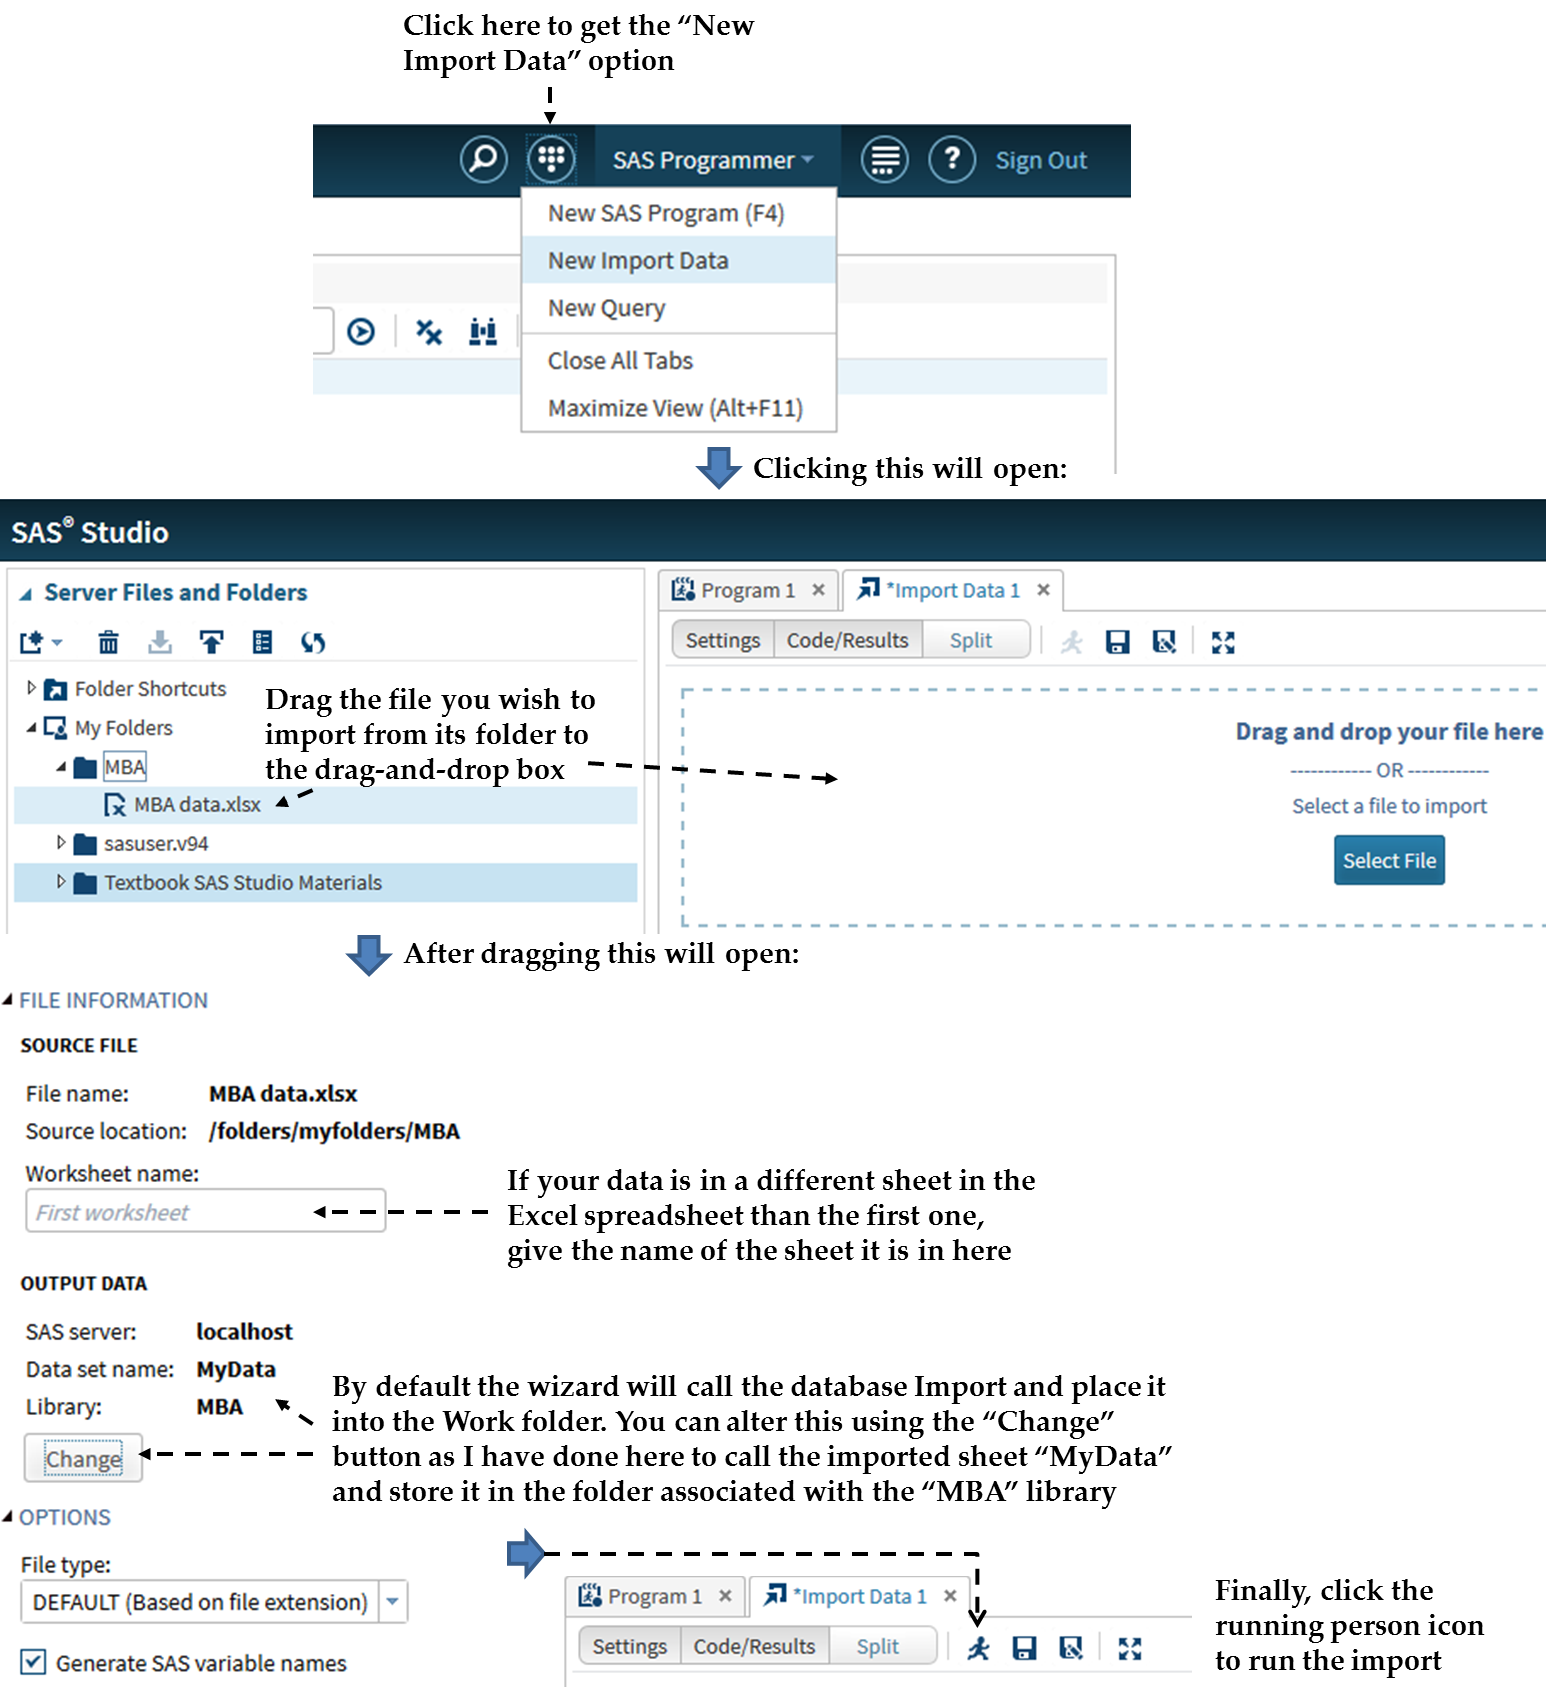
As seen in Figure 5.12 The New Import Data wizard in SAS Studio, you simply do the following:
-
Place the data sheet you wish to import from into a folder linked to SAS Studio. You usually do this by placing your materials into the ”myfolders” folder. In Figure 5.12 The New Import Data wizard in SAS Studio, the example is a folder called “MBA,” which contains an Excel spreadsheet called “Data.”
-
Open the New Import Data wizard from the options icon at the top right of the SAS Studio window. This will open a drag-and-drop box.
-
Drag the sheet that you want to import, into the box on the right. This will open a set of options for the import
-
Choose options. Often, you will alter Output Data options using the change button, specifically to identify a library with which to associate the imported dataset as well as a name. (By default, the output data is named “Import” and is placed in the “Work” library, which I discuss in the next chapter).
-
Press the running person icon at the top of the options to run the import.
(Optional): Setting SAS Studio Options
When you first open SAS Studio, I strongly suggest making one change to the native
settings. It is always desirable to get your final statistical results in a good,
easy-to-read format. To enable this, I suggest doing the steps seen in Figure 5.13 Setting the HTML options in SAS Studio where you change the HTML, PDF, and RTF output styles to one of the “Journal” styles,
which creates neat black-and-white tables (you only have to do this the first time
you open SAS Studio):
Figure 5.13 Setting the HTML options in SAS Studio

Now that we have made SAS ready to use, with a library created for your current task
and datasets associated with that library, we are ready to start major data analyses
and tasks as described over the rest of the book.
Last updated: April 18, 2017
..................Content has been hidden....................
You can't read the all page of ebook, please click here login for view all page.