
Scheduling Jobs
Using the at command, you can schedule commands for execution at a specified time. If you need to schedule repeated execution of a command, you can add the command to the cron file for a user.
To send an email with at:
1. | At the command prompt, type at followed by a time expression (see sidebar). For example, type at teatime + 5 minutes |
2. | Yes, Virginia, teatime is a valid time expression for use with at (it means 4:00 P.M.), so teatime + 5 minutes means 4:05 P.M. |
3. | Press Enter. On the new line, the shell prompt will be replaced with an at prompt, at> (Figure 12.1). Each valid command you type at the at> prompt will be executed at the specified time. |
4. | |
5. | Press Enter. The at> prompt for the next line will appear. |
6. | Type the text of your email on as many lines as you need. |
7. | After you've entered your final line of text, press Enter to start a new line at the at> prompt. |
8. | Hold down the Ctrl key and press D to complete the at command. The email that was specified in the at job will be sent at 4:05 P.M. (Figure 12.2). |
Figure 12.1. Commands entered at the at> prompt will be executed at the time you specify.

Figure 12.2. You can enter at to send email or execute sequential commands.

Figure 12.3. To display the queue of jobs, enter atq.

Tip
The email example shows the use of a single command. However, there is nothing to stop you from using the at command to schedule multiple jobs, each entered at the at> prompt. All the commands you enter will be executed at the time you specify.
To remove a job that has been scheduled with at:
1. | List all the current jobs by typing atq at the prompt. |
2. | Press Enter. The user's current jobs in the queue will be displayed (Figure 12.3). If the user is root, all jobs will be displayed. The first column in the display is the job number; the second column indicates when the job is supposed to execute. |
3. | To eliminate a job, enter atrm followed by the job number: for example, atrm 2. |
4. | Press Enter: |
5. |
Using cron files
The purpose of a user's cron file is to launch commands that are executed periodically. For example, the file can be used send an email once a day to remind the administrator to back up the system, or it can be used to run the weekly accounting program, well, once a week.
It makes sense to script commands and then call the script from the cron file, rather than individually calling a lot of separate commands from the cron file.
The superuser, root, can use the crontab command to access each user's cron file, as I'll explain in a little while. Including crontab, root has three means of adding or editing cron settings:
Using the Linux Configuration applet in the control panel
Editing the cron file directly
Using the crontab –e command
I'll explain each of these options in the following paragraphs. Bear in mind that in a multiuser environment, security precautions may be in place to prevent individual users from modifying their cron files. If you need to modify your cron file, and you are not the system administrator, well then—contact your system administrator.
To set a cron command for root using the Linux control panel:
1. | Log on as root. |
2. | Open the Linux configuration applet. |
3. | Scroll down the list on the left until you see Configure Superuser Scheduled Tasks (Figure 12.5). Figure 12.4. Jobs can be removed from the queue by entering atrm.
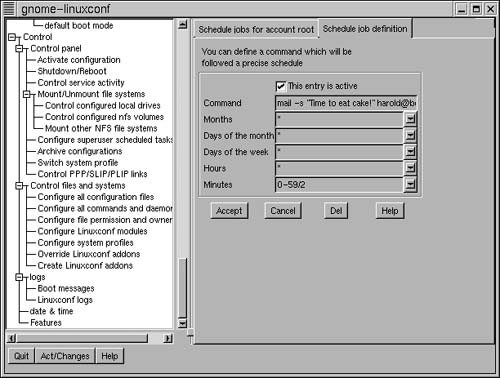
Figure 12.5. You can use the Linux control panel to add a scheduled command for the root user.
Figure 12.6. The Schedule Jobs Definition tab lets you add jobs to the cron file without editing it directly.
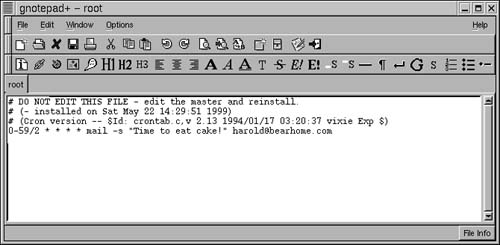
Figure 12.7. Cron files, which are stored in the /var/spool/cron directory, can be edited directly.
|
4. | On the Schedule Jobs for Account Root tab, click Add. The Schedule Job Definition dialog box will open (Figure 12.6). |
5. | Check This Entry Is Active. |
6. | In the Command box, enter the command you want executed. The command shown in Figure 12.6 sends an email: mail –s "It's time to eat _ cake!" [email protected] |
7. | In the Time boxes, enter your scheduling parameters (see the sidebar for help deciphering cron time). The setting shown in Figure 12.6, 0-59/2 Minutes, with an asterisk for all other times, starts the command twice a minute. |
8. | Click Accept. |


Tip
Writing cron jobs that send email is something that can easily be abused. Think before you do whether the email function really needs to be scheduled.
You're on cron time now...In a cron file, numbers are supplied before each command to specify the execution time. Numbers appear in five fields, separated by commas, with a hyphen indicating the range and an asterisk indicating all values. (If the Day of Month field is set to *, that means the command is executed every day.) Here are the five fields and their range of values:
|
To edit a cron file directly:
-
Each user's cron file is located in the user's /var/spool/cron directory. You can open that file directly and add, edit, or delete cron commands using your favorite text editor (Figure 12.7). (The cron file for root shown open in Figure 12.7 was created using the Linux control panel.) You can add a cron file if one doesn't already exist for a particular user by giving it that user's logon ID as a name and placing it in the /var/spool/cron directory.
To add a cron command using crontab:
1. | At the command prompt, type crontab –e The cron file that corresponds to your logon ID will open in the default text editor (Figure 12.8). The vi editor is shown. |
2. | Use the commands of the text editor to add, edit, or delete cron commands (for more information on command-line text editors, see Chapter 10). |
Tip
If a cron file doesn't already exist, entering crontab –e will create one.
Tip
Root can use crontab –e –u to edit the cron file of any user: for example,
crontab –e –u hdavis
Tip
Those emails do mount up (Figure 12.9).
Figure 12.8. Entering crontab -e opens a user's cron file in the default text editor.
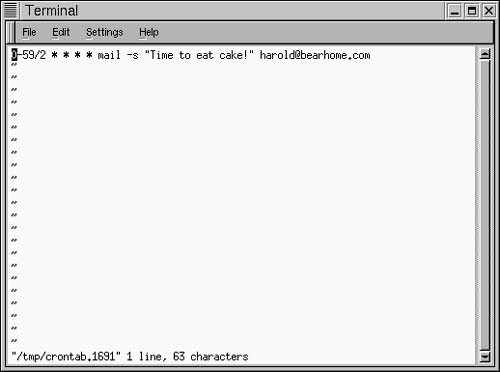
Figure 12.9. My name is not Marie Antoinette! Stop, l've had enough cake!

Figure 12.10. Shell scripts can be created in any text editor (Gnotepad+ is shown).

Figure 12.11. A script can be run as an argument to the shell command.
