
Telnetting to Your Server
Telnet provides one of the most basic and easy ways to use your Linux system as a server, which telnet calls a host. Essentially, this approach reduces your client computer to the status of a dumb terminal. Most people who have worked in large, mixed Unix and NT environments will be familiar with the use of a Windows machine to telnet to a Unix server. Once you get your Linux server running, the procedures, of course, are the same.
To telnet to your server using the Windows telnet client:
1. | On the Microsoft Windows Start menu, choose Run. The Run dialog box will open (Figure 13.3). Figure 13.3. To run the Microsoft Windows telnet client, first open the Run dialog box.
|
2. | Type telnet. |
3. | Click OK. An empty Telnet window will open (Figure 13.4). Figure 13.4. If you start the telnet client without specifying a connection, an empty Telnet window will open.
|
4. | Choose Remote System from the Telnet window's Connect menu. The Connect dialog box will open (Figure 13.5). Figure 13.5. The Connect dialog box is used to specify a server connection.
|
5. | Type the name of the server in the Host Name box. This is the Linux server's host name, set as explained in Chapters 3 and 4: for example, type linuxbear. Depending on the network connection between you and the server, you may be able to type just the name of the server, or you may have to type the name with its fully qualified domain address: for example, linuxbear.bearhome.com In some situations, using a straight IP address works better than using a host name. |
6. | Click Connect. You will be prompted for your logon ID (Figure 13.6). Figure 13.6. When you connect to a host, you will be prompted for your logon ID and password.
|
7. | Type your logon ID. |
8. | Press Enter. |
9. | Type your password. |
10. | Press Enter. You will be connected to your Linux server, at the shell prompt, in the home directory for your user ID. You can proceed to use the server at the command line using the tools and techniques explained in Chapters 10 through 12. |


Tip
You can enter the host name in the Run dialog box at the same time you start the telnet client: for example, you can enter telnet linuxbear. This saves a step.
Tip
The telnet client keeps a most recently used (MRU) host names list on its Connect menu. You can access one of these hosts without having to retype the information.
Tip
There are numerous telnet programs available that are a big improvement over the Microsoft Windows telnet client. Many of the programs are shareware or are free. For example, at CNet's site, http://www.download.com, if you search for telnet, you'll find at least 60 programs available for downloading.
To configure the Windows telnetclient:
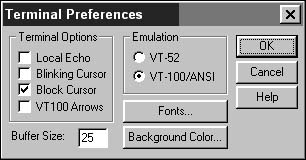
1. | On the Telnet Terminal menu, select Preferences. The Preferences dialog box will open (Figure 13.7). Figure 13.7. You can customize the telnet client by using its Preferences dialog box.
|
2. | Make the changes you want. |
3. | Click OK. |
Tip
The most common change in the Preferences dialog box is increasing the buffer size (the default size is 25). This has the effect of making more scrolling lines of code from the server available to you.
Tip
You may also want to change the fonts and colors to improve readability.
To close the connection:
1. | At the shell prompt in the Telnet window, type logout or exit. |
2. | Press Enter. You will receive a message stating that the connection to the host has been lost (Figure 13.8) |
Figure 13.8. When you log off of a telnet session, the connection to the host is lost.
