
Using DHCP
DHCP—Dynamic Host Configuration Protocol—enables the automatic assignment of dynamic IP addresses to hosts on a network. If you have to administer a Class C—or larger—network, dynamically assigning IP addresses will make your life a great deal easier.
To use DHCP to assign IP address to hosts on your network, you need to have a DHCP server. Your Linux system can be configured to function in this fashion, but you should bear in mind that you cannot just make up the assigned IP pool numbers. The Class C IP addresses you assign dynamically must be yours to assign. Furthermore, this kind of configuration should not be regarded as trivial. The normal configuration advice, "ask your system administrator for the right settings," probably does not apply, because if you are attempting to set up DHCP, you probably are the system and network administrator. In this case, you'll have to work with the vendor who supplies you with the Class C network to get the DHCP settings right.
To configure a DHCP server on your Linux system:
1. | Log on as root. |
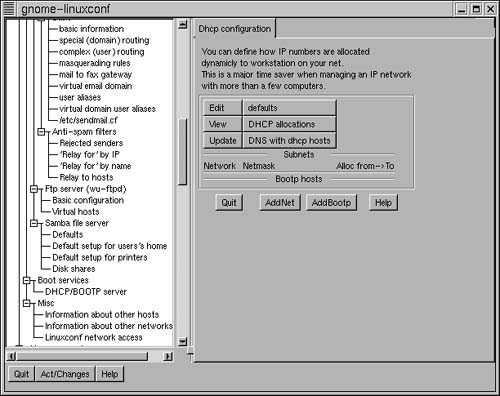
2. | Open the Linux Configuration applet. |
3. | Scroll down the panel on the left until you reach Boot Services. |
4. | |
5. | |
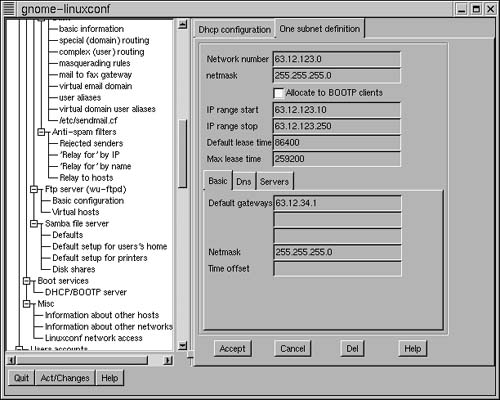
6. | In the Network Number field, enter the IP address for the network. |
7. | In the Netmask field, enter the netmask. |
8. | In the IP Range Start and IP Range Stop fields, enter the beginning and ending IP addresses that will be assigned. |
9. | In the Default Lease Time field, enter 86400 This number is in seconds, so 86400 means one day. It represents the amount of time a host can hold an IP address before having to renew it with the server. |
10. | In the Max Lease Time field, enter 259200 This is the maximum time that a host can hold onto an IP address. |
11. | Enter at least one default gateway and a netmask. |
12. | Click Accept. |
Tip
You can change the DHCP settings by editing the /etc/dhcpd.conf file.
Tip
If you choose to manually edit the dhcpd.conf file, you will need to create an empty file named /etc/dhcpd.leases.
Tip
To start DHCP service manually, use the following command:
/etc/rc.d/init.d/dhcpd restart
To configure a Microsoft Windows client to work with DHCP:
1. | Right-click the Network Neighborhood icon and select Properties from the fly-out menu. The Network Properties dialog box will open (Figure 13.26). Figure 13.26. Use the Microsoft Windows Network Properties dialog box to configure a Windows client to work with DHCP.
|
2. | Scroll down the list of installed components until you see the TCP/IP protocol entry pointing to your network card. |
3. | Select the TCP/IP protocol entry. |
4. | Click Properties. The TCP/IP Properties dialog box will open (Figure 13.27). Figure 13.27. Select Obtain an IP Address Automatically.
|
5. | On the IP Address Tab, select Obtain an IP Address Automatically. |
6. | On the WINS Configuration tab, enable Use DHCP for WINS Resolution (Figure 13.28). Figure 13.28. Use DHCP for WINS Resolution should be enabled.
|
7. | On the Gateway tab, make sure that no gateways are defined. |
8. | On the DNS Configuration tab, disable DNS (DNS values are supplied by DHCP). |
9. | Click OK to return to the Network Properties dialog box. |
10. | Click OK to accept the new settings. |
11. | When prompted, click Yes to reboot the client computer. |


Tip
Depending on the files on the computer, you may need a Windows CD when the computer reboots