Postgre SQL
PostgreSQL is a descendant of Postgres, which was written under the leadership of Michael Stonebraker at the University of California at Berkeley.
Most likely, PostgreSQL version 6.4.2 was installed on your system when you installed Red Hat Linux 6 (see the next section).
As I mentioned earlier, PostgreSQL is not public domain software. The Regents of the University of California own the copyright to PostgreSQL. They have granted general permission to "use, copy, modify, and distribute" PostgreSQL and its documentation at no cost provided their copyright notice and two specific paragraphs of legalese appear in all copies. For more information on the PostgreSQL license, and for information on PostgreSQL in general, visit
It's important to understand that there are many different programming languages that can initiate client access with a PostgreSQL server. This kind of access is called an interface. You can think of it as a programming "hook." If you need a program to talk to a database server, then you should make sure that the database has an interface for the language in which the program is written. Available PostgreSQL interfaces include:
C
C++
Java
Perl
ODBC
Python
Tcl
For more information on using the programming languages that ship with Red Hat Linux 6, see Chapter 12.
To check that PostgreSQL has been installed:
1. |
Choose GnoRPM from the System fly-out of the Gnome main menu. Gnome RPM will open. |
2. |
In the Packages list, click the plus sign to the right of Applications. The Applications category list will expand. |
3. |
Select Databases. In the Packages pane, you should see two packages: postgresql and postgresql-client ( Figure 9.1 ). Figure 9.1. If PostgreSQL has been installed, Gnome RPM will have packages for the PostgreSQL server and clients.
|
4. |
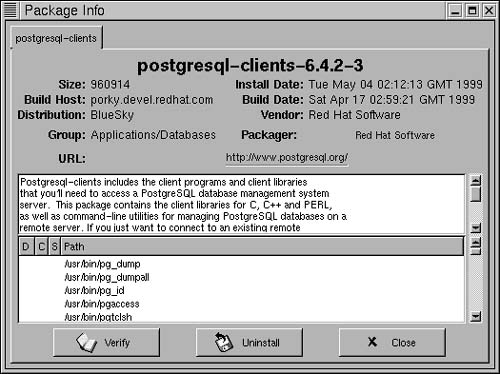
In turn, right-click each package and select Query from the pop-up menu. You will see information about PostgreSQL ( Figure 9.2 ) and the PostgreSQL client ( Figure 9.3 ) package and a list of the files that were installed. Figure 9.2. The Package Info window displays information about Postgre SQL and the files that were installed.
|


Tip
Depending on your choices during installation, PostgreSQL may not have been installed. If the PostgreSQL packages are not present in Gnome RPM on your system. You can use Gnome RPM to add them from the Red Hat Linux 6 VQS CD following the steps explained in Chapter 3.
Tip
Alternatively, you can download PostgreSQL from http://www.postgresql.org If you do, be sure to follow the installation procedures detailed in Chapter 4 of the PostgreSQL Administrator's Guide, also available at the PostgreSQL Web site.
Figure 9.3. To use PostgreSQL, you will also need to have the client package instaled.
The postgres user
The PostgreSQL server must be run by a user named postgres. It is extremely important for security reasons that this user not be given root privileges. (If you grant the postgres user root privileges, the security of your entire server is completely compromised.) The postgres user is sometimes referred to as the postgres superuser. In other words, postgres is to PostgreSQL as root is to your Linux system.
The postgres user may have been already added by the Red Hat installation process—in which case, you still need to have a look to make sure, and to change the user's password.
If there is no postgres user, you should add one using the settings that appear in Figure 9.5.
For information on adding and editing users in Gnome, see Chapter 6.
To configure the postgres user:
1. |
While logged on as root, open the control panel's Linux Configuration utility. |
2. |
Scroll down the list on the left until you see User Accounts. |
3. |
Expand Users Accounts. |
4. |
Expand the Normal category below Users Accounts. |
5. |
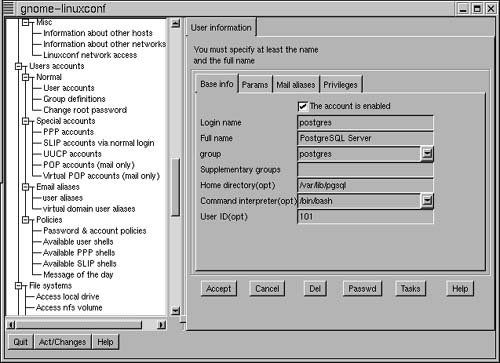
Click User Accounts. A list of user accounts will open in the right pane ( Figure 9.4 ). Figure 9.4. In the Linux Configuration utility, choose User Accounts from the Normal category under Users Accounts.
|
6. |
Scroll down in the list until you see postgres. |
7. |
Double-click postgres. |
8. |
The User Information dialog box will open (
Figure 9.5
). Figure 9.5. The user postgres—known as the PostgreSQL superuser—must be configured to run the PostgreSQL server.
|
9. |
Make a note of the postgres user's home directory, /var/lib/pgsql. |
10. |
Click Passwd. The Changing Password tab will open ( Figure 9.6 ). Figure 9.6. You must change the postgres user's password so that you know what it is.
|
11. |
In the New Unix Password box, enter a new password for postgres: for example,
postgres.
(Although postgres is an easy password to remember when you are testing this software, in a production situation you should, of course, use a password that is not so easy to guess.). |
12. |
Make a note of the password you have selected. |
13. |
Enter the password again to confirm it; then accept the changes. |
14. |
Close the Configuration tool. |
15. |
Select File Manager from the Gnome main menu to open the Gnome File Manager. |
16. |
Locate the directory containing the file local1_template1.bki.source. This will probably be /usr/lib/pgsql. |
17. |
Use File Manager to copy the contents of the directory you found to the postgres user's home directory, /var/lib/pgsql. |
18. |
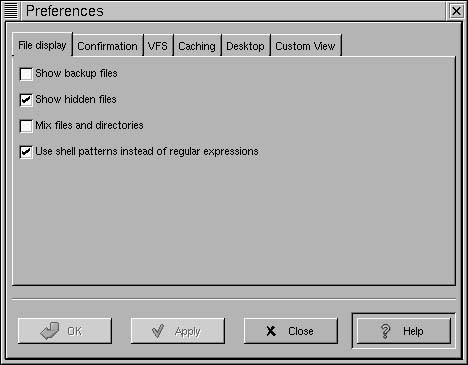
Choose Preferences on File Manager's Edit menu. The File Manager Preferences dialog box will open ( Figure 9.7 ). Figure 9.7. To see if the postgres user already has a profile file, make sure you can view hidden files.
|
19. |
Place a check mark next to Show Hidden Files. |
20. |
Click OK. |
21. |
View the contents of the postgres user's home directory, /var/lib/pgsql (
Figure 9.8
). Figure 9.8. If the file .bash_profile is present, you will need to edit it; if it is not present, you will need to create it.
|
22. |
Check to see if a file named .bash_profile is present. This file is the profile for the postgres user under the Bash shell, meaning that it is loaded to set environment variables when postgres logs on. (For more information on Bash and profiles, see Chapter 10.) The period at the beginning of the file name means that it is a system file and is hidden. |
23. |
If .bash_profile already exists, right-click the file and select Open With from the pop-up menu. The gmc window will open ( Figure 9.9 ). Figure 9.9. You can edit the profile by opening it in Gnotepad+(gnp).
|
24. |
If .bash_profile is not present, then open Gnotepad+ and create it with the information in the next few steps.
|
25. |
Close any open applications and log off. |
26. |
Log back on as postgres. Use the password you created. |
27. |
Open a terminal window by clicking the terminal icon on the Gnome desktop. |
28. |
Type
env
to check that the environment variables you entered in the postgres user's profile are correctly displayed. If they are there, you are ready to fire up your database server. |


Tip
The nuances of individual configurations may vary greatly depending on many variables.
Tip
You can change file locations, for example, the postgres user's home location, to suit yourself, provided appropriate permissions are in place.
Tip
The /usr/bin directory must be on your path. You can check this by typing env or by typing $PATH.
Tip
The best source for further configuration information is the PostgreSQL Administrator's Guide, available at
Figure 9.11. The Postmaster daemon must be running for clients to connect with the server.

To initialize your database server:
1. |
With the terminal window open, type
initdb
at the prompt. |
2. |
Press Enter. |
Figure 9.12. The PostgreSQL Interactive SQL Monitor provides a way to directly enter SQL commands that are processed by the server.

The Postmaster daemon
The Postmaster daemon is the back-end process that must be running for clients to be able to connect to the database server.
To start Postmaster:
1. |
With the terminal window open, type
postmaster –I
at the prompt. |
2. |
Press Enter. So long as Postmaster is running, the terminal window will not return to the prompt ( Figure 9.11 ). |
Tip
In a production situation, you will probably want to have the Postmaster daemon started automatically (which must be done by the postgres user). For a variety of ways to do this, see Chapter 4 of the PostgreSQL Administrator's Guide.
To test a connection:
1. |
With the Postmaster daemon running in a terminal window, open a new terminal window. |
2. |
Create a new database named hobbits by typing
createdb hobbits
at the prompt. |
3. |
Press Enter. |
4. |
Connect to the new database by typing
psql hobbits
at the prompt. The PostgreSQL Interactive SQL Monitor will open ( Figure 9.12 ). |
5. |
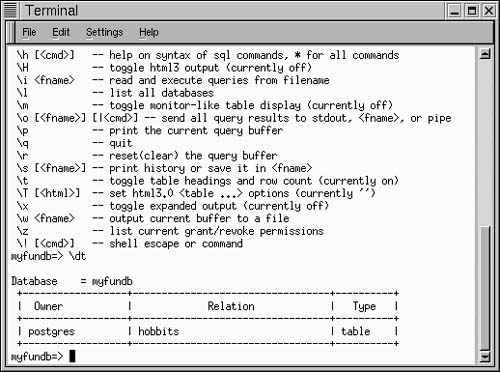
At the Interactive SQL Monitor's prompt— which appears with the name of the database to which you are connected—type
?
to see a list of available commands (
Figure 9.13
). Figure 9.13. You can list the commands available in the Interactive SQL Monitor by typing ? At the prompt.
|
6. | |
7. |
At the Monitor prompt, enter a SQL query that does not depend on any table data: SELECT datetime 'now'; |
8. |
Press Enter. The current date and time will be displayed ( Figure 9.14 ). Figure 9.14. You can issue a simple SQL statement to make sure that your client server connection is working.
|


Tip
It's conventional, but not required, to type SQL keywords in all uppercase. SQL statements are not case sensitive.
Tip
Each SQL statement entered in the Monitor must conclude with a semicolon.
To delete a database:
-
In a terminal window, at the shell prompt, type
destroydb
databasename
For example, enter bash$ destroydb hobbits to delete the hobbits database.
Creating a table
Tables, consisting of columns—also called fields—and rows, are the basic building blocks of relational databases.
To create a table:
1. |
With the Interactive SQL Monitor connected to a database, for example, to myfundb, create a table named hobbits by typing the following: CREATE TABLE hobbits(
fname varchar (20)
lname varchar (20)
ssn int);
|
2. |
Press Enter. |
3. |
To verify that your table was created, type
dt
at the Monitor prompt. Your table will appear in the display ( Figure 9.15 ). Figure 9.15. You can use standard SQL to create a table, and then verify that it has been created by using the Postgre SQL Interactive SQL Monitor's dt option.
|
Tip
For information on SQL syntax, types, and reserved words, consult a book on SQL and database design.
Figure 9.16. You can display all table rows and columns with SELECT*.

To populate a table:
1. |
With the Interactive SQL Monitor still connected to the myfundb database, populate the hobbits table by typing the following: INSERT INTO hobbits VALUES
('Frodo', 'Baggins', 12345678);
|
2. |
Press Enter. |
3. |
Repeat steps 1 and 2 for each row you want to insert in the database. |
4. |
To see all the rows entered in the database, at the monitor prompt type: SELECT * FROM hobbits; |
5. |
Tip
If you have a lot of data to insert in a table, the normal procedure is to insert it based on a selection from another table or to load it from a delimited ASCII file. An insertion statement for each row would not be feasible in a situation with a lot of data.
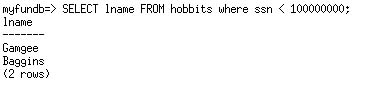
To query a table:
1. |
With the Interactive SQL Monitor still connected to the myfundb database, query the hobbits table by typing the following: SELECT lname FROM hobbits WHERE ssn < 100000000; |
2. |
Press Enter. The results that match the criteria will appear ( Figure 9.17 ). Figure 9.17. When you use SELECT with a FROM clause and a WHERE clause, only the data that matches the criteria is returned.
|
To update a table:
1. |
With the Interactive SQL Monitor still connected to the myfundb database, type the following to update the hobbits table by changing the first name of Sam Gamgee to Samwise Gamgee: UPDATE hobbits SET fname = 'Samwise' WHERE lname = 'Gamgee'; |
2. |
Press Enter. |
3. |
To verify the change, display the table contents by typing the following: SELECT * FROM hobbits; |
4. |
Press Enter. The field has been updated( Figure 9.18 ). Figure 9.18. You can update individual fields using the criteria that you want.
|

Table inheritance
It is possible to create a table that inherits all columns (fields) from another table. The new table might have additional columns besides the ones inherited from the original table.
PostgreSQL calls table relationships used in this way classes, which makes sense when one is talking about inheritance.
To create a new table that inherits from an existing table:
1. |
With the Interactive SQL Monitor still connected to the myfundb database, create a new table, hobbitsplus, that inherits from the hobbits table, by typing the following: CREATE TABLE hobbitsplus (alias varchar(20)) INHERITS hobbit; |
2. |
Press Enter. |
Tip
The new table, hobbitsplus, has a new column, alias, that wasn't present in the hobbits table.
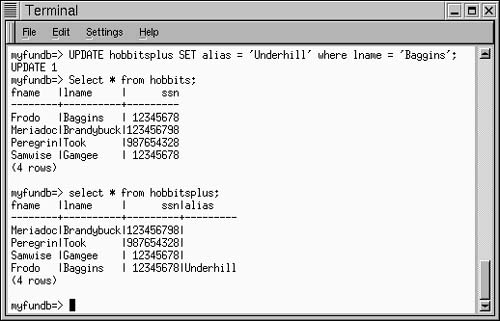
To insert the hobbit rows into hobbitsplus:
1. |
With the Interactive SQL Monitor still connected to the myfundb database, type the following: INSERT INTO hobbitsplus SELECT * FROM hobbits; |
2. |
Press Enter. If you run a SELECT * query on hobbitsplus, you will see that the rows from hobbits have been inserted ( Figure 9.19 ). Figure 9.19. Using table inheritance, you can move fields and rows from one table to another.
|

To populate a new field:
-
You can populate the new field by typing a SQL command along these lines:
UPDATE hobbitsplus SET alias =
'Underhill' WHERE lname =
'Baggins';
If you then compare the contents of hobbits and hobbitsplus, you will see that the new table has data in the new field ( Figure 9.20 ).
Figure 9.20. You can then insert data into the new table's fields.
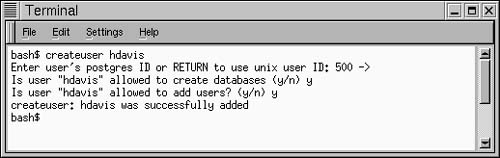
Adding users
If users need to access the PostgreSQL server, they must do so as the postgres superuser, or as a new user that you create. Creation in this sense has nothing to do with Linux access privileges; it gives a user rights to access the database server.
To add a new user:
1. |
In a terminal window, at the shell prompt, type
createuser
followed by the user name: for example,
createuser hdavis
|
2. |
When prompted, supply an ID number and specify the user's PostgreSQL privileges (
Figure 9.21
). After the questions have been answered, your user will be created. |
Tip
The default ID number for an existing Linux user will be that user's Linux ID.
Figure 9.21. Createuser is used to add PostgreSQL users who can connect with the database server.