Booting to Windows and Linux
The final step is to set your computer up so that you can boot to Linux or Windows. There are a number of different possible approaches to accomplish this. If it works, the easiest thing to is to configure LILO, the Linux bootstrap loader that actually starts the Linux kernel.
Once LILO has been configured, when you reboot your system, the LILO prompt will appear:
LILO bootIf you press the Tab key, the names for booting the different operating systems will be displayed: for example, DOS and Linux. Type the name of the operating system you want to boot the computer to.
Another very good approach is to use a boot floppy to load Linux. Otherwise, if you are booting from DOS, you may want to write a DOS batch file to load the Linux kernel.
To configure LILO:
1. | When you reach the LILO installation dialog box, you will first be asked whether to place LILO on the master boot record (MBR) or on the first sector of your root partition. Choose the MBR unless you are using another bootstrap loader such as that supplied with OS2. |
2. | Use the Tab key to highlight OK; then press Enter. |
3. | Next, you will be asked to supply special options to identify your hardware to Linux. Leave this field empty. |
4. | Also leave LBA mode empty, unless you are using LBA to access your SCSI drive (you know who your are!). |
5. | Use the Tab key to highlight OK; then press Enter. |
6. | A dialog box appears that lists the different partitions on your system, the type of file system present on the partition, whether the partition is the default boot partition, and the label for the partition that LILO will use. Use the Tab and arrow keys to select a partition for editing. |
7. | If you want, you can change the default boot partition and also the LILO label for a partition (this is the text you type to select a particular partition when LILO boots). |
If LILO won't...Suppose you've followed these instructions and then you get to the moment of truth and reboot your computer, and it won't reboot. Perhaps it hangs when the LILO prompt appears. This can happen! The most likely cause is a conflict between LILO and your computer's BIOS. Fear not. There are always alternatives in life. First, don't panic. You should be able to boot to Linux using the Linux boot disk you prepared during installation, and you should be able to start Windows using the boot disk you made when preparing to run the FIPS utility. As a second step, you will probably want to reinstall Linux on the Linux partitions. Make sure to bypass LILO installation by clicking the Skip button when you get to the LILO installation screen. (I know this is a lot of work, but at least you have done it once before, so you'll know the routine.) Once Linux has been reinstalled without LILO, you have several viable alternatives. One is to have your system boot by default to Windows. When you want to boot to Linux, simply insert the Linux boot disk in your boot floppy drive. Another possibility is to use the Loadlin utility to boot Linux directly from the DOS prompt in your Windows partition (see the nearby section "To boot Linux from DOS using Loadlin"). |
Tip
Once you have Linux running, you can manually edit the file lilo.conf, located in the /etc/ directory, to make changes to the way LILO is configured. After saving changes to this file, you must run the program /sbin/lilo to make them effective.
To boot Linux from DOS using Loadlin:
1. | From your Windows desktop, select Shut Down on the Windows Start menu. |
2. | |
3. | Choose OK. Your computer will exit to a full-screen DOS window, and your prompt will probably say C:WINDOWS. Note that DOS mode is different from running a DOS box in Windows. |
4. | |
5. | Create a directory for the Loadlin utility by typing md loadlin and then pressing Enter. |
6. | Create a directory for the Linux kernel image by typing md vmlinuz and then pressing Enter. |
7. | Place the Red Hat Linux VQS 6 CD in your CD-ROM drive. |
8. | Change to the loadlin subdirectory by typing cd loadlin and then pressing Enter. |
9. | Copy Loadlin.exe to the loadlin subdirectory by typing copy d:dosutilsloadlin.exe where d is the drive letter that designates your CD-ROM drive. Then press Enter. A message will appear stating that one file has been copied. |
10. | Move to the vmlinuz directory that you created earlier by typing cd and then pressing Enter. Then type cdvmlinuz and press Enter once again. |
11. | Copy the Linux kernel to the vmlinuz subdirectory by typing copy d:dosutilsautobootvmlinuz where d is the drive letter that designates your CD-ROM drive. Then press Enter. A message will appear stating that one file has been copied. |
12. | Return to the loadlin directory by typing cd loadlin and then pressing Enter. |
13. | Type loadlin c:vmlinuzvmlinuz root=/dev/hda2 ro and then press Enter. In this example, the Linux root partition established in Disk Druid is /dev/hda2. The computer will start to boot to Linux. |

Tip
If you didn't make a note of the designation of your Linux root partition when you ran Disk Druid, you can rerun the installation program as far as Disk Druid to obtain this information. Once you've obtained the information you need, simply reboot the computer and remove the CD.
Tip
If you are planning to use Loadlin to regularly boot to Linux from DOS, you should probably do a few things to make this process easier. You can set Windows to boot to the DOS prompt rather than to the Windows GUI. You can also write a batch file to automate invoking Linux. Once you have done these things, when you turn on your computer, it will boot to a DOS C:> prompt. To start Windows, type win and press Enter. To start Linux, type linux and press Enter.
Figure 2.11. To be able to save changes to a file, you should clear the Read-Only box in the Properties dialog box.

To set Windows to boot to the DOS prompt:
1. | Open Windows Explorer and locate the C: folder. |
2. | Highlight the file named Msdos.sys and right-click with your mouse. |
3. | Select Properties from the pop-up menu. The Properties dialog for Msdos.sys will open (Figure 2.11). |
4. | In the Attributes box at the bottom of the Properties dialog box, uncheck the Read-Only attribute. |
5. | Choose OK to accept the change and close the Properties dialog box. |
6. | Open Windows Notepad, which can be started from the Accessories fly-out on the Windows Program menu. |
7. | Select Open from the File menu. |
8. | In the File Name box of the Open dialog box, type c:msdos.sys and press Enter. |
9. | Edit the [Options] section of Msdos.sys so that it contains this line: BootGUI=0 (For help, see Figure 2.12.) |
10. | Select Save from the File menu. The next time you restart your computer, it will boot directly to the DOS prompt. |
Figure 2.12. Set BootGUI=0 to boot to the DOS prompt.

To create a batch file that invokes Linux:
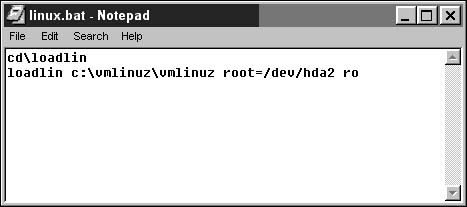
1. | Open a new document in Notepad. Enter the following two lines in the document: cdloadlin loadlin c:vmlinuzvmlinuz root=/dev/hda2 ro (for help, see Figure 2.13) |
2. | Select Save As from the File menu. |
3. | Select All Files from the Save As Type drop-down list. |
4. | Enter c:linux.bat in the File Name box |
5. |