Working with WordPerfect Documents
WordPerfect has many useful and powerful features. If you are not familiar with the program, you can easily learn about these features as you use it.
Of course, all of WordPerfect's features cannot be covered in a book on Red Hat Linux. If you haven't used WordPerfect before—or even if you have—hopefully you'll come away from this chapter with the realization that word processing on the Linux platform has come of age.
Figure 8.13. You can use the shadow cursor to start typing anywhere in a document.

Entering text anywhere on a page
Have you ever wanted to start a Word document somewhere in the middle of a page without having to use the Enter and Tab keys to reach the location?
Using the WordPerfect shadow cursor—a rectilinear cursor that follows the mouse pointer—you can easily do so. (If you've used Microsoft Word, you'll know that you cannot do this in Word. The cursor can only be placed in an area that has been first accessed using the keyboard.)
To enter text anywhere on the page:
1. | Open a new WordPerfect document. You'll see the insertion point is at the upper left of the document. When you move the pointer using the mouse, you'll also see the shadow cursor, a blue line with arrows on either side (Figure 8.13). |
2. | Using the mouse, move the shadow cursor to where you want to enter text. |
3. | Click and then start typing. |
Macros
Macros are used to automate repetitive tasks. You can record a macro, create a macro using WordPerfect's macro language, or first record a macro and then edit it.
A common simple macro is one that creates the standard closure you like to use in a letter.
Figure 8.14. Give the macro you are recording a name that will remind you what it does.

To record a macro that closes a letter:
1. | With a WordPerfect document open, choose Record from the Macro fly-out menu on the Tools menu. The Record Macro dialog box will open (Figure 8.14). |
2. | Enter a name for the macro in the Macro Name box. You can also specify a location (that is, a path) to store the macro file. |
3. | If you think you will want to edit the macro code after it has finished recording, make sure that Edit after Recording Macro is checked. |
4. | Click Record to start recording. The Record Macro dialog box will disappear, and you will be back in your open WordPerfect document. |
5. | Check status bar at the lower left to make sure that it says Macro Record (Figure 8.15). Figure 8.15. If you are in Macro Recording mode, the status bar will display the message "Macro Record."
Type the keystrokes you want recorded. For example, type this: Yours very truly, Frodo Baggins |
6. | Stop the recording by again choosing Record from the Macro fly-out. |
7. | To try out your macro, open a blank new document. |
8. | Choose Play from the Macro fly-out menu. The Play Macro dialog box will open (Figure 8.16). Figure 8.16. To play a macro, enter its name in the Play Macro box.
|
9. | Enter a macro name (and a path, if appropriate). |
10. | Click Play. The keystrokes generated by the macro you recorded will be added to the blank document (Figure 8.17). |


Figure 8.17. The text and keystrokes you recorded are added to the current document when you play a macro.

Tip
For each macro you record, WordPerfect adds a menu item to the Macros fly-out menu. You can use this item to start the macro directly without having to go through the Play Macro dialog box.
Watermarks
A watermark is a gray background character or word that is added to a document to create distinctiveness or make a point: for example, "Confidential." It's easy to create and add watermarks in WordPerfect.
To insert a watermark:
1. | Create a document to which you want to add a watermark. |
2. | Choose Watermark from the Insert menu. The Watermark dialog box will open. |
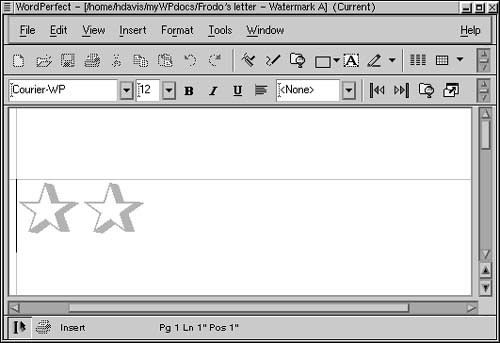
3. | Click Create. A watermark design window, where you can create the watermark, will open (Figure 8.18). Figure 8.18. A window will open for you to create a watermark.
|
4. | Use the tools provided to create your watermark. If you like, you can use typographic symbols, and you can use the Font dialog box to make the symbols you choose become large (Figure 8.19). Figure 8.19. You can use the Font dialog box to get your watermark effect exactly the way you want it.
|
5. |

Hidden codes
Hidden codes are the behind-the-scenes tags that determine WordPerfect's formatting and the appearance of WordPerfect documents. If you want to become a power WordPerfect user, you will need to learn about hidden codes and how to work with them.
Figure 8.20. The watermark you created will appear in the background of your document.

To reveal hidden codes:
-
Choose Reveal Codes from the View menu. The hidden codes will appear in a new pane at the bottom of your WordPerfect document (Figure 8.21).
To close the Hidden Codes pane:
-
Choose Reveal Codes from the View menu again. The Hidden Codes pane will close.
Figure 8.21. Hidden codes control the formatting and appearance of a WordPerfect document.

Tables
WordPerfect's table formatting facilities are quite extraordinary. You can easily create fancy tables and format individual cells.
Figure 8.22. Use the Create Table dialog box to insert a table.
To create a table:
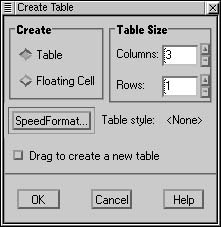
1. | With a WordPerfect document open, choose Table from the Insert menu. The Create Table dialog box will open (Figure 8.22). |
2. | Enter the number of rows and columns for your table. |
3. | To preformat the table, click SpeedFormat. The Table SpeedFormat dialog box will open (Figure 8.23). Figure 8.23. The Table SpeedFormat dialog box is used to preformat a table in the way you specify.
|
4. | Select a style from the list on the left. A preview of the style appears on the right. |
5. | Click Apply. Your new table will be created. |

Individually editing cells
WordPerfect cells can be individually edited. This gives you tremendous flexibility in creating tables.
Figure 8.24. You can use the Table Lines/Fill dialog box to format individual table cells.

To add a fill to a table cell:
1. | Right-click a table cell. |
2. | |
3. | Click the texture illustrated to the right of Fill Style in the Fill Options frame. A Textures fly-out window will open (Figure 8.25). Figure 8.25. From the Texture fly-out, select a texture to use as a cell fill.
|
4. | Choose the texture you want to use. |
5. | In the Table Lines/Fill dialog box, click OK. |
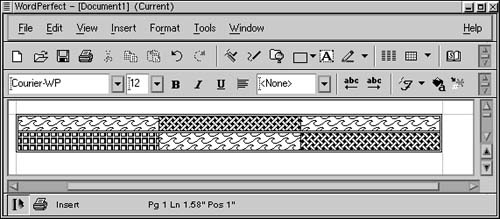
6. | Select another cell and repeat the process until all the cells in your table are formatted to your satisfaction (Figure 8.26). |

Figure 8.26. Each cell in a table can be formatted differently.