
Using the Gnome Control Center
The Gnome Control Center allows you to configure most aspects of your Gnome desktop. The Gnome Control Center works in configuring Gnome just as the Display Properties dialog box in Windows is used to configure the Windows display.
The choices you can make regarding your desktop range from the trivial to the sublime. In other words, some things you can configure have merely cosmetic implications, while others will affect the way you work.
To open the Gnome Control Center:
-
Select GNOME Control Center from the Settings menu on the Gnome main menu.
Tip
The Gnome main menu is activated by clicking the leftmost applet button on the Gnome panel, which by default sports an icon of a footprint.
Tip
You can also open the Gnome Control Center by clicking the third applet button from the left on the Gnome panel (its iconic representation looks something like a digital calculator).
Figure 3.1. You can set your desktop background or wallpaper using the Gnome Control Center.

Figure 3.2. You can choose a color by clicking the color wheel.

Figure 3.3. The Wallpaper Selection dialog box allows you to browse to find a graphic file to use for wallpaper.

To set a desktop background:
1. | |
2. | Click the Color button on the left side of the Background panel. The Pick a Color dialog box will open (Figure 3.2). |
3. | Select a color by clicking within the color wheel or by using the sliders. |
4. | Click OK in the Pick a Color dialog box. The new color will now be previewed in the window on the Background panel. |
5. | To save your new desktop color, click OK in the Background panel. |
Wallpaper
You may prefer to set your background as wallpaper. Gnome comes with many graphics files that can either be used by themselves as a desktop background or patterned to give an interesting textural effect.
To set wallpaper as the background:
1. | On the right side of the Background panel (Figure 3.1), select a wallpaper mode. Choose Tiled to create a pattern of a small image repeated on your desktop, Centered to place an image in its natural size in the center of the desktop, Scaled (Keep Aspect) to enlarge the image vertically to the height of the desktop while keeping its horizontal proportion, or Scaled to use a single image enlarged to fill the desktop. Figure 3.4. The graphics files are organized by likely functionality; for example, all the images appropriate for tiling are in one directory.
Figure 3.5. The image you select will be displayed in the preview window.
Figure 3.6. Once you click OK, your choice will be used as desktop wallpaper.
|
2. | Click the Browse button to find an image file. The Wallpaper Selection dialog box will open (Figure 3.3). The location opened in the Wallpaper Selection dialog box will be /usr/share/pixmaps/backgrounds. |
3. | Use the mouse to navigate the directories on the left side to find an appropriate graphic. For example, the tiles subdirectory contains many images suitable for tiling (Figure 3.4). |
4. | |
5. |


To select a screen saver:
1. | With the Gnome Control Center open, select Screensaver from the hierarchical list in the left panel (Figure 3.7). |
2. | Choose a screen saver from the Screen Saver list in the middle of the panel. The screen saver you select will be displayed in the preview box in the Control Center. (Deco is shown selected in Figure 3.7). |
3. | To configure the screen saver, click the Settings button. |
4. | A configuration dialog box that is specific to the screen saver you have chosen will appear (Figure 3.8). |
5. | Make changes that you would like to the screen saver's configuration and click OK. |
6. | In the Control Center, make any global changes to the way screen savers operate. For example, enter the number of minutes of inactivity before the screen saver starts, or whether a password is required (Figure 3.7). |
7. | Click OK to save your changes and activate the screen saver. |
Figure 3.7. You can choose from many screen savers that ship with Gnome.

Figure 3.8. Each screen saver has a configuration dialog box that you use to set properties specific to that screen saver.
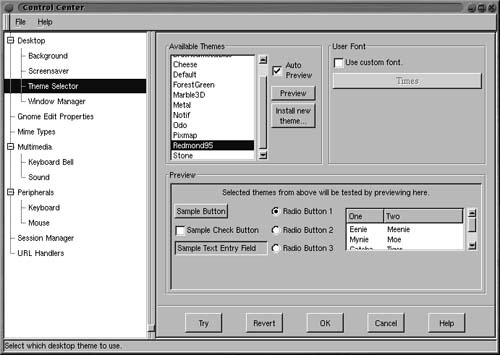
Figure 3.9. Desktop themes control the appearance of windows components such as check boxes and buttons.

Desktop themes
Desktop themes are coordinated schemes that determine the appearance of standard window elements such as check boxes and scroll bars.
To select a desktop theme:
1. | With the Gnome Control Center open, select Theme Selector from the hierarchical list in the left panel (Figure 3.9). |
2. | Choose a theme from the Available Themes list in the middle of the panel. Provided that the Auto Preview box is selected, the results of your choice will be previewed in the lower right of the Control Center panel. (Redmond95 is shown selected in Figure 3.9.) |
3. | Click OK to enable the desktop theme. |
Tip
Admittedly, this may not be your goal, but if you want to make your Linux desktop look and behave as much like Windows as possible, select Redmond95 as your desktop theme.