
Chapter 6. Taking the Taskbar to Task
In This Chapter:
- Master your Windows Vista Taskbar
- Move your taskbar
- Change taskbar properties
- Gain quick program access with the Quick Launch toolbar
- Understand your notification area
- Use your taskbar to arrange multiple windows
In many ways, Vista’s taskbar at the bottom of the screen is like a customized computer dashboard. At the ready are programs, windows, and icons with which you can control your computer and work with programs faster and more efficiently.
The taskbar is generally underutilized. Many people use Windows for years, and understand a lot about Windows, but they don’t know how they could use the taskbar more effectively. Vista adds even more power to your taskbar than previous Windows versions.
You will find that if you begin to adjust your taskbar to suit the way you work, you will use your Windows Start menu less and less. The taskbar reduces your keystrokes and saves you time. The taskbar also provides information about your computer, such as the status of devices and programs.
Your Taskbar Awaits You
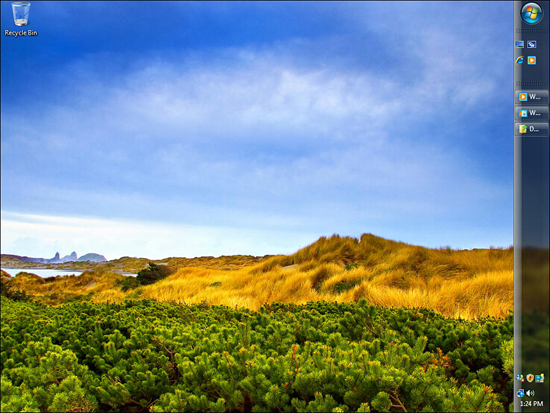
Unless you’re brand new to computers, you know by now that your taskbar is your primary means of controlling the programs and windows you’re currently using on your computer. As Figure 6.1 shows, a button appears on your taskbar for each open program. In addition, if you’ve opened windows such as the Control Panel or a Windows Explorer window, a button appears for each window as well.
Figure 6.1. A taskbar button appears for every open program and window.

Put Your Taskbar Where You Want It
The taskbar’s default location is at the bottom of your screen. It doesn’t have to stay there! You can move your taskbar to any edge of your screen, including the top of your screen. If you move the taskbar to the top of your screen, the thumbnail images (assuming that your hardware supports Aero Glass) drop down from the buttons instead of appearing above them as when the taskbar lies at the bottom of your screen. If you move your taskbar to either the left or the right edge of your screen, the thumbnail images appear to the side of their respective buttons.
You lose no functionality when you move your taskbar away from the bottom of your screen. Some users prefer the taskbar somewhere other than the bottom of the screen; perhaps because they use programs with information along the bottom edge that is more visible without the taskbar in the way.
Moving your taskbar to any of the four screen edges is easy; simply drag it to the new location as follows:
- Locate a blank spot on your taskbar and point to the spot with the mouse cursor. Be sure that you’re pointing within the taskbar and not at a button.
- Drag the taskbar to another edge of your screen. As you drag the mouse, the taskbar moves with the mouse and appears at the edge of the screen.
- Release the mouse button to anchor the taskbar at its new position.
Figure 6.2 shows the taskbar against the right side of the screen.
Figure 6.2. You can move your taskbar to either edge of your screen or to the top of the screen.
Did you Know?
If you have multiple monitors, you can move your taskbar to any one of them. For example, if you use three monitors, your Windows Vista workspace becomes three screens wide and you can move windows and programs between your monitors and extend windows over more than one monitor. On a three-screen system, you might want to move your taskbar to the center screen to keep it handy in relation to the other screens.
By the Way
If you find that you cannot drag it to another edge of your screen, your taskbar is locked into place. Right-click on your taskbar (over an unused area) and click Lock the Taskbar to uncheck that option. When locked, a taskbar cannot be moved or resized (see the next section). When you unlock your taskbar, you can move it. After you move your taskbar, right-click and select Lock the Taskbar again to select that option to keep your taskbar in place and safe from inadvertent movement or resizing.
Remember that your Windows Vista Start button appears on your taskbar. That means that when you move your taskbar, you also move your Start button. Your Start menu will fly out from wherever the Start button resides. Therefore, if you move your taskbar to the top of your screen, your Start menu will fall down from the top of your screen instead of coming up from the bottom of your screen.
Some users prefer to put their taskbar on either screen edge because the taskbar buttons don’t have room to display the full program or window title when multiple programs are open at one time. This is less of a problem with the Aero Glass feature due to the thumbnail images, but there are still times when you need to read a button’s full title. By placing the taskbar against the left or right edge of your screen, you can expand the taskbar’s width to read more of the title on each taskbar button. Of course, doing so significantly reduces the amount of screen real estate available to open program windows.
Resize Your Taskbar
You can change the size of your taskbar as follows:
- If it is on the bottom or top of your screen, you can change the height of your taskbar.
- If it is on the left or right edge of your screen, you can change the width of your taskbar.
To resize your taskbar, first make sure that it isn’t locked. As explained in the previous section, right-click on your taskbar and click to uncheck the Lock the Taskbar option if it’s checked. To resize your taskbar, point to the edge closest to the center of your screen. In other words, point to the top edge of your taskbar if it’s on the bottom of your screen or point to the bottom edge of your taskbar if it’s on the top of your screen. Your mouse pointer changes to a double-pointing arrow. Drag the edge closer to the center of the screen. As you drag, your taskbar increases in size one row at a time. If you find it difficult to drag the edge of your taskbar without instead dragging a window edge that might reside close to it, first minimize the window close to your taskbar.
Generally, you’ll want to keep your taskbar no taller than two rows or it will consume too much of your screen space. Figure 6.3 shows a two-row taskbar. By giving the taskbar two rows, you have more room for taskbar buttons, the buttons can show more of the open program or title, and your taskbar is less cluttered.
Figure 6.3. Adjust your taskbar’s height (or width if you’ve placed it on the left or right edge of your screen) to see more at one time.
![]()
Did you Know?
By resizing your taskbar to at least two rows, Vista is able to display not only the time in the lower-right corner’s notification area but also the date. The date is handy to keep displayed.
Using the Taskbar Menu
As you saw in the previous sections, a right mouse button click over your Taskbar produces the same result as a right mouse button click over many Windows programs and elements: a pop-up menu appears. This menu, sometimes called a context-sensitive menu, displays several options available to you at the time you right clicked. To determine what task-appropriate options appear in this menu, Vista looks at what you are doing when you right-click.
You can change the appearance and performance of your taskbar and of the windows controlled by your taskbar from this menu. Just locate an empty spot on your taskbar, right-click it to open the contextual menu shown in Figure 6.4.
Figure 6.4. A right-click on your taskbar’s blank area displays this contextual menu.
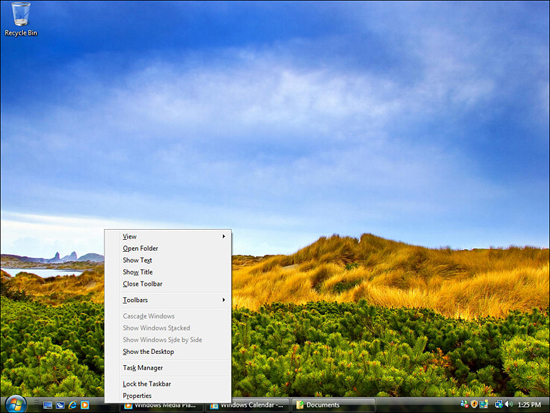
The taskbar menu is not necessarily one you’ll need to display often. Most users play around with various taskbar settings for a while until they find preferences that suit them best. Thereafter, those users might rarely use the taskbar properties menu.
The taskbar actually displays several menus, depending on where you right-click and how you’ve configured the taskbar. For example, if you right-click over the notification area, several more options appear that don’t otherwise show if you right-click over other parts of your taskbar.
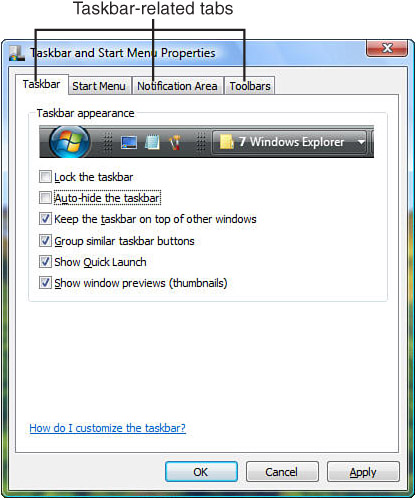
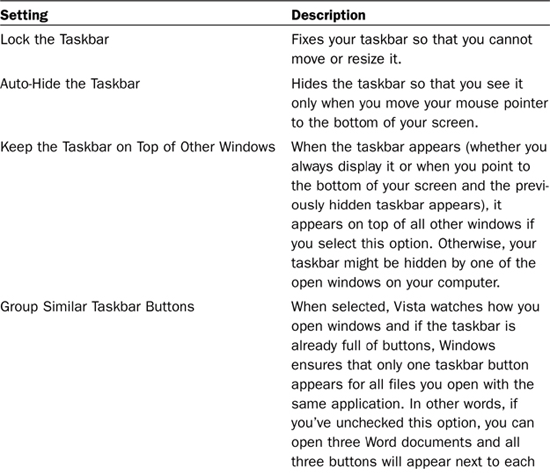
The Taskbar Properties Menu
When you select Properties from your Taskbar menu, the Taskbar and Properties dialog box appears as shown in Figure 6.5.
Figure 6.5. Adjust your taskbar and Start menu settings from this properties dialog box.
By the Way
If you have too many windows open to locate a blank spot on your taskbar to right-click on, you can display the Taskbar and Start Menu properties dialog box by right-clicking over your Start button and selecting Properties.
In the previous chapter, you learned how to use the Taskbar and Start Menu Properties dialog box to adjust your Start menu’s behavior and appearance. You’ll use the same dialog box to change your taskbar. Three of the four tabs across the top of the Taskbar and Start Menu Properties dialog box relate to your Taskbar: Taskbar, Notification Area, and Toolbars.
Table 6.1 describes the taskbar page’s settings. One of the settings used most frequently is the Auto-Hide setting, which keeps the taskbar hidden until you move your mouse pointer to the bottom of the screen to display the taskbar. This leaves the taskbar out of the way until you’re ready to use it, allowing for more screen real estate for your open program and folder windows.
Table 6.1. The Taskbar Property Settings
Using the Quick Launch Toolbar
Your Quick Launch toolbar, shown in Figure 6.6, is extremely helpful for speeding up how you start programs that you want to run routinely. Each icon on the Quick Launch toolbar represents a program or folder that you can open with a click of that icon; the only exception is the Show Desktop icon, which minimizes all open windows with one click and returns those windows to their previously open state when you click the Show Desktop icon again.
Figure 6.6. The Quick Launch toolbar puts your favorite programs on your taskbar.

Your taskbar’s Quick Launch toolbar might only show two or three icons to begin with, such as the Internet Explorer, Show Desktop, and Windows Media Player icon. If you upgraded from a previous version of Windows and your previous version contained a Quick Launch toolbar with more icons, Vista should also display those same icons after you install Vista.
To start a program, just click its icon. Unlike the taskbar buttons, when you point to a Quick Launch icon, a thumbnail will not appear but a description of the icon’s program will.
Many users add several icons to their Quick Launch toolbar. You can do the same. Add those programs you run often such as your word processor. If you put too many icons on the Quick Launch toolbar, the icons can get unwieldy and consume too much room on the taskbar that would be better used for running program and open window buttons. By putting those programs you often use there, the Quick Launch toolbar button means you don’t have to open your Start menu to run a program.
Did you Know?
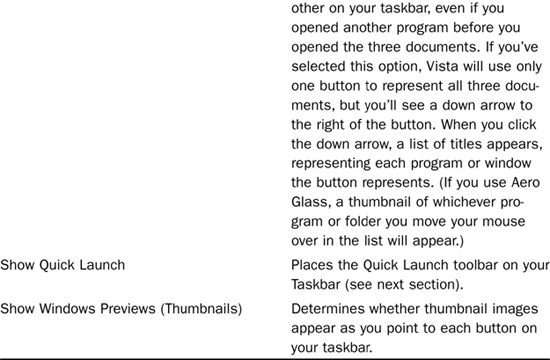
If you increased the height of your taskbar, your Quick Launch icons will not be squeezed for space and you’ll more easily see and distinguish them. If your taskbar is only one row high, you might have to click the Quick Launch toolbar’s down arrow to see additional icons you’ve placed there, as Figure 6.7 shows.
Figure 6.7. If your Quick Launch toolbar shows a button with an arrow on it, you can click the arrow to see additional Quick Launch icons.
To add a program to your Quick Launch toolbar, locate the program on your Start menu and right-click the program name. Select Add to Quick Launch from the contextual menu and Windows Vista puts an icon on your Quick Launch toolbar that represents the program while keeping that program in your Start menu. After you place the icon on the Quick Launch toolbar, simply click the Quick Launch icon to start the program without having to display your Start menu first. Put icons that represent the programs you frequently start on your Quick Launch toolbar to keep them just one click away at any time.
To remove a program from your Quick Launch toolbar, right-click that program’s icon on the toolbar and select Delete. Vista removes the icon from your Quick Launch toolbar.
By the Way
Vista doesn’t erase the program from your disk that you remove from your Quick Launch toolbar using the Delete command. The icons on your Quick Launch toolbars represent shortcuts to your programs, not the programs themselves. A shortcut is simply a pointer to the disk location where that program resides. Removing that pointer, or the shortcut, erases only the toolbar’s path to the program but not the actual program.
Understanding Your Notification Area
Vista’s notification area, also called the system tray or systray, appears in the lower-right corner of your desktop’s taskbar. The notification area holds the system clock and icons that represent programs or utilities loaded into your PC’s memory, such as a communications icon when you’re online and memory-resident programs that start when Vista starts, such as your anti-virus and firewall programs.
Depending on what you do on your computer, other icons and information appear in the system tray. For example, if you’ve increased the size of your taskbar to two rows, the date appears along with the current time.
If you’re running a laptop, an icon usually appears that indicates whether your laptop is running on AC power (plugged into an outlet) or, if running on battery power, how much battery life remains.
Often, the notification area icons are not as useful as the information that appears when you point to them. For example, Figure 6.8 shows the message Windows Security Alert when the mouse pointer rests on an icon. When you see a message such as this one, you can double-click the icon to open a program or control panel to adjust the settings for the message. For example, when you double-click the shield shown in Figure 6.8, a message might explain that your antivirus program hasn’t started and you’ll know that you need to start it (or install one if you haven’t installed one yet).
Figure 6.8. Your notification area contains icons and messages that display the status of your computer.

Did you Know?
If you double-click a notification area icon and no program starts, try right-clicking the icon and selecting the program from the contextual menu that appears.
As you use your computer throughout the day, messages might automatically pop up from the notification area informing you of the status of certain activities. For example, if Vista or another program on your computer, such as your antivirus program, has recently downloaded updates, a message might pop up to let you know that you need to click to install those updates. Depending on the program, the updates might be applied automatically and the message will let you know that the program was updated after the fact. When you receive an email, an icon might let you know that your inbox has a new entry.
Because of space limitations, Vista doesn’t always display all the notification area icons. Instead, Vista hides inactive icons and displays a clickable arrow to the left of the icons. Clicking the icons shows all active and inactive icons.
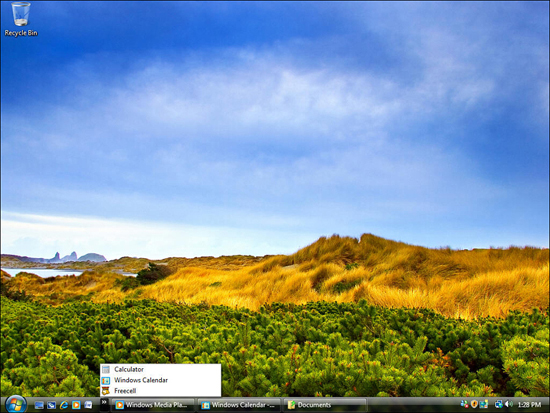
The notification area tab on your taskbar and Start Menu Properties dialog box, shown in Figure 6.9, gives you various ways to adjust your notification area settings. Most users prefer to keep the inactive icons (or those with little activity) hidden by keeping the Hide Inactive Icons option checked.
Figure 6.9. You can adjust the properties of your notification area.
Did you Know?
Click the Customize button on your Notification Area dialog box page to specify exactly which icons you want to hide. You’ll select from a list of available icons that might appear on your notification area depending on which programs are installed on your computer.
The remaining options enable you to determine whether you want a clock, volume control, network status icon, or power indicator (useful for laptops) on your notification area. You control the appearance of these four icons yourself through this dialog box. You will control the other icons that appear by clicking them or by right-clicking and selecting from their contextual menus.
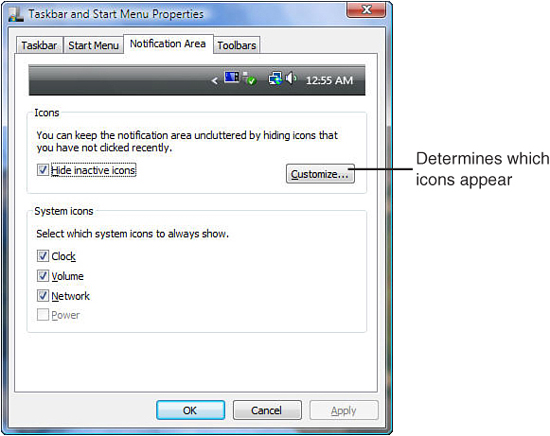
The volume control is handy for controlling your overall system volume. By keeping the volume control on your taskbar in the notification area, you can always adjust your volume settings no matter which program you’re running at the time. Just click the speaker icon in your notification area and the volume control appears, as Figure 6.10 shows. Drag the volume control up or down to adjust your overall system speaker volume.
Figure 6.10. Click the speaker icon any time to adjust your system volume.
Managing Multiple Windows with Your Taskbar
Right-click over a blank area of your taskbar and you’ll see a menu that enables you to modify the way programs and windows behave. Even advanced Windows users forget these options are available to help make multiple windows more manageable.
When you open two or more windows at once, they can be difficult to manage individually. You could maximize each window and display only one window at a time. There are many reasons to keep more than one window open and displayed at the same time, however. You might need data from one program window to use in another.
The more monitors you use, the easier it is to keep multiple windows open and in your viewing area at the same time. Nevertheless, even with multiple monitors, you sometimes need a quick way to arrange your open windows.
When you want to see more than one open window at a time, your taskbar can help you. You don’t have to drag and resize all windows yourself. You can let the taskbar do this for you. Three ways exist to organize several windows that are open at once: You can cascade them, horizontally stack them, or vertically show them side by side. The following steps demonstrate these window placement options:
- From a clean desktop without any open windows, open your Computer Explorer window by selecting Computer from your Start menu’s right pane. If your Computer Explorer window (formerly called My Computer in Windows XP) opens maximized, click the Restore button to shrink the window down in size.
- Open your Control Panel window.
- Open the Help and Support window. These windows are open just to put some things on your desktop to practice with here.
- Start your Windows Media Player.
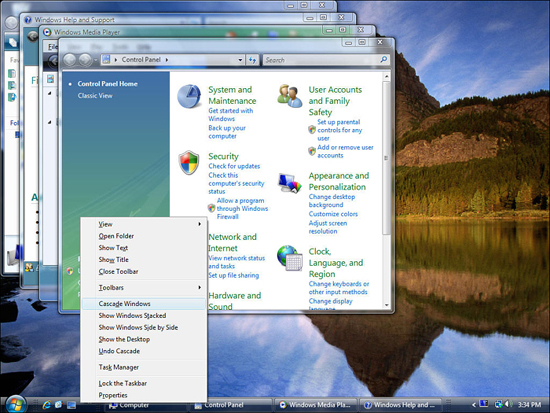
- Now that you’ve opened four windows, ask Vista to organize those windows for you. Right-click over a blank spot on your taskbar, and select Cascade Windows. Vista instantly organizes your windows into the cascaded series of windows shown in Figure 6.11.
Notice that the title bars of all your open windows are placed where you can read each one. When you want to bring any hidden window into the foreground, click that window’s title bar and the window rises to the top of the window stack. The cascading effect always gives you the ability to switch between windows. As long as any part of a hidden window is peeking out from under another, you can click the title bar to bring that hidden window into view.
Figure 6.11. Your windows are now more manageable with only window borders showing for the windows in the background.
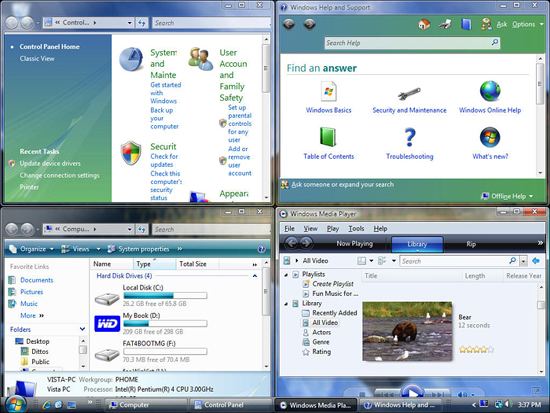
- Sometimes you need to see the contents of two or more windows at the same time. Vista enables you to tile the open windows so that you can see the actual body of each open window. Vista supports two kinds of tiling methods: vertically stacked or horizontally side-by-side.
Display your taskbar’s contextual menu and select Show Windows Side by Side. Vista will properly resize each of your open windows, as shown in Figure 6.12.
At first glance, side-by-side tiling might seem too limiting. After all, to fit those open windows on the screen at the same time, Windows cannot display much of any one window.
Keep in mind that you can move any window by dragging its title bar with your mouse as long as the window is not maximized to your full-screen size. You can also point to an edge of a window and drag the edge to resize that window.
After you’ve tiled several open windows, you can still use the moving and resizing feature of the individual windows to arrange your desktop. After tiling the windows, you can move the Help window toward the top of the screen if you want to see more of the Help window. (Scrollbars automatically appear in tiled windows if the contents of the window consume more space than can be displayed at once. Click the arrows at each end of the scrollbar to move window contents into view.)
Figure 6.12. Your windows are now tiled.
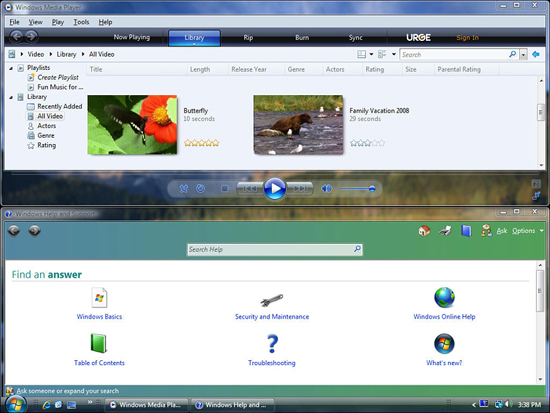
- The vertical tiling method, called stacking, produces windows that are fairly thin but offer another kind of open window display. Close two of your windows because stacking works best when you have two windows open. Its purpose is to enable you to move data between two windows easily. Select Show Windows Stacked from your Taskbar’s pop-up menu and Vista reformats your open windows once again (see Figure 6.13).
Figure 6.13. Two windows are now stacked.
- At any point you can undo one of the stacking options. Undo appears on your Taskbar’s pop-up menu only after you’ve selected a Cascade Windows, Show Windows Stacked, or Show Windows Side by Side option.
Did you Know?
No matter how you cascade or tile your open windows, each window’s Maximize, Minimize, and Restore buttons work as usual. Therefore, you can maximize any cascading window by clicking that window’s Maximize button.
Chapter Wrap-Up
You now know virtually everything there is to know about using your taskbar to control programs. Your taskbar acts like your dashboard, putting items where you need them and giving you options to arrange open programs and windows as you choose.
Your desktop’s background itself is a useful place to manage your programs. The icons that appear there offer a handy place to locate programs you start often and windows you commonly open. In addition, the background holds the graphical wallpaper image that shows when Windows Vista loads. In the next chapter, you’ll learn how to manage your desktop, change your wallpaper image, add and remove icons to and from your desktop, and even trigger screensavers to keep prying eyes away from your sensitive data when you leave your computer.