
Chapter 17. Modifying and Sharing Photos
In This Chapter:
- Organize, manage, and edit digital pictures
- Import pictures into Photo Gallery
- Display both images and videos
- Master Photo Gallery’s control panel
- Fix common picture problems
- Print pictures from Photo Gallery
- Put pictures on CDs and DVDs
In the previous chapter, you learned how to get pictures onto your Windows Vista computer. Whether you transfer from another computer, download from the Internet, import from a digital camera, or scan a picture directly into Photo Gallery, you should have little trouble getting a picture to your computer’s folders.
Photo Gallery is the best place in Windows Vista to organize, manage, and edit your photos. This chapter explains how to maximize your use of Photo Gallery to get the most from the program. Almost every digital image library can use some organization and photo retouching—with Photo Gallery you now have the tool to do that.
Working in Photo Gallery
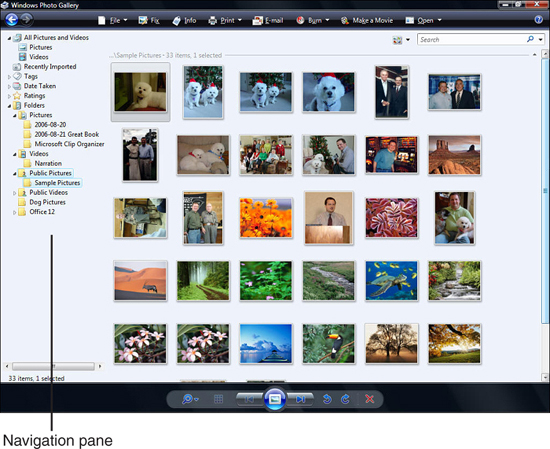
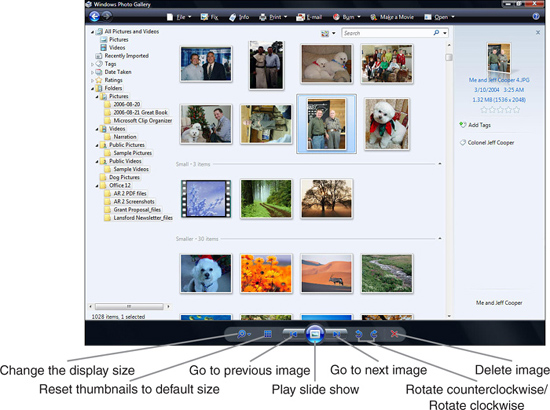
Start Photo Gallery by selecting Windows Photo Gallery from the Windows Start menu. Photo Gallery appears with one or more pictures in the central Photo Gallery window pane, as Figure 17.1 shows.
Figure 17.1. Photo Gallery is the best place to organize, manage, and edit pictures in Windows Vista.
Watch Out!
If you see far fewer pictures, or none at all, but you know digital pictures reside on your computer, Photo Gallery doesn’t yet know that you have digital pictures on your computer. You will learn how to add images to Photo Gallery, just as you add media files to Media Player’s library, in the next section.
Telling Photo Gallery You Have Pictures
Photo Gallery displays only pictures contained in your Pictures folder and the subfolders within it. If you have pictures located elsewhere on your computer and you don’t want to move them to your Pictures folder, you can tell Photo Gallery to display those pictures by adding their location to Photo Gallery’s digital image gallery.
When you tell Photo Gallery to display pictures and videos from a folder other than your Pictures folder, Photo Gallery adds that folder to the Folders entry in the left navigation pane. This enables you to browse and manage that folder’s picture contents and subfolders as easily as you can the Pictures folder and its subfolders.
To add folders to Photo Gallery’s picture gallery, click the File button at the top of Photo Gallery and select the Add Folder to Gallery option. A dialog box appears from which you select the folder you want to add to Photo Gallery’s picture gallery. Click to select the folder and click OK. Photo Gallery adds the folder to its picture gallery and displays the Add Folder to Gallery dialog box shown in Figure 17.2. Click OK to close the dialog box and review your navigation pane.
Figure 17.2. Photo Gallery confirms the addition of the new folder to your picture gallery.
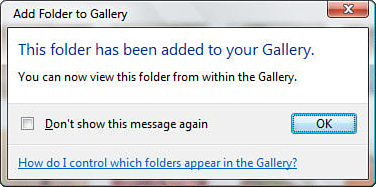
Photo Gallery now displays the newly added folder in its Folders list along with the Pictures folder and any other added folders. All folders listed are now available for your work within Photo Gallery. As you organize your photos, it’s important for you to realize that Photo Gallery treats all the folders as one big collection—your picture gallery. Using this picture gallery, you can tag the pictures, and group and browse them in various ways without worrying that some are stored in different folders on your disk drive. After you add a folder, the pictures in that folder are on equal footing with the pictures that Photo Gallery displays; the only difference is that the pictures don’t share the same top-level folder.
Displaying Photo Gallery’s Images and Videos
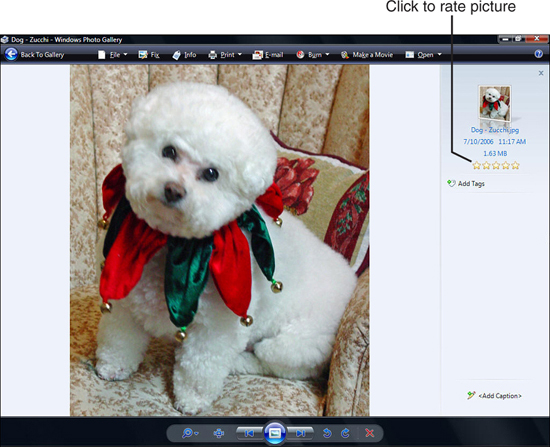
Depending on how you want to view your photos in the current session, you might want to change the way Photo Gallery displays pictures. Instead of small thumbnail images, you might prefer to see one photo at a time, enlarged so that you can see the details. Just double-click the thumbnail image to see the picture in a large area (such as the one in Figure 17.3), where you can edit the image, email it to someone, or print it. Click the Back to Gallery button to return to the gallery of images.
Figure 17.3. When working with a single image, Photo Gallery shows you only that image and not the thumbnail list of other pictures that would get in your way.
Did you Know?
If you hold the Ctrl key on your keyboard and move your mouse or trackball’s scroll wheel, your picture thumbnails increase or decrease in size (depending on the direction you scroll).
Did you Know?
In both the thumbnail and single picture views, you can easily change the rating of any photo by clicking the appropriate star in Photo Gallery’s right window pane. (Click Info if you don’t see the rating pane.) In addition to giving a picture a star rating, you can click the Add Tags button below the rating area to add one or more tags, separated by semicolons, to the picture. If a tag hasn’t been used before, a new tag appears in your navigation pane when you expand the Tags entry. If you apply a tag that’s been used, the picture appears along with the other matching tagged pictures when you click that tag in the navigation pane.
Because doing anything with your digital picture collection requires that you view the pictures in a manner that suits the job you must do, learning how to view pictures in various ways is important. There are times when you need a bird’s eye view of your pictures and the thumbnail images are more helpful than a close-up view of individual pictures.
Did you Know?
When viewing thumbnails, if you point to a thumbnail image, Photo Gallery temporarily pops up a window that is larger than the thumbnail view, but smaller than the full-screen, single image view, so you can see more of the picture’s detail without having to change from the thumbnail view in many cases.
Fortunately, Photo Gallery uses methods similar to Media Player, so how you view your picture files will be familiar to you. The navigation pane on the left side of your Photo Gallery window is the place you should go first. Click on any of the items: Recently Imported, Tags, Pictures, Videos (Photo Gallery enables you to manage your videos if you want to, just as it does your photographs, although Media Gallery is a better place to view videos), Date Taken, Ratings, and Folders.
If you don’t see all the pictures that you expect to see in your Photo Gallery window, you might have to click the navigation pane’s Folders entry and locate your Pictures folder. From there, you can open subfolders to view any pictures in those folders.
Always keep in mind Photo Gallery’s navigation pane at the left of your screen. Some people get confused about where pictures reside (and video locations because Photo Gallery enables you to tag and track videos, too) and how to display them.
The Folders entry, shown in Figure 17.4, contains every folder that Photo Gallery currently uses. If you see only the Pictures folder in the Folders entry, click the arrow to the left of Pictures to see subfolders from which Photo Gallery is also getting pictures to work with.
Figure 17.4. You can see individual folders of pictures or all your pictures at once.
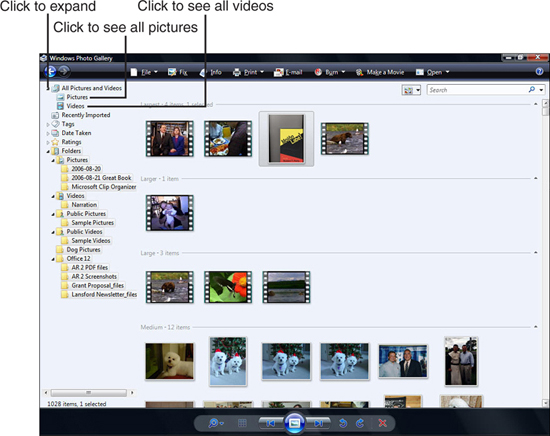
When you click a folder, Photo Gallery shows you all pictures from that folder and any subfolders beneath that folder. If any of those folders also have videos, Photo Gallery displays the videos, too. Instead of clicking a folder, if you click the Pictures entry toward the top of your navigation pane, all pictures from all of Photo Gallery’s collection appear. If you cannot see images that you know reside on your disk somewhere, follow the directions in the previous section to add that location to your Photo Gallery’s image gallery. After you do so, the images’ folder appears under the Folders entry and the images will appear when you click the Pictures link under All Pictures and Videos.
You can click any entry in the navigation pane to expand or collapse that entry. For example, to see every tag you’ve given to pictures, click the Tags entry, and Tags expands to list all tags available for every image in Photo Gallery. Click Tags again and the list collapses back to the single Tags entry. Click Recently Imported, Date Taken, or Ratings to see images ordered by those criteria.
You can view your images in all these ways, but when you want to see all your pictures, or perhaps all your videos, don’t mess with the Folders, Tags, or Ratings entries. Just click Pictures or Videos under All Pictures and Videos, and Photo Gallery lists every single item with a thumbnail view in its center window pane.
Using Photo Gallery’s Control Panel
The control panel that looks something like a video player’s controls appears at the bottom of Photo Gallery’s screens. Whether you’re viewing a list of thumbnails or working on a single image, the control panel is there to give you access to some common Photo Gallery tasks. Figure 17.5 labels each of the control panel’s controls as follows:
- Change the Display Size—Changes the image size of the image or images that appear in Photo Gallery; if your thumbnails aren’t large enough to see the detail you want, click the Zoom button and drag the slider up to enlarge the images.
- Reset Default Thumbnails to Default Size—If you’ve used the Zoom control to change the level of zoom used in the Photo Gallery window, you can click this button to reset the display to the default level of magnification.
- Previous—Moves the selection one image to the left. When viewing thumbnails, the Previous button only moves the highlighted image back one image. But when viewing a single picture, clicking Previous changes the image to the image that falls before it in the current view. For example, if you clicked a navigation pane Tag entry named Summer Vacation 2008, the thumbnails would show only the images with that tag. If you double-clicked to show only one of that summer vacation’s images, and then began clicking Previous, Photo Gallery would move backward through the summer-vacation-tagged images. When it got to the first tagged image, the next time you clicked Previous the images would wrap around so that the last summer vacation picture would appear.
- Play Slide Show—Displays your images (all or only some, depending on what you’re viewing at the time) in a full-screen slideshow presentation. In doing so, Photo Gallery transitions between the images smoothly and slowly changes depending on which theme you’ve selected. By moving your mouse during the slideshow, a slideshow control panel appears. Using it, you can change the theme and speed, manually move forward or backward through the slideshow, pause the slideshow, change the volume of the background music (this assumes that you selected at least one video to display, along with optional pictures, before starting the slideshow), and end the slideshow.
- Next—Moves the selection one image to the right. This button operates in the same way as the Previous button. So, when viewing thumbnails, the Next button moves the highlighted image forward only one image, but when viewing a single picture, clicking Next changes the image to the one that appears after it in the current view.
- Rotate Counterclockwise—Rotates the selected image 90 degrees (a quarter of a complete rotation) to the left.
- Rotate Clockwise—Rotates the selected image 90 degrees (a quarter of a complete rotation) to the right.
- Delete—Erases the selected picture (or video). Photo Gallery erases the picture from your disk drive, so be sure that you want to delete the picture or video before clicking Yes at the verification prompt.
Figure 17.5. Use Photo Gallery’s control panel to move through your images and perform routine maintenance.
Fix a Photo with Photo Gallery’s Editing Tools
If you need to make routine edits to an image, Photo Gallery will help. When editing a photo, Photo Gallery displays the image in full-screen mode to prevent thumbnail images of other pictures from getting in the way.
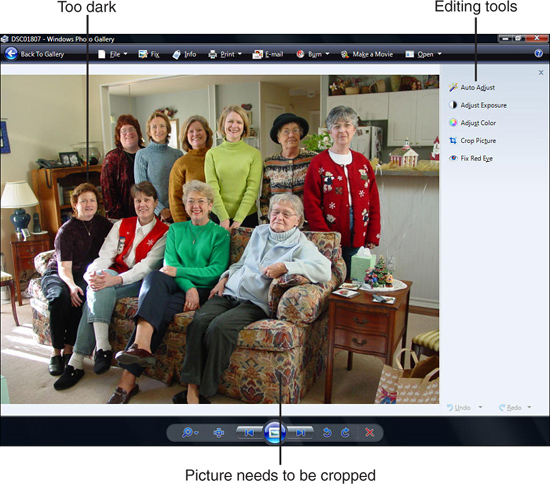
To edit a picture, double-click it. Alternatively, you can click to select the image and click the Fix button from the toolbar. Photo Gallery displays the full-screen view of the picture and puts editing tools in the right window pane, as shown in Figure 17.6.
Figure 17.6. Photo Gallery’s editing tools enable you to crop and fix routine picture problems.
By the Way
The Fix button isn’t available when viewing your video thumbnails because Photo Gallery cannot edit videos. Chapter 19, “Making Movies with Windows Movie Maker,” explains how you can use Movie Maker to edit videos.
In Figure 17.6’s picture, the image needs cropped. It was scanned and the scanner’s bed was much larger than the image itself. In addition, the image is dark and doesn’t contrast well.
One of the first edits you’ll want to make to any photo that needs fixing is to click the Auto Adjust link. Auto Adjust corrects and sometimes sharpens your images. Auto Adjust doesn’t modify brightness or cropping, but can sometimes fix a picture all by itself.
By the Way
Ctrl+Z, the Undo command, reverses any fix you make to your photo. If Auto Adjust or any other fix changes a picture too dramatically, press Ctrl+Z to reverse the fix. An Undo button also appears at the bottom of your tools pane to enable you to undo the most recent edit or revert the image back to its original, unedited state.
You don’t have to rely on Photo Gallery’s skill at auto-adjusting your photos. You can take the reins yourself. If you want to adjust the picture’s brightness or contrast, click the Adjust Exposure link. Two slider controls open that enable you to adjust the picture’s brightness and contrast. Click the Adjust Color link to display slider controls for Color Temperature, Tint, and Saturation. Bad or artificial lighting often affects these three properties when taking a picture. By using these controls on a picture where some colors seem to overwhelm the others, you can fix the color problems.
The Crop Picture tool allows you to cut off an unwanted portion of the picture. One reason to crop a picture is that you scanned an image into Photo Gallery and you want to get rid of the blank area that surrounds the scanned image. Cropping is also useful for losing the surrounding area in a photo where you would prefer to have zoomed in on the subject.
To crop a picture, click the Crop Picture tool link. A rectangular highlight appears over the photo with resizing handles at its four corners. Click to open the drop-down list under the Proportion title to see a list of common picture sizes such as 8 × 10. When you select a size, the cropping highlight changes to that size and proportion. With your mouse, drag any resizing handle to move, expand, or shrink the highlight. The highlight will change but retain the proportions of the picture size you first selected. Click within the highlight to move the highlight without changing its size. The goal is to retain as much of the picture as you require, filling up the proportion that you need. If you’re going to print this picture on wallet-sized 3 × 5 photo paper, you would select the 3 × 5 proportion to ensure that the final cropped image is in that proportion.
Did you Know?
If you click the down arrow to display the Proportion drop-down list in the tool area and select Custom, two more resizing handles appear on the crop’s highlighting area. You can now drag any of the six resizing handles in or out to cover those areas. The Custom proportion is useful if you want to use an image on the Web, or perhaps view the picture only in a slideshow or from Media Center when you don’t have to worry about a common printed picture proportion size such as 3 × 5 or 8 × 10.
By the Way
The Rotate Frame button rotates the cropping frame so that instead of using a 3 × 5 frame, for example, the cropping highlight frame rotates to a 5 × 3 proportion (longer than taller). You might want to rotate the frame when you work on landscape pictures.
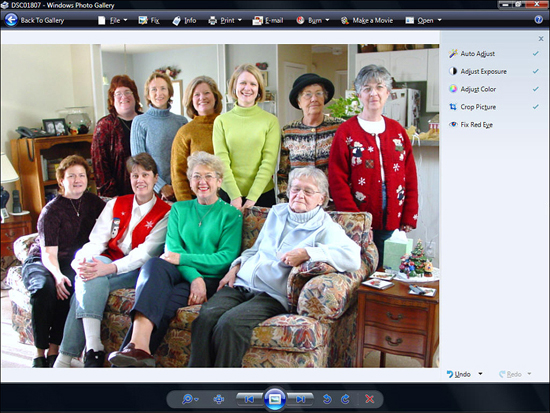
After you move and size the highlight to the part of the picture you want to save, click the Apply button and Photo Gallery crops the picture. Figure 17.7 shows Figure 17.6’s picture after editing. The cropping worked to make the entire picture fill the frame area by eliminating all the blank space around the image. In addition, the Auto Adjust and Adjust Exposure tools sharpened the picture and brought it into a better light and exposure.
Figure 17.7. A badly cropped and underexposed picture now looks better.
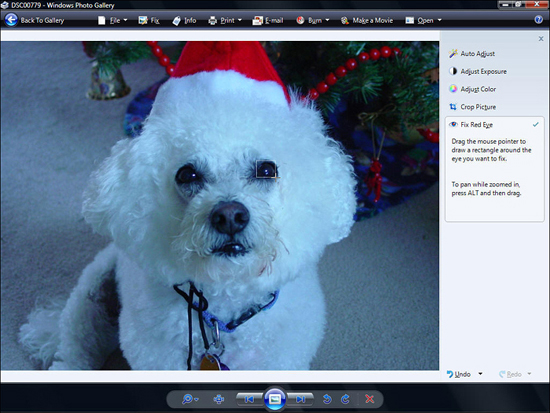
Red eye occasionally occurs when taking pictures of animals or people with flash photography. Sometimes, the eye’s response to the flash causes a reddish tint to occur on the eye. To fix red eye problems, select a picture with red eye and click the Fix button to display the image repair tools. Click the Fix Red Eye link and then drag your mouse to form a rectangle around one of the eyes in the picture with the red eye problem, as shown in Figure 17.8. When you release your mouse, Photo Gallery analyzes the problem and adjusts the picture to reduce or eliminate the red eye.
Figure 17.8. Photo Gallery can reduce or eliminate red eye problems in your pictures of pets and family.
When you click the Back to Gallery button to return to the thumbnail image gallery after fixing a picture, the thumbnail will reflect your repairs on that picture.
Printing Pictures from Photo Gallery
To print one or more pictures, select the picture or pictures you want to print. Press Ctrl+A to select every picture whose thumbnail is in view. After you select the pictures to print, click the Print button’s down arrow and select Print. Photo Gallery’s Print Pictures dialog box appears.
As you can see in Figure 17.9, Photo Gallery’s Print dialog box doesn’t look like most Windows applications’ Print dialog boxes. Printing pictures offers some unique challenges in comparison to printing documents and charts to paper. Pictures often print based on standard sizes to match frames, wallets, and other traditional picture holders. If you have a photo printer, you probably purchased photo paper based on one of the standard sizes and Photo Gallery will ensure that the picture conforms to the size you need.
Figure 17.9. Photo Gallery’s Print Pictures dialog box ensures that you can print your pictures based on traditional picture sizes when the need arises.
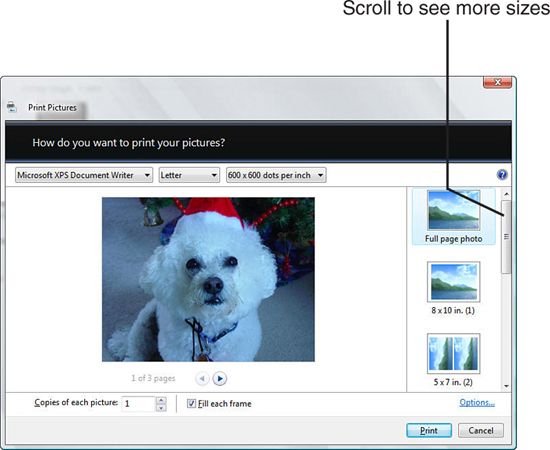
If you selected multiple pictures to print, the Print Pictures dialog box shows only the first picture so that you can tell Photo Gallery how you want that picture printed. You then can click the right arrow below the picture preview area to display and adjust the print settings for each subsequent picture.
Click to tell Photo Gallery how many copies you want to print of each picture by changing the value next to the Copies of Each Picture prompt.
Scroll down to see additional picture sizes. Some of the sizes provide for more than one picture per page. For example, suppose that you select three pictures to print and you want to print wallet photos of those pictures. When you scroll to the Wallet size, you’ll see that you can print up to nine pictures on each page of wallet-sized photos.
How do you want to print those nine pictures? If you tell Photo Gallery that you want nine copies of each picture, Photo Gallery will print three pages with nine wallet-size pictures on each page, one page for each of your pictures. If, instead, you tell Photo Gallery you want to print only three of each of the pictures, Photo Gallery will print all three pictures on one page for nine wallet-size photos as shown in Figure 17.10.
Figure 17.10. Photo Gallery adjusts the number of prints you want to the number of prints per page to maximize your page use.
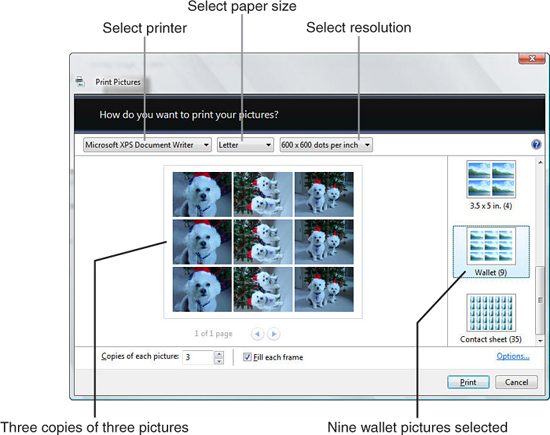
Select the printer you want to print to, the paper size, and the resolution you want to use by clicking and selecting from the three buttons across the preview area. You might want to print a sample page at a low resolution to save on printer ink. If the sample comes out the way you want, you can reprint multiple copies at a higher print resolution. After setting the appropriate options, click the Print button to start printing.
By the Way
The Options link in the Print Picture dialog box’s lower-right corner provides picture-sharpening, color-management, and printer properties options you can select, depending on what your printer allows.
Send Your Photos to a Professional Photo Service
Through Photo Gallery you can order prints online and the professional service you choose will mail your prints to you. If you want to explore this option, select the pictures you want to send away for printing and click the Print button’s arrow to display the Order Prints option. Select a service from those listed, such as Shutterfly, and click Send Pictures.
By the Way
It’s always possible that Microsoft could add or change services used for your photo processing over time. If you sign up for a service and Photo Gallery stops accepting that service, you can almost surely stay with that service and access it through your web browser. If Microsoft no longer has a Photo Gallery relationship set up, that only means that you cannot access the service through Photo Gallery.
Photo Gallery opens a new window for the service, such as the one shown in Figure 17.11. If it’s the first time you’ve made use of the service, you’ll be required to go through a preliminary sign-up process. Signing up often includes a free trial membership, such as 15 free prints the first time you order, but in any case you’re usually required to tell the service who you are, create an account, and provide credit card payment information. (Even if your initial print order is free, odds are good that you’ll still have to pay shipping fees.) After you have an account with a service, however, you’ll only need to sign in by clicking the Sign In button, and entering your username and password. At that point, you can order as many prints as you like.
Figure 17.11. Photo Gallery offers at least one online professional photo service that you can send your digital images to for processing.
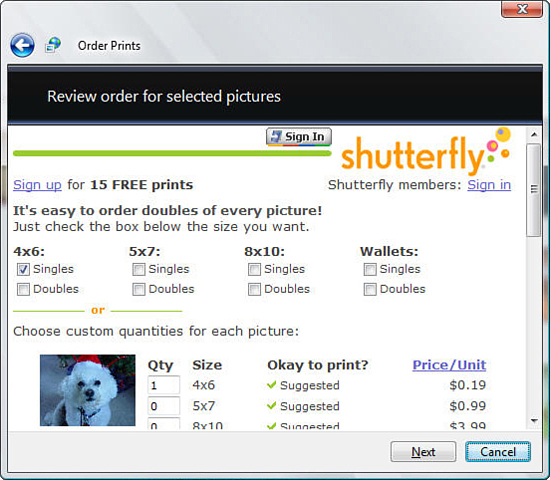
When you sign in, you specify the number and size of prints you want. Prices are given next to each size. Scroll down to make sure that you complete the specifications for each image you select to print. After you place your order, the prints usually arrive within a few days.
Did you Know?
Look through the options available in the photo printing service, or services, available before you decide on one. You might want to try the free trial membership of all services before selecting one to do business with on a more permanent basis. Some of them will offer to put your images on coffee cups, T-shirts, mouse pads, and other fun things.
If you have no photo printer and don’t want to use one of the online services, most picture processing drugstores and department stores (such as Wal-Mart) accept a CD or DVD burned with your images. They’ll produce prints for you, often for less than an online service can do. It means you must travel to the store to leave your CD or DVD and pick up the prints instead of getting them in the mail, but the service is typically cheaper and faster. (Although Wal-Mart and other retailers allow you to upload to their websites, so the only thing left to do on your part is to pick up the prints.)
The next section explains how to store Photo Gallery images on a data DVD.
Put Pictures and Videos on DVDs
Photo Gallery can put your pictures and videos onto DVDs for others to watch in the PC’s DVD drive or in a standalone DVD player. Photo Gallery does this in one of three ways:
- A data DVD
- A video DVD
- A movie that you edit and place on a DVD
The following sections explain each of these methods.
Creating a Backup Data DVD
With Photo Gallery, you can easily back up your pictures to a DVD. To create a DVD backup, place a blank DVD into your writeable DVD drive. Click the down arrow on Photo Gallery’s Burn button and select Data Disc. Photo Gallery opens the Burn a Disc dialog box that you can add a title to. When you click Next, Photo Gallery begins preparing the DVD.
First, Photo Gallery must format your DVD. This can take a while, sometimes 15 to 20 minutes if you have a slow DVD burner. When formatting finishes, Photo Gallery sends your selected pictures and videos to the DVD. Put the disc in a safe place, preferably at a location different from your computer so that a disaster such as a fire won’t ruin both sets of your pictures.
Did you Know?
To back up your entire Photo Gallery image and video gallery, click All Pictures and Video in the navigation pane (the top option) before making the data disc. Photo Gallery sends all your pictures and videos to the DVD as a backup disc (assuming that they’ll all fit). If you have a large collection of high-quality image files, you might need more than one disc.
Creating a Video DVD Using Windows DVD Maker
Photo Gallery can create DVDs that do more than work as simple data backups for your pictures and videos. You can create DVDs with Photo Gallery that become video DVDs. Many DVD players can play video DVDs that present your pictures in a slideshow fashion. In addition to the pictures, you can add video and audio to the DVD slideshow. You can even set up DVD menus to give quick access to various parts of your video DVD.
By the Way
Photo Gallery accesses a Windows Vista program called Windows DVD Maker to create your video DVDs.
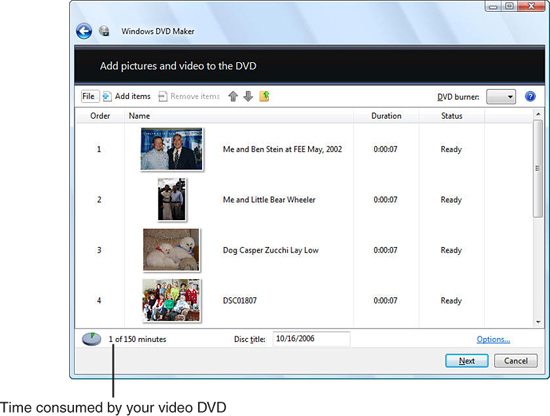
To begin creating a video DVD, click the arrow below Burn and select Video DVD. Photo Gallery opens the Windows DVD Maker window shown in Figure 17.12 and displays your pictures in a scrolling list. Rearrange the pictures and videos by dragging them to a different order one at a time, or by selecting one and clicking the Move Up and Move Down buttons. Add items you failed to select by clicking the Add Items button and remove items you decide against putting in your video DVD by clicking the Remove Items button. As you add more and remove items, the running time of your video DVD updates in the window’s lower-left corner.
Figure 17.12. Photo Gallery produces video DVDs from your videos and pictures.
The Options link in the lower-right corner opens an Options dialog box where you can specify your DVD’s
- Aspect ratio (4:3 or 16:9, depending on the type of display you use; the default is the standard computer monitor’s ratio of 4:3)
- Playback style (you can choose to loop the video automatically or use a DVD menu)
- Video format (either NTSC [the North American video standard] or PAL, which most other countries use)
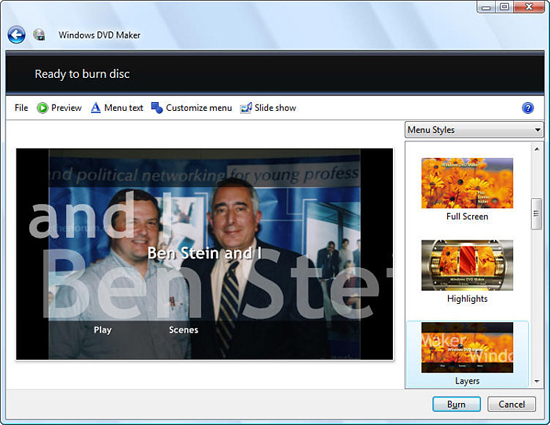
After you select the pictures, videos, and their order, click Next to work on the DVD’s menu, assuming that you chose to use a menu in the Options dialog box. On the menu window, select the menu style you want to use from the options at the right by scrolling through the list. As you click to select sample menu styles, the preview window changes to show you how the DVD’s menu will look. Some get rather fancy; however, you should consider not only the style but also the options. Most menu themes enable anyone viewing the DVD to select Play or Scenes so that they can play the video DVD straight through or select from one of several scenes that Windows DVD Maker will insert in your video at fixed time intervals.
After you select the menu style, click Menu Text and type a disc title (so that the date you create the DVD, which is the default title, isn’t used in place of something more appropriate). In the Notes field, you can enter notes that the user will see when her or she clicks the Notes option before or after playing the video DVD.
Click Save to save the DVD menu, title, and notes. To customize your video DVD further, click Customize. On the Customize window, you can select foreground and background videos that play during the menu sequences and an audio file that plays anytime the user displays the video DVD’s menu. If you want a still image to appear behind your menu select a digital picture instead of a video. After you finish setting these customization options, the final step is to click Slide Show if your video DVD is comprised of pictures and not videos or a combination of videos.
By the Way
Your video DVD does imitate Photo Gallery’s slideshow when the video DVD contains only pictures to display. The music and transition effects can make such a movement from picture to picture much more enjoyable for your viewers. You can turn the slide show into a training video if you record narration over the slides, but getting the timing correct is not an easy thing to do. If you want to create slideshow training video DVDs, you should probably transfer the training images to Movie Maker and create the training video there, where you have much more freedom in the synchronization between audio clips and the video scenes.
Did you Know?
If you begin to change something on your video DVD, such as the menu style, and decide you want to go back a step in the process, click the Back button in the Windows DVD Maker’s upper-left corner.
At the Slide Show Settings window, you can add music that the DVD plays while the user views the pictures. You can set a default time, in seconds, for each picture to appear, and select a transition effect that occurs every time the video DVD changes from one picture to another.
Click Save to save your Slide Show Settings and return to the primary Windows DVD Maker window. You’re almost done now. Figure 17.13 shows a sample DVD Maker window that has all its options completed. You can click the Preview button to generate an onscreen preview before burning the DVD. If the preview has problems, you can change the video DVD settings. After you finalize your video DVD, place a blank, writeable DVD in your writeable DVD drive and click Start Burn to burn your video DVD.
Figure 17.13. Photo Gallery reduces the size of pictures you send to others in email attachments.
When Windows DVD Maker finishes writing your video DVD to the DVD, Windows Vista ejects the disc from your DVD drive and displays a small dialog box asking whether you want to create another DVD of the video. You can keep clicking the Duplicate This Disc option and burn as many DVDs as you need. When you finish burning the final DVD, click Close and you return to Photo Gallery.
Creating a Movie from Photo Gallery Images and Videos
If you click the Make a Movie button, Photo Gallery, automatically starts Windows Movie Maker and transfers any selected pictures and videos to Movie Maker. From there, you can edit together the movie you want to make and save the movie to a DVD. Chapter 19, “Making Movies with Windows Movie Maker,” explains how to use Movie Maker.
Send Pictures and Videos in Email Messages
Surely there will be times when you want to send pictures and videos to someone else. Email is a quick choice as long as you are careful not to overload your recipient’s inbox with huge files. It’s not considered appropriate to send tens of megabytes of pictures to someone as email attachments unless you’ve written or spoken to them first. If your recipient has a dial-up Internet connection, several megabytes or more of email attachments will bog down both email and web browsing activities, so make sure that the recipient expects a large attachment and knows to give it some time.
Even if your recipient has high-speed Internet, such as a cable modem, DSL, or T1 line, you should get permission to send large attachments. Some email services limit the size of an email attachment to around 5MB and your email might never get through.
Did you Know?
Always send a follow-up email telling the recipient how many emails you sent with attached pictures and videos. That way, if their email service blocked your emails, your recipient can let you know that your items didn’t get through. You might decide to send a CD or DVD with the pictures instead of using email.
The nice thing about Photo Gallery is that if you do want to send some pictures to someone else using email, Photo Gallery will give you the option of reducing those pictures to a smaller size before sending them.
Watch Out!
Photo Gallery will not reduce the size of videos you send. Surprisingly, short videos can be massive, easily reaching 10 or more megabytes of space even though the video might only be seconds long. It’s typically unwise to send all but the smallest of videos to someone as an email attachment. CDs and DVDs sent by regular mail are much better options.
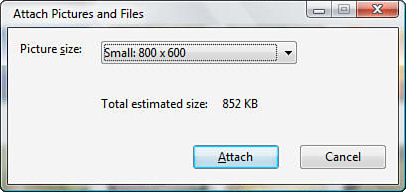
When you select pictures or videos to send to someone as an email attachment, Photo Gallery displays the dialog box shown in Figure 17.14. Click to open the drop-down list next to Picture Size and select the size you want Photo Gallery to use for your pictures in the email. The total estimated file size is the size of all your selected pictures. If you find that the smallest size still results in an email attachment that’s too large, you might have to cancel the email request and select fewer pictures. Sending eight emails that are 1.5MB each is wiser than trying to send one email with a 12MB attachment.
Figure 17.14. Photo Gallery will reduce the size of pictures you send to others in email attachments.
You will want to select the highest size possible that won’t bog down the email. When you approach 3–4MB or higher, you’re beginning to reach the limit and you might want to reduce the size or the number of emails you select to send at once.
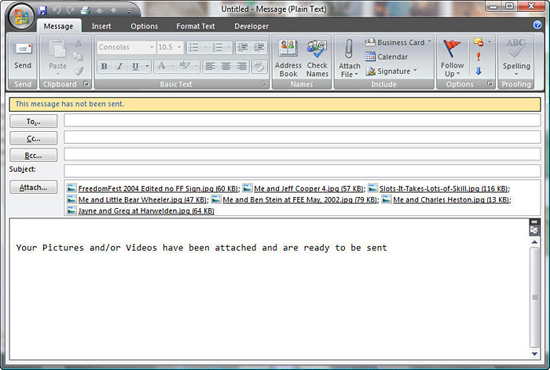
When you get the best-fit size and number, click the Attach button. Photo Gallery compresses the images according to the size you selected, opens an email message, and fills in the attachment field as shown in Figure 17.15. The email system used is your system’s default mail program. Generally, this will be Windows Mail (formerly Outlook Express), Microsoft Outlook, or Eudora. If you use an online email service, such as Hotmail or Gmail, that service’s message window will open if you’ve set that service as your default email provider. You now must fill in the recipient’s email address and subject, and click Send to send your message with the attachments.
Figure 17.15. Photo Gallery opens a new email message and automatically attaches your compressed picture files.
By the Way
Photo Gallery shrinks the image sizes that you send as attachments but does not actually change the stored images themselves. They retain their original resolution. Only the attachments are smaller.
Chapter Wrap-Up
As you’ve seen in this chapter, Photo Gallery not only enables you to organize and view your pictures and videos, it also gives you a way to edit your pictures and correct problems such as poor lighting and red eye.
After you get your images in shape, you can print them to your photographic printer using photo paper for picture-quality prints. If you don’t have a photo printer, you can use one of Photo Gallery’s available online services to send your images over the Internet and go to your mailbox in two or three days to retrieve your prints.
Although Photo Gallery doesn’t give you all the features of a more complex program, such as Google’s free Picasa and Adobe’s full-featured Photoshop Elements, it is a major functional leap past Windows XP’s picture tools.
Now that you’ve learned how to work with digital images and videos, it’s time to switch over to sound. The next chapter shows you how to use the Windows Sound Recorder to make recordings.